
The coolest ideas for hanging photo frames on the wall. Designer tips on how to hang photos beautifully How to arrange photo frames of different sizes
When creating a unique design for your apartment, you don’t need to be afraid to experiment. But we shouldn’t forget that sometimes the most familiar things can turn out to be the most advantageous and can easily transform any space.
This article will discuss the use of photographs in the interior. Today this technique is often used by designers to create unusual accents. There are many ways to decorate the interior of your apartment with photographs. The most popular ideas are creating photo galleries on the wall and hanging individual photos. However, this is not all.
A DIY photo collage will help you quickly transform the interior of a room.
A photograph is a specific event, emotion or story. Think carefully about your future composition. Select the photo according to size, hang the pictures symmetrically, scattered or parallel to each other. Using photographs you can create a picture of any time of year or post your wedding photos. Start from the room in which you will hang the photos. Then the work done will give you a good mood, and the room will sparkle with new colors.
A large photo on the wall is one of the original and modern ways of interior design options
When using photographs in the interior, it is very important to choose the right frames. First of all, you need to pay attention to the color scheme and interior style of the room. Frames can be wooden, metal, plastic or openwork. Handmade frames look dignified and unusual. You just need to buy blanks in the store and decorate them with buttons, shells or other elements that will match the photo.
Black and white photographs are a great decoration for white walls
When creating a home gallery, it is best to choose frames of the same color. However, their shape, thickness, texture and size may differ. In addition, there are many different options for placing frames on the wall. You can arrange them in any order and add photos in the future or create unusual shapes from photos. You don't have to use only photo frames. Try adding other details - mirrors, clocks or drawings. They will add originality and uniqueness to the finished composition.
Strengthen the memories of happy and bright moments in your life by adding a variety of captions around your photos.
If you want to make your room design truly amazing, don't be afraid to use large format photos that you can hang on the wall or place framed photos of that size directly on the floor. The advantage of such photographs is that they are easy to replace with others and thereby refresh the interior. You can radically vary the design of the room without making much effort. In addition, as experts write on the website http://damaxstudio.com/izgotovlenie-reklamy, this decor option can be done for reasonable money. You can easily choose a large-format poster for the wall that will perfectly match the wall decoration, creating a holistic style and unique character.
The idea of beautiful interior design using photographs
Photos on the wall can also be placed in the shape of a rectangle.
An example of a collage of photographs without frames
Create your own unique photo gallery that will remind you of the best moments in life
Large format photo on the wall
How to hang a photo on the wall? Examples


A modern person accumulates a lot of photos - in his memory, phone, computer or other gadgets. Pictures, even if associated with pleasant memories, are viewed extremely rarely. But why miss the opportunity to cheer yourself up by looking at memorable photos? It is enough to hang the pictures on the wall, and they will not only charge you with positivity, but will also decorate the interior.
1. Vinyl stickers - instead of frames

If artistic skills are completely absent and it is not possible to depict frames on the wall, then use vinyl stickers. They can be purchased in online stores. Such stickers do not damage the wall finish.
2. Drawing lessons
In order to depict frames on the wall, it is not at all necessary to have an art education. Even a child can repeat drawings in the style of primitivism. In order for the drawn frames to look harmonious, the wall must be monochromatic.
3. Graceful cords
Thin decorative laces act as a photo holder. Tie the cord into a knot and glue the free edge to the back of the photo. All that remains is to hang the photo on the wall, after hammering a nail into it.
4. Decoration in eco-style
A non-standard shaped branch replaces the frame, turning photos placed on it into original decor. The branch can be painted or varnished - then the homemade “frame” will last a long time.
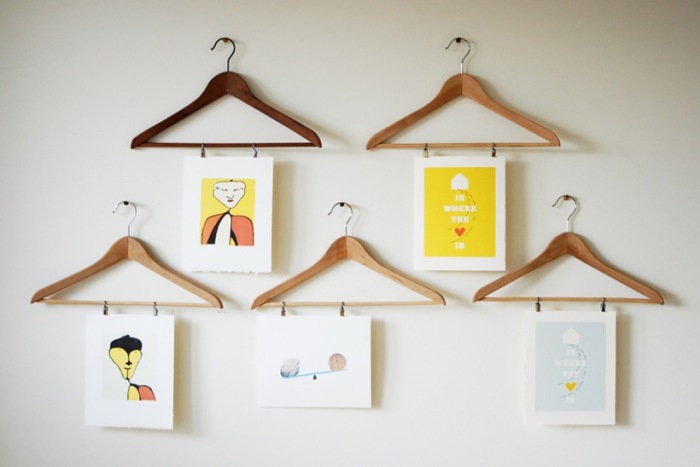
5. From the closet to the wall
Hangers with hangers, which hang dozens in every closet, become unusual photo mounts. The main thing is to print the photo in a suitable size that matches the length of the hanger.
6. Flirty ribbons
A lady's boudoir will be transformed if you decorate it with photos on ribbons. Wide tapes are glued to the back of the frame using construction adhesive, such as silicone or acrylic.
7. Free style collage
Many photos, differing in style and size, look harmonious inside a large frame. The center of the decorative composition becomes a large photograph located in its central part.
8. Useful and beautiful angle
A brilliantly simple way to display photos is to hang them in a corner so that they form a single colored surface. Choose any geometric shape, and you can fix the photo on the wall using double-sided tape.
9. Unifying drawing
You can make a single decorative composition from several photos hanging on the wall using a laconic drawing on the wall. Any single-color pattern drawn over a group of photographs will do. Instead of a picture, you can use a vinyl sticker.
10. Nothing worse than a painting
If the paintings do not fit into the interior design, but you want to decorate your home with paintings, then replace it with a photo in a large frame. Glue several decorative cords to the back of the frame and secure the pictures to them with clothespins.
11. You can stand on the wall
Narrow shelves are great for displaying photos and paintings. They will also allow you to avoid making unnecessary holes in the wall. If there is no narrow shelf, then it can be replaced with wide moldings.
12. Optical illusions
As a rule, each frame comes with glass and thick cardboard, which serves as a holder for the photo. Use a second piece of glass instead of cardboard. Place the photo, with a drop of glue on the back side, between the two glasses. All that remains is to hang the picture on the wall.
13. Clear geometry
Once you have selected a few of your favorite photos, print them out as a collage. To do this, you just need to contact any photo or copy center. Depending on your preferences and interior design, you can choose any color for the background and type of photo placement.
14. Both photo and inscription
Think about an inscription that you would like to see on the wall every day. Then draw the outlines of the desired letters on the cardboard and carefully cut them out with a stationery knife. All that remains is to place the photo behind the cardboard and insert the entire composition into a frame of a suitable size.
15. Personal photo wallpaper
If family archives are impressive in size, then you can use them to make photo wallpaper. To keep the pictures securely on the wall, it is recommended to first cover it with paper wallpaper. Then the photo is glued to the wallpaper so that there is equal free space between adjacent photographs.
16. Democratic and stylish
The most accessible fixative for photos is ordinary clothespins. If this solution seems too radical, then buy decorative hats. They are sold in stores specializing in the sale of handicraft supplies.

A modern person accumulates a lot of photos - in his memory, phone, computer or other gadgets. Pictures, even if associated with pleasant memories, are viewed extremely rarely. But why miss the opportunity to cheer yourself up by looking at memorable photos? It is enough to hang the pictures on the wall, and they will not only charge you with positivity, but will also decorate the interior.
1. Vinyl stickers - instead of frames

If artistic skills are completely absent and it is not possible to depict frames on the wall, then use vinyl stickers. They can be purchased in online stores. Such stickers do not damage the wall finish.
2. Drawing lessons

In order to depict frames on the wall, it is not at all necessary to have an art education. Even a child can repeat drawings in the style of primitivism. In order for the drawn frames to look harmonious, the wall must be monochromatic.
3. Graceful cords

Thin decorative laces act as a photo holder. Tie the cord into a knot and glue the free edge to the back of the photo. All that remains is to hang the photo on the wall, after hammering a nail into it.
4. Decoration in eco-style

A non-standard shaped branch replaces the frame, turning photos placed on it into original decor. The branch can be painted or varnished - then the homemade “frame” will last a long time.
5. From the closet to the wall
Hangers with hangers, which hang dozens in every closet, become unusual photo mounts. The main thing is to print the photo in a suitable size that matches the length of the hanger.
6. Flirty ribbons

A lady's boudoir will be transformed if you decorate it with photos on ribbons. Wide tapes are glued to the back of the frame using construction adhesive, such as silicone or acrylic.
7. Free style collage

Many photos, differing in style and size, look harmonious inside a large frame. The center of the decorative composition becomes a large photograph located in its central part.
8. Useful and beautiful angle

A brilliantly simple way to display photos is to hang them in a corner so that they form a single colored surface. Choose any geometric shape, and you can fix the photo on the wall using double-sided tape.
9. Unifying drawing

You can make a single decorative composition from several photos hanging on the wall using a laconic drawing on the wall. Any single-color pattern drawn over a group of photographs will do. Instead of a picture, you can use a vinyl sticker.
10. Nothing worse than a painting

If the paintings do not fit into the interior design, but you want to decorate your home with paintings, then replace it with a photo in a large frame. Glue several decorative cords to the back of the frame and secure the pictures to them with clothespins.
11. You can stand on the wall

Narrow shelves are great for displaying photos and paintings. They will also allow you to avoid making unnecessary holes in the wall. If there is no narrow shelf, then it can be replaced with wide moldings.
12. Optical illusions

As a rule, each frame comes with glass and thick cardboard, which serves as a holder for the photo. Use a second piece of glass instead of cardboard. Place the photo, with a drop of glue on the back side, between the two glasses. All that remains is to hang the picture on the wall.
13. Clear geometry

Once you have selected a few of your favorite photos, print them out as a collage. To do this, you just need to contact any photo or copy center. Depending on your preferences and interior design, you can choose any color for the background and type of photo placement.
14. Both photo and inscription

Think about an inscription that you would like to see on the wall every day. Then draw the outlines of the desired letters on the cardboard and carefully cut them out with a stationery knife. All that remains is to place the photo behind the cardboard and insert the entire composition into a frame of a suitable size.
15. Personal photo wallpaper

If family archives are impressive in size, then you can use them to make photo wallpaper. To keep the pictures securely on the wall, it is recommended to first cover it with paper wallpaper. Then the photo is glued to the wallpaper so that there is equal free space between adjacent photographs.
16. Democratic and stylish

The most accessible fixative for photos is ordinary clothespins. If this solution seems too radical, then buy decorative hats. They are sold in stores specializing in the sale of handicraft supplies.

Molded elements made of plaster or polyurethane become an original replacement for shelves. Even ordinary photos standing on such a stucco element turn into a real work of art.
19. Brutal placement

Hanging a photo on the wall using a cornice and chains is a solution for the most daring. But such a composition can become a real highlight of the interior. This idea is good for large and bright photos.
20. Family watch

The clock mechanism can be purchased at a craft store or taken from another clock. All that remains is to select twelve small photographs, each of which will replace the number on the dial.
Hanging photos on the walls is a great way to make your home more comfortable. Is this not enough? Then we recommend that you read
Good afternoon friends!
Bare empty walls in rooms sometimes evoke boredom, so quite often we decorate them with paintings, panels, and hang shelving. Wall decoration with photographs has become popular again, just like in the old days. And to make your photo gallery look stylish and beautiful, you just need to know a few rules on how to place photos on the wall in the room, whether they are photos with frames or without them. This is what today's topic will be devoted to.
How to place framed photographs on the wall in a room
On the wall in our gallery we would like to see photographs of different shapes, sizes, colors, styles, and genres. With all this, they need to be somehow harmoniously combined into one whole to create a stylish composition. We’ll figure out how to beautifully place photos and how to do it correctly.
Selecting photographic material
I remember from my childhood with what pleasure I looked at family photographs on the wall of my grandmother’s room. There were no albums then and all the photos of different generations were hung over the sofas, and my grandmother always told some story from them.
I think that now there is no such need to turn a room into a photo studio and hang everything. Let's choose the best photos that we would like to always see before our eyes.
Wedding photos or those taken during the honeymoon are suitable for the bedroom.
In the nursery, as a rule, photographs of children are placed.
In the living room - general photos against the backdrop of nature, in the kitchen - photographs with images of their pets - cats and dogs.
The number of photographs can vary from one bright large photograph to several, and it is possible to use photos of both the same and different sizes.
Photos in frames of the same size always look advantageous; they are perfectly placed on the wall both in width and height, creating strict geometric shapes such as a square or rectangle, as well as others, for example, in the shape of a heart.
Framing photos
It is preferable to place photographs on the wall in frames. Small photos can first be placed in a passport, and then framed.
This is where you need to maintain a uniform style: it is desirable that the frames be painted the same color regardless of their size, thickness and material from which they are made. It's fun to make photo frames with your own hands. We have several. Only for the most part, such homemade frames are suitable for decorating one or two photos, and not an entire gallery.
Color photographs look harmonious in black or white frames.
Black and white photos look good in gilded frames.
In a room with bright accessories, place photos in silver frames, and in bright rooms, strict black frames will be a bright accent.
Rules for placing photographs in frames of different sizes
While preparing the material, I came across an excellent video of an interior designer and everything became very clear. Knowing the basic compositional principles of placing photographs on the wall, you can decorate the wall in the room with photographs very beautifully and at the same time in an original way.
There are only two placement principles:
- symmetry
- equilibrium
The principle of symmetry is a simple and win-win way to arrange photographs on the wall.
Whatever size photos you choose, you need to place them on the wall, maintaining symmetry. For example, place one large photo in the center, and small ones to the left and right of it. Or place four small photos under two large ones.
Several examples can be seen in the diagrams. If you mentally draw a vertical line in the center (axis of symmetry), then it is obvious that to the left and right of it all the images are symmetrically located.

The subject in the photographs may be different, but the shape and size placed on both sides of the axis of symmetry are fundamental.
Moreover, another object can be placed in the center: a painting or a mirror.
If everything is clear and simple with the placement of photographs above the sofa, then when placing photographs above the table, you need to take into account what else may be on it. All objects placed on it should become a single whole in the composition with photographs.
The second principle, “Balance,” is clearly shown in the following diagrams.

Again, mentally draw a line in the center and see that the objects on both sides are not symmetrical, but the large photo on the left (in the first diagram) is balanced by four small photographs on the right.
This can also be clearly seen in other examples.
Any object hanging on the wall or standing nearby on a table or shelf (mirror, candlestick, vase, clock, floor lamp) can act as a balance, which makes the composition even more interesting.
Where to post photos
Most often, photographs are hung above the sofa or bed, above the table, or simply on a free wall.
Just like for, when placing photographs on the wall, the rule is to place them at eye level, because if it is higher, it will simply not be convenient to look at them.
Sometimes they place photographs so that their bottom edge is on the same line, or they place the photo up and down symmetrically relative to the horizontal line.
How place a lot of photos in the room - diagrams
There is a classic version of arranging photographs of 10 pieces, placed so that they form a rectangle.
In the next diagram you can see that this is a large photo on the right, to the left of it are two rows of smaller photographs, rotated horizontally and vertically, one square photo.

Under this composition there is another row of square photographs and horizontally elongated photographs.
Now we take all the selected pictures and lay them out on the floor, experimenting. Let's rotate our composition 90 degrees, or maybe 180 or 270?
Let’s add 10 more photos to these, placing them symmetrically relative to the existing ones vertically or horizontally.

You can try to shift the location of part of the composition downward; for example, this option is just right when placing the photo above the stairs.
In general, experiment.
Let me remind you of the basic rules for posting photos:
- Single style
- Color spectrum
- Symmetry
- Equilibrium
- Eye level.
These simple tips will help you beautifully place photos on the wall in your room.
Creative photo placement without frames
If you don’t have photo frames, or there are so many photos that it’s impossible to frame everything, or if you just want to place photos creatively, I suggest the following idea.
We find an ordinary twig while walking in the park or at the dacha; it will serve as a crossbar on which we will hang photos.
We'll also need rope and tape.
Using tape, we attach the photographs to strings and hang them on the crossbar.
Photos. Moments of life captured by a camera lens. Vintage and modern photos stored in albums and interactive cloud of computer systems. For some, there is no greater pleasure than rearranging yellowed photographs on the pages of photo albums, carefully storing old photographs and Polaroid tapes. And some enjoy scrolling through the pages of social networks, looking at digital photographs.
Photographs, regardless of the date of shooting, have an amazing property, acting as a unique composite material. Photographs from the beginning of the last century enjoy a special status. They, like museum exhibits, should appear before the eyes of others. Family history should be passed on as a precious heritage.
Decorating a wall with photographs is considered the most emotional form of design art. Hiding emotions in albums, flash drives and disks, and not sharing them with loved ones, relatives, friends, is equivalent to a crime,
says designer of the Moscow studio A-Design, decorative artist Elena Vorobyova.
According to the artist, picture frames play a big role in interior decoration with photographs. Photo frames are not only a beautiful photo design, but also a protective packaging of the photo from the influence of the external environment. Direct sunlight leads to fading, humidity - to cracking, dry air - to the fragility of not only ancient photographs, but also modern photographs.
Photo frames are selected for each photo individually, depending on the style of the interior being created. When placing photo frames on the wall, keep the shapes and sizes consistent.
Frames are available in various colors. Depending on the style orientation, a palette of frames is selected.
Event photo notes

A simple but popular interior design solution is to place several photographs in frames on a table or on specially equipped wall shelves. The rigor of the classical framework is acceptable in the office. Solid voluminous photo frames decorate the interior of the living room. Delicate and romantic frames are appropriate in the bedroom or boudoir. Passe-partouts are created for small but very important event photographs.
The basis for choosing a place on the wall for a photo is the principle of direct visual perception of the original composition. In the bedroom, photographs are placed at the head of the bed. In the living room or hall, the most visible and easily visible place on the wall should be chosen for photos.
The most fertile room for placing pictures is the children's room. Photos of the baby from birth, coupled with photographs showing the child's growth and development, will create a magnificent collage.
Photos, dressed in classic frames of strict forms, can be arranged randomly or in a certain sequence. Photos for a nursery can be decorated, for example, in a nautical style for a boy, or a fruity style for a girl. It is advisable that all frames for the target design be created from the same material. Regular double-sided tape will help secure frames with pictures on the wall.
Design of wall photos
Photo frames play a primary role in interior design. The richness and variety of the assortment allows you to vary and combine all kinds of frames, creating charming compositions, regardless of the style orientation of any room.
Color selection

The range of shades of the frames and mats for photos is colossal. Designers advise using two directions when decorating rooms. Either select the color scheme of the photo frames to match the color of the interior, or frame the pictures with frames that contrast with the wall covering.
Do not allow glass frames to be adjacent to wooden frames in the exhibition - this is vulgar. Different sizes and shapes are acceptable, but made in the same style.
Photos enclosed in a passe-partout and inserted into a frame look harmonious on the wall. The color scheme of the design can be done in one of three options:
- color mats for color photographs, dressed in colored frames;
- classic black and white design of a series of “antique” or vintage photographs;
- color frames or color mats for simple frames in the design of black and white photographs.
Frame sizes
 wall decoration with photographs - photo
 Large baguette frames are good to use for a collage of all kinds of pictures. On the wall, such a handmade work of art looks both stylish and like an artistic painting.
Photo frame shape

Any frames for one exposure can be selected. They can be oval, rectangular, square or round in various sizes. The main thing is that the shapes of the frames are combined with each other, and harmony reigns in the exhibition.
A fashionable trend in modern interiors has become the design of photographs with puzzle-style frames.
Fastening system
In addition to double-sided tape - the most primitive method of attaching photo frames to the wall, you can use a little imagination. Share your experience on Sdelay.tv about how to beautifully hang a photo on the wall.
The most creative option is to place photos pinned with original holders or ordinary clothespins on a rope or wire stretched along the wall. This option is inherent in the design of a room in the avant-garde style.
Style direction
For a classic interior and a room decorated in Provence or country style, wooden frames made of light or dark wood are appropriate.

Art Nouveau, high-tech or eclectic styles prefer metal or plastic to frame photographs.

The handmade style dictates the creation of photo frames that are unique in their originality. For example, hand-knitted.

Accommodation options
The symmetrical arrangement of the frames requires great care and depends entirely on the interior. This option is inappropriate for a child's room. For a teenager’s room, the reception is quite possible if the photos in the exhibition are arranged in ascending order of size using additional decor.
The popular solution of building a family tree from a photo with a drawn tree can be implemented in a child’s room or family room. Hand-drawn designs work well with simple oval frames.

There are a huge number of room decorating ideas for children's rooms. In the boy’s bedroom, decorated in a nautical style, photographs on the wall in round frames are shaped like portholes of a painted liner.
For little princesses, picture frames adorn wall shelves or serve as the windows of painted carriages. Any fantasy can come true in children's or playrooms.
You can decorate the space along the spiral staircase with randomly placed and different-sized photo frames.

The classic design option for staircases is to place photos in identical frames above each step at the same distance from the floor.
The compositional collage “Clocks” will add originality to the room. Where frames with pictures are placed around the dial in any order, or in accordance with the age category of family members.

For a richly decorated living room in a classic or modern style, baguette photo frames that imitate artistic canvases are appropriate.
Frames in the interior of rooms
Diptychs and triptychs should be united by photo frames of the same style. Such works look great in the interior of living rooms or kitchens.
In the bedroom, framed photographs are placed on bedside tables or placed above the head of the bed.
In the corridor, as the most boring room of a house or apartment, you can arrange an art gallery that keeps family secrets and legends.
 photo frames in the interior – photo
 Girls' apartments are decorated with openwork lace photo frames.
Strictly designed pictures on the wall decorate halls, living rooms or offices.
For original placement of photo frames with pictures, a straight wall is not always required. From two frames, after removing one of the sides, you can build a corner frame.
Photo ideas for interior design using photographs in original frames:


