
How to make a broom from plastic bottles step by step. DIY plastic bottle broom
Plastic bottles are a wonderful and versatile material that serves many purposes. Not only do we store liquid in them, but containers can also be useful for all kinds of crafts. Some may be purely decorative, while others are useful in practice. One way to use plastic bottles is to turn them into a broom. it useful device that you need for your home or garden. Instead of buying a broom from the store, you can spend an hour or two making one.
Everyone has the material, and a banal set of tools is required. Let's learn how to make yourself a broom out of plastic bottles step by step.
Tools and materials for work
It does not take a lot of money to create a broom from a bottle with your own hands. All accessories are in the house, so you don’t have to run to the store. The set of tools is simple, and even children can work with them. What is required for work? Here is that little list:

From such a set of simple things, you get such a practical broom from a plastic bottle.

Now that you have everything you need, you can start creating a product with your own hands.
Creation technology
It will take you about an hour to produce, plus or minus. There is nothing difficult in the work. The main thing is to follow the instructions and do the job carefully. For your convenience, we have made step-by-step instructions that will help you. So, consider the creation in stages:
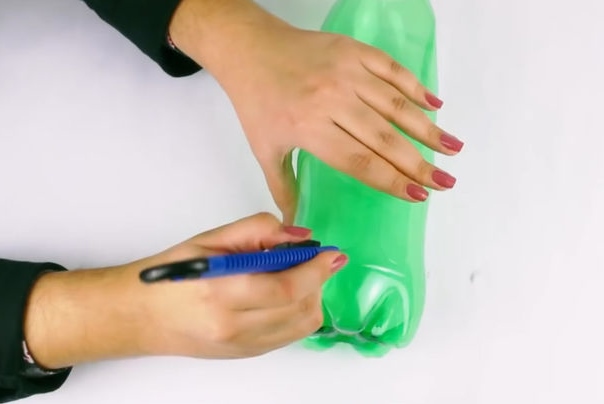
- Take the first bottle and a clerical knife. It must be sharp. Cut off the neck from it, stepping back a few centimeters from the top.

- Cut off the bottom of the plastic container in the same way.
Tip! Work carefully so as not to injure your hands. Plastic is a soft material, so it lends itself well to processing.
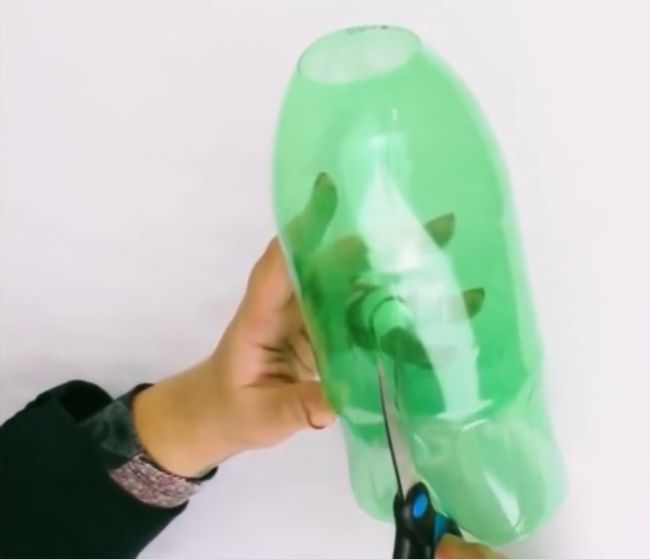
- Now you need scissors. Each broom has twigs or stalks. Your task is to create these stems. Using scissors, start cutting the workpiece along, from the bottom up. The width of each strip is approximately 0.5-1 cm. Do not cut it to the very end. Move a little above the middle, leaving about 6 cm on top.
- Treat the rest of the bottles in exactly the same way. Leave only two of them untouched. Please note that the more products there are, the thicker the broom bunch will become. It will be more effective in cleaning.

- So, at this stage, you have 3 or 5 blanks ready (depending on how much you stocked initially), with the neck cut off and the rest cut into strips. You also have two intact plastic bottles. Take one of them and, without cutting off the neck, do the same as with the rest.
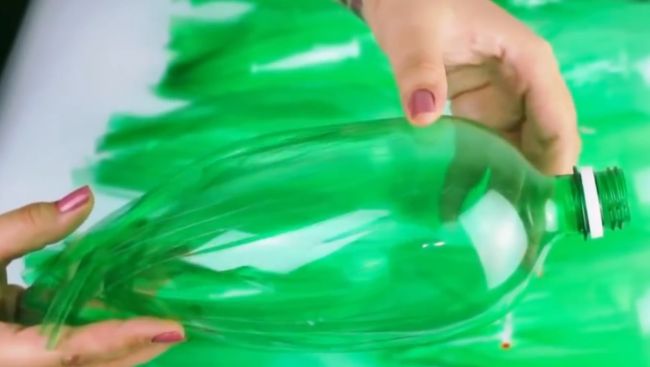
- Your bottle broom is almost ready. Take a blank with a neck and start inserting it one by one inside each part made without a neck. A product with a neck will freely enter the prepared hole. Fit all blanks completely.
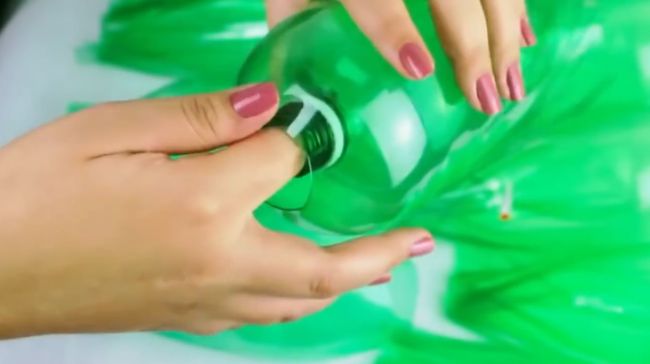
- In fact, the lower part is ready. It remains to bend (flatten) to give shape. But, we will not stop there, but will improve it to make it beautiful and practical. Take the remaining bottle, preferably with a high neck, and cut it in half with a utility knife. We only need the top.

Tip! Do not throw away the lower part, you can make a table or hanging pot, a pen container, an owl or a ladybug out of it.
- In the desired part with scissors, make two cuts on each side, opposite each other. Make the cut approximately to the middle of the plastic part.

- The finished part must be put on a blank made from the rest of the bottles.
- Using a large nail (50 or 100 mm), sew the product in two places in a horizontal plane. You can use an awl. You need to make an effort. Insert the wire into the holes formed and firmly tie all the layers. It should turn out as shown in the photo.

- That's all, the product is almost ready. It remains only to attach a stalk to it. The stick should not enter the neck of the bottle freely, but back to back. To control the thickness, cut it with a regular knife.
- When the stick enters the neck, it remains to fix it with nails or screws so that it does not fall out and does not spin. The nails will securely fasten the handle, and the broom will be one piece.
- For reliability, it is better to use not one, but two or three nails. They need to be driven into the neck with the handle inserted. For better fixation, you can use small self-tapping screws.

You have successfully created a fixture. A do-it-yourself broom made of plastic bottles will do the job perfectly. It can sweep the yard, room, paths, etc. Create multiple brooms and impress your friends with your skills. To make it clearer for you how to make a broom out of plastic bottles, check out this video.
A plastic container is a versatile material from which you can create many useful household items. In addition to their direct purpose - storing liquids - they make interesting and useful items, such as brooms.
A broom is an item without which it is very difficult to imagine cleaning an apartment or cottage. You can do it yourself. It only takes a few hours of free time, plastic bottles and a little inspiration.
What accessories are required?
The main advantage is that the creation of such a broom does not require a lot of money. Therefore, this option is perfect for those who like to save money. All the necessary components are in almost every home, which means that a trip to the store is not needed. The set of tools is quite simple, and even children are allowed to work with them.
So, to create a broom you will need:
- plastic bottles (preferably designed for 2 liters) - 5-8 pieces;
- a stick that will be a handle;
- some strong wire;
- nails / screws - 2 pieces;
- hammer / screwdriver;
- stationery knife;
- awl;
- scissors.

After all the necessary elements are collected in one place, you need to get to work.
Broom Making Technique
To make a broom with your own hands, it does not take much time. It is enough to allocate a few hours of free time, it may even be possible to complete the work ahead of schedule. Therefore, in this matter, everything is subjective.
The main rule is to follow the instructions and not jump from step to step. Work must be done carefully and with great care, which will allow the item to extend its operational capabilities. For convenience, there step-by-step instruction. It will allow you to do everything quickly and efficiently.
- To begin with, the first bottle and a clerical knife are taken. With it, you need to cut off the neck, while it is important to retreat from the top by a few centimeters.
Important! The knife must be sharp and pre-sharpened. While working with it, it is imperative to observe safety precautions, especially if children are involved in it.
- The bottom of the bottle is cut off in the same way.
- Then scissors are taken - they will help to make rods or stems that make up any broom. The main task is to make these rods. The workpiece is cut lengthwise from top to bottom. The width of the strip should be within 0.5-1 centimeter. You don't have to cut it to the very end. Move a little above the middle. It is important to leave somewhere 5.5-6 centimeters on top.
- The remaining plastic containers are processed in exactly the same way, only a few pieces should be left untouched.
Important! The more blanks there are, the more magnificent and thicker the broom will turn out to be. This will allow you to deal with pollution more efficiently.
- After the work done, you need to take two untouched bottles and, without cutting off the neck, cut them into the same strips.
- Previous fully cut bottles are inserted into the new blank.
- The resulting part should be flattened to give it the desired shape.
- The second untouched bottle is cut in half with a knife. It is desirable that she had a high neck.
- Using scissors, two cuts are made to the middle of the bottle.
- Put the finished part on a new part and fasten it with nails in two places in a horizontal plane.
- Insert the stick into the neck and secure with wire.
The broom is ready to use.
With the onset of spring, probably every gardener begins to think about cleaning up accumulated debris, litter and fallen leaves, remnants of old grass and other vegetation on the plot. In his assortment, as always: a pitchfork, a rake and a broom. Today we'll talk about the broom. More than one rural farmstead and city courtyard cannot do without it. Therefore, if you do not have such a unit, then you should definitely get it. The easiest way to purchase in a store for a few hundred of our rubles. And there is a slightly more difficult way. For example, make it from soft and elastic branches of twigs, flexible wood (elm, elm, birch, fir). Well, the most incredible one is to make it yourself from plastic bottles that are in every home. A good positive aspect of the latter method is respect for nature and the environment around us through the recycling of plastic waste. In this article, we will tell you how to make a broom out of plastic bottles.
Step-by-step instructions for creating a broom from bottles
So, let's get down to the question of how to make a broom out of plastic bottles step by step. To get started, we need the following materials:
Plastic bottles eight pieces with a volume of two liters. You can use more, in which case you get better bristles on the brushes and, as a result, there will be better debris capture,

Shank (suitable from an old shovel, chopper, rake or something else, if not, you have to purchase it at a hardware store),
Wire, hammer, nails, clerical knife, awl, clerical scissors and axe.
Progress:
If you do not know what to make a broom for the yard from, then use our information. When all the necessary tools are assembled at hand, you can get to work.
For all plastic eggplants, cut out the bottom with a clerical knife and cut with clerical scissors into strips along the neck of the eggplant. The width of the strip is half a centimeter, and the length, not cutting to the neck of the bottle, is six to eight centimeters.


At six eggplants, we cut out the neck with a clerical knife, and leave the seventh untouched with the neck, on which we string six eggplants without a neck.

At the eighth eggplant, we cut off the neck of 13-16 centimeters with clerical scissors and string it on seven bottles and pierce two symmetrical holes with an awl. We thread the wire into these holes and, on the other hand, carefully tighten the two ends of the wire. 
We fit the handle into the neck, if it does not fit, you need to cut it with a hatchet along the diameter of the neck of the plastic bottle and fit it tightly so that you then need to take a hammer and a nail and pierce the neck of the bottle and thereby fix it on the handles.


That's all, our broom is ready, you can start working on it.

Another option for making a broom
Do you want to know how to make a broom at home? Then rather get acquainted with another version of the product. There is a more complicated version of a homemade broom, rather a brush broom. Nothing complicated is required to make it. First you need to get raw materials from the PET bottle with a bottle cutter, and then make a broom brush out of the tape.
And so let's start considering this option. We need:
- bottle cutter,
- fused tape from a PET bottle,
- construction adhesive 88,
- neck from a plastic eggplant (7 pieces),
- double sided twist
- lid from a plastic eggplant (7 pieces),
- screws seven pieces,
- curly screwdriver,
- a larger bar and a smaller bar with a small hole,
- cutting.
The main device here is a bottle cutter. There are many variations of drawings on the Internet that can be used in the manufacture of this product.
If not: a bar, a corner, a knife, an ax, then we will need 3 screws, a clerical knife blade, 4 nuts and 4 washers. You can use either one nut or one washer. And he drank off the boards or a piece of chipboard (which will be at hand) for the base on which it will all be attached. You need to take a screw (the length must be calculated so that it does not come out on the other side), put a washer on it, a knife from a clerical knife, a washer and a nut and screw it into the board, similarly, the second knife will simply rest against the screw between the washers.
Then the third screw is taken and fixed on top in the same way as the second one, and now the knife blade is not movable, you can try to extract the tape. To do this, exactly the bottom is cut off from the eggplant, and a small notch is made with scissors, after it is inserted into this notch, the blade smoothly scrolls, the tip of the tape comes out, they begin to gently pull on it. And after the eggplant, almost all of it turns into a ribbon, which then needs to be thermally processed. This can be done: on fire, or in water, or with a building hair dryer. So that it gives sediment and decreases in size.
After heat treatment, the tape has become more durable; it is cut into equal lengths of 25 centimeters, tightly stuffed and rammed, and the edges are aligned into prepared and sanded necks from eggplants in the amount of 7 pieces. We put on a double-sided twist on top, and pull out the neck.
While the edge is drying, let's move on to the second part of the broom-brush. It is necessary to take a bar and place 7 eggplant caps on it, then drill a hole in the middle and screw it with a self-tapping screw, and then double-sided necks with glued tapes from a PET bottle are screwed onto these caps. The main part of the brush broom is ready, now you need to take another smaller bar with a hole and screw it to the larger one with a broom, and insert and secure the handle.
The video will tell you more about making a broom:
You can try to take out the trash.
Finally
Then take the ribbons and (70 centimeters or 140 centimeters from the size of the broom that you will make) fold into two. Then a piece of a branch is inserted into the ribbon, which is even from a tree as thick as a finger for the rigidity of the handle, they begin to knit like an ordinary sorghum broom, only the ribbon from a plastic bottle replaces the willow twigs. The resulting screeds, knots and tapes are treated with fire or a building hair dryer to shrink the plastic and tighten. The result is a broom that is not inferior to the store. Plus, it will be durable.
We think the considered examples of a broom and a broom will help you in cleaning and cleaning up debris: houses, yards and streets, and the proposed material will help clean environment from plastic containers (eggplants).
You didn’t know for sure that you can make a do-it-yourself broom out of plastic bottles from ordinary unnecessary garbage that you were probably about to throw away.
What will be useful in the process of work?
At the beginning of construction, prepare a set necessary materials and tools:
- Plastic bottles of 2 l - 3 pcs.
- Sharp scissors.
- Stationery knife.
- Wooden stick used as a holder. If you don’t have an old broom from which to take the handle, then find any branch that is suitable in length and use it as a holder. Such an addition will give the product a special entourage.
- A hammer.
- Nails - 3-4 pcs.
At the preparatory stage, the bottles are thoroughly washed with warm water, adding a few drops of detergent to it. After that, remove any stickers, if any. Leave the container for a few hours and wait until it dries. At this time, you can prepare tools and a handle for a future broom from plastic bottles with your own hands. Now you can start designing.
How to cut bottles?
The bottom of each bottle is cut off. To cope with the task, use a clerical knife. Then proceed to the formation of bristles. The bottle is cut in a circle into small strips, starting from the bottom. Try to make them the same - about 1 cm wide. Use sharp scissors.
Important! The thinner the stripes, the better. The thick bristles will scrape the ground with little effect. When cutting strips, they do not cut about 5 cm to the top so that the broom from plastic bottles retains its elasticity and does not fall apart during operation.

Having done the manipulations with one plastic bottle, proceed to the next. They start from the bottom: they cut it off completely, focusing on each previous bottle. The intervals must be the same. The bottom edge of the strips after assembling the structure should be at the same level.
The same with stripes. Actions are repeated similarly to the first option. They retreat from the neck to the same height as when working with the first bottle.
Processing the neck of plastic containers
If the previous steps were duplicated and did not differ in any way from the sequence of cutting a plastic bottle, then something new lies ahead. The top of the second bottle is cut off. To remove the neck, use a clerical knife.
Important! Cut off the top carefully, otherwise the strips will fall off, and you will no longer use such a bottle.
The first bottle is pushed into the second, as if putting it on. Make sure that the neck of the second bottle properly passes through the first, center the structure, giving it the right look.
Important! The more plastic containers you take, the more magnificent the broom will turn out.
The top of the bottle with the neck is also cut off. It is from this part that the upper part of the future do-it-yourself plastic bottle broom will consist. They do it this way: taking a clerical knife, the bottle is cut off from the bottom by 2/3. At the same time, enough space is left so that the third part of the structure can hold the previous two.

What does broom assembly look like in practice?
The third, upper, part of the broom from the bottle is pulled onto two previously prepared and already connected and cut containers. The tops of the bottles are aligned, making sure they sit snugly on top of each other. In the process of making brooms from plastic bottles, additional fastening is performed.

A nail is driven across the bottles so that it penetrates all three plastic bottles in the horizontal direction. The end of the nail protruding from the other side is bent so that it does not touch objects during the operation of the broom. The sharp edge of the nail can easily scratch the surface or damage the coating.
The same operation is carried out in the opposite direction, placing the nails close to each other, but not forgetting that there should still be a do-it-yourself plastic bottle broom holder.
How to attach a holder?
A stick that acts as a handle is threaded into the opening of the neck of the bottle, pushing until the free end comes out from the opposite side, passing through each of the three layers. The excess part of the handle is cut off, fitting to size. Remember that this is only a handle, and the holder should not stick out from the bottom of the product, otherwise you will “sweep” with it.
The third nail is driven into a stick, fixing the structure and attaching the handle to the most panicled part. If you chose a nail that is too long and it happens to come out the other side of the handle, don't worry - it's easy to fix. Take a hammer and bend the protruding end to the side to finally secure the handle on both sides. Congratulations! You managed to make a broom out of plastic bottles with your own hands.
On this, the manufacture of a broom from plastic bottles is considered complete, and the product can be used for its intended purpose.

Masters who have tried many methods for constructing panicles from plastic bottles give the following recommendations:
- By taking small bottles of thirty milliliters, you can make mini panicles.
- Use colored containers instead of transparent ones, and give the product a designer touch. In addition, colored plastic masks nails better.
- Instead of nails, you can use wire, which, no worse than the first, fastens the panicle, and all that is required is to make holes for the wire and thread it into the holes.
Now you know how to make a broom from plastic bottles with your own hands step by step. With such an unusual broom you can sweep up small debris or use it as an inventory to complement a Halloween costume.
broom made with my own hands from plastic bottles is the choice of people who care about the environment.
We are surrounded by many things, home modern man they are just full of them. It is noteworthy that they litter not only housing, but the entire environment. This is surprising, but by reusing, say, a plastic liter bottle, you can both save nature and make your room or, for example, yard cleaner. The proof of this assertion is shown below. step by step lesson making a real panicle from plastic bottles.
For fast work and high-quality results, you need to get all the necessary things in advance. Making such a broom will not work without the following:
- bottles (more than 10 pieces);
- scissors;
- wires;
- knife
- cutting;
- hammer;
- nail.
To start the workflow, you need to get a certain number of plastic bottles. It mainly depends on the purpose, why the broom is needed and where it will be used, for example, for erasing dust, cleaning indoors or outdoors. So, first you need to cut off the bottom of the plastic bottle. The incision itself is made with a sharp knife and only then continues with scissors for convenience.

Next, you need to cut strips that will act as twigs. Only when they are connected can one achieve the rigidity required by any broom. But this will be later, now you need to cut such strips so that the cuts do not reach about six centimeters to the neck of the bottle. Their desired width should be about half a centimeter.
The next step is cutting off the necks of the bottles. This is not so easy, because in this place the bottle has the hardest plastic. As with cutting the bottom, it is best to use both a knife and scissors for this. You also need to cut the plastic with a knife, and continue with scissors. The process is quite dangerous, because if the knife slips off the bottle, you can get injured.
However, to make a broom, one bottle still needs to leave its neck. She will need to wear all the others. Care must be taken during this process. You should put the bottles on top of each other so that they are as tight as possible. To facilitate the task, when cutting the necks, you can make cuts wider and wider, then they will be better put on.

You need to take another bottle and cut off its neck, but lower than the rest - stepping back about 15 centimeters from the base. Then it must be put on as tightly as possible on all the bottles from above, this may resemble a nesting doll.
Parallel to each other on both sides, a hole should be made with something rather sharp, an awl is perfect. It is necessary to carefully pierce each layer, it is best to mark the holes in advance. If you are not careful, you can also get injured.
Next, you need a wire that must be threaded through the holes already made with an awl. If they are well made and they are wide, then this should not be a problem. If the holes are too narrow, then you should widen them with some sharp tool wider than the awl. Then all that remains is twisting the ends of the threaded wire and biting off the excess length with wire cutters.

This completes the manufacture of the base, but any broom needs a stalk. You can buy a new one, but everyone in the closet happens to have some broken ones. gardening Tools. If the stalk found is too wide, it is easy to solve the problem - you can cut it enough with a knife and then insert it into bottles. Be sure to nail the neck to the handle with a nail so that the broom lasts longer.
Thus, a panicle useful in the household is ready for further use. If it breaks, you can simply replace it, because the process is quite fast.
