
How to draw a cat and a cat with a pencil. How to draw a cat for children: step by step instructions Outline the outlines of the cat's body and draw the tail
Cats are very beautiful and graceful pets that children adore. And little artists often ask mom or dad to draw their favorite pet on paper. And even if adults themselves do not have the talent of a painter, phased drawing will come to the rescue. Based on sequential schemes, even a five-year-old kid can create an image of an adult cat or a little mischievous kitten in the picture. At school age, children should be offered more intricate options, for example, the image of realistic cats and popular cartoon characters.
Age features of drawing a cat
It is advisable to teach a child to draw a cat from the age of five: it is at this age that the baby is already able to create a more or less believable image, so do not rush things.
Before embarking on the creative process, it is advisable to consolidate the knowledge of basic geometric shapes with your son or daughter (this will be needed in the process of work) and teach them how to depict them correctly. These are a circle and an oval, a triangle, a square and a rectangle.
To draw an animal well, the kid must be able to correctly depict geometric shapes.
Be sure to consider a live cat with a novice artist (as an option, a ceramic figurine or a realistic soft toy is suitable). At the same time, an adult focuses on the proportionality of the body, the ratio of the size of the head and torso, the location of the eyes, ears on the muzzle, etc.
If there is no real cat at home, then you can consider a realistic soft toy with your child.
Because the children preschool age do not yet understand proportions very well, drawing can be started with cartoon cats. They often have a disproportionately large head, cheerful coloring, a funny expression of the muzzle (smile, wide eyes, protruding tongue), dressed up in bows and other accessories.
Cartoon cats are distinguished by irregular proportions, cheerful coloring, a smile and other features.
With younger students, you can already start drawing realistic cats. Children already understand that the animal's head cannot be too big or small, the tail must be long (practically full-length). An adult should look at photographs of cats in various poses with a child: lying, sleeping, sitting, jumping. At the same time, attention is drawn to how the animal arches, how it folds its paws and tail.
The adult first discusses with the student in what position the cat can be drawn
The images of cartoon animals become more intricate: an adult teaches the child to give the cat a mood: surprise (wide-open mouth), sadness (corners of the mouth beveled down), thoughtfulness (pupils shifted to the side), fear (wide-open eyes). There are a lot of options here, because children's imagination knows no bounds.
Choice of tools and materials
Since a cat can be drawn in various techniques, a small artist will need various materials to work. These are colored pencils, wax crayons, felt-tip pens (many children love to outline them and emphasize details), gouache (since drawing a cat in watercolor already requires higher skill). In any case, you will need a sharply sharpened simple pencil and an eraser (to correct defects and erase auxiliary lines).
As a basis, you should prepare A4 white paper or colored cardboard (if the baby draws with gouache).
How to draw a cat step by step with a pencil
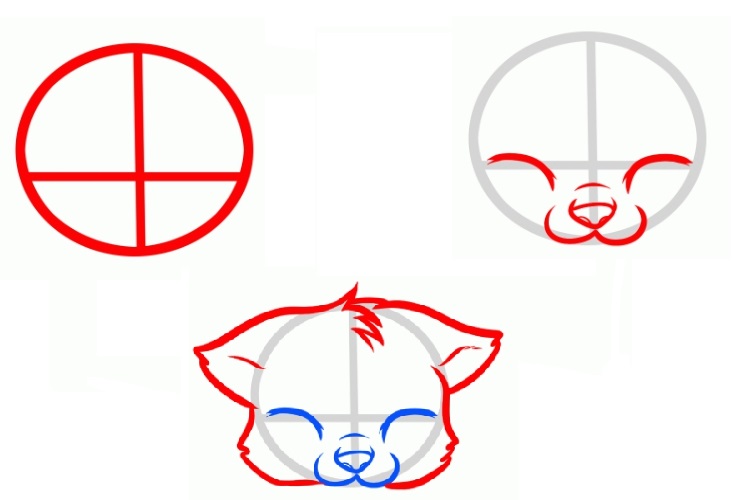
Introduction to the animalistic genre of painting should begin with simple circuits drawing animals. One of these options is a cat from circles. An adult shows a child a funny picture where the body of an animal for the most part consists of round shapes (there are also triangles - ears and nose).
The cat in the picture has a round body, head and cheeks, the rest of the details complement them.
Then follows the image process according to the scheme. For example, to depict a sleeping cat, you need to draw a large circle, inside it - a small one (in the lower part, in contact with the large one, the ratio is approximately 1:2). Further, the image is complemented by the ears, nose, closed eyes and mustache of the animal. The image is completed by a long tail enveloping the body of the animal. It remains only to decorate the animal to your liking.
The circles in the drawing are the main parts of the cat's body, which are simply complemented by the necessary details.
When the child masters drawing round cartoon cats, you can move on to the next stage of mastery - a realistic image of an animal, for example, sitting. First, the head of the cat is indicated in the form of an oval. The oval will also be the basis of the body shape. Here it is necessary to observe proportions: vertically, the oval slightly exceeds the length of the twice taken oval of the head, and horizontally, the width of the body is slightly less than the twice taken oval of the head. In this case, the head and torso slightly overlap each other. The next stage is the drawing of the ears, front and hind legs of the animal.
At the first stage, the main parts of the animal's body are schematically indicated in the form of ovals, paws and ears are added
Then, with the help of auxiliary lines, the child depicts the face of a cat: nose, mouth, eyes and whiskers.
Eyes, nose, mouth and mustache are depicted with opra on auxiliary lines.
Auxiliary lines are combined into the final drawing, which remains only to be colored.
At the last stage, the cat is painted
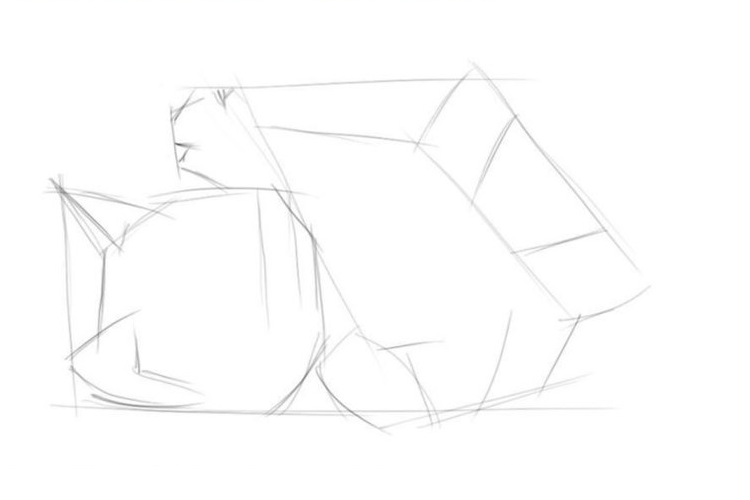
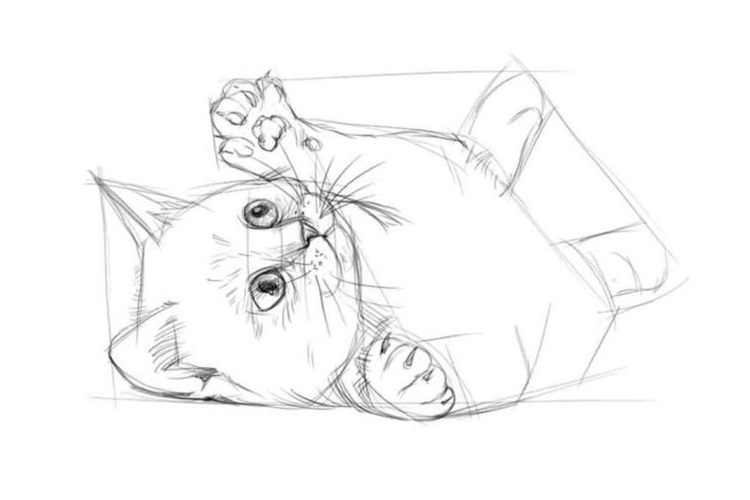
Drawing a lying kitten is also not a very difficult task. Again, the head and torso are indicated by ovals, and then the muzzle, ears, paws and a beautiful tail are drawn. In this case, the head can be placed in profile and full face (this is not reflected in its shape). The child needs to be explained that in the first case only one eye is drawn (the second one is not visible).
The lying kitten is also drawn on the basis of ovals.
Photo gallery: step-by-step cat drawing schemes
A kitten from semicircles turns out to be very funny. The character of the cat is conveyed by the eyes. The most crucial stage is drawing the muzzle. Due to the observance of proportions, the cat turns out to be very realistic. This kitten resembles the cartoon character Smeshariki. The body of the cat is made up of circles of different sizes. The body of the cat is made up of ovals. , the task is to color it beautifully. The cartoon cat is drawn very simply. The body of the animal consists of circles, an oval and rectangles.
We draw a muzzle
After the child learns to depict cats in different poses, one should dwell in more detail on drawing the muzzle (full face, profile and three-quarter turn).
- First, an auxiliary shape is drawn - a circle, auxiliary lines are outlined (vertical and two horizontal). Large slanting eyes are depicted and necessarily hairs above them - this will make the cat's portrait more charming. The nose can be made like a heart. At the bottom of the circle there will be cheeks in the form of semicircles.
Auxiliary lines will help to make the muzzle proportional
- To make the cat more cute, you should shade the corners of the eyes. After that, the head is drawn to the desired shape: it expands on the sides of the circle. Ears are added.
The muzzle increases in width, and ears appear
- For maximum realism, it remains to shade the ears, sketch out the lines of the neck and draw the mustache. A cat has twelve hairs on each side (although this is not important in the figure).
An indispensable attribute of any cat is a long mustache.
- A cat's face can also be drawn based on a square. We draw a figure and divide it into four equal parts.
Square - the basis of the muzzle
- Focusing on the grid, proportionally represent the ears, eyes, mouth, cheeks and nose.
The grid allows you to maintain all proportions
- We erase the auxiliary lines.
We remove the auxiliary lines, and the muzzle becomes alive
- And now let's give freedom to imagination: paint the cat in natural shades or create an unexpected fantastic image.
Why not color with a fantasy pattern
Photo gallery: schemes for drawing a cat's face
The muzzle is drawn on the basis of a circle and auxiliary lines The eyes, nose and mouth are drawn in random order, without auxiliary lines Using the eyes and mouth, you can give the cat a certain character The image is made up of segments, which are then smoothed into smooth lines
Draw an anime cat
Anime is a popular Japanese animation. This is not just an animation, but a special perception of life, a cultural layer with its own unique symbols and types.
Children of all ages love the playful and charming anime cats. These are fantasy images with huge expressive eyes. The head is often larger than the body. Of course, the child with great enthusiasm will take up the image of this cute animal.
Anime cats are charming and playful, their indispensable attribute is huge expressive eyes
You can offer a young animal artist the following algorithm:
- First, the body of a sitting cat is depicted: a large head with ears, a torso (teardrop-shaped oval), paws in the form of ovals and circles, and a neat tail.
The head is almost the same size as the body.
- The most responsible occupation is the drawing of the muzzle. This will require auxiliary lines. We depict huge eyes (the size of the ears, while we denote the pupils and sparks in the eyes) and a wide-open mouth. At this stage, we also add a mustache, a drawing of ears and fingers on the paws.
It is the muzzle that gives the anime cat a unique playful character.
- At the end of the work, we erase the auxiliary lines and color the kitten to our liking.
You can color the anime kitten as you wish
Photo gallery: step-by-step anime drawing schemes
A simple scheme for drawing - an almost symmetrical figure At the heart of drawing - circles and ovals The highlight of the image - a tousled forelock and cheeks
Drawing Angela
A game for tablets and smartphones with talking cats - Tom and Angela is popular among modern children. A cute fluffy cat with anthropomorphic features (in a beautiful dress) may well become an object for drawing. Distinctive feature her huge slanting eyes.
Children love to draw characters from their favorite cartoons and games.
The child can portray Angela in full height in one position or another, or draw her portrait. Let's take a closer look at the last option.
- First, draw a circle with guide lines. Let's transform it into a cat's muzzle, slightly pointed downwards.
Angela's muzzle is slightly pointed down
- We depict neat (also pointed ears) and outline the eyes, nose and mouth.
Making the eyes very big
- And now we draw in detail the eyelids, pupils and iris of the eyes. We make the nose and mouth more expressive. Don't forget the flirty mustache. We designate the neck and shoulders.
Draw in detail the eyes, nose and mouth
gouache painting
To draw a fluffy beauty, it is quite possible to use gouache. This material is suitable even for very young artists: the paint does not need to be diluted with water (like watercolor), but simply dip it with a brush. The compositions are saturated, the color is perfectly visible even on colored paper. Working with gouache, it is easy to correct any mistake. In addition, the paint dries quickly, one color can be painted on top of another, and they do not mix.
Using gouache, you can get an interesting color of cat hair - for example, a mixture of shades of gray, pink and orange.
The adult reminds the child that it is better to use a thick brush to draw the silhouette of an animal, and a thinner brush to draw details.
- Younger students can be offered to portray a charming cat in the grass with gouache. at first with a simple pencil a simple silhouette of the animal is outlined at the bottom of the sheet (it is located vertically). Then we draw a muzzle.
At the bottom of the sheet, we outline the silhouette of a cat, draw a muzzle
- With wide strokes we draw a background - grass and sky. We color the cat itself in gray.
To paint large areas use a thick brush
- We paint the eyes and make out the fur with a dry brush: use different shades of gray (mix it with black and white paint). When drawing a muzzle, we use the poke method with a wet brush.
When drawing fur, we use different shades of gray
- With white gouache we draw a mustache and finally correct the cat. Next, we finalize the background: we depict a forest in the distance and grass in the foreground. Composition completed.

Cats and cats are incredibly graceful and beautiful animals, so drawing them is a real pleasure. For novice artists who have recently begun to master graphics, master classes on how to draw a cat with a pencil in stages are suitable.
The creation of such cats does not require skill, talent or artistic taste. If a child asks to draw a cat, and time is running out, then you can limit yourself to funny images.
sleeping kitten
Anyone can easily draw such a sleeping miracle. All that is needed for this is an A4 sheet, soft and hard pencils, an eraser, a little patience and perseverance.
Stage 1: We start drawing a sleeping cat from the head. To do this, draw a circle with a hard pencil and mark thin auxiliary lines. The vertical divides the muzzle clearly in half, and the horizontal passes so that the upper part accounts for more than half of the circle.
Stage 2: Focusing on the auxiliary lines marked in the first stage, we outline the kitten's eyes, nose and mouth.
Stage 3: Mark the contour of the head with a soft pencil. We draw ears, protruding fur, and a funny “whirlwind”.
Stage 4: draw the body of the animal and draw the tail. Please note that the kitten is curled up, so the tail covers part of the muzzle.

Stage 5: At the last stage, paws and whiskers are drawn. Gently erase the extra lines and markings with an eraser. The kitten is ready. If desired, it can be painted with paints or colored pencils, or left as is.

naughty kitten

This naughty baby will appeal to any child. You need to start drawing a mischievous kitten from the head. We draw a circle, we add triangular ears and we draw a muzzle. Then follows the drawing of the torso and paws. Play with the emotions of the kitten and show your child that the mood of the cat shown in the picture depends on small details. Surprise can be conveyed with wide eyes; a protruding tongue will add mischief, and by slightly shifting the pupils to the side, you can make a thoughtful or sad cat.
Kitten from circles

Such a drawing of a cat from circles with a pencil can be done even by a child, since this is one of the most simple ways for beginners. The animal is drawn from the back, so there is no need to draw features and keep proportions.
First, two circles are drawn on the sheet so that they intersect slightly with each other. In this case, the diameter of the lower one should be approximately two times larger than the upper one. Then the ears are drawn to the top, and the tail to the bottom. Then the mustache is drawn and the wool is arbitrarily marked.
One circle, two circles
Another good example how you can easily and quickly draw a cat with a pencil.

A larger circle is drawn first, and then another smaller circle is drawn inside it. Add ears, facial features and tail. A funny sleeping kitten will appeal to children and will be able to quickly distract the child and cheer him up.
Such a sketch is a cross between simple schematic drawings and realistic drawings of animals.
We mark the contour of the animal with thin auxiliary lines made with a hard lead. The sketch of the head looks like an octagon, the ears are triangles, the torso is a rectangle or cylinder. After that, we make markings for the paws.
We draw a horizontal line in the center of the head, thus indicating the level of the eyes. We draw outlines of the mouth and nose, round eyes. We draw a chin, mustache.

We clearly denote the muzzle. We draw in detail the eyes, nose, mustache and cheeks. With a soft pencil, draw the villi on the ears, on the head and muzzle. Then we draw the front paws with claws and pads, detailing the back.

At the final stage, all auxiliary lines are carefully erased. It's the turn to draw fur. For these purposes, a 2M (or 2B) lead is best suited, but in principle any soft lead can be used.

Realistic
It seems to many that realistic pet portraits are not the easiest task for beginners, but in fact, not all sketches are difficult. You can verify this using the example of a step-by-step instruction for a portrait of a Scottish fold.
Draw a Scottish Fold cat with a pencil
Scottish Folds are loved by many breeders for their temperament and charming appearance. Due to the distinctive feature of the breed - the ears bent forward and down, these cats look so cute that it is impossible to resist squeezing such a mustache. We offer a simple step-by-step lesson for beginners on how to draw a British cat with a pencil step by step.
At the first stage, auxiliary lines are outlined with a hard pencil: 1 vertical and 2 horizontal. The vertical one shows the center of the muzzle, so it needs to be moved slightly to the right from the center of the page, since the cat sits slightly turned.
The horizontal ones should be parallel to each other as they indicate the size of the animal's eyes. After that, you need to start drawing the contour of the muzzle and eyes.
Important! For a cat to be proportional, the distance between the eyes must match the size of the eye.
When drawing the nose, remember that its size should be less (narrower) than the distance between the eyes.

Then with a lead M or TM we darken the eyes and nose. For more experienced artists who are confident in their movements, a black pen can be used for this purpose.
To make the look of the cat "alive", do not forget to leave unpainted, white places, as in the picture.

In the third step, you will need a 2M (or B2) pencil. Gently, with smooth lines, shading the strokes, darken the places around the pupils. Notice how the color transitions from the darkest (around the pupils) to the lightest. Then, arrows are marked with a hard lead, in the direction from the nose. They show directions for drawing wool.

With the softest lead (it is better to use B4 or 4M), focusing on the arrows, draw the darkest wool. The crown and under the ears should be the darkest.

To complete the picture, draw the rest of the wool. The cat is ready
Attention! The color of the villi depends on the force of pressing.

Today we will tell you how easy it is to draw a cat for children 5 years old and get acquainted with unusual drawing techniques. At the age of 5, kids already show interest in drawing and want to learn how to create images of animals, nature and people. Drawing a cat is an activity that both boys and girls will enjoy, as we will look at non-traditional drawing techniques using paints, fingers, dry brushes and even cotton buds.
How to start drawing a cat for children 5 years old?
It is impossible to teach children to draw a cat without mastering the basic shapes that make up the animal and any other object: a circle, an ellipse, a rectangle, a triangle, etc. After getting acquainted with the figures, it is worth explaining to the baby what proportions are, why the head is smaller than the body and by how much. Then follows the study of the composition - the successful arrangement of the subject on the sheet. First of all, you need to outline the cat with a pencil.
How to draw Caramel from the cartoon "Three Cats"?
In order to draw a cat from Three Cats, arm yourself with a pencil, gouache, brushes and our master class, which you can watch in the video below. In it, we tell in detail how to draw a kitten using simple shapes, as well as give important tips for drawing with paints.
How to draw a cat with a pencil for children 5 years old?
Here we will learn how to draw such a cute cat:

How to draw a cat with a dry brush technique?
Having become familiar with the basics of drawing a cat, we move on to non-traditional techniques such as dry brush painting. In order to draw a cat, the dry brush technique is very useful, as it gives the effect of the fluffiness that the animal has. With this technique, you can draw anything: portraits, animals, landscapes, etc.

We will need:
- Brushes (can be of different hardness)
- Gouache or acrylic
- jar of water
- Palette
- Cloth for brushes
- First you need to create the outline of the cat. To do this, use a template or draw your own.
- Dip a dry brush into the paint and apply to the sheet with light pokes perpendicular to the sheet. The brush gives the effect of texture and fluffiness.
- Change brushes, observe which mark leaves a soft dry brush, and which hard.
- After washing the brush in the jar, dry it with a cloth.
- Let the cat be of several colors. Add fluffy strokes of different colors to make it more voluminous.
Here are other drawings of a cat made using the dry brush technique.


Here you can see what patterns can be achieved with the dry brush technique:
"Cat" drawing in watercolor on wet paper
A cat is a drawing that can be done not only on dry paper, but also wet. There is a special technique of painting on wet paper in watercolor and it has special advantages. The drawing of the cat's fur will look much more realistic, as the vague lines will convey that weightless texture of the coat, its lightness and tenderness that the animal has.

We will need:
- Watercolor
- brushes
- jar of water
- Sponge
- Napkin
- First, outline the outlines of the cat with a pencil. You can slightly draw the eyes and muzzle.
- Now dampen the paper with water using a sponge or brush. Do not rub the sheet too much, as it may begin to roll and be damaged. Remove excess water with a napkin. Paper should not shine.
- Dip the brush into the paint and swipe across the sheet. You will see how the paint spreads over the sheet and becomes like a haze. Watch how the paper reacts to the paint, and adjust the amount of water on the brush depending on this.
- Clear lines should be drawn on dry paper.


Having mastered this technique, in the future you can create such charming drawings of a cat. The first drawing of the baby may not work out, but there is no need to give up. The main thing is to get used to the features of wet paper and then the wet effect will not be an obstacle, but an interesting assistant.
How to draw a cat with fingers for children 5 years old
Finger painting is similar to dry brushing, only instead of using brushes, we create a painting with our fingers. It is not difficult at all and children of 5 years old will be extremely happy that they will be allowed to smear their hands in paints.
We will need:
- Gouache
- Cloth for hands
- Draw the outline of the cat's body on paper. Now dip your fingers in different colors colors: red, brown, gray, white, etc.
- With flapping movements, apply strokes to the sheet without going beyond the contours.
- Overlay one stroke on another - this will create a variegated effect.
- It is better to draw clear lines with a brush after the whole picture has dried.
Bitmap cat for kids
The technique of dot painting is similar to finger painting, only here the strokes are created using a cotton swab. A very simple technique, but, nevertheless, much more interesting than traditional painting with paints.

We will need:
- Cotton buds
- Gouache
Draw the outline of the cat using the template or our instructions at the beginning of the article. Mark with a pencil the muzzle and other details that are clearly drawn.
Dip a cotton swab into the paint and print on paper. Then another color with another stick.
Unlike finger technique, dot painting is created with strokes of the same size. From this, the picture looks more clear and accurate.


Other options for drawing a cat using dot technique. You can use templates or draw the cat yourself. All cat templates can be found at the end of the article.
How to draw a cat with stained glass paints
It is difficult to find a child who would not like to paint with stained glass paints on glass. The advantage of this drawing is that it is not necessary to draw clear contours with liquid paint on your own, but you can use templates. A cat drawing can be created on film, and then pasted onto a window or other smooth surface.

We will need:
- stained glass set
- Thick film (if not included)
- rag
- Take the template of the cat you like and circle it with the outline paint from the kit. Most often, the tube is signed. Let dry.
How easy it is to draw a cat with a pencil in stages - for children and adults. We learn to draw a beautiful cat with a pencil in stages with a child. Learn how to quickly and easily learn how to draw a beautiful cat.
To make it easy for a child to draw, for example, a cat, we will tell you how to draw a cat in stages. Draw with your child, then it will be easier for him to remember and master the drawing of a cat.
Take a sheet of paper and a pencil and start drawing with your child, controlling and prompting him. At the top of the sheet of paper, draw a circle so that it is slightly extended to the sides.
Then draw two curved lines from the circle down, from these lines, just below half of the curved line, draw two more curved lines, these lines will indicate the cat's hind legs.
So, you got the torso of a cat and the hind legs of a cat.

Now you draw the ears of the cat, they look a bit like triangles with curved sides.

Look with your child at the bottom of the cat's muzzle, here you need to draw a nose in the form of a triangle, draw two curls from the nose - this will be the cat's mouth.

Now the cat needs to draw eyes. The eyes should be semi-oval in shape with pointed corners at the edges. Inside the eye, you need to draw circles, and inside the circles, draw the pupil, it should be elongated.

Look carefully at the drawing, your cat is missing paws, now we will draw paws. Draw four paws for the cat, each paw should have three fingers.

Now the cat needs to draw a tail. The tail should be drawn on the left side of the cat. The tail of the cat should be slightly fluffy.

Your kitty is almost ready, but to make her look prettier, draw some fluffiness on her chest and on her paws.

Now draw the fluffy ears, the cat's whiskers and draw the cat's bow for beauty.

Well, your kitty is ready, next to the kitty you can draw a ball, a ball with which she plays or a mouse.
Another step by step drawing of a cat
Now let's see step by step how you can draw another cat in a different way.
Let's see how you can draw a full-length cat in a different way, for this we offer you step-by-step instructions and visual pictures.
Take a sheet of paper and a pencil, first you need to mark a sheet of paper so that the cat enters completely.
First, let's draw the cat's head. Look carefully at the next picture and draw the cat's head exactly as shown in the picture, now draw triangular ears, look carefully at how the torso is located and draw in the same way.
Apply the sketch lines of the cat with thin strokes so that later you can correct, erase and draw further.

Draw the cat's eyes a little above the nose, they should be in the form of an oval with pointed ends.
Now pay attention to the cat's ears, they need to be tweaked a little so that they turn from simple triangles into beautiful ears, draw a mustache and finish the eyes of the cat, draw her vertical pupils.

Now you have to start drawing the body of the cat, look carefully at the picture and draw the front paws of the cat and the fingers on the paws.
Look at the following picture, now you need to finish the cat's back, tail and draw her hind legs. Give the kitty a few touches that will make her more cute and expressive.
Remove the lines that interfere and are superfluous in your drawing, outline the outline of the cat more brightly, paint your cat in any color you like.

Here is such a beautiful kitty you got.
Courses for the development of intelligence
We also have interesting courses that will perfectly pump your brain and improve intelligence, memory, thinking, concentration:
Development of memory and attention in a child 5-10 years old
The purpose of the course is to develop the child's memory and attention so that it is easier for him to study at school, so that he can remember better.
After completing the course, the child will be able to:
- 2-5 times better to remember texts, faces, numbers, words
- Learn to remember for longer
- The speed of remembering the necessary information will increase
The secrets of brain fitness, we train memory, attention, thinking, counting
If you want to overclock your brain, improve its performance, pump up memory, attention, concentration, develop more creativity, perform exciting exercises, train in a playful way and solve interesting puzzles, then sign up! 30 days of powerful brain fitness are guaranteed to you :)
Super memory in 30 days
As soon as you sign up for this course, a powerful 30-day training for the development of super-memory and brain pumping will begin for you.
Within 30 days after subscribing, you will receive interesting exercises and educational games in your mail, which you can apply in your life.
We will learn to remember everything that may be required in work or personal life: learn to memorize texts, sequences of words, numbers, images, events that happened during the day, week, month, and even road maps.
How to improve memory and develop attention
Free practical lesson from advance.
Money and the mindset of a millionaire
Why are there money problems? In this course, we will answer this question in detail, look deep into the problem, consider our relationship with money from a psychological, economic and emotional point of view. From the course, you will learn what you need to do to solve all your financial problems, start saving money and invest it in the future.
Speed reading in 30 days
Would you like to read interesting books, articles, mailing lists and so on very quickly.? If your answer is "yes", then our course will help you develop speed reading and synchronize both hemispheres of the brain.
With synchronized, joint work of both hemispheres, the brain starts to work many times faster, which opens up many more possibilities. Attention, concentration, perception speed amplify many times over! Using the speed reading techniques from our course, you can kill two birds with one stone:
- Learn to read very fast
- Improve attention and concentration, as they are extremely important when reading quickly
- Read a book a day and finish work faster
Conclusion
Learn to draw yourself, teach your children how to draw a cat step by step, it took you a little time, but now you know how to draw a beautiful cat. We wish you good luck in your future work.
Master class on drawing cats in sitting and sleeping poses step by step with a photo.
Gorbova Nadezhda Yuryevna, teacher of MBOU DOD "Children's School of Arts" of the Yaransky district of the Kirov region, the city of Yaransk.
Description: this master class shows a step-by-step drawing of a ginger cat sitting and sleeping in watercolor. It also shows the step-by-step drawing of a Siamese cat using the raw technique.
Purpose: the master class is intended for teachers of fine arts, educators additional education, parents and children from 7 years old who want to make beautiful work for an exhibition, interior decoration or just for a gift.
Target: making a drawing of a ginger cat in a sitting and sleeping poses, making a drawing in the technique of a raw Siamese cat.
Tasks:
- consolidation of knowledge, skills and abilities of drawing an animal with the help of simple geometric shapes;
- further improvement of watercolor skills;
- fixing the skills of arranging an animal on a sheet of paper;
- consolidation of skills in color science;
- fostering love for animals;
- development of attention and accuracy.
Materials: pencil, eraser, watercolor, sheet of A4 watercolor paper, squirrel brushes No. 2,6,8, white gouache, rag, jar of water.

Hello dear guests!
This master class is dedicated to drawing one of your favorite pets - a cat.
Cats - children of the universe -
Poems are dedicated.
Cats are cute creatures
Graceful and light!
Egyptians and beyond
They could be deified
So many years have passed since then
Do not return the centuries of those back.
But centuries are not a burden to them,
Cats don't care about years
After all, they have in our time
The tail is a pipe, but life is the key!
Cats just have a mass:
Bring coziness and comfort into the house.
Yet the cat is a princess,
Well, the cat, no doubt, lord!
Cats and cats are varied in color. Today I propose to draw a red tabby and Siamese cat.
The watercolor technique is not simple, it does not tolerate fading and it is not always possible to correct a mistake. But we will not be afraid, and if the drawing does not work out, we will take a new sheet and try again.
Progress:
1. Let's imagine the cat's body as an oval, and the head as a ball. The body is placed at an angle and shifted relative to the center of the sheet to the right. There should be margins on the sides. We leave a little more space at the bottom than at the top.

2. Draw the front, hind legs and tail.

3. We begin to draw a muzzle. The nose is similar to the letter "T", the eyes are slightly oval and are located at an angle. Let's increase the breast a little and bend the back.

4. Paint over the muzzle with the color of golden ocher. Cold pink nose. Leave white spaces around the eyes.

5. We outline the dark areas with red ocher.

6. Paint over the ears with dark pink. Draw stripes (pattern) on the muzzle in brown.

7. We paint over the entire body with shades of yellow ocher and red ocher and, until this layer is dry, immediately draw a striped pattern.

8. Then we will depict the texture of the wool, drawing with small strokes in the direction of hair growth.

9. Let's start drawing the muzzle. We emphasize the nostrils and the contour of the mouth with a pink-lilac color. Let's draw dots from where the mustache grows. Then we draw a yellow eyeball, then a black pupil in the form of an elongated oval dry, leaving a white highlight. Circle the eye around the contour with a pink-lilac color.

10. Then draw a mustache in pink-lilac color, and repeat on top of them with white gouache. With white gouache we will paint on the hairs on the ears of our cat.

11. You can also emphasize the fur on the cat's chest with white, so it will look even more voluminous.

Now I propose to draw a sleeping ginger cat, curled up in a ball, using the raw technique.
1. Draw an oval

2. Outline the tail, right hind leg and round muzzle.

3. Wet the sheet well cold water. The sheet should absorb water well. Before you start writing, make sure that there are no puddles on the sheet of paper. Daylight is cold, so we will go through the bright places in blue and pink.

4. We paint over the remaining places with shades of yellow ocher, red ocher. When dry, the color in watercolor is very lightened, so take a thicker paint on a wet brush.

5. Strengthen the shadows on the body, muzzle and under the tail.

6. Draw a striped pattern.

7. As the paint dries, the tone brightens, so I will strengthen the shadow parts. If you drop clean water from the brush next to fresh paint, you will get interesting stains.

How to draw in the technique of raw Siamese cat.
1. On the right side of the sheet, draw an inverted drop. This will be the head and front legs. On the left side of the sheet, draw a semi-oval (the back of a cat).

2. Then we will draw a muzzle in more detail, outline a fluffy tail and paws.

3. The Siamese cat has a very interesting coat color. It casts blue, lilac and different shades of blue and brown. We begin to write from light to dark, after the sheet is well saturated with water. Puddles should not be on the surface of the sheet. We paint the chest with cold shades, interspersing warm ocher. Then brown shades back and paws.

4. We begin to write a muzzle. First, light shades of brown, then a richer tone, and at the end we emphasize the center of the muzzle with dark blue.
Attention: we try so that the paint does not flood the eyes of the cat, we will write them in a dry, beautiful cornflower blue color!

5. Let's draw the wool on the breast and make the tail darker.

6. Select the central part of the muzzle even darker (the paint dries and brightens). With a dry brush, remove the paint on the cheeks a little so that they are lighter. Let's draw a nose more clearly. Lastly, we write the eyes: first in blue, and when it dries, we put narrow vertical pupils. At the end, we put highlights in the eyes and draw a mustache.

Taika is made of fur
Taika is made of fur
From desires and riddles.
A cat is not a dog
She has her own habits!
Someone's secret cannot be
Appreciates kindness and care.
It was very hard
She is without a home in bad weather.
Taiko was invented by people
To come home from work,
Ironing sitting on the couch
Forgetting worries.
Taika comes to the house at night
Through the window on the first
She knows a lot of windows
Just be able to be true.
Taika is a matter of mood:
Suitable when you want
If he gives a look
Also somehow by the way.
Taika wants to go to the roof
To fall in love under the moon
Remember, you can't replace Thai
Will only by yourself!
Taika sees everything in the dark
Bright blue eyes.
Thai soft paws
Only the truth with claws.
Taika is a complex creature,
It’s not easy with her, it’s not funny,
I need this cat...
Taika is made of fur.
I wish you creative success!
Here are some drawings made by my first graders.