
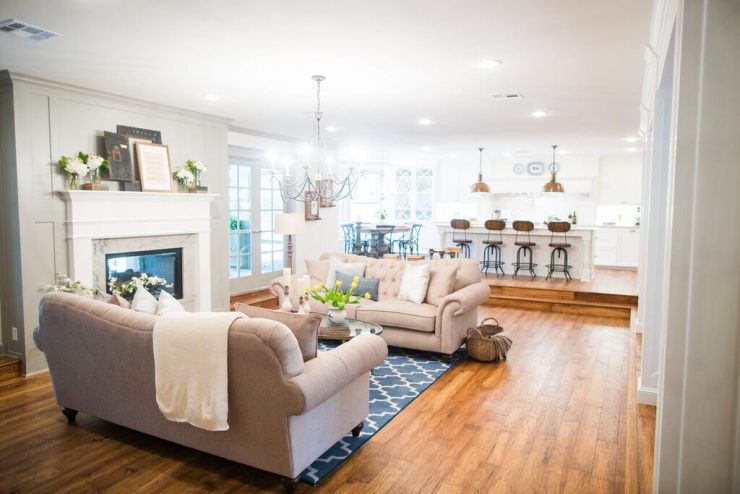
Floors in the house options. Floors in a private house - the best options for flooring in a house (100 photo ideas)
It's no secret that the convenience of living in a house largely depends on high-quality floors. The installation of the basement ceiling is carried out using various materials: wood, concrete, special mixtures using the “self-leveling floor” technology. The floors in a private house should be smooth, durable, retain heat and have aesthetic qualities.
Floor types
The question of what to make the floor in the house from often arises when building your own home. Therefore, there is a need for a detailed study of the varieties of sexes, taking into account their advantages and disadvantages.
wood flooring
Wooden floors look spectacular, they meet environmental requirements, combine practicality and long service life, and allow for repairs as needed.
Installation of a wooden floor implies the presence of the following materials: timber at least 15 cm thick, edged boards at least 2.5 cm thick, waterproofing and vapor barrier elements, insulation. Timber and boards must be taken dry, their moisture content should not exceed 12%.

As a waterproofing, a polyethylene film or roofing material is suitable. There are many vapor barrier membranes on the market. Mineral wool slabs, sheets of extruded polystyrene foam, expanded clay can serve as a heater. You will also need nails and screws, metal corners, a hammer and a screwdriver.

The installation of a wooden coating goes through several stages. The first thing to do is to carefully level the ground, on which a sand cushion is then created. It needs to be waterproofed. If roofing material is used, then the overlap between the strips is at least 15 cm.

Further along the perimeter of the house, a strapping beam is installed, to which logs are attached using metal corners. All bars are pre-treated with protective compounds. The distance between the lags should be maintained, equal to the width of the insulation. If mineral wool slabs are used, then they are installed by surprise. This must be taken into account when installing the log.
Then, a vapor barrier membrane is stretched over the lag and insulation with an overlap, the joints of which are glued with special adhesive tape. The final stage involves the installation of boards. They are also recommended to be treated with protective compounds. The boards themselves should be nailed as tightly as possible to each other.
Note! Lighting a private house - how to organize? Photo review of the best ideas!

When the wooden floor is ready, it can be varnished, or linoleum can be laid on it.

Concrete floors
Most often, concrete floors in a private house are arranged in utility rooms, but this option is also possible in residential areas. Filling the floor is carried out according to the following scheme.

If necessary, a small pit with a depth of 10 cm is first dug in the area of \u200b\u200bfuture pouring. Then a cushion of sand with a thickness of at least 5 cm is made, which is carefully rammed. A reinforcing mesh is laid out, beacons are set up, by which it will be possible to monitor the evenness of the surface.


Concrete will gain its nominal strength in 28 days, after which it will be possible to proceed to fine finishing. Options for such finishes are tile or linoleum on a thick base.

Linoleum is used in living rooms, tiles are laid in the hallway, bathroom and toilet, in the kitchen. Linoleum is glued to concrete with special mastics, or simply lies freely, fixed along the walls with a plinth. A special glue is used for laying tiles.
Bulk coating
For the device of such a floor in a private house, special mixtures are used, which are self-leveled after they are applied. This is one of the most popular ways of flooring in country houses. The cost of self-leveling floor directly depends on the manufacturer and brand of the mixture.

In addition, there are options for floors with a pattern or in color, which is also reflected in the price. The basis of self-leveling floors is a concrete screed, the surface of which is treated with special primers to improve adhesion. Using a drill with a special nozzle, dilution is carried out bulk mixture water. The solution is applied to the primed substrate in small portions and rolled out with a spiked roller to remove air bubbles.
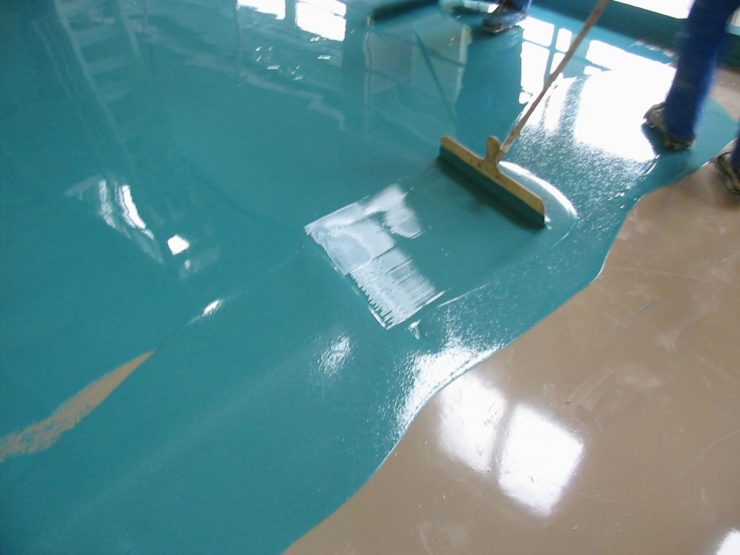
The finished floor for a better set of strength is covered with plastic wrap, if this is specified in the instructions for the mixture. After the solution has completely hardened, it can be coated with polyurethane varnish to give it a shine.


The coating will be ready for full use in a week, and you can move on it already 12 hours after pouring. The peculiarity of this floor is that it is often used as the main one. But you can also lay carpet on top, lay parquet or laminate.

If there is a financial opportunity and the floors are made in a residential area, then it is best to use three-dimensional or decorative self-leveling floors. To do this, you need to consider what kind of pattern will be located on the floor, and then contact a company specializing in these issues. She will make a photo of the floor in the house, making a printout on a banner of the required size. Subsequently, using a special technology, this banner will be installed on the floor, making the room stylistically very attractive.
Underfloor heating technology
The most convenient and practical option is the device of a warm floor in a private house. Allocate floors with water and electrical system. Electric floors are popular in small spaces of apartments or country houses. The main condition for the installation of electric floors is the presence of a power supply line capable of operating under heavy load.

The electric floor heating system has only the disadvantage that it consumes a lot of electricity.

In the case of underfloor heating in large rooms, in which, moreover, there is no central heating, it makes sense to use water floors, since they can significantly save energy.
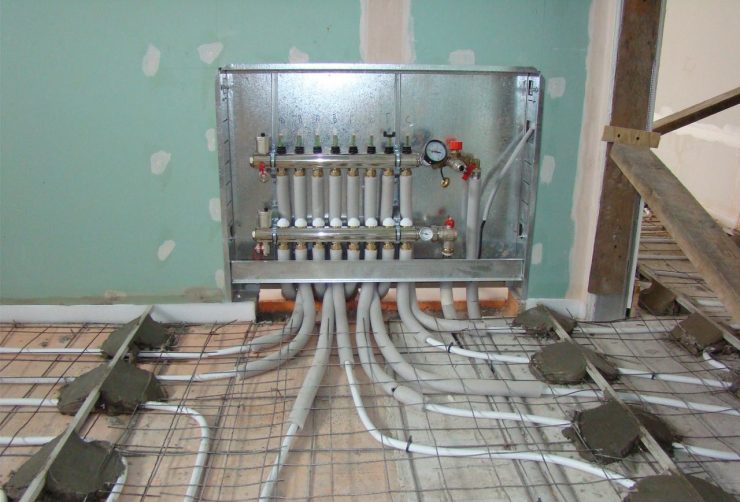

The water floor as a heat source has water heated by the boiler, circulating through pipes built into the floor. The role of heating elements is assigned to metal-plastic pipes (there are applications plastic pipes). They are laid on the subfloor and are connected to the supply and return manifolds through the distribution mechanism. The water circulating in the pipes has a temperature of +35-45°C. More high temperatures would make the floor uncomfortable, and subsequently lead to its destruction.

The water heating system has a number of advantages:
- heating costs are reduced due to the low temperature of the coolant;
- as an independent unit makes it possible to effectively use the living space (in the absence of radiators);
- Economical compared to electric underfloor heating despite high installation costs
What kind of floors to make in a private house in each case is always decided on an individual basis. At the same time, it is necessary to measure the purpose of the floors, their price and the quality of the materials used. Knowing the intricacies of all options, the advantages and disadvantages of a particular type of flooring, you can eventually achieve a unique result, while getting the best floors for yourself.

Photo of floors in a private house


The wooden house is a cosiness, heat and harmony with the nature. That is why everything more people When choosing material for a future home, they prefer wood. However, when building a natural house, special attention should be paid to the arrangement of the floor. What it will be - you decide, of course, but for those who appreciate real comfort, experts advise equipping a concrete floor. concrete floor in wooden house It will last for many years and will allow you to lay any floor covering on it without any hassle.
It's no secret that concrete floors are the undisputed leaders in popularity. This is due to the numerous advantages of such structures:
- durability and reliability. You can be sure that concrete floors will serve faithfully for more than one year;
- high physical strength. Concrete is a unique material that can withstand enormous loads;
- Smooth surface. A smooth, perfectly flat floor contains not only aesthetic qualities, but also provides endless possibilities for decoration;
- the concrete floor is not afraid of fire, moisture, chemicals, immune to microorganisms.
Concrete floor installation
Concrete floor installation can be carried out in different ways. Most often used.

It is important!
The arrangement of a concrete floor on the ground is justified if the ground is dry, otherwise problems with waterproofing cannot be avoided.
A solid concrete floor consists of several layers, layout options may vary slightly, but ideally it should look something like this:
- compacted soil base;
- bedding of river sand;
- bedding of crushed stone or expanded clay;
- waterproofing agent;
- rough concrete screed;
- vapor barrier;
- insulation;
- finishing reinforced screed;
- flooring.
Installation of a concrete floor: stages
By and large, the installation of a concrete floor does not present any difficulties, the main thing is to adhere to the correct sequence of work.
Foundation preparation
1. Installation work begins with leveling with a laser or optical level. In the process, the relief, the zero mark and the surface level of the future concrete floor should be determined. Among other things, leveling provides an opportunity to correctly calculate the amount of excavation work.
2. The soil on which the concrete floor will be laid must be carefully compacted, which will avoid subsidence in the future, and therefore reduce the risk of cracks. Compaction is carried out using special tamping devices.

3. On ground base a "cushion" of sand is laid. To ensure the required density of the backfill, the sand is laid 25% thicker than necessary, then moistened and compacted again. For compaction, vibrorammers or rollers are used.
4. A layer of expanded clay or gravel is poured over the sand.
Concrete floor waterproofing
After performing sand-claydite or sand-gravel bedding, you can proceed to waterproofing measures that prevent the absorption of liquid by the floor base from the concrete screed and prevent capillary suction of moisture from the soil.
Waterproofing is carried out by means of polymer membranes or rolled bituminous materials.
It is important!
It is allowed to use thick polyethylene as a waterproofing agent.
Waterproofing materials must be laid out on the base with an overlap, connecting the strips with construction tape.

- make sure that no damage appears in the waterproofing layer;
- the waterproofing should be laid with the institution on the walls to a height of 20 cm (after laying the finishing screed, the excess can be cut off);
- if for some reason it is not possible to perform waterproofing at this stage, then its implementation is carried out by coating when arranging the subfloor.
Subfloor laying
This layer, intended for technological needs, got its name because of the “lean concrete”. The draft floor is used as the basis for steam and waterproofing materials. The rough screed is made of concrete of class B7.5-B10 and crushed stone of fraction 5-20. If a waterproofing bedding was used during compaction, then the use of M50-M75 concrete is allowed.
The rough floor is laid simply and easily, because. the requirements for it are low. The thickness of the rough screed should be about 50 mm, the horizontal difference should not exceed 4 mm.
Vapor barrier installation
On the finished subfloor. Polymer-bitumen membranes are optimal in this case. In addition, membranes made of polyester or fiberglass are practical and inexpensive.
A little more expensive than PVC membranes, but the cost pays off with more than important advantages - PVC membranes are durable and do not rot at all.
You can, of course, make a vapor barrier from polyethylene, but it is rather problematic to check its integrity under the insulation and screed.
Floor insulation
Laying a layer of insulation will save up to 20% on space heating. The most commonly used heaters are:
1. Polyfoam PSB35. To give the material additional strength, it is covered from below and from above with an overlapped polyethylene film.
2. Extruded polystyrene foam is one of the best views insulation for the floor on the ground. Due to the small deformation during compression, this material can be used in rooms where the floor experiences significant loads.
3. Mineral wool with a density of at least 120 kg/m3. Due to the fact that mineral wool tends to accumulate moisture, it should be insulated with plastic wrap.

Laying the final screed
Screed - the final layer of the concrete floor on the ground, which performs important functions. For example, it is necessary for leveling, improving thermal absorption, creating a slope on the floors. The screed can be performed in several ways:
Monolithic filler screed
Horizontal guides are installed -. The first strip is placed along the wall, taking into account the minimum thickness. The rest are parallel to each other with a step convenient for subsequent leveling by the rule.
It is important!
Plant profiles on plaster - so the work will go twice as fast. Check the correctness of the installation with a bubble level.
Let's get to the main part of the work. Can choose concrete screed when the fillers are large gravel, stones, small pebbles or a more popular variety - cement-sand. For this, a mixture of cement and pure quartz sand is prepared in a ratio of 1: 4. The consistency should be pasty. If you mix the components in a concrete mixer, the solution will be much better than with manual mixing.
It is important!
The prepared solution must be used within 2 hours, when the technological qualities are maximum.

Filling starts from the far end of the room. The solution is leveled by the rule between rows of installed beacons. After pouring and leveling the first strip, go to the second and so on until the end. Full hardening occurs within 30 days, it is impossible to forcefully accelerate this process.
Semi-dry screed
Western technology has taken root with us just fine - it is becoming more and more relevant due to its numerous advantages. The addition of polypropylene fiber not only improves the quality of the coating several times over, but also avoids floor deformations and cracks. The reinforced fiber added to the concrete mixer is distributed evenly throughout the mass, and when a liquid is added, it forms a very strong mixture.
It is important!
The use of fiberglass also allows you to reduce the curing time of the concrete floor.
The laying technology is similar to the above method.
This is a new method, which is not yet very common, but is already actively used in modern construction. Made from different materials: Chipboard, plywood, asbestos-cement sheets, moisture-resistant drywall.
First, a plastic film is spread (overlapped by 20 cm). To avoid the occurrence of "sound bridges", you need to take care of the presence of technological gaps near the walls of 1 cm, in which a sound insulator (glass wool or polyethylene foam) is placed. Then comes the turn of backfilling - it is allowed to use expanded clay, quartz sand, silicate slag, etc. The thickness of the backfill is on average 5 cm.
The selected material is laid in two layers, fixing it together with self-tapping screws or building glue. Seams and gaps need to be puttied and sanded.

That's all. As you can see, there is nothing complicated in arranging a concrete floor in a wooden house. The main thing is desire and some theoretical knowledge that you now have. So, you can make concrete floors with your own hands without any problems.
In the modern construction market at the moment there are many floor coverings, but, as before, the basis for them can only be of two types: concrete or wood. This article provides instructions for arranging the foundation with your own hands, a comparative analysis of the merits of these coatings will also be given, and which floors are better than wood or concrete for you, you can decide for yourself by analyzing this article.
Wooden floor
Logs can be based on brick or concrete posts, laid on a foundation or attached to walls. Further on each method in more detail.
Lag installation
- Lags are laid on the posts in buildings with a large quadrature. The step between the columns is from 70 cm to 1m. Leave about 60 cm between rows.
- Before erecting columns, a layer of soil should be removed, as a rule, the fertile layer is removed, or the soil is simply removed 20 - 30 cm below the soil level around the house.
- Next, we mark the places for the columns and make a small foundation for each column., as a blind area, we fill in gravel with sand and lay brick columns 1.5 or 2 bricks wide on the mortar.
It should be laid with a well, the internal space is reinforced and poured with concrete. You can simply make a formwork for a column measuring 50x50 cm, install a reinforcing mesh and pour concrete.
![]()
- All columns are set horizontally. On top of them, a waterproofing of 2 - 3 layers of roofing material is laid.
- After that, you should make a blind area. It can be made from gravel, crushed stone or sand, in some regions of our country, where there are metallurgical plants, it is cheaper to fill up dump slag. The blind area is covered in layers and rammed, it should rise above the ground by 200 mm.
- Next, we lay the logs at the level with an entry to the foundation of 100 mm, be sure to leave a gap of 20 mm between the joists and the wall.
- If the building is small, then you can do without the installation of columns, but in this case, the logs are taken with a larger section or logs are used as load-bearing beams.
- The support bearing beams must be laid on the foundation piercing or framing by at least 100 mm, plus 20 mm for the damper gap. If the foundation is narrow and there is not enough support, then the beam cuts into the wall to the missing depth, but not more than half the wall. You can attach special metal supporting structures to the wall and lay beams on them.

Floor installation
When the logs are laid, we begin to mount the floor. Coverage can be single or double.
We will consider a more capital double, since a single cover is an unfinished double.

Important: all wood that goes to the floor must be treated with protective solutions.
For a finishing floor, they should be colorless, it is the cheapest way to treat with machine oil.
- Initially, you need to fill the cranial beam 40x40 mm at the bottom of the lag. Planks of the first level of the rough coating are laid on it, it is not necessary to nail them, since only insulation will lie on them. As a rule, a slab or an unedged board is taken.
- Further, as a waterproofing, polyethylene is covered and fastened with a stapler. Insulation is placed on it in the openings between the lags, the best option is mineral or glass wool. The level of insulation should be 15 mm lower than the level of the finishing coating.
- The insulation is covered with a vapor barrier and a finishing floor is mounted on top.
- For an interfloor overlap, where the floor of the upper floor is the ceiling of the lower one, an edged board is initially attached to the logs from below with self-tapping screws, you can fill it with lining or other finishing material.
- Next, a vapor barrier is laid on top, a heater is laid on it and covered with another layer of vapor barrier. After that, a 5.5 mm soundproof gasket should be laid on the logs, it can be a cork or foamed polyethylene and a fine, wooden coating is already spreading on it.

concrete base
Concrete warping is more durable and therefore in given time most buildings are made this way. But concrete has one serious disadvantage, it is cold. In this regard, the concrete base can be insulated by itself or an insulated top coat is laid on top, for example, a wooden floor on a concrete base.
Installation of concrete screed
- When building a private house, the best option is to use reinforced concrete floor slabs. But if the house is old and stands on the ground, then it would be reasonable to pour a concrete screed on the 1st floor. To do this, remove the old coating to the ground.
- Next, we fill it with gravel or sand in layers and tamp the blind area. After that, a layer of waterproofing is laid on it.
- After that, a reinforcing structure is mounted in order to stiffen the base. We set the metal beacons horizontally on the reinforcement, according to the level. Next, fill the solution and align it with the beacons.
- will harden for at least a month, after hardening, you can mount wooden floors on concrete.
- If floor slabs act as a base, then after removing the old base and cleaning, the level of curvature of the base should be measured. If the difference in height does not exceed 35 - 40 mm, then self-leveling mixtures can be used, they are poured simply and quickly, plus they freeze in a maximum of 10 days.
- Before pouring, you need to putty all joints and cracks on the plane and cover the floor with several layers of soil for waterproofing. You can cover with polyethylene.
- If the curvature along the plane is greater, then it is more expedient to pour a cement-sand screed along the beacons, because the price of self-leveling mixtures is quite high.

Important: pouring the screed with your own hands for several days, carefully control the joints between fillings.
Because due to the temperature difference between the cooled solution and the fresh one, an influx can form.
- If you plan to lay tiles on a screed or subsequent installation of a warm floor system, then it makes sense to insulate the screed initially. To do this, waterproofing is laid on the base, and expanded polystyrene plates are laid on it. For floors on the ground, a slab with a thickness of about 50 mm is taken, for overlapping with a warm lower floor, 20 mm is enough or penofol is covered.
- A reinforcing mesh is laid on the insulation and the solution is poured.
Important: regardless of what you mount, fill in the screed, install logs or lay the finish coat.
It is necessary to leave a damper gap, otherwise all work can be hopelessly spoiled.

- When your screed is ready, you can already lay any coating on it, depending on your desire and possibilities.
- Under linoleum, you need to cover the surface several times with soil and you can lay it. Under the laminated floor or parquet, waterproofing is laid, the substrate is laid and the coating is mounted.
- But if your ceiling height allows, we advise you to equip the flooring on the logs. To do this, cover the concrete base with waterproofing, set the logs horizontally on it. In this case, under the logs, a beam with a section of 50x50 mm or 50x100 mm is sufficient, with a step of 30 - 50 cm.
- A heater is laid between the lags and covered with a vapor barrier, and the gap between the heater and the upper deck should be about 5 mm.
- Further, we advise you to make flooring from thick plywood or OSB boards; in rooms with high humidity, you can lay DSP boards. The flooring is done in 2 layers with a run between the plates. After installation is completed, any finish coating can be laid on such a warm flooring.

Comparative analysis
Of course, a wooden floor is more environmentally friendly, its price is often lower than concrete, it is warm and reliable, but short-lived. And there is a possibility that your descendants, having decided to change sex, will remember you "not with an evil quiet word."
In our opinion, it is more reasonable to make a combined version of the coating, in other words, the base is poured from reliable, durable concrete, and then you make slab flooring on logs. If necessary, it can be torn off and an economical warm water floor or other coating of your choice can be installed in its place.

Conclusion
Do you install concrete or wood floors? The decision is, of course, up to you. We revealed the main points of installation and gave practical advice, but everyone has their own situation, and if this information is not enough for you, then the video in this article clearly shows the installation process of the coating. See, decide!
