
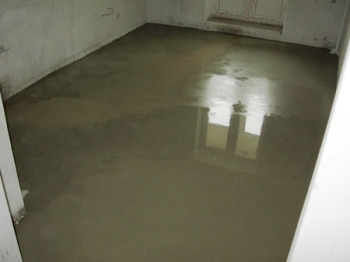
Correct tie. Laying concrete screed. Determination of the zero level of the screed
Comments:
How to make a floor screed using modern building technologies? Depending on the functional purpose of buildings and the premises located in them, the floors arranged in them have a number of design features due to the impact on them during operation of mechanical, thermal and liquid (water, aggressive liquids) factors. Wherein common element, without which no floor can do, is a screed.
Why do you need a floor screed?
The functional purpose of the screed is to level the surface of the underlying floor layer, which can be a concrete underlay, a floor slab or a heat and sound insulating layer.
To create a slope in order to divert water to the water inlets of showers, baths, pools, car washes and other objects, a floor screed is also needed.
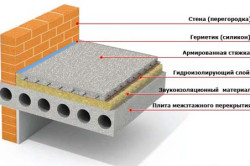
- 1 - coating;
- 2 - coupler;
- 3 - heat or soundproof layer;
- 4 - concrete underlying layer;
- 5 - floor slab;
- 6 - base soil

Figure 1. Floor screed layout: 1 - coating, 2 - screed, 3 - heat or sound insulating layer, 4 - concrete underlay, 5 - floor slab, 6 - base soil.
As shown in the figure, the screed (2) itself is the basis for laying the floor covering (1): linoleum, laminate, parquet or ceramic tiles(Fig. 1).
In order to achieve optimal use building materials, during the construction of floors, the developer must take into account that floor structures of the first floor of residential buildings that do not have basements and heated basements must have a heat-insulating layer between the screed and the underlying layer (or floor slab).
Currently, it is increasingly used in the course of finishing work. Sometimes this technology is called "machine" or "mechanical" floor screed, since when using it, manual labor is reduced to practically controlling various mechanisms.
A mechanized screed is performed using mechanisms such as pneumatic mixers, vibrating screeds, and trowels.
Back to index
How to make a floor screed using this equipment?
A mechanized semi-dry screed is performed in the following technological sequence:
- equipment preparation;
- procurement of materials;
- preparation of the premises;
- preparation of semi-dry cement mortar;
- solution transportation;
- laying the solution;
- creation of optimal conditions for the hardening process.
Back to index
Equipment preparation
To carry out the work you will need:

- Level (you can also use a laser plane builder, hydraulic or laser level) - 1 pc.
- Trowel - 1 pc.
- Mixer-pneumatic blower - 1 pc.
- Vibrorail - 1 pc.
- Trowel - 1 pc.
The entire range of this equipment can be rented from construction organizations or construction equipment rentals.
When ordering a mixer-pneumatic blower, it should be borne in mind that it is produced with various types drive mechanism. If the construction site does not have a 380V connection point (i.e. three-phase electrical wiring), the electric blower mixer will not work. In this case, it is necessary to order a mixer-pneumatic blower with a diesel drive.
Back to index
Procurement of materials
Based on the configuration and area of \u200b\u200bthe screed to be arranged, it is necessary to prepare:
- PVC film with a thickness of 150 to 250 microns;
- expanded polystyrene;
- Portland cement brand 400;
- construction sand;
- fiberglass;
- "rail" beacons.

The proportion for mixing cement mortar is 1 part cement to 3 parts sand. The need for sand, cement and "rail" beacons per 1 sq. km. m. (based on the minimum recommended screed thickness of 40 mm) is: cement - 18.6 kg; sand - 57.0 kg; rail beacons - 1.33 m.
The fiberglass prevents the formation of cracks and serves as a replacement for the reinforcement. Consumption per 10 liters of water is about 80 g (for a more accurate amount, see the manufacturer's instructions).
Back to index
Room preparation
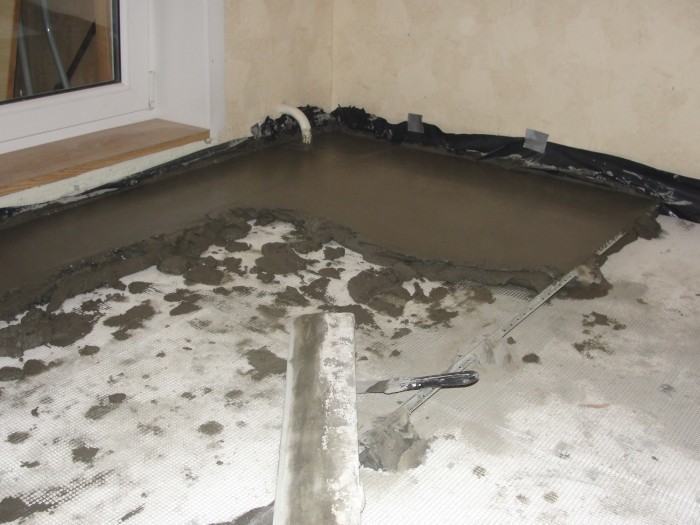
How to make a screed so that it is a single array that is resistant to temperature and deformation effects? It is necessary to exclude its adhesion to the underlying layer, walls, columns and other structural elements. To do this, it is necessary to make a thorough inspection of the underlying layer with tapping of the cement base (if any) and identifying areas of delamination and cracks. After that, the exfoliated sections should be removed, the cracks should be embroidered, and the voids formed as a result of this should be filled with cement mortar. Further, on the ceiling or underlying layer, a polyethylene film is laid in a whip of at least 15 cm, with a rise on the walls to a height of 10-15 cm.
The polyethylene film, in addition to the role of a compensator between the ceiling and the screed, also serves to waterproof the rooms below and prevents possible leaks. Along the perimeter of the wall, on a plastic film, a polystyrene foam tape is attached, which prevents thermal deformation of the screed and performs the functions of sound insulation.
Using a level (laser plane builder, hydraulic or laser level), the level of the screed on the walls of the room is marked, taking into account that the thickness of the screed layer must be at least 40 mm.
With the help of the same tool, the installation of "rail" beacons is carried out. "Rail" beacons are installed on the hills of cement mortar, stacked at a distance of 60-80 cm from each other parallel to the walls. The distance from the wall to the first beacon closest to the wall of the beacon must be at least 40 cm. the level of the top of the screed, measured with a level. The excess solution that protrudes when the beacon is pressed in is cut off with a trowel to the level of the beacon. The laying of the screed can be started a day after the installation of the beacons, when the slides of the solution under them gain sufficient strength.
Back to index
Preparation of semi-dry cement mortar
Dry mixing ratio cement-sand mixture: cement - 1 part, sand - 3 parts. These parts can be measured with hand tools such as buckets or shovels. Due to the fact that a material such as sand has a variable moisture content, the preparation of a semi-dry cement mortar is carried out only by adding water, until the mortar reaches the required consistency.
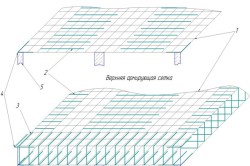
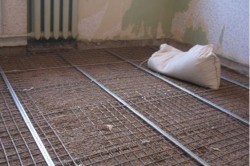
Screed reinforcement scheme: 1 - main mesh, 2 - additional reinforcement of the main mesh, 3 - "P" shaped reinforcement of the edges of the slab, 4 - "L" shaped reinforcement of the corners of the slab, 5 - load-bearing walls.
The essence of the preparation of a semi-dry cement slurry is that the amount of water added with constant stirring is sufficient to hydrate the cement molecules, leading to the formation of crystalline bonds.
The consistency of the solution should be similar to a lump of clayey sand stuck together, compressing which by hand does not lead to the release of water, and after unclenching the fingers, the lump does not lose its shape. A semi-dry solution possesses such properties within 45-60 minutes after preparation. During the specified time, it must be quickly transported to the place of work, it must be laid, leveled and polished. The curing speed of the mortar requires that the preparation of the room into which the mortar is supplied be carried out with high quality and completely completed before laying begins.
Most modern floor coverings lay on a perfectly flat surface. Indeed, not only the appearance of the finish, but also the duration of its operation depends on the quality of the base. Let's take a look at how to properly screed the floor in order to eliminate height differences and irregularities - the main culprits for the rapid "aging" of the finish.
When is a concrete screed necessary?

The fill starts from the far corner
Concrete flooring is used in several cases:
- To create a monolithic base.
- For leveling the base under the decorative coating.
- When you need to fill the floor directly on the ground or on a wooden base.
- If you need to strengthen the strength of an existing structure.
- To bring the surface of the sexual base to the desired height.
- To create a technological bias.
- To save on the preparatory stage of the overhaul.
Solution recipes
Recipes for the preparation of concrete mortar are well known. If you do not know how to properly screed the floor in the bathroom or any other room, you can use the following cheat sheet. The solution is kneaded from 4 ingredients - cement, sand, crushed stone and water. The proportions of dry ingredients - 1 × 3. Approximately 0.5 liters of water is added for each kilogram of dry mix. Its quantity can be increased during kneading, bringing the solution to the consistency of thick sour cream.
If you need to reduce the load on the ceiling, but at the same time create a thick base that eliminates large elevation differences, expanded clay or perlite is added to the dry ingredients. In this case, the recipe will be as follows - for 1 kg of cement, 3 kg of sand and 3 kg of expanded clay are taken.
Work technology
Before describing how to make a floor screed in a bathroom or other room of an apartment, let's calculate in detail the required amount of concrete. To do this, you need to know the magnitude of the height difference.
The hydraulic level will help determine it. It is applied to the junction of the walls and the floor, make marks on the walls, and then connect them with a solid line around the entire perimeter of the room. It will show the thickness of the future screed and help you decide how to fill the floor in the bathroom or any other room.
To eliminate differences up to 3 cm, self-leveling mixtures are used. Height differences from 3 to 5 cm are eliminated with a cement-sand mortar, to which fine-grained crushed stone is added for strength. It is possible to perform a screed with a thickness of 5 to 7 cm only using expanded clay. It will significantly reduce the load on the floor slabs. Screed over 7 cm in apartment buildings unacceptable, since the probability of destruction of the plate is high.
After measurements, you can begin to level the base.
Floor waterproofing

The waterproofing layer must be continuous
If you do the floor screed in the bathroom with your own hands, you should not forget about waterproofing work. They are carried out in order to prevent excessive wetting of the existing base, and so that moisture does not leave the concrete itself too quickly.
In the living rooms of the apartment, plastic wrap can be used for these purposes. And in the bathroom, experts recommend using hydrostekloizol, which is applied to bituminous mastic in two layers. The materials are overlapped, and the joints are securely fixed.
Note! Waterproofing must be laid in such a way that the material extends 15-20 cm onto the walls.
Screed reinforcement
The next step is the creation of a reinforcing layer. As it can be used a metal mesh with a mesh size of 150-150 mm and a rod thickness of 5 mm. And you can assemble a frame from a reinforcing bar.
If thin pouring is planned, the mesh or frame should be placed on mounting stands. If you do not fully understand how to do a floor screed, the video will show this process clearly. Well, we move on.
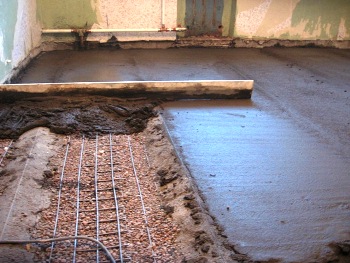
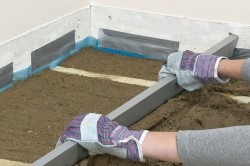
Installation of beacons
It is possible to level the solution, eliminating height differences, only with the help of beacons - metal T-shaped profiles, which are used when plastering walls. The first one is set at the zero level, and the rest are oriented along it. The accuracy of the installation helps to determine the hydraulic level.
The profiles are placed in increments of 1 meter from each other and fixed on a gypsum mortar, which is laid in piles along the line of beacons.
Laying concrete screed

"Floating" screed
For those who do not know how to properly make the floors in the apartment, you can advise the following:
- divide the area of the room into even squares
- prepare the solution according to the described recipe
- start pouring it into the corner square farthest from the front door
The mixture is simply poured into its middle, and then straightened by the rule. This allows you to evenly redistribute the solution and fill the existing voids, based on the exposed beacons.
After pouring, the screed is allowed to “rest” for 12 hours, and then the surface is finally leveled with a trowel.
Cutting expansion joints
If you are interested in how to properly make a concrete floor screed, you should pay attention to one more important point. When solidified, the solution expands and begins to put pressure on the walls. And since they easily withstand such a load, it is not the walls that are destroyed, but the still weak screed. If you do not cut expansion joints, cracks will appear that will nullify all your efforts.

The seams are filled with polyurethane sealant
Expansion joints help to avoid rigid adhesion of concrete to wall supports. Therefore, they must be made around the entire perimeter of the room and around the columns, if any.
There are several ways to cut:
- Lay them on the base that has not yet hardened, using a seam-forming rail.
- Cut expansion joints after the initial hardening of concrete - 8 hours after grouting the new base.
Be sure to make straight seams with a certain size. The thickness of the seam is 1.3 mm, the depth is 1/3 of the thickness of the screed. Their location can be drawn with chalk or beat off with a rope.
Note! Even if the floors crack when the concrete hardens, cracks will appear only near the expansion joints. The base, which bears the entire operational load, will remain intact.
Close the seams after the concrete has completely dried (it takes 28 days) as follows. First, the Viloterm cord is laid in the groove, and then the gap is filled with polyurethane sealant.
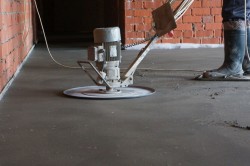
Upper layer hardening technology
Leveling cement-sand screed
Perhaps someone will be interested in concrete floors with a hardened top layer - the technology of their laying consists in pouring high-grade cement into the top layer of concrete. This material is applied to a fresh solution after pouring at the time of leveling the base with a grinder.
With the help of it, a layer of the mixture with a thickness of 2-3 mm is rubbed to “ironize” the concrete. In addition to cement of high grades, fillers of increased hardness can be used - corundum, quartz, marble or granite additives.
They allow you to even better level the surface, increase its wear and impact resistance, increase water resistance and obtain a coating that can be used immediately after the completion of the technological cycle. It makes no sense to use the method of "iron" concrete in an ordinary apartment. This technology is necessary for the creation of industrial concrete floors.
Generalization on the topic
After carefully studying the material presented, you can understand how to properly make the floor in the apartment by performing a concrete screed in compliance with the necessary rules. It does not matter in which room the filling is performed, since the algorithm of actions is the same. If, for example, you are interested in the floor screed in the bathroom, the video posted on our website will show you in detail.
The use of a concrete floor with "iron" in a residential area is not recommended for one simple reason. It will be decorated on top. The finishing material itself will increase the resistance to mechanical and dynamic loads, increase the wear resistance of the base. Therefore, there is no need to spend money on additional procedures.
Related publications
 Ruslan Vasiliev
When we think about the future interior of an apartment or house, the aesthetic qualities of finishing materials and furnishings usually come to the fore. Wallpaper or paint sets the mood, a complex ceiling and decorative elements form the space, wooden or glass panels become the center of the composition. And only when it comes to sex, practicality comes to the fore. This is not surprising - the floor surface is under load around the clock from objects placed on it, as well as vibration effects created by people, animals and working equipment.
In order to have an idea of the quality of execution and the price of this work, you can independently study many offers, or you can save time by sending a complete list of the required works and services on our website and choosing the best option for you from the provided offers.
The basis for any flooring that you plan to choose for your home should be a quality screed that will stiffen the structure, level the surface and provide better heat absorption of the floor. Screeds are special solutions and mixtures that include a binder (cement or gypsum), modifiers (responsible for elasticity and strength) and mineral additives. The specific composition and proportions vary depending on the brand and manufacturer. Screeds are durable, resistant to abrasion and cracking, moisture.
Types of screeds
According to the main component of the screed, it is customary to divide it into cement and gypsum. The first material has remained popular and in demand since Soviet times, when getting cement, unlike other building materials, was not a problem. It is easy to use and environmentally friendly. From European and American builders to us in last years the understanding of all the “charm” of gypsum came. This material is natural and therefore environmentally friendly. In addition, during operation, it does not generate dust, which is typical for cement. Today, self-leveling self-leveling mortars are also actively used, which are easily applied to the surface and do not form any cracks or crevices. Their main advantage is the speed of hardening. Literally in a day you can walk freely on such floors; place heavy objects on them.

If we talk about the principle of implementation, then the screeds can be divided into solid (single and multilayer) and prefabricated. The former are made from cement and gypsum compositions and are laid in one layer of a given thickness or in two or more layers that have a mandatory adhesion to each other. According to the device, solid screeds are divided into:
- connected screeds (there are no separating layers between the screed and the base, which ensures the ability to withstand significant loads, however, cracks can form with uneven shrinkage);
- screeds on a separating layer (oiled or bituminous paper, as well as synthetic films that play the role of a separating layer, prevent the adhesion of the screed to the base);
- screeds on an insulating layer (the base and the screed are separated by sound and heat insulating materials; such systems have a low threshold of strength).
Quality dry cement mixture for a screed should have a pure gray color without a yellow, red or brown tint, which indicates excess sand or the presence of clay impurities. In dry mixes, you should not add additional cement or PVA glue (as a plasticizer), as this will only worsen the quality of the mixture. All ingredients and quantities must be in accordance with the manufacturer's instructions.
Prefabricated screeds are characterized by the absence of "wet work". They are mounted from sheets of plywood, fiberboard and chipboard, large plasterboard. The sheets are fastened with screws and glue, and the joints are sealed with putty. Such screeds are not suitable for all types of coatings.
Screed technology
Before starting the main work, it is necessary to determine the zero horizontal level. This is done using laser devices or a spirit level (water level). A standard linear carpenter's level will not work. The zero level is marked in all working rooms at a height of 1.2-1.5 m. For this, the first beating is made in an arbitrary place, which is transferred to all other walls with the help of a spirit level. Then the marks set relative to the horizon (and not the floor) are connected by a solid horizontal line. This line is the zero level, relative to which the horizontal planes will be determined at all stages of work.
To set the level of the screed and correctly calculate the amount of required solution, you should determine the maximum floor height in this room and the level of height difference. This is done as follows: the distance from the zero level to the floor is measured in different places. The more such measurements, the better. The largest value indicates the lowest point, and the smallest value indicates the highest point. Their difference determines the level of elevation difference.
If a cement mortar is used for the screed, then its minimum thickness should be 30 mm (on average, 3-5 cm is obtained). For self-levelling compounds, the maximum and minimum thicknesses are determined for each compound by the manufacturer.
 The floor surface in front of the screed device is swept and carefully inspected. If there is a construction vacuum cleaner, then it is better to remove dust and dirt with it. For additional dedusting, a primer can be used. Existing delaminations are cleaned, and the cracks are sealed with a thick cement mortar. If, during the construction of the house, workers carried out “iron floors” (they smeared them with a liquid cement solution), the layer will have to be removed, since it has poor adhesion to the base.
It is also necessary to carry out temporary waterproofing of the walls in contact with the screed: the roofing material tape is glued from below so that the upper edge is 10-15 cm higher than the level of the screed.
Final stage preparatory work- setting beacons, i.e., guides along which the plane is leveled. Builders usually choose metal profiles and pipes for maximum rigidity. They can be installed in different ways: fastened to the base with adjustable screws or placed on “hills” of cement mortar. The main rules are precise height adjustment, reliable fixation, parallel placement in such a way that a rule can be placed on adjacent beacons to level the mortar.
The solution is prepared in accordance with the manufacturer's instructions on the package. It should be used within 1-1.5 hours. It is pointless to store longer, because the solution loses most their properties.
Filling the screed in one room is done at a time. A two-stage device is possible only in the case of a level difference, when several types of floor coverings are used in the room. Then a seam of 1-2 cm should be left between the “multi-temporal” layers. The solution is applied in strips, and then leveled. To avoid the formation of air voids in the screed, the freshly laid mortar can be “pierced” in several places with a metal rod.
Screed Care
 Proper care of the screed involves ensuring its sufficient moisture for 7-10 days. The screed is moderately wetted with water 2-3 times a day, which helps to avoid its premature drying. 2-3 days after pouring, beacons are removed, the remaining recesses are treated with soil and rubbed with fresh mortar. Finally, the screed is once again abundantly wetted, covered with polyethylene and left in this form for 2 weeks until complete “setting”.
Concrete screed floors in our time has gained considerable popularity. And this is despite the fact that slabs are produced in Russia, which serve as a ceiling. However, they have only one flat side. The side that is intended for floor screeding is usually much more skewed, and only professional builders can move on such floors.
The screed is used to level the floor, on which the facing material is subsequently laid.
If you do not have experience, then you can cause significant harm to your health. These plates have a large amount of reinforcement, which can cause serious injury. Next, let's talk about how to make a concrete screed to solve the problem of irregularities and flaws.
How to make a screed: some features
The concrete screed serves only as a preliminary layer, which will include sand, cement and water.
To strengthen the screed, its reinforcement is carried out.
To strengthen the screed, metal (mesh or wire) and fiber are used. Granite gravel, crushed brick, expanded clay serve as a filler for this layer. Granite gravel contributes quite well to increasing the strength of the screed. Expanded clay will act as a heater and thermal insulation of the intermediate layer. Such a filler is quite light in weight and at a price not very expensive. Speaking of broken bricks, one can note its cheapness, since this material is waste.
Noting the advantages of leveling floors in this way, we can assume that this leveling serves only as the initial base of the main floor, and can withstand fairly large loads. Often, concrete floor screed is used as a reinforcement. But where there are pluses, as a rule, there are also minuses, these include:
The addition of a polymer modifier to the cement mortar will make it stronger and more waterproof.
- Intolerance to various chemicals.
- Appearance.
- Low impact resistance.
- Big weight.
- The likelihood of sagging and cracking.
- Water permeability.
- Low viscosity resulting in crumbling and dust.
Of course, all these shortcomings are easily eliminated with the help of a polymer modifier, which is introduced into the solution. If you add it to the composition, you can achieve aesthetic appearance, such a floor will not gather dust and pass moisture in the future. The strength of the screed will double, and its performance will be equal to granite. The initial value of the brand of cement used will also change. For example, cement grade M400 will change to grade M800.
This screed is used for floors both inside the building and outside and serves as an initial coating. In the event that you do the installation of the floors yourself, be sure to observe all the proportions in the composition and components when mixing polymer concrete.
Before starting work on a concrete floor screed, you need to prepare everything in advance necessary tools, such as hydraulic level; rule; Master OK; drill; screws, screwdrivers; gloves; profile PN 27x28 or similar; ruler; cement mix.
The procedure for the installation of concrete screed

The alignment of the screed is carried out according to pre-made beacons.
To make a concrete floor screed, you must perform the following steps:
- carry out marking work;
- set the required floor height for the screed;
- if necessary, install noise, hydro and thermal insulation;
- to carry out work on the installation of beacons or rails as a direction adjustment;
- make concrete mass;
- Pour the finished mixture and carefully level;
- using a special grater, wipe the finished plane;
- wait for the screed to dry;
- smooth the top layer using a grinder, closing up small cracks, and polymer concrete will give the coating a beautiful appearance.
First of all, it is necessary to indent approximately from 30 to 40 cm, while obtaining the regulating directions of the rail of the first line. Then the markings are marked 20-30 cm less than the length of the direction. With a large space, it is customary to divide the floor into concreting areas, these are squares 6x6 meters in size, which serve for laying concrete. It is necessary to do the work on the screed on each such markup separately.
Between the individual parts of the screed it is necessary to lay elastic replacement materials, they will contribute to minimal cracking and shrinkage during drying, and further swelling due to temperature changes.

The thickness of the concrete screed depends on the room in which it is made.
In order to prevent flaws or steps from forming at the end of work on the floor screed, it is better to first carefully calculate the height of all subsequent layers in the entire building. Differences in size can occur if the final flooring used is different for each room in the building.
For example, such flooring as linoleum is usually laid on plywood, and parquet flooring is laid on special logs, vinyl tiles are laid in the bathroom, toilet and kitchen, while using a system of warm floors. When calculating all these coatings, you can get the estimated thickness of all these layers that will be above the screed.
- In bedrooms 60 mm.
- In the hallway 27 mm.
- In office premises 84 mm.
When leveling the floors with concrete screeds, taking into account the recesses and swellings, the thickest layer is laid using a laser level or water level, for a bedroom 50 mm, a hallway 40 mm and service rooms 46 mm. If a classic screed is used, then for these layers the required thickness is at least 40 mm.
Installation work on concrete floor screed is of the following types:
- floating;
- related and unrelated.
If there are no additional layers between the base and the screed, then it will be necessary to use screeds that bind to the main one.
The screed can be easily sanded, which makes it a very practical and durable coating.
Using a special brush, the surface is cleaned to the largest filler, then the solution is poured. Such a mass is similar in its density to pancake dough or sour cream. If the width of the ligaments is more than 1.5 cm, then this procedure should be skipped. The main mixture should be laid, not allowing it to dry. If it includes waterproofing layers that are laid in advance, you will get a screed that is incoherent with the main base. Primed cementing for this case would be inappropriate. At this stage, you need to be more careful in your work, otherwise you can seriously damage the layers of waterproofing.
A waterproofing or water-repellent layer will contribute to a good setting of the mortar. Of course, there is a high probability of shelling, and to prevent this from happening, you need to compact the mixture well. With a screed height of more than 100 mm and crushed fillers of about 12 mm, this will prevent unnecessary formation of shells.
In many cases, after this layer, it is customary to lay sound and thermal insulation, such layers are very flexible. When mounting screeds on thick and flexible layers, a floating screed is formed, the thickness of which is more than 60 mm. To come to the desired compaction, 30-40% of the total width of the ligaments is first laid, while it is not worth making an effort when leveling, then after 24 hours the main part of the mass is laid out on the compacted layer.
Until recently, it was customary to make a solution of water, cement and sand, then the mass was poured, having previously exposed the grid. Currently, there are a large number of different fillers, they will improve the properties of the cooked mass.
One of them is fiber, it consists of threads with a diameter of 15 microns and a length of 1-2 cm. It will reduce the risk of minor cracks and the period of work performed. It will be necessary to use 0.7-0.8 kg of fiber per square meter. In this case, there is no need to lay a metal mesh.
It takes about two months for the concrete floor screed to dry completely. If the surface can withstand the mass of human weight, this means that it has hardened well enough and is ready for grouting.
Grouting must be done with a trowel, and the top layer of the screed is leveled. All this will eliminate some minor errors and roughness.
In order for the screed not to start cracking, during the first two weeks it must be moistened and kept under plastic wrap for a while. With a traditional screed, after two months or more, you can proceed to further work on the arrangement of the floor.
At the end of all work, you can start grinding the finished concrete floor, it is polished using special grinders. The best ones can process up to 50 square meters in hour.
Everything is simple! Making a floor screed is not the most difficult task. Good luck with your work!
During the construction of private houses, as well as during the renovation of apartments in new buildings, it is often necessary. Today, there are different options for how to properly make a floor screed using different materials and technological solutions. Consider the features of the main ones:
- screed with cement-sand mortar;
- self-leveling screed;
- screed, performed on the "warm floor".
The concrete screed is used as a leveling base for the subsequent floor covering.
Tools and materials
To perform all the work on arranging a smooth and durable surface of the subfloor quickly and correctly, you need to prepare everything necessary materials and tools. For different types of screeds, they can be different. We list the standard set that should come in handy when creating one or another type of concrete floor:

Tools: cement, trowel, spatulas, hydro-level, drill and mixer - drill attachment, bucket for preparing screed mortar, rule.
- Cement 300 grade, sand and water. These ingredients will definitely be needed to create a cement-sand mortar.
- Special mixtures for creating a self-levelling floor surface. Today there are different types such mixtures, the choice among which is made mainly on the basis of financial preferences.
- Tools for leveling the floor surface during pouring (smooth wooden plank, trowel, etc.)
- To install leveling beacons, you may need profiled metal strips, wooden pegs, self-tapping screws, a tension cord, a spirit level, etc.
- In the case of pouring the solution over the mounted heating elements of the “warm floor”, a plasticizer additive and a damper tape will be required.
Features of performing different types
For each type of floor pouring, there are specific rules, on the implementation of which the quality of the concrete base, its strength, the absence of further cracks and the suitability for flooring of any floor coverings depend.
Cement-sand screed
This type of formation of the sexual base is the most common in the construction of private houses.
It is important to initially remember that the minimum thickness of the cement-sand screed should be at least 3 cm.
With this in mind, you can proceed to the phased formation of a flat surface of the concrete floor in a particular room. The main stages of work will be the following:
The cement-sand screed is laid in strips between the beacons and pulled out by the rule, slightly shifting it to the left and right.
- Installation of beacons, with the help of which the horizontalness of the floor surface is regulated. To create such beacons, you can use, for example, cuts of metal profile rails, which are seated on “stumps” of concrete mortar and leveled with a spirit level. You can also install wooden pegs into which self-tapping screws are screwed from above. Then a cord is pulled between the screws, which is leveled with a spirit level by gradually screwing one or another screw into the peg. Whichever method is used, it is important that the distance between the leveling strips or cords is not greater than the length of the tool with which the mortar will be spread and leveled.
- Next, you need to prepare the cement-sand mortar itself. For residential premises, a 150 or 200 mark of solution is being prepared. For both of them, 300 brand cement is used. The difference is that when preparing a mortar of 150 grade, cement and sand are mixed in proportions of 1: 2, and 200 - 1: 1. If super-heavy structures or equipment are not installed in the room, then a 150 grade solution is quite suitable for all its efficiency.
- Having installed the leveling beacons and prepared the solution, it remains only to evenly distribute it over the entire area of the room being repaired, using a simple tool - a flat wooden plank. If the air temperature is too high and the solution dries very quickly, then it must be periodically sprayed with water so that cracks do not form. The complete drying process should ideally last about a week, but after a couple of days you can walk on the floor, which allows, if necessary, to remove the beacons and fill the holes left from them with mortar.
Thus, it is quite simple and quick to make a cement-sand floor screed with your own hands, on top of which it will be very convenient to lay any fine floor covering in the future.
Application of self-levelling mortars
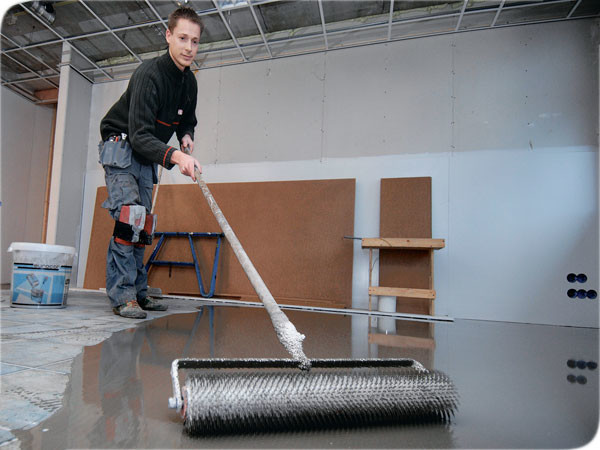
The solution is applied to the floor simply: the mixture is poured onto the floor, and then spread over the surface with a spiked roller, removing air bubbles.
A very popular option for the formation of a strong and even sexual base in recent times was the use of special self-leveling solutions. Such popularity is due primarily to the fact that it is very simple to pour a solution from such a mixture. No need to worry about installing beacons that control the horizontalness of the floor surface. It is only necessary to prepare the solution according to the instructions that are attached to a particular mixture, and pour it into the repaired room. The solution itself will spread, creating an ideal horizontal surface.
It is only important to remember that the allowable thickness of the self-leveling mortar layer should not exceed 2 cm. This is one of the main disadvantages of this type of filling. But it is very convenient to use a self-leveling mortar over a cement-sand screed. You can create a layer of literally a few millimeters, which will smooth out all the bumps in the previously created floor surface.
Features of surface pouring of a warm floor
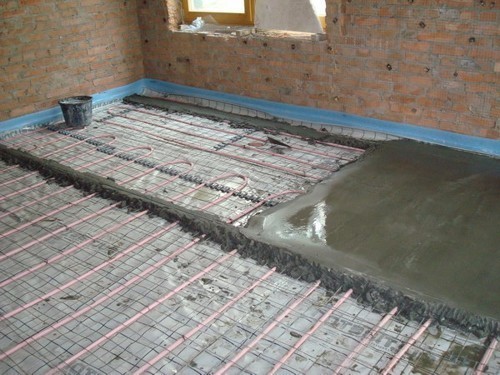
The technology of laying the screed over the “warm floor” is similar to the method of laying the cement-sand mortar.
Forming a screed over an underfloor heating system is very similar to the way a cement-sand mortar is applied. Features in progress