
Useful for the garage. Necessary tools for the garage
A garage is not only a place for a car, but also a source of invaluable additional space that can be used truly rationally if you construct useful devices with your own hands.
DIY garage accessories
Since the garage is intended to be a home for cars, care should be taken to ensure that the place for tools is well organized. Also in the room there are probably a few square meters in order to take out some of the items from the apartment, so as not to clutter up the living space.
When installing various devices in a room, it is important to consider that all available equipment is at hand. To do this, you can use the following recommendations:
The rational organization of space in the garage creates many tangible benefits:
- it becomes possible to independently carry out small-term repairs of auto parts and other mechanisms, due to which you can significantly save money;
- convenient placement of tools significantly speeds up the progress of work and saves time;
- the creation of additional places for storing tools, old things, clothes makes it possible to unload the apartment from things that are rarely used in the household;
- finally, the well-thought-out internal logistics of the premises allows it to maintain its attractive appearance and avoid clutter.
NOTE. At the stage of project development, it is important to proceed from the area of \u200b\u200bthe room, as well as take into account several mandatory utility compartments - for storing summer and winter tires, canisters, a jack, etc.
Video TOP of the best ideas for arranging a garage with your own hands
Garage rack: step by step instructions for making
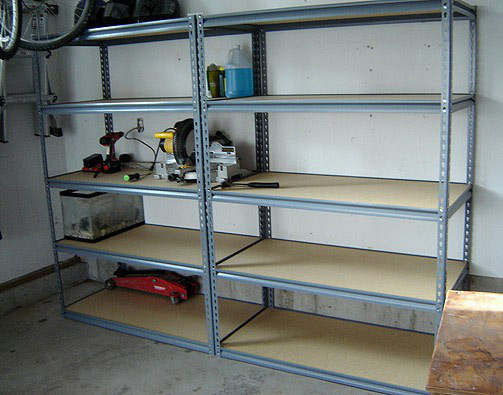
Since the garage always contains quite a lot of items, ordering their location is a fundamental requirement for proper storage. The simplest and at the same time convenient option is to create a rack with shelves.
Preparatory stage
Before proceeding with the installation of the structure, several important requirements should be considered:
- The total weight of the rack should not be more than 4-5 centners - otherwise the structure will be very difficult to move if necessary. It will also significantly press on the floor, which can degrade the quality of the coating.
- When choosing materials, it is important to proceed from considerations of strength and durability of the structure. Metal is optimal, as well as wooden products made of beech or oak. Plastic shelves are not suitable - they are not durable and, moreover, may not withstand temperature changes.
- Choosing between a metal and a wooden structure, you should proceed from your specific needs. Metal is more durable and stronger, but wood is more affordable. If you need to place a few tools, it is enough to make a small wooden rack.
- Since all tools are very heavy, you should immediately calculate the strength of the structure so that it can withstand at least 100-150 kg on one shelf.
Installation of a wooden structure
To make such a device for a garage with your own hands, you will need the usual working tools:
- hacksaw for wood and metal;
- hammer, nails;
- screwdriver, self-tapping screws;
- roulette construction;
- construction level;
- electric drill.

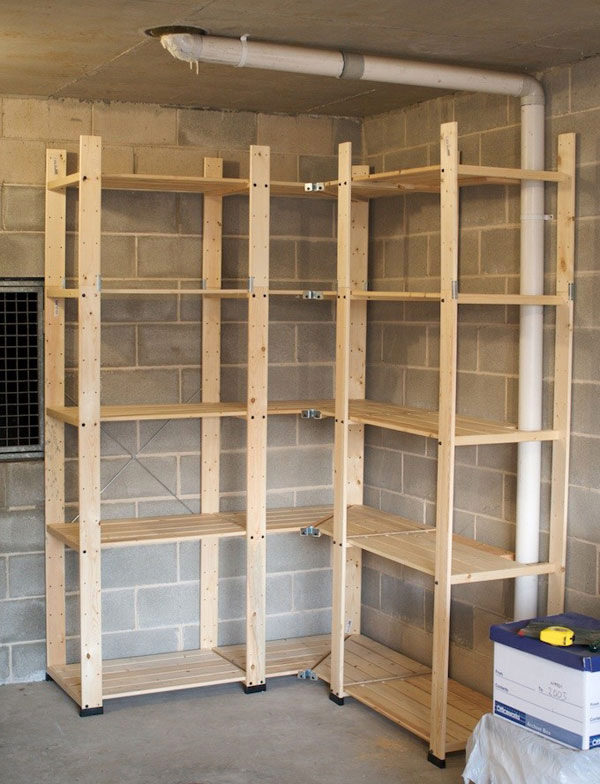
Before assembly, it is important to treat all wooden parts with a primer and varnish. In the garage, there may be increased humidity or temperature differences - therefore, without treatment, the tree will not last long.
Video - Do-it-yourself wooden rack manufacturing technology
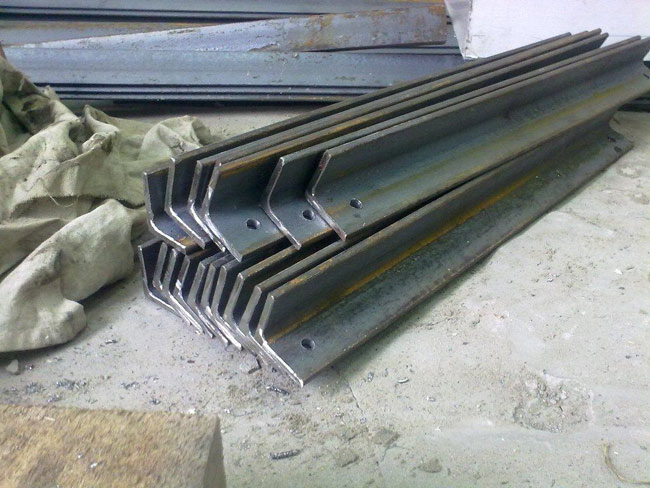
Installation of a metal structure
Metal structures are exceptionally durable and strong. In addition, they do not need to be treated with special materials to prevent decay.
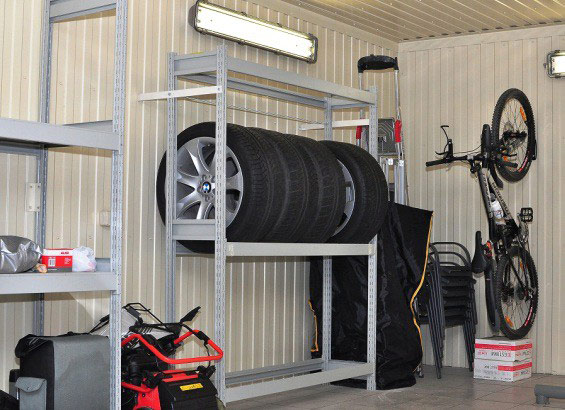
From metal, you can make both a rack and separate structures, for example, for storing rubber.
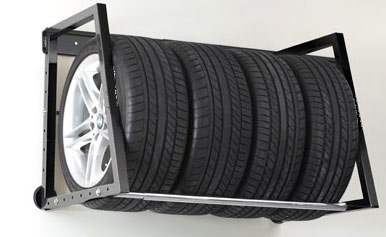
In this case, the rules for storing tires, which are schematically shown in the figure, should be taken into account.

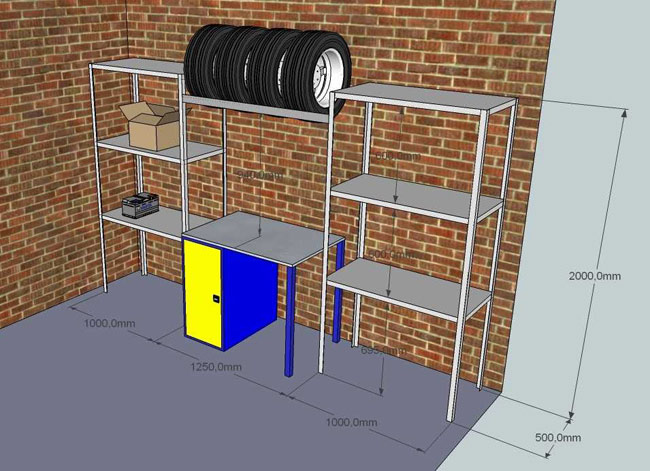
At the stage of designing a metal rack, it should be taken into account that all the necessary items can be freely accommodated in it. You can take this drawing as a basis.

Or this option.
The easiest option is to purchase a modular design and assemble it yourself. But you can make this device for the garage with your own hands. The sequence of actions is as follows:
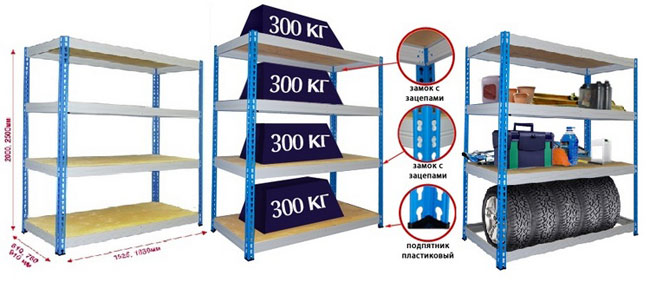
The heaviest equipment is best placed on the lower shelves for optimal load distribution throughout the rack. At the same time, the most the best option- when the lower floors are made of corrugated metal, and for the upper floors it is quite acceptable to use durable chipboard.
Hanging shelves: fast and practical
Not in all cases there is a need to create a rack, since it will take up a lot of space. On the other hand, in a garage of any size, there is always an unused upper space that can be easily occupied by hanging shelves.
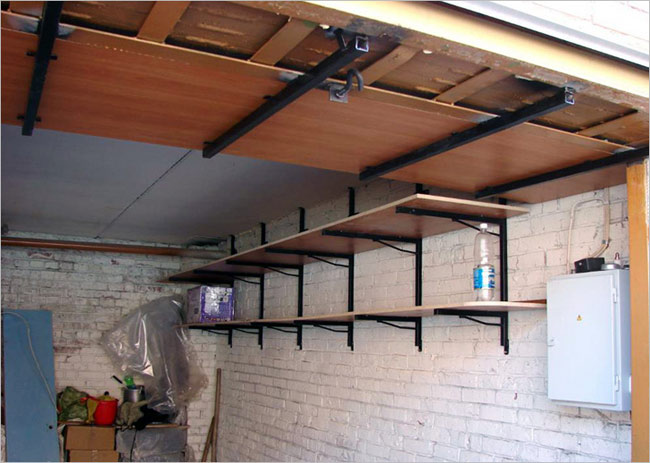
Structurally, it is quite realistic to do with your own hands any version of such a device for a garage:

Of the tools you will need a standard set, described above. The sequence of actions is as follows:
If the shelf is mounted to the ceiling, you can strengthen its connection to the wall using metal corners - then the product will not sway and will last much longer.
Schematically, the whole technology is shown in the figure.

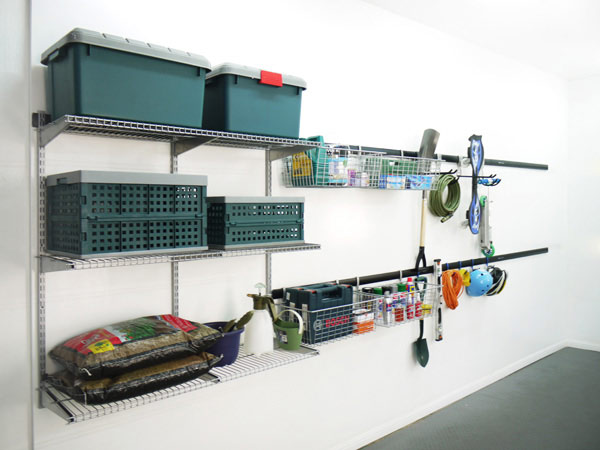
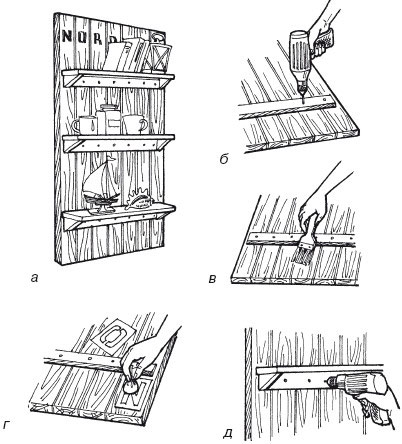
Making a shield shelf
The do-it-yourself manufacturing technology of such a device for a garage has its own differences compared to the installation of conventional shelves:
- The shield itself is made of durable plywood, the parameters of which are selected according to the situation. Visually, the shield should completely cover the surface of the desktop.
- A place is allocated on the shield for all the shelves and appropriate notes are made.
- Further, all holes are made in the surface of the structure, into which dowels enter. It is on them that the hooks will be attached, on which all the tools will be placed.
- The shield is fixed to the wall using brackets. Corresponding holes are made using a perforator.
Schematically, all steps are shown in the figure.
Do-it-yourself toolbar above workbench in garage
Garage workbench: step by step instructions
Another design that will probably be needed for repair, plumbing and other types of work is a workbench. It can be purchased at the store, but if you have a certain skill, then it is quite possible to make such a device with your own hands and put it in the garage.
Before carrying out the actual installation work, it is important to clarify a few important details:
- Where will the table be located?
- What kind of work will be mainly carried out on it.
- Which work surface material is suitable - metal or wood.
All these questions are closely related to the purpose of the product. If the work is supposed to be done often, then it is better to choose a durable metal. And for standard household tasks, a durable tree will do.
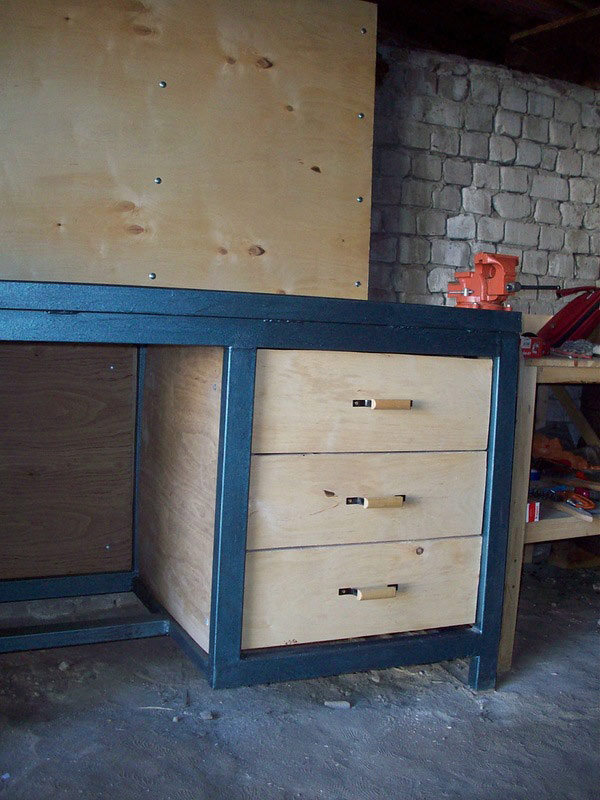
It is important to understand that a workbench is not just a work surface. Often it combines the function of a cabinet, a small chest of drawers and even a metal safe - a similar set of parameters depends on the specific configuration of the product.

Varieties of workbenches
The key classification of workbenches is based on the types of work that are supposed to be carried out on it:

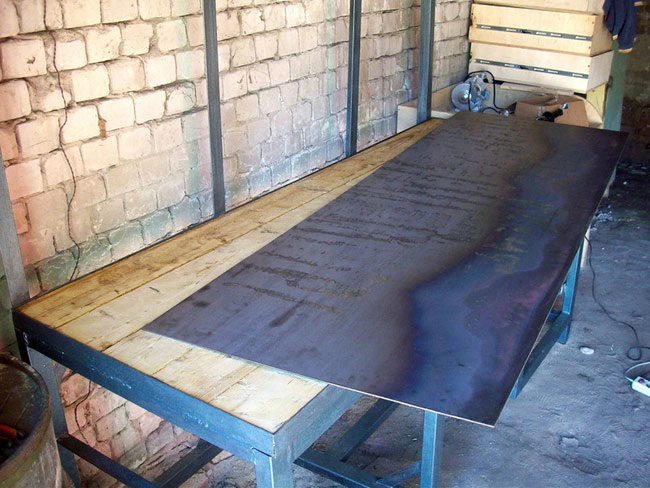
At the same time, these functions can be combined, so such a classification is largely conditional. The best option for such a garage fixture is a metal frame structure with a wooden table surface and drawers. It is more reliable than a wooden counterpart, and allows you to save on manufacturing due to the fact that some parts will be made of wood. Table top can be reinforced sheet metal- then the workbench will last a very long time.
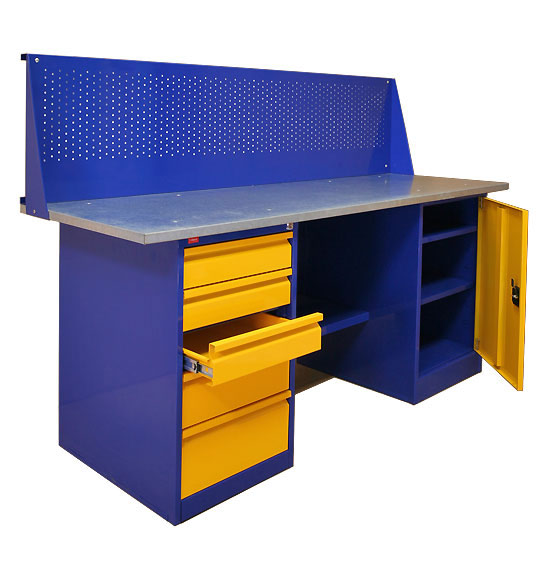
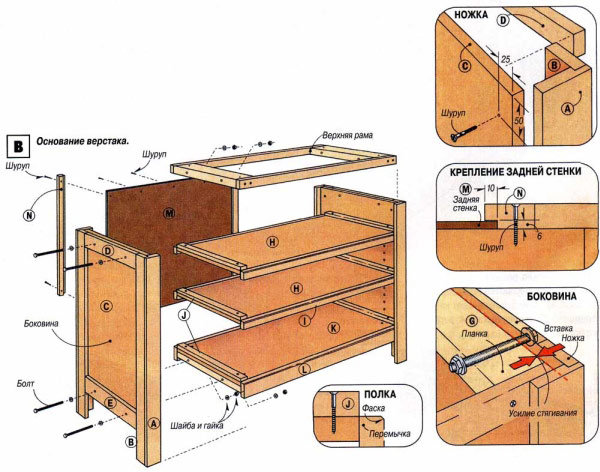
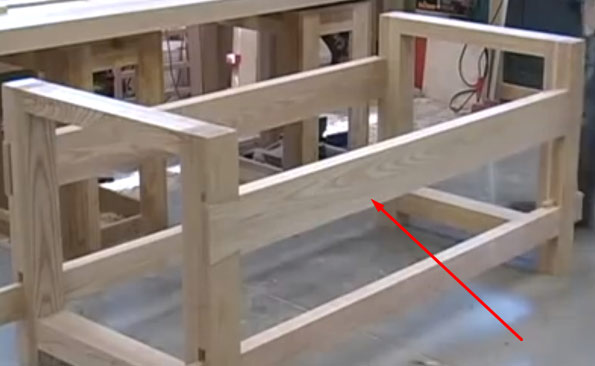
Manufacturing technology of a workbench from a metal frame
For installation of the structure, you will need a standard set of tools and materials:
- welding machine;
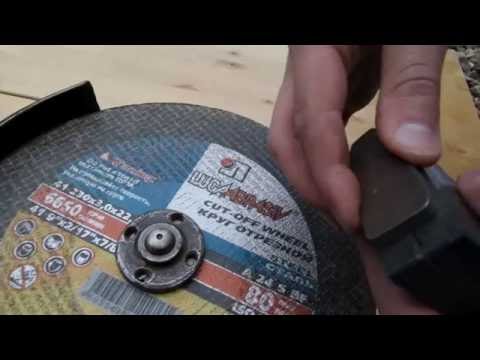
- grinder for metal;
- building level;
- jigsaw for wood;
- screwdriver, drill;
- self-tapping screws, anchor bolts;
- hammer and nails;
- metal corners with parameters 5 * 5 cm;
- pipes are square 6 * 4 cm, total length is about 24-25 m;
- steel strip 4 cm thick, up to 8-9 m long;
- paint for wood and metal processing.
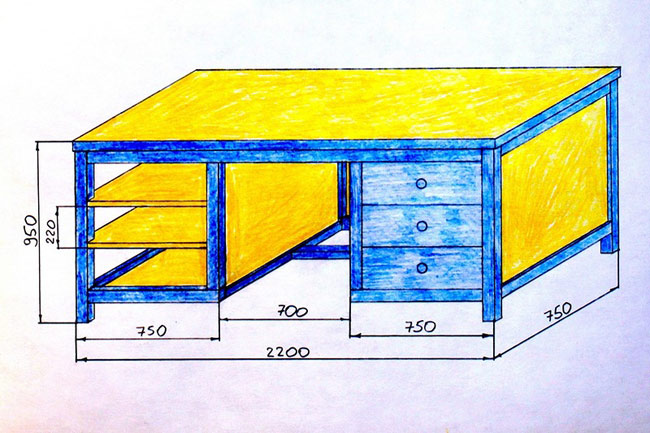
Such parameters are intended for the manufacture of a finished product with table parameters of 220 * 75 cm, as shown in the figure.
The sequence of actions is as follows:
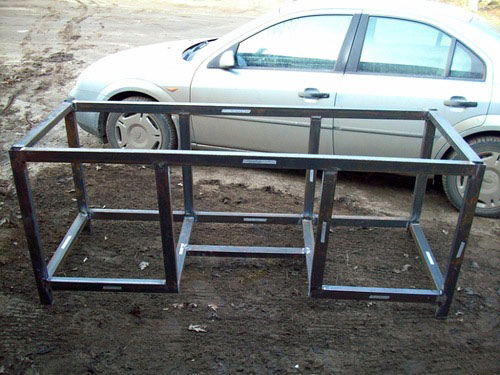
Even at the stage of designing a workbench, it is important to decide whether the device will be collapsible or whether it will be stationary in the garage. In the case of a collapsible version, all parts are fastened with self-tapping screws, and the principles of technology will be different.
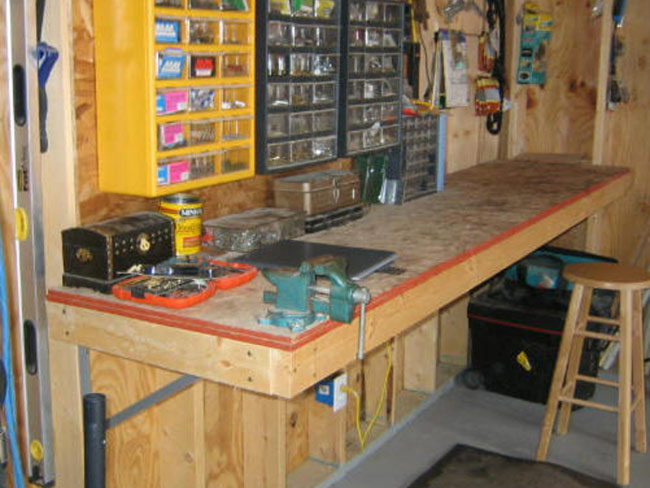
Manufacturing technology of a wooden workbench
A wooden workbench is less durable than a metal workbench. It is well suited for those cases where the work is supposed to be done not so often - several times a year.
To make this do-it-yourself garage fixture, you can use the same drawing that was given above, or take the diagram shown in the figure as a sample.
The algorithm will be something like this:
Do-it-yourself garage tipper: step-by-step video instruction
Along with the creation of the considered devices for the garage, you can also take care of making your own working tools that will be needed directly for Maintenance auto.
One of the most useful installations is a tipper for inspecting the bottom of the machine. The need for such a product is most relevant for Russian realities, since not in every case there is a real possibility of building a viewing hole.
Detailed video instruction with step by step diagram manufacturing
Before making such an installation, it is extremely important to consider the issue of safety. Even a light car, if dropped, can cause an accident and at least get severely injured. Therefore, it is possible to undertake the creation of such a structure only if there is sufficient skill.
Self-manufacturing of garage fixtures allows you to rationally organize the interior space and, in fact, get your own workshop in which you can perform any ongoing repair work.
Original ideas for organizing space in the garage
And finally - a photo selection of visual ideas for creating capacious structures from a variety of items that are sure to be found in any garage.


On the “hands out of the shoulders” channel, another issue was released with a review of a YouTube video about homemade products for a garage and a home craftsman.
1. Let's start with an interesting trimming made on the basis of a grinder. Two aluminum corners act as guides, along which the grinder moves on bearings. The return of the mechanism to its original position is carried out using a spring. The turntable has two stops: for angles of 45 and 90 degrees.
2. Super-budget, you can say free homemade clamp clamp made from a piece polypropylene pipe and 2 planks. Clothespin designs are quite well known.
3. Surely many people will like the combination spatula for tile work, which you can’t buy in the store. Its design allows you to adjust the height of the comb. A very good option for laying curbs, cornices, clinker.
4. This idea will be of interest to owners of Khrushchev houses and other small-sized housing. The desk can be easily transformed into a bed in a room with a width of only 2 m, as in a standard Khrushchev, it will be an excellent solution and will allow you not to clutter up the usable area with unnecessary furniture. Mechanisms for such bed tables are commercially available. Chipboard cutting can always be ordered if desired.
5. If you have to drill a large number of workpieces of the same type, an interesting jig will help you, which will significantly save the time of the master in the garage or home workshop.
6. A very simple fixture that can be made in half an hour. For applying plaster coats. Suitable for compressor owners. Air is supplied through a tube that enters the neck of the canister. At the end of the tube there is a nozzle, on the contrary - a hole. We put the solution in the bunker and get good performance at a minimum cost.
Do-it-yourself garage homemade products are almost rationalization developments with important effects that help motorists when servicing a car. The proposed article will tell car owners what they can do in the garage with their own hands.
Here, the structures are briefly described, helpful tips on their use.
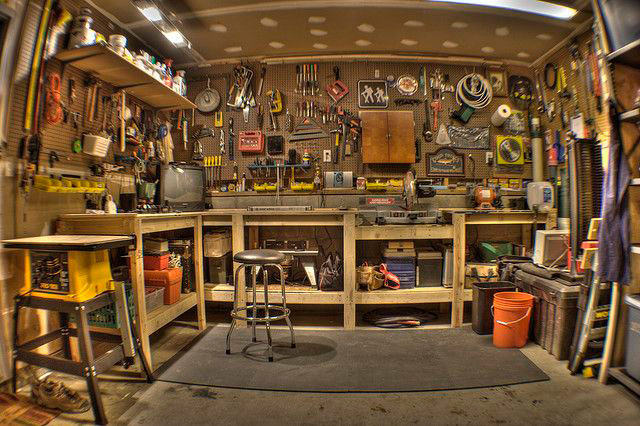
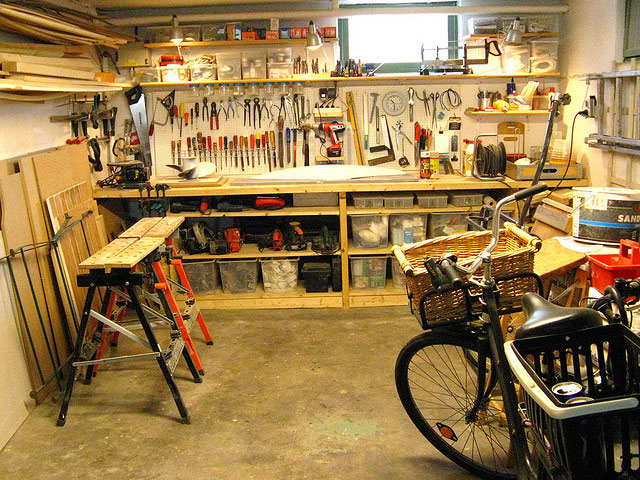
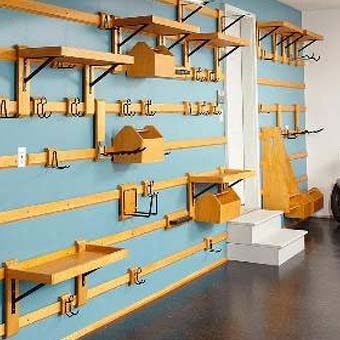
In any garage, it is necessary to ensure convenient storage of all frequently used tools and a dense arrangement of various little things “in reserve”. Here it is good to have not only a place to place a car, but a workshop with a convenient layout system for all items, as shown in the photo.

The first homemade products in the garage are convenient racks (see), shelves, all kinds of drawers where spare parts for the car will be placed, the most necessary tool.
Tip: For these purposes, the entire height of the room should be used. On the floor and under the ceiling in plastic boxes you can put things you need from time to time.
Convenient homemade products in the garage are:
- Stand on the wall for storing all sorts of little things.
- Open shelves.
- Drawers for storing unnecessary things.
- Lockable stand-box.
- Metal mesh, for storing all kinds of cans, packages.
- Special stand for storing power tools.
- Sliding panels can be an additional place for tools.
How to equip your garage, what homemade products you can make with your own hands in the garage will tell the video.
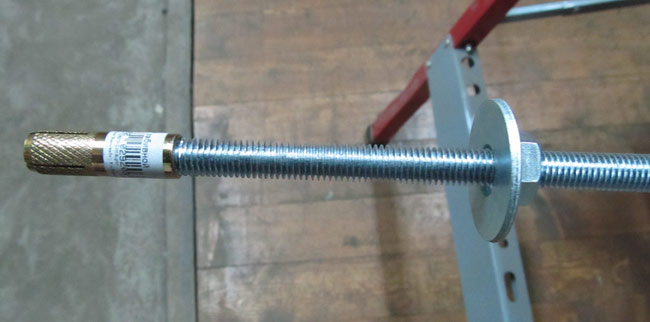
How to make a drill stand
Crafts for a garage with your own hands can be made not only for, but also to facilitate repair work. It is very convenient to have such do-it-yourself homemade products in the garage, for example, racks for various power tools.
An example of such a homemade product for home and garage is a drill stand.
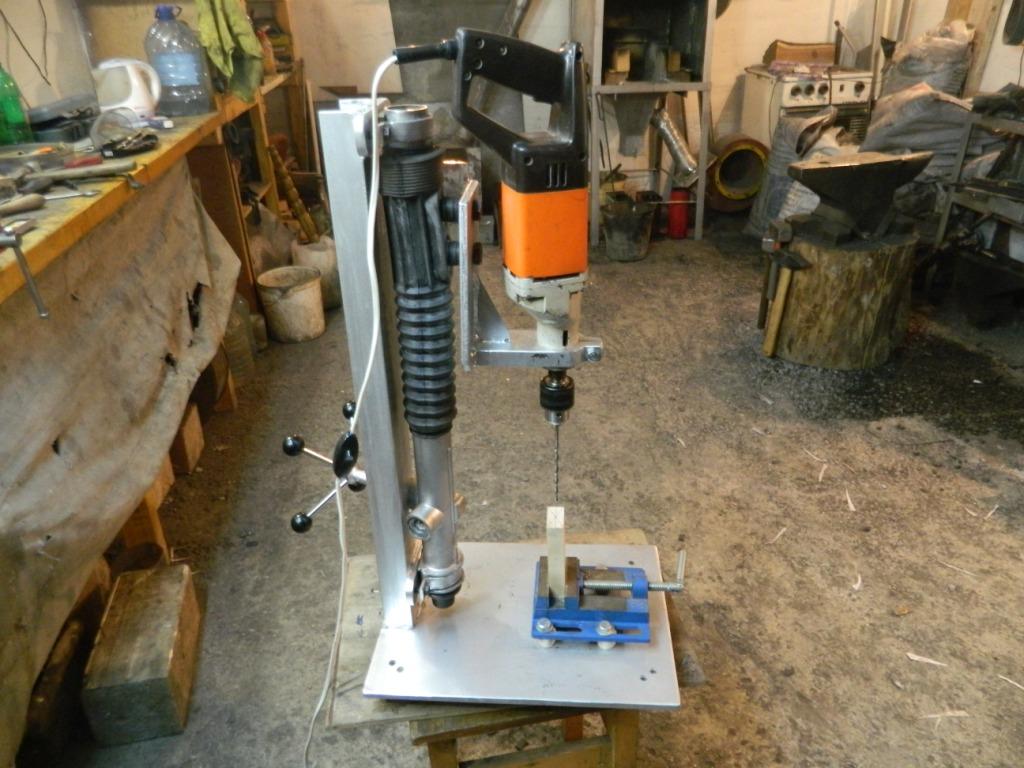
Often, when doing homework, you have to drill holes that must be even so that their axes are strictly perpendicular to the plane of the part, which is quite difficult to do with an ordinary drill without distortions in any direction. A do-it-yourself drill stand helps to solve this problem.
To make the device you will need:
- Milling machine base.
- Tube calibrated or bar.
- Plywood.
The basis for the fixture is a platform from a worn hand mill.
Its advantages are:
- Flat plane.
- There are guides that change to longer elements of the tubes.
- A box is made of thick plywood, according to the size of the drill.
- With the help of wing nuts, the drill is firmly fixed in the box.
- Two holes are drilled in the box.
- Through them, this element is mounted on the guide bases. In this case, the movement of the drill will be only vertical.
Tip: For ease of use, a limiter is made on a quick-clamping latch, which allows you to adjust the depth of drilling a hole.
- A handle is attached from plywood on top of the guide rods.
- Using the base from the router, allows you to use a standard ruler as a limiter. A slight refinement of this limiter makes it possible to make a convenient prefix for adjusting the size from the drill to the limiter. In this case, all holes can be:
- drill at the same distance;
- make them at the end of the part.
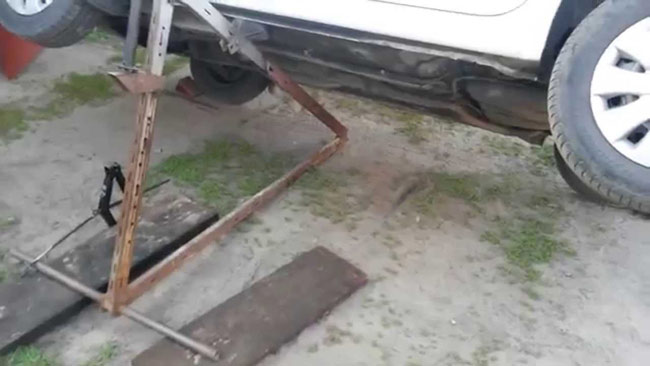
How to make a flyover for car repair
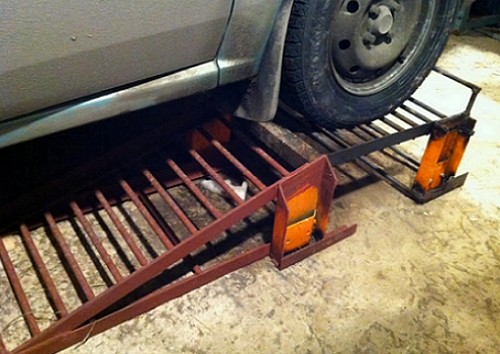
Motorists who are accustomed to servicing their car on their own are well aware that this requires an inspection pit, equipped in the garage. The price of its construction is quite large, so the owner of the garage has to think about what can be done with his own hands in the garage to facilitate machine maintenance, in the absence of an inspection hole.
A mini flyover, built independently, will help solve these problems.
Tip: To raise the front, rear or side of the car, two flyovers should be made, which will allow you to perform all the necessary operations under the car.
To adjust the height of the overpass, durable boards and bars are used. The main part of the device is mounted on them. The other part of the overpass controls the angle of inclination, which is acceptable for repairs.
You can completely raise the car with four flyovers. On such devices, the car can be installed with all four wheels, which will greatly facilitate the work.
A flyover of small dimensions, made of metal, may consist of several assemblies. Such do-it-yourself crafts for the garage can be used as a bench assembled from several overpass elements.
How to assemble a compressor for a garage
Garage DIYs are also capable of assembling more complex equipment, such as a compressor for monitoring tire pressure, painting a car, or blowing something. If you have the necessary parts in the garage, you won’t need to spend a lot of money to assemble such a necessary device.
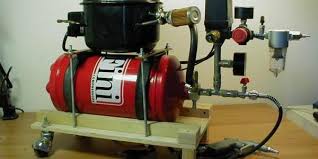
For the manufacture of the compressor will be useful:
- Old refrigeration unit.
- Air receiver, approximately 10 liters.
Tip: To improve the appearance of the unit, you should peel off all rust and paint, paint the compressor from an aerosol can of the desired color.
- For receiver oxygen manometer.
- Pressure regulator.
- Two meters of high pressure hose 20 bar.
- Filter regulator, the cheapest.
- Clamps.
- Adapters.
With limited space in the garage, the compressor can be placed on a makeshift shelf, in the right place on the wall. Then all the details are assembled, according to the previously drawn up sketch.
The receiver of such a compressor has three outputs:
- Up. To supply compressed air to the consumer.
- in the middle. For receiver pressure gauge
- At the bottom. For draining condensate and oil.
Air is supplied to the panel in the lower part, where the filter regulator and the power button are located. The minimum pressure of the regulator is two atmospheres, the maximum is 8 atmospheres. For safe operation of the unit, an emergency valve can be installed.
How to make a hoist crane
To facilitate the repair and maintenance of vehicles, a hoist or overhead crane should be used.
![]()
To assemble the crane, you need to purchase:
- Pipe for the manufacture of a transverse rod with a diameter of 100 millimeters.
- Pipes for rod supports with a diameter of 110 millimeters.
- M16 bolts for fixing the rod to the supports.
- Square pipe 100x100 mm for racks.
- Corner 100x100 millimeters for the base and bevels.
- Cable rollers can be taken from the elevator door drive.
- Strip 50 mm wide for fixing rollers.
- To move the structure, rollers from warehouse trolleys are attached to the vertical racks.
- To lift the load, a manual worm winch was taken.
These are just some of the homemade garages that will make your vehicle easier to maintain.

Under the tool - useful homemade products for the garage with your own hands
Under the tool - useful homemade products for the garage with your own hands
- the patrimony of a man not yet conquered by women. It is there that he has time to do DIY - and for the garage in the first place. For crafts - homemade, you need a tool, a lot of tools, and you need crafts and fixtures where to store it. On the video - an overview of homemade products for the garage, for a tool made by fans of the garage lifestyle. Maybe you will like such crafts and decide to make some with your own hands. My garage is my castle!
29 useful DIY garage crafts
29 useful DIY garage crafts
29 useful DIY garage crafts
Homemade products for the garage can only be useful: judge for yourself - they are either created for work (it means useful. Things you can’t do without in the garage, with your own hands # with your own hands # homemade # adaptations # car repair. Code readers and scanning tools for AUTO: ✓Microfiber for car cleaning.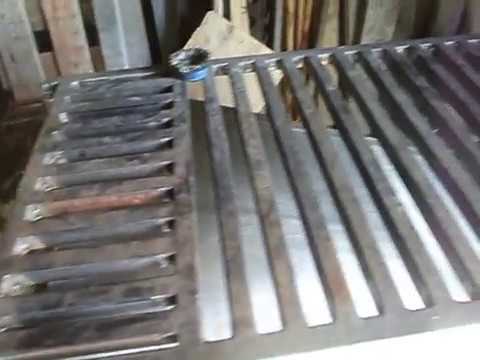
Useful homemade for the garage.
Useful homemade for the garage.
Garage welding table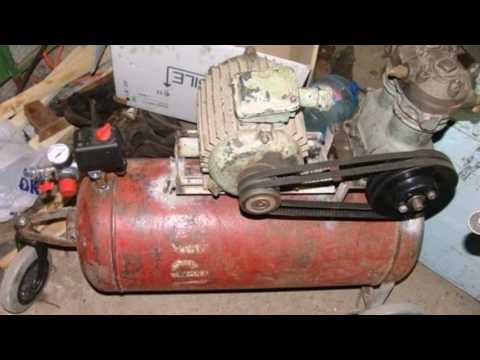
DIY for the garage
DIY for the garage
DIY for the garage
Things #8 You Can't Do Without in Your Garage
★ LIFE HACKS for the GARAGE and at home with your own hands. Life hacks with TOOLS for the garage. DIY for the garage.
★ LIFE HACKS for the GARAGE and at home with your own hands. Life hacks with TOOLS for the garage. DIY for the garage.
★ DIY DIY ★ Useful LIFE HACKS for the GARAGE and at home. Life hacks with TOOLS for the garage. DIY for the garage. Everything for the garage. LIFE HACKS for the GARAGE with TOOLS. New ideas!!! Useful #LIFEHACKS for #GARAGE. life hacks with #TOOL.#homemade for the garage.#ScrewsScrew 0:08 - How to INCREASE A HOLE without a needle file and a drill in a metal part. 1:44 - How to fix the wheel on the axle of a folding handcart in a new way. 2:40 - How to grind a thin piece of metal or a plate on sandpaper. # Useful GARAGE HACKS. life hacks with #TOOL.#homemade for #garage.#ScrewSpuntik https://www.youtube.com/edit?o=U&video_id=xc-q1HdbI1U -~-~~-~~~-~~-~- Please SEE: "★Spark extinguisher for a grinder. Cutting metal with a grinder without abrasive dust. Dust collector for a grinder" https://www.youtube.com/watch?v=XRn9Jy3V7QU -~-~~-~~~-~~-~- ★ Screw channel and Shpuntik https://www.youtube.com/channel/UC3ZEFbDSZQIw1gHn6V6rPSA/videos ★ How easy and EASY TO UNLOCK a tightened nut on #BULGARIAN. https://www.youtube.com/watch?v=5eNZkQQ6rOo ★ A simple DRYER of fruits from #FAN HEATERS. https://www.youtube.com/watch?v=Oxrt5caCFLk&t=4s ★ Best Garage Hacks with a BLOWTORCH. https://www.youtube.com/watch?v=WOgeGLCOeEE ★ How to make a HOLDER for an outdoor THERMOMETER from a MOP with a wringer. https://www.youtube.com/watch?v=5ZOE9Q59010&t=19s ★ Useful LIFE HACKS for the GARAGE. life hacks with #TOOL. https://www.youtube.com/watch?v=xc-q1HdbI1U ★ How to screw a self-tapping screw in a NEW WAY. https://www.youtube.com/watch?v=nfucNBI7adM ★ Foaming of deep 1 mm seams, gaps, cracks, crevices, voids. https://www.youtube.com/watch?v=iGelc4eVdKc ★ How to make a Super jigsaw file. https://www.youtube.com/watch?v=Co9eYM03Q5o&t=1s ★ How to lubricate a protected Bearing without removing the protection. https://www.youtube.com/watch?v=xA2eH7imoec ★ The simplest beer can aroma lamp. https://www.youtube.com/watch?v=6lqoSMAjOLE ★ Do-it-yourself tool case. https://www.youtube.com/watch?v=17gDmuLAyXw ★ Hiking flashlight without battery. https://www.youtube.com/watch?v=kcn4TqUNaRU ★ Replacement of bulk Bearings with separator bearings, (industrial) at a wheelbarrow or trolley https://www.youtube.com/watch?v=Oc7gOdz65tM ★ DRY LUBRICANT for locks with their own hands. https://www.youtube.com/watch?v=aO9RuKh3VMo ★ Second life for pliers. https://www.youtube.com/watch?v=Y6afEdECySU ★ How to lubricate hard-to-reach places. https://www.youtube.com/watch?v=R6rgnrXaBsY ★ How to RINSE and clean your cart BEARINGS. Car wheel repair. https://www.youtube.com/watch?v=Dg3Go8jS6oI ★ How to remove SOLD from el. do-it-yourself solder with a building dryer. https://www.youtube.com/watch?v=eSm1sg_d-tY ★ Micro wire grinder. https://www.youtube.com/watch?v=QNm4kEX2x3A ★ How to lubricate the zipper. https://www.youtube.com/watch?v=nH2FWCKXb8o ★ Silicone grease against super glue. https://www.youtube.com/watch?v=I8G4iyWxDvQ ★ How to make a budget electric meat grinder. https://www.youtube.com/watch?v=0jg5vW17fGs ★ How to make a Mini MIXER from improvised materials. https://www.youtube.com/watch?v=fZgBsiyQg5E ★ How to make tomato juice without a juicer. https://www.youtube.com/watch?v=LG05dRocvwY ★ Do-it-yourself scratching post for cats. How to make a scratching post. https://www.youtube.com/watch?v=Pp4UZj2qNW0 ★ How to make a comfortable push handle. https://www.youtube.com/watch?v=tnNNOhqHm4U ★ How to lubricate hard-to-reach places. https://www.youtube.com/watch?v=R6rgnrXaBsY OWN HANDS FOR THE GARAGE - it's very simple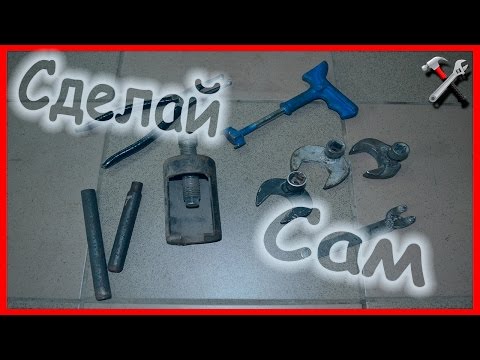
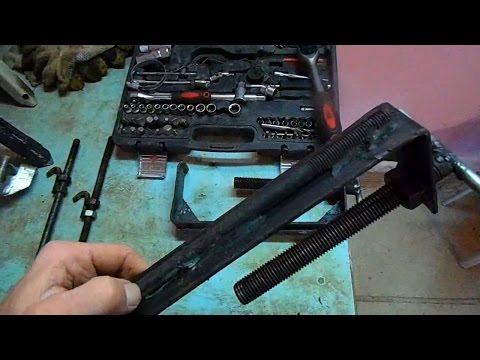
Homemade Garage Fixtures #Tool
Homemade Garage Fixtures #Tool
Vkontakte group - https://vk.com/club109464179 I recommend a do-it-yourself garage lift - https://www.youtube.com/watch?v=cwn-MiqKpug Hello everyone!! today we will look at some DIY #garage fixtures. #Homemade tools. This is especially true for those who live in a fraction of the city, where there are no auto shops where you can buy a tool. 1:12 - ball joint puller 2:05 - tie rod puller 2:42 - caliper piston screwing tool 4:05 - valve stem seal pliers 4:40 - valve stem seal driver My blog on drive2 https:/ /www.drive2.ru/users/andron3030/ "Become a part of the Vkontakte community" - https://vk.com/texastv .youtube.com/playlist?list=PLSVbQlAQoj8HGblXZDKm3KzwujI4gZiui Subscribe to the channel https://www.youtube.com/channel/UC4nLdRx0Hibra_gFo6DiZKA?sab_cnfirmation=1 do it yourself
Homemade DIY. Arrangement of the garage / A - Video
Homemade DIY. Arrangement of the garage / A - Video
https://www.youtube.com/watch?v=D1BKvgCBg8Q A - =============================== ================== DIY DIY. Arrangement of the garage. ================================================= = Comfort and order in the garage probably like all the owners of these buildings, but not everyone manages to achieve this. Sometimes it is worth making a little effort and the room literally transforms. The video clip "Homemade DIY. Garage Arrangement" presents various homemade products and options for arranging a garage. From the simplest to the more complex and expensive. There are also options for various shelves, tool mounting and storage of one or another inventory. ================================================= #Homemade #homemade DIY #useful homemade #Homemade for giving ========================================= ========= All videos of channel A - Video: https://www.youtube.com/channel/UCfsN6BunY0xThinbm5xZzTQ/videos Thank you very much for watching our video!!! Like and Subscribe to our channel https://www.youtube.com/channel/UCfsN6BunY0xThinbm5xZzTQ A - Video ========================== ======================== Music tracks " the () " Deley and the 41 " Succotash " " " " Silent Partner taken from YouTube https://www .youtube.com/audiolibrary/music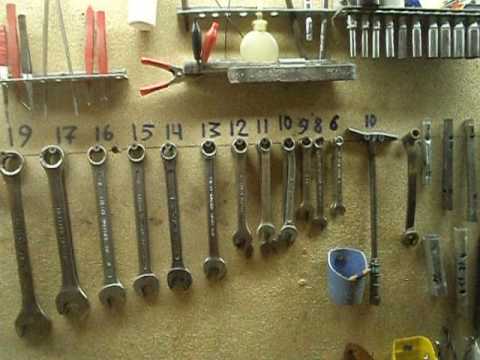
Useful DIY for the garage
Useful DIY for the garage
Useful DIY for the garage
Everything you need at your fingertips
Crafts for a garage made of PVC pipes
Crafts for a garage made of PVC pipes
I tell you what crafts can be made from plastic pipes.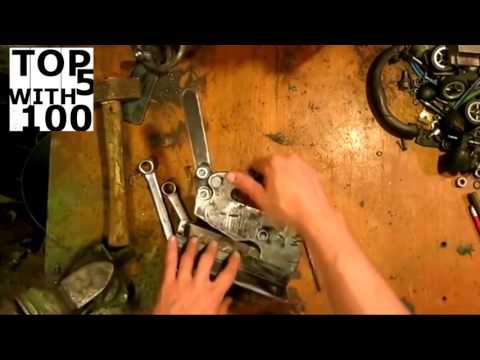
top cool do-it-yourself crafts
top cool do-it-yourself crafts
interesting ideas how to make practical and useful things with your own hands
Do-it-yourself remote alarm in the garage
Do-it-yourself remote alarm in the garage

Flip #10 for auto. Do-it-yourself tricky system

29 useful DIY garage crafts
29 useful DIY garage crafts
Homemade products for the garage can only be useful: judge for yourself - they are either created for work (which means they are useful by definition) or to please the harsh soul of the garage dweller - which means that such homemade products are doubly useful. And what is most useful about them is that they are all made by hand, which means that these are not just different garage crafts - they are the essence of amulets and talismans. But seriously, I spied a number of handicrafts - homemade products made by my own hands from the masters. Choose what you like, but probably the best thing is the thing that you not only do yourself, but also think up and decide how to do it yourself. Soyuzgarazh!Video of the TEXaS TV channel. Topic: Gadgets and more for the garage. At one time, when the master was just starting to repair cars, money for good tool and was not. Complex and expensive designs had to be done by myself. The author of the channel decided to prepare a review of homemade devices.
Watch the video youtube channel"Hands from the shoulders." Great fit for garages and gardens.
If you have an old vacuum cleaner lying around, you can return it to service again, redo it, for example, a blower. With it, you can quickly clean some equipment from dust or put things in order on the street. You will need sealing gum, a motor and part of the body. We remake the button, leg, handles and get a compact and convenient device. To focus the flow in this case, the socket of the fire extinguisher. There are probably many other alternatives out there.
This summer it is planned to make a similar dryer at the dacha. It can be used not only for fish, but also for meat, apples, mushrooms. Cool option. There is a thermostat that maintains the required temperature in the chamber. Air intake from 150 vent pipe. It has a built-in heater of two incandescent lamps. Mosquito net filter on top. Server rack fan. Exit openings are brought out to the street.
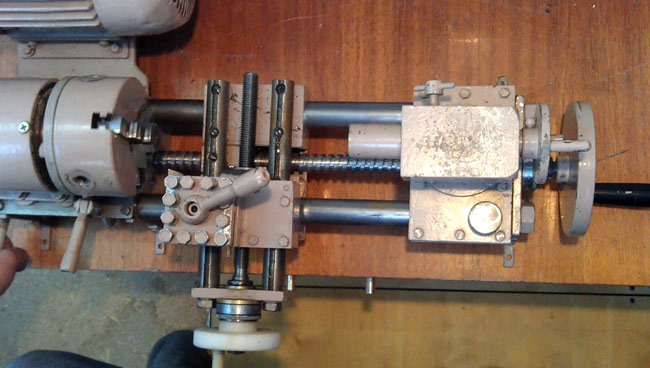
Interesting execution of the milling copier. Movement on shafts with a diameter of 20 mm is carried out using linear bearings.
If you build something from foam blocks, then you probably felt all the charm of their ascent to the floors. It's still a pleasure. Weight over 30 kilograms. The simple design of the grab, together with a winch or an electric hoist, will make the work easier.
An improved version of the vice for welding. Additional instructions were added to the fixture, which made it possible to connect parts in 3 planes at once.
At the beginning of May, a hot season begins for summer residents, including potato growers. If you have a walk-behind tractor, then it makes sense to think about automating the harvesting process. Moreover, the preparation for the whole summer. This digger is of a roaring type, but there is no roar in it as such. This greatly simplifies the manufacturing process. Instead, the rods on the plowshare are lengthened. The soil with potatoes is picked up by a plowshare and served on a table of twigs. The latter vibrates, the soil wakes up through the cracks, the roots on the other side fall to the ground. It remains only to pick up and put in a container.
In a private house, a garden shredder is a useful thing. No need to think about where to put the cut branches. Secondly, for such a fertilizer, your garden will repay with an excellent harvest. Knives are mounted on discs 16 mm thick. Cutting elements from springs. Hammers for crushing branches to a fraction of the desired size.