
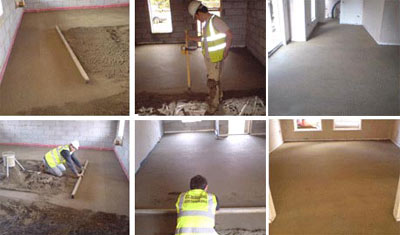
Floor screed from cement-sand mixture
Cement-sand screed is indispensable for building a strong and high-quality foundation for industrial facilities, and serves as one of the most the best options in private construction. Its main trump cards are the porosity of the structure, which provides excellent sound and heat insulation, minimal shrinkage due to the limited amount of water and the availability of manufacturing materials. And how to make such a screed with your own hands and technologically correct, we will now tell.
The cement-sand screed is considered to be the most reliable and durable screed with base differences of no more than 3 cm. It is simple, accessible even to a beginner, and inexpensive.
Cement-sand screed is mainly produced using semi-dry technology, but we will consider both options.
Stage I. Calculation of the future screed
On compacted soil, its thickness should be at least 12 cm, and on the already old concrete base- from 7 cm. If you make a cement-sand screed thinner than 3 cm, it will soon crack and begin to peel off from the base. Its optimal layer is 5 cm.
But, if the surface of your floor has differences from 10 to 20 cm, and you still plan to make a cement-sand screed, then use expanded clay as a leveling base. Mix it with a solution - get expanded clay concrete. The soundproofing of this floor will be wonderful.
But the main disadvantages of a cement-sand screed, which must be taken into account when calculating the screed:
- Long drying - about a month in dry summer, and much longer if the work was carried out in winter.
- Lots of dirt and dampness in the process.
- A significant increase in the load on the floor.
- The limitation of the thickness of the screed is only from 5 to 7 cm.
- Ready-made mixtures are often sold of poor quality, with incomprehensible additives, and a fake often comes across.
And with all these disadvantages, the screed is still quite popular among builders. Therefore, if these problems are not problems, we proceed to the direct process.
Stage II. Determine the curvature of the existing base
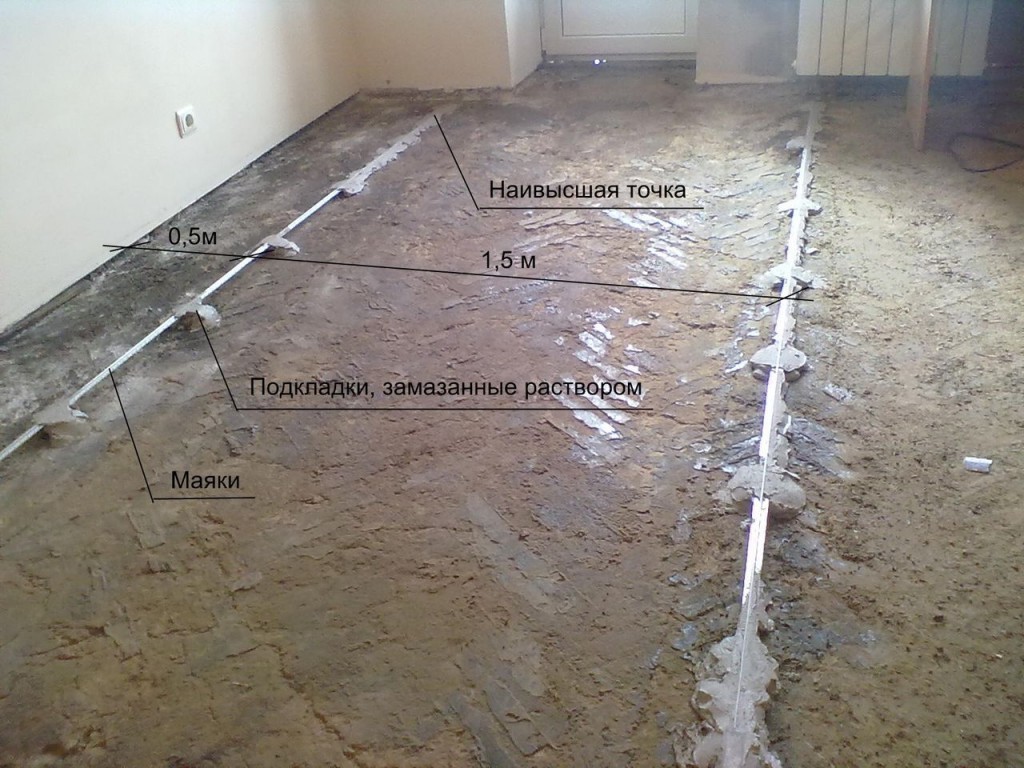
To help you will be a linear level, plumb lines or more modern devices, such as optical or laser levels. There is only one goal: to determine the relief of the base, mark the zero mark, find the highest point of the floor and calculate future costs - how much will you need to buy to make such a floor screed.
The simplest device for measuring the floor is the level. They do not need special skills to use - this is a simple glass flask with an air bubble, by which they navigate. The flask is mounted in a wooden ruler, which we take in our hands.
Stage III. Preparing the floor for screed
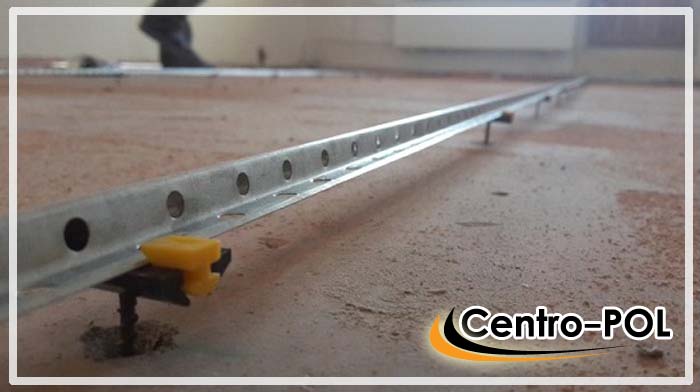
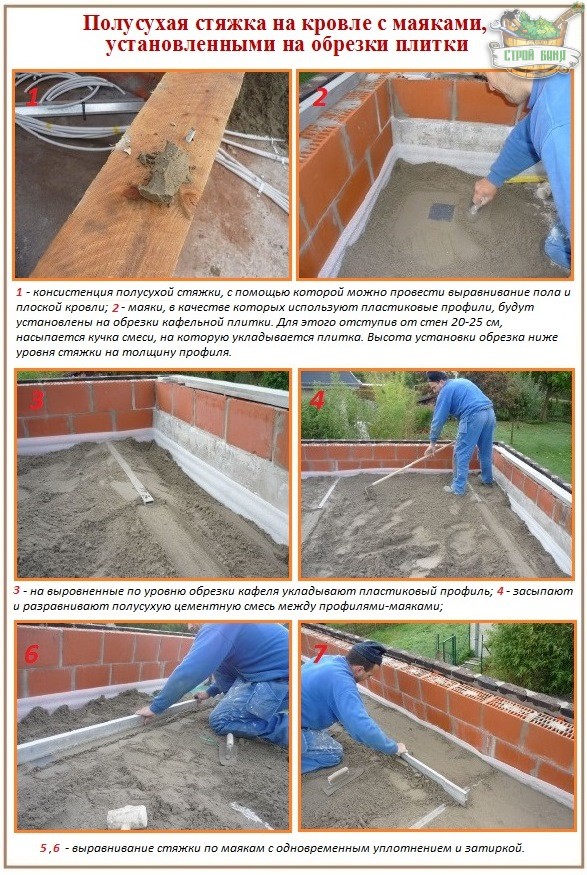
Now we put beacons. These are special guides along which we will align the screed plane. Any even linear material is suitable - pipes with a diameter of 15-32 mm, mounting rectangular profiles or timber. The main thing is that the beacons do not bend during the laying of the screed - i.e. were tough enough.
But you can put beacons in several ways:
- Method number 1. We take the rack level and measure the horizontal along the length of each beacon and between them. And in order to set all the guides evenly, you will need to stretch the network of threads at the height of the future screed. All this takes a lot of time and requires some skill.
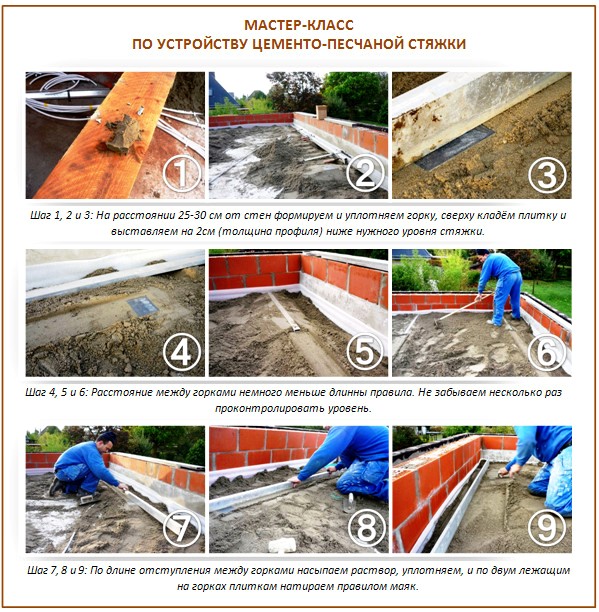
- Method number 2. We use the most primitive laser level. First, we beat off the lines of the lighthouses, then we put them strictly parallel to each other and so that the first one is at a distance of 20 to 30 cm from the wall. Make such an indent between the other lighthouses so that it would be convenient for you to rest the ends of the rule on two adjacent lighthouses. You will then level the solution with it. Usually this is 1.5 meters, and the rule for such work is better to take two meters.
Drill self-tapping screws along the broken lines. For each such beacon, three pieces will be enough: along the edges with an indent of 10 cm and in the middle. We set the laser level at the topmost broken line.
After the level is beaten off, fix the screws on the walls along the marks. Pull the threads on them around the entire perimeter of the floor - these will be your beacons. And so that the threads do not sag, make additional supports in the center of each of them using the same screws or bars.
Stage IV. Preparation of cement-sand mortar
Cement-sand mixture can be obtained in three ways:
- Method 1. Order a ready-made solution in a mixer. Of the advantages of this method, you will be pleased with the quality and reasonable price. But the disadvantages will also be significant: for a sufficiently large floor area per day, the solution cannot be transferred from the mixer. And ordering the same composition several times, in parts, is both difficult and expensive. The only option for spacious rooms is a concrete pump service, which is even more expensive.
- Method 2. Order the finished mixture in bags, and dilute it with water on the spot. But these bags cost a lot.
- Method 3. Independently mix cement and sand right on the spot, according to the selected recipe. This is time-consuming, but the most rational in terms of budget option. Choose the method that suits your room and future finish.
Here is how the mechanized supply of the cement-sand mixture takes place:
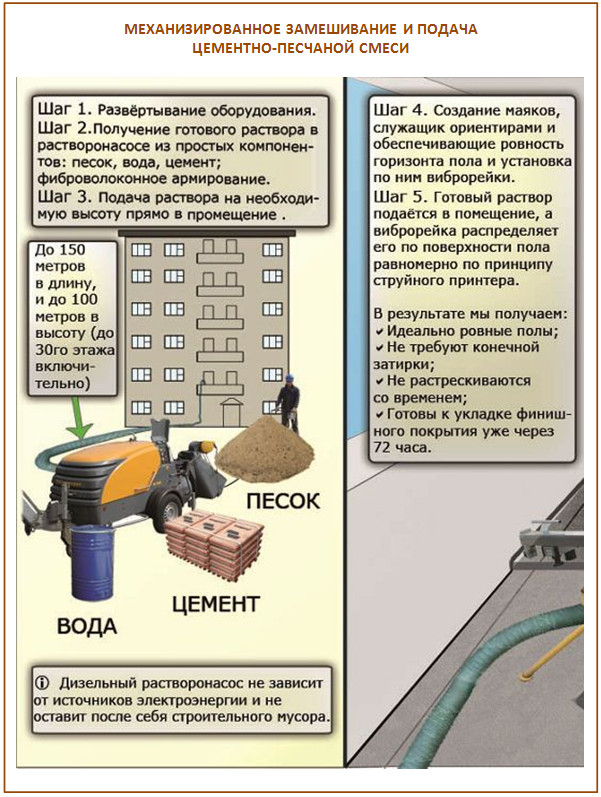
To begin with, let's learn how to prepare a cement-sand mixture using wet technology. So, the recipe is quite simple: sand + cement in a ratio of 3: 1, and water to this mixture in a ratio of 50/50. Those. to prepare a cement-sand screed, take one part of cement and three building sand. And then - according to the instructions:
- Sand is mixed with cement with a trowel.
- Pour water into the container and carefully introduce the dry mixture.
- We knead the solution in a deep container with a volume of up to 30 liters, using a drill with a stirrer attachment.
- If desired, add a plasticizer to the solution to improve the plasticity of the future screed.
- As soon as the solution becomes similar in consistency to thick sour cream, take a little mixture in your fist to check. It should neither spread nor fall apart. Pour the solution directly onto the floor, and level it well. In an hour and a half it must be fully used.
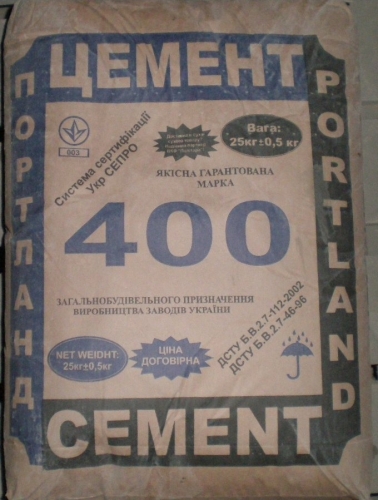
And now for semi-dry. For a screed device, take cement grade M-400. For one room, you will need about 7-8 bags, if the screed is made 4-5 cm thick.
Mix the solution directly on the floor, placing a sheet of metal on this area. This method is called "volcano", and it is according to it that a semi-dry cement-sand mixture is made:
- Step 1. We pour out a 50-kilogram bag of sand, on top of it - 1/3 bag of cement, and mix it all with a shovel. We haven't added water yet.
- Step 2. On all this we pour out the second bag of sand and the same amount of cement as the first time. And so - the third time, and only then mix the whole mixture.
- Step 3. In the resulting slide, we form a “crater” with a shovel, and pour water into it. Mix well and proceed to laying the screed.
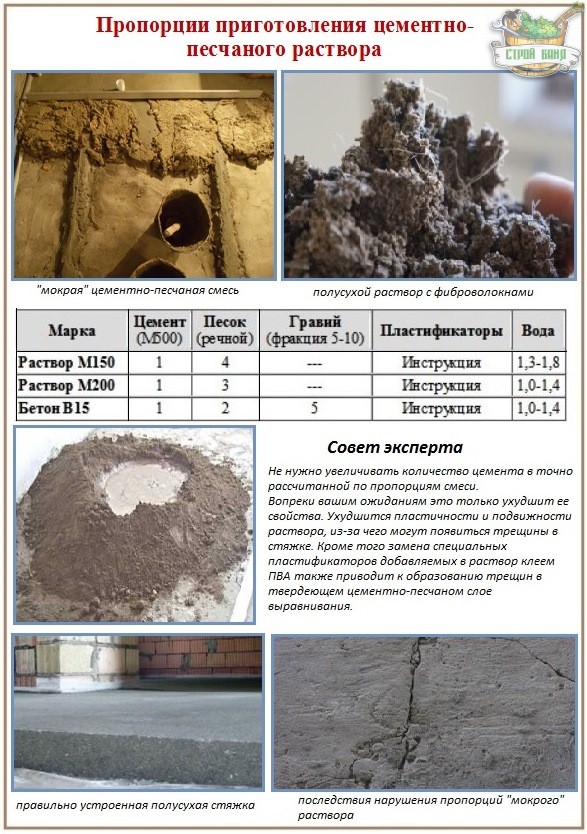
The correct cement-sand mixture should have a gray color - and yellow or red shades indicate that there is too much sand in the solution. Of course, special plasticizers can also give their color. Such additives allow the solution to solidify better and subsequently not crack.
Stage V. Preparatory work
To separate the screed from the walls, a damper tape is attached. It is easy to calculate its amount: this is just the perimeter of the room.
The process itself is simple. In a row you need to put beacon rails. Install the first beacon from the wall at a distance of several centimeters, and each subsequent one - in increments of 50-100 cm. After installing the beacons, lay out the mixture and level it with the rule. After the mixture is so solid that it can be moved freely, remove the slats.
Beacons for sand-cement mixture can be made independently. To do this, buy inexpensive 10 mm plaster beacons and 30 kilograms of gypsum plaster for them at a hardware store. For each lighthouse, we make four gypsum supports - and this will be enough so that nothing bends while working with the rule. And the strongest adhesion of lighthouses is from Rotband, if you knead it in small portions. Just put the mortar in small slaps next to the screws, between them, and a little higher. Then attach the beacon, slowly lowering it until it touches everyone. Check the resulting plane.
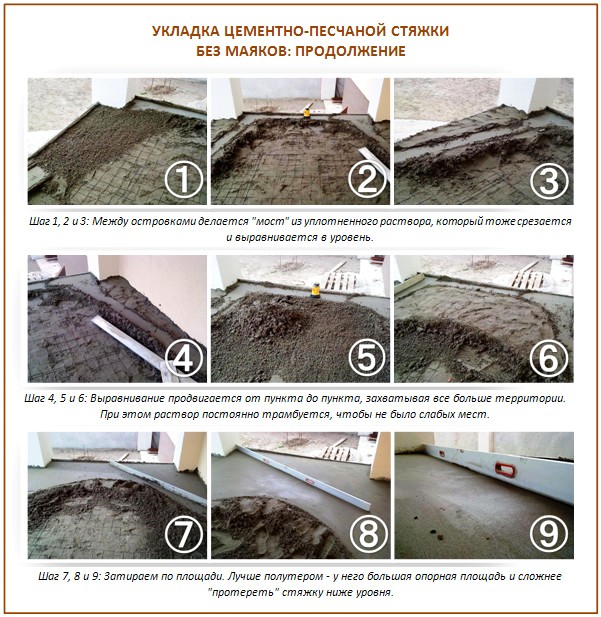
You will be surprised, but many masters of their craft manage to arrange such ties without beacons at all:
Concrete floor screed is a traditional way of strengthening and leveling the rough base for laying the finish coat. In the process of preparing and pouring a cement screed, certain norms regulated by SNiP must be observed. Only in this case, the formed coating will be durable and suitable for use.
Basic requirements for screeds
Do-it-yourself cement floor screed is poured only if all technological standards for the construction of rough foundations are observed. It is this part of the base that will experience the greatest load during operation. Therefore, according to certain standards specified in the SNiP, the DSP must comply with the quality characteristics and the following requirements:
- High coating strength, which would allow to withstand large static and dynamic loads;
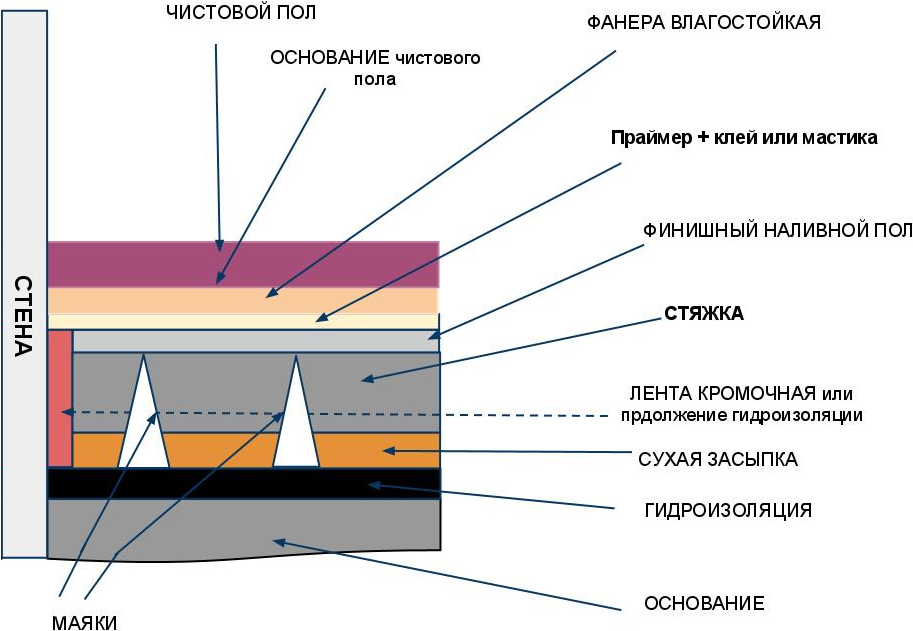
- Mandatory presence of a waterproofing layer under the cement layer;
- Waterproofing should be not only on the floor, but also on the walls at the level of the thickness of the screed;
- In the case of laying a “warm floor”, the thickness of the poured solution should be at least 5-6 cm;
- If the solution is poured over the communications, its thickness above the level of the pipes should be at least 2-3 mm.
In order for the laid screed to meet all the above requirements, it is necessary to properly prepare the working solution. In this case, special attention is paid to such nuances:
- the composition of the solution;
- proportions;
- method of mixing components.
You can see how to properly knead the cement mixture in the video.
What is included in the CPS?
The cement-sand floor screed consists of elementary components, which, nevertheless, provide high strength to the rough coating. The standard composition of the working solution includes purified river sand and cement. However, to improve the mechanical properties of the solution, plasticizers and other synthetic components can be added to its composition. Thanks to them, it is possible to improve the characteristics of the DSP and, accordingly, increase the period of its operation.
What components can be included in the working mixture?
- Cement - a binder that is responsible for the strength and density of the screed;
- Sand - plays the role of a small-caliber filler, thanks to which it is possible to significantly reduce the cost of the solution;
- Plasticizers - increase the plasticity of the mixture, which can significantly reduce water consumption and, accordingly, the curing period of the screed;
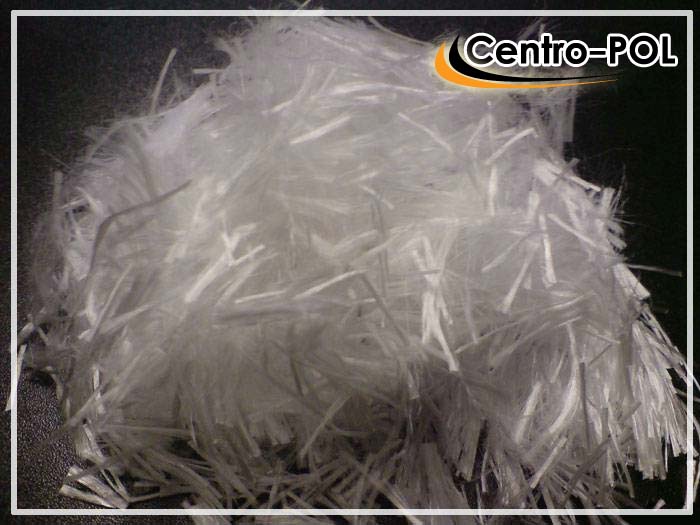
- Polypropylene fiber- performs the function of a reinforcing mesh, strengthening the concrete coating; significantly reduces the plastic shrinkage rate, due to which the cement composition practically does not crack during the drying process;
- Water is the “reagent” that ensures the homogeneity of the mixed components of the solution, as well as its fluidity.
It should be noted that the plasticizers included in the DSP can affect many specifications concreted surface, namely:
- strength;
- water resistance;
- frost resistance;
- heat capacity.
You can learn more about how to make a cement floor screed in the video.
Proportions of the CPS
The quality and strength characteristics of the solution are largely determined by the ratio of all the necessary components. In other words, proportions play an important role in the quality of the mixture. Properly prepared composition has the necessary sound and waterproofing properties, which must be taken into account in the process of its preparation. What proportions must be observed?
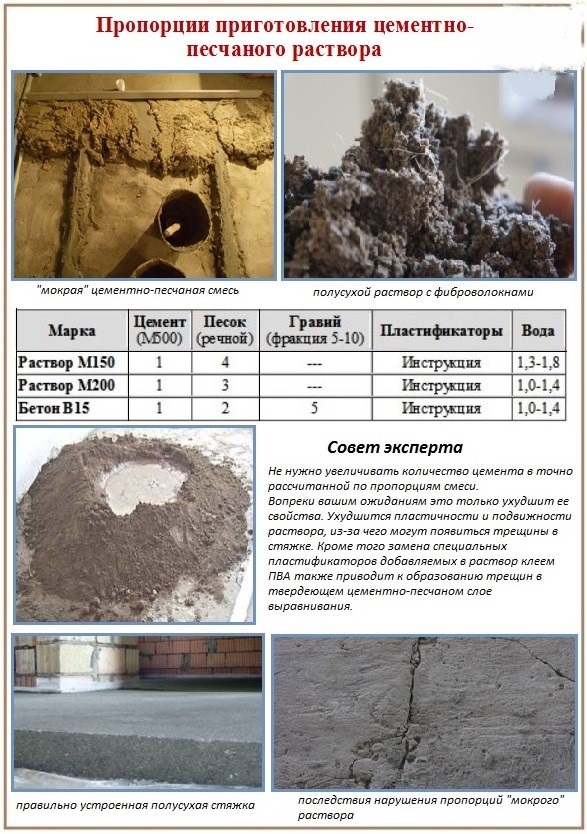
The ratio of the required amount of water and sand depends on the quality of the cement - its brand. The higher the brand of cement, the better its strength characteristics. For the preparation of the screed mixture, as a rule, cement grades M300, M400 and M500 are used. The proportions of the necessary components for the specified cement grades are shown in the table below:
| Grade of cement | Part of the cement | Part of the sand | Part of the water |
| 300 | 1 | 2 (3) | 1.2-1.6 |
| 400 | 1 | 3 | 1.3-1.5 |
| 500 | 1 | 3 (4) | 1.6-1.9 |
According to the basic provisions of SNiP, the proportions that were given in the table may vary depending on what load will be created on the base. You can see how to mix the solution correctly in the video.
Features of mixing the components of the solution
Preparing a working mixture is much more difficult than it might seem at first glance. Indeed, the wear resistance, density and abrasive resistance of the created screed depend on the degree of homogeneity of the solution. How to knead the screed mixture correctly?
- Pour the required amount of sand and cement into the prepared container;
- The components are thoroughly mixed in dry form;
- When adding a plasticizer to a solution, it is preliminarily diluted with water;
- A deepening is made in the dry cement-sand mixture and water is gradually added;
- The density of the solution should be similar to sour cream;
- It is best to knead the composition not with a shovel, but with a construction mixer to obtain a solution of high uniformity.
Rules for pouring cement mortar
The DSP must have high adhesion to the rough base, therefore, in the process of pouring it, several important nuances must be observed, namely:
- Before pouring the solution, the base is specially coarsened so that the coating becomes grainy;
- Beacons are placed on the floor to control the thickness of the screed;
- Then the base is moistened with water to ensure normal adhesion to the screed;
- The poured mixture is leveled and rammed to the required level, which was set on the lighthouses;
- The final adjustment of the working mixture is carried out using the rule;
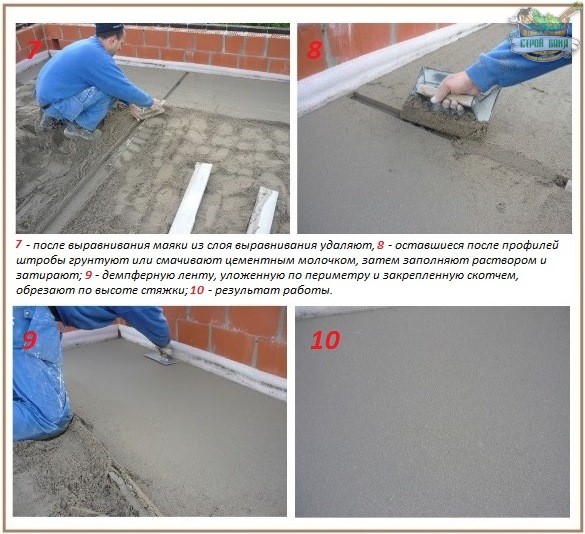
- After about 20-28 hours, the beacons are removed;
- The holes from the beacons are primed and filled with mortar.
Visually, the process of pouring concrete mixture is shown in the video.
Strengthening the screed
The concrete base is prone to dusting and cracking. To prevent damage to the screed, a “strengthening” composition is used - impregnation. It fills all the pores on the coating, making the subfloor more durable and resistant to mechanical stress.
What impregnation is suitable for strengthening the DSP? Impregnation based on the following substances will help to strengthen and remove dust from the concrete surface:
- epoxy resin;
- liquid glass;
- lithium polysilicate;
- acrylic;
- polyurethane.
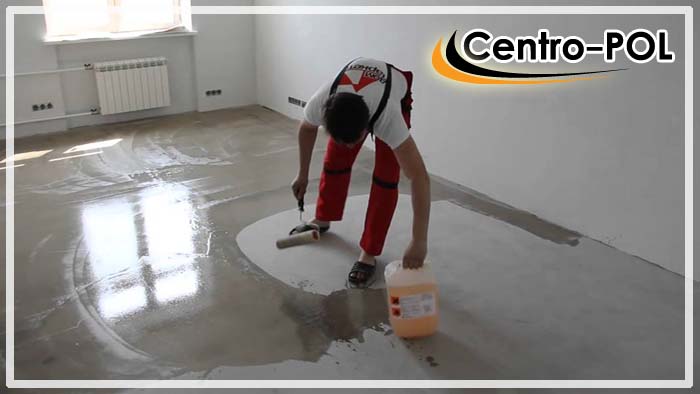
High-quality and correctly applied impregnation solves 4 problems.
Whatever flooring technologies are being developed today, cement-sand floor screed is still one of the most suitable options for administrative premises, production units and private housing construction. Many of its advantages speak in favor of its use, first of all, it is a porous structure that provides excellent heat and sound insulation, minimal shrinkage, no tendency to be saturated with water and, of course, the comparative cheapness of the device. The technology of cement-concrete screed is quite simple, so it can be done independently - there is additional savings by refusing to hire employees. Of course, the device of such a screed requires compliance with certain subtleties and technological nuances, which we will discuss below.
Classification of cement-sand screeds
This type of screed can be made using one of 2 technologies:
- semi-dry;
- on wet.
The last option is most often used, a wet screed is created from a cement-sand mortar poured onto the base of the floor.
A sufficiently liquid consistency of the screed provides it with the ability to level itself - after pouring, the solution spreads almost to an absolutely even state.
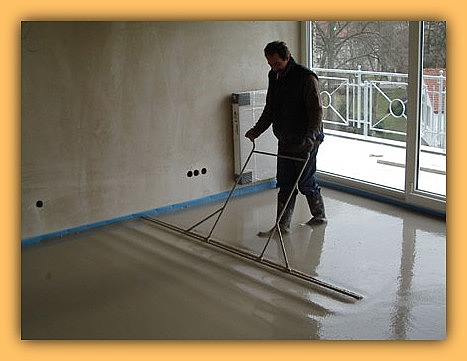
However, it is not enough just to pour the cement-sand mixture, you need to roll it with a special roller, which will expel the air remaining over the filled solution, you also need to level the solution with a spatula in especially critical places - at corners, mates, etc. After pouring and leveling the solution, you need to leave the floor at rest until the screed is completely cured. This process can take up to several weeks, so be patient.
If there is no time to wait, then it is better to use a semi-dry technology for creating a screed, due to the smaller amount of water that is part of the solution, the screed dries many times faster. And so that the screed does not lose its strength due to a smaller volume of water, special plasticizing additives are added to the solution, they give the solution elasticity, strength and resistance to external influences.
In addition, the cement-sand floor screed, made using semi-dry technology, is distinguished by the best heat and sound insulation.
The disadvantages of this type of screed include the need to make the screed as quickly as possible and use a special tool.
Preparation for creating a screed
The preparation of the solution should be carried out in the following proportion: 1 kg of cement: 3 kg sand. Water is added in proportion 1 l: 5 kg of cement.
An important requirement is thorough mixing of the solution, it should not contain lumps, unmixed materials. At this stage, many make the mistake of adding too much water to get a liquid consistency. In fact, exceeding the required volume of water leads to the loss of its qualities by the solution, primarily strength.

Also an important stage is the preparation of the base of the floor for pouring the solution:
- calculate the required height of the poured screed;
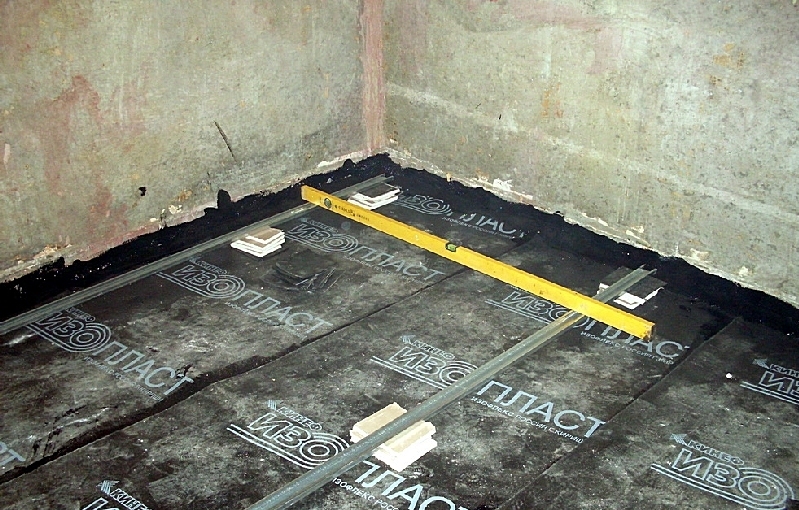
- perform waterproofing;
- set up beacons.
The surface before waterproofing must be cleaned of dust and other debris, remove all remnants of the old floor covering(if any), level the irregularities with a solution of a thick consistency.
As a waterproofing, a dense polyethylene film can be used, which should be laid with approximately 20 cm overlap on the walls.
In some cases, it is generally required to perform a full-fledged waterproofing of the walls, for example, when pouring a large area screed or when installing a warm water floor system. In this case, the level of waterproofing material must be higher than the level of the created screed.
In accordance with the regulations, the height of the cement-sand screed should not exceed 50 mm. However, there are restrictions on the minimum height.
Thus, a semi-dry screed should have a thickness within from 20 to 50 mm.
If the underfloor heating system is closed with a screed, the thickness of the screed must exceed the diameter of the pipes used in underfloor heating by 45 mm.
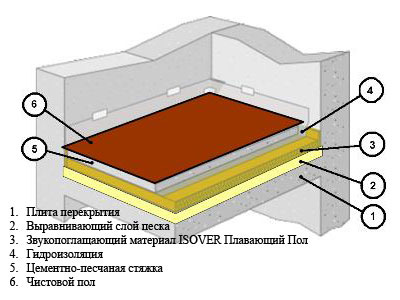
Scheme of the floor screed device:
Now we measure the horizon. To do this, we fix a laser level on the wall at a height of about 1 meter and draw a perfectly even level on it. Along the line of the level, the level is fixed with a pencil - this is the so-called zero mark. After that, the highest point of the floor is located, and from it, about 304 cm higher, a mark of the required level is deposited on the wall. The distance from the zero mark to the mark at the highest point is used to determine the required screed level around the entire perimeter of the room.
Direct pouring of the screed
To make it easier to fill, we install beacons on the base area.
The distance between the beacons should be about 2 meters, and the first beacon should recede from the wall by about 25 cm.
The lighthouses themselves can be built from improvised means - from a pipe, from a metal profile, etc. The main criterion for choosing a material for a lighthouse is its rigidity, the lighthouses should not deform under the pressure of the solution. When the beacons are placed, their bases are firmly fixed with cement mortar, not forgetting to level the beacons.
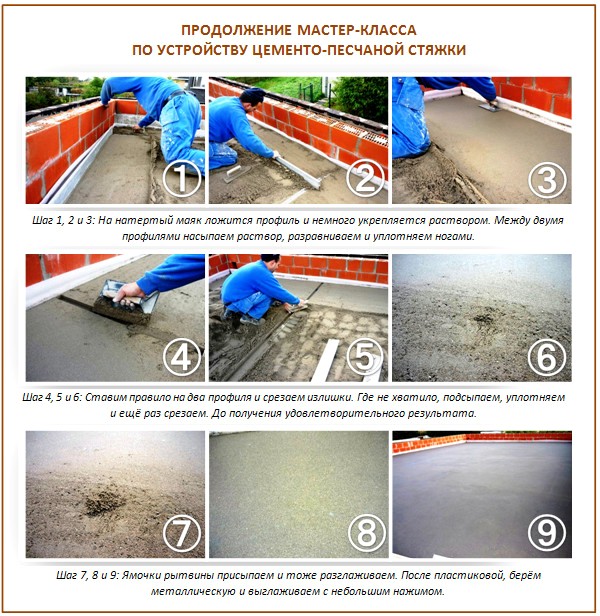
After about 2 days after cementing the beacons, you can prepare a solution and proceed with the construction of the screed. It should be extended from the far corner using a metal rule. The space between the beacons is filled with a small slide with mortar, then the excess is removed by the rule strictly according to the level of the beacons. If they are set correctly, you will get a perfectly flat and horizontal surface.
If a wet screed technology is chosen, then there will be fewer problems with leveling, however, it is necessary to perform a more thorough waterproofing of the base, ensure a calm regime for the entire drying period of the mortar, and generally comply with the technology for creating a screed.
Creating a monolithic leveling slab by pouring an aqueous solution of sand and cement is the most common, however, and the most time-consuming method of preparing the base for laying pavements. The owners of suburban baths are attracted by the cement-sand screed with the ability to provide a slope for organizing the flow of waste water into sewer system. With the help of a cement mixture, it is possible to create an impeccably flat surface that does not require further cladding. A formed stone floor or a flat roof will perfectly resist alkalis, fats, acids, and excess moisture will not harm them. Cement stone is an excellent conductor of heat, which is why it is most often used in the installation of an "underground" heating system.
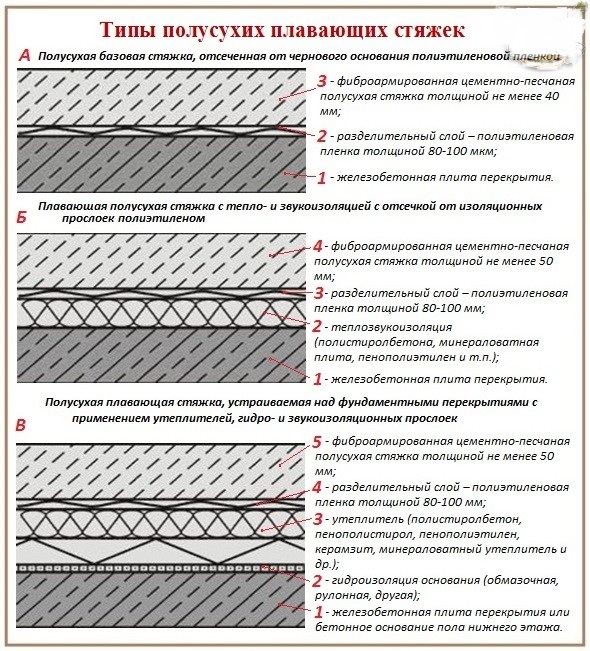
Types of screeds from cement-sand mortars
The leveling layer of a mixture of water, sand and cement has a considerable weight, depending on the percentage of water, on the brand of cement and on the power of the screed. According to average statistics, approximately 90 kg of artificial stone slabs 4 cm thick will press on 1 m² of the rough base. Therefore, this method of preparation is used if the bearing capacity of the base allows, that is, the concrete rough floors are mainly leveled.
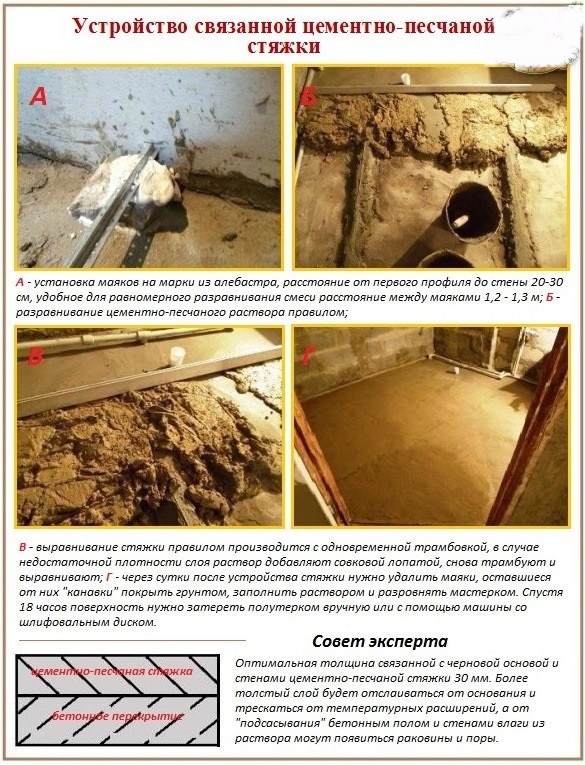
According to the technical regulations, the minimum leveling height is 3 cm, otherwise the monolith will crack when dried, “tear” from the stress during solidification and peel off from the concrete floor located under it. The maximum limit is 7 cm. If the specified limit is exceeded, a cement floor screed becomes an unnecessarily expensive pleasure. It will be necessary to strengthen the foundation, and it will take a lot of material to fill the leveling layer.
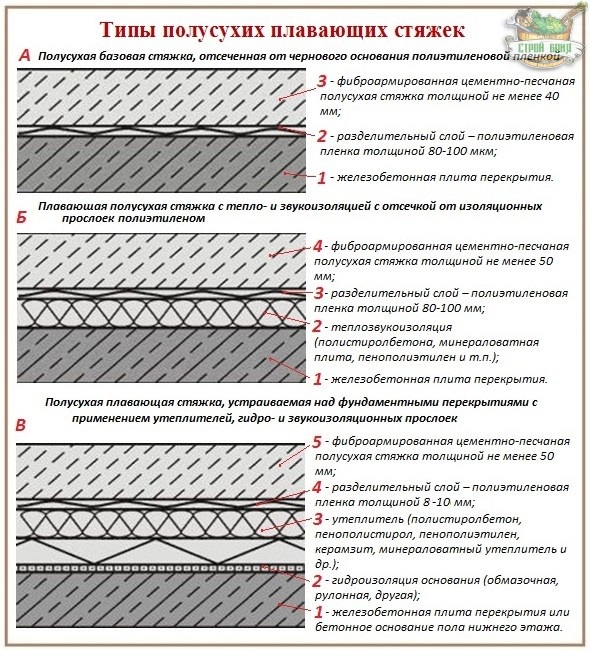
Depending on the thickness of the leveling layer, it is determined according to which scheme the cement-sand mortar screed will be arranged, which can be:
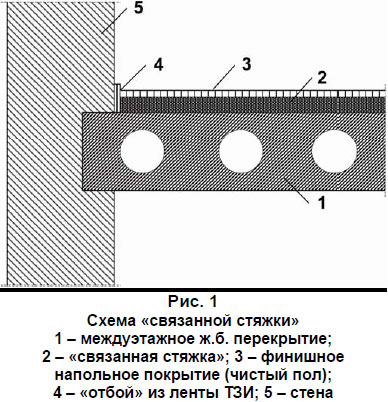
- connected to the draft base and associated walls;
- not connected, that is, not linked to building structures;
- be a floating slab cut off from the floor and walls by insulating layers.
Related cement screed option
It is arranged if the leveling layer does not exceed 4 cm. Since the cement-sand fill should eventually become one with the rough base and adjacent walls, careful preparation is required for the installation of a bonded screed. First, the floor area to be equipped is carefully examined, deep cracks are repaired, and mounting ears are bent with a sledgehammer. However, minor floor irregularities are not eliminated, but left to optimize adhesion to the mortar.
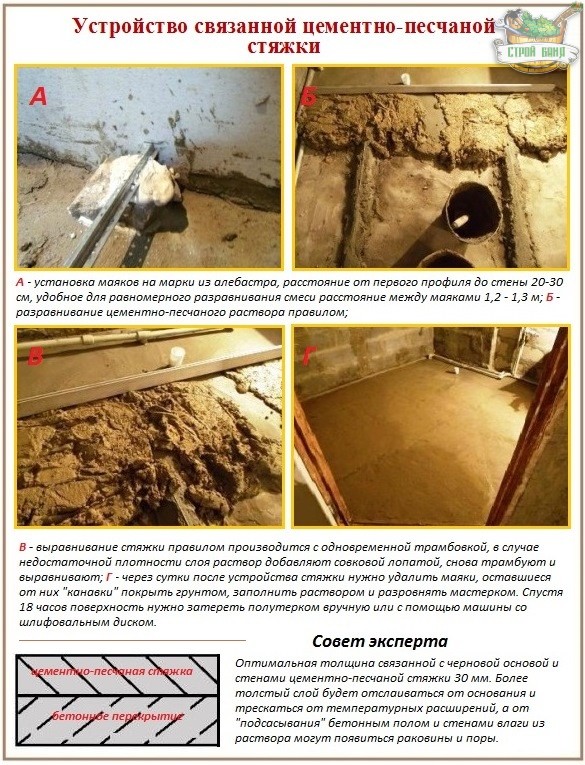
Recently laid concrete floors are specially coarsened, the surface is cleaned with a metal brush to coarse-grained inclusions, then:
- set up beacons;
- thoroughly moisten the surface of the rough base;
- knead the solution until the density of the confectionery cream is obtained;
- the cement-sand mixture is poured so that its surface level exceeds the beacons by approximately 1 cm, with the expectation of shrinkage inherent in this scheme;
- they ram the filled layer to the level of the exposed beacons using boards and their own weight, but it is better to rent a flat vibrating device for this operation, designed to compact cement mixtures and evenly remove air bubbles from them. It is necessary to ram the screed with a vibrating rail in two steps at low speeds, not being too zealous so as not to delaminate;
- carry out the final adjustment of the level of the screed with a rail-rule, moving it along the lighthouses, as if on rails with a slight swing to the right and left;
- beacons are dismantled in a day;
- the strobes remaining after the removal of the beacons are primed, filled with a solution and rubbed.
Attention. After 20 minutes after production, the slurry begins to gradually lose its astringent properties. It is necessary to try so that the cement screed with your own hands is filled with it before the expiration of the specified period. It makes no sense to cook too much. If the mixture is closed and fed by means of small-scale mechanization, the amount of solution can be increased, focusing on own forces and skills of a concrete worker.
Checking the density of the arranged cement-sand screed is carried out by pressing a piece of board on an arbitrarily selected area. If a deep recess is formed as a result, the mortar must be added to this place with a shovel and the segment to be restored must be rubbed. When a puddle forms in the recess, the solution to eliminate the defect must be kneaded more densely.
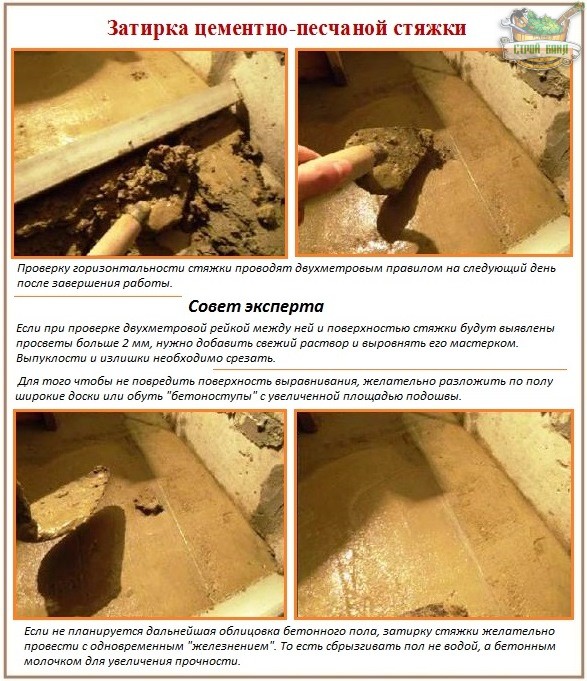
In addition to checking the density, it is necessary to check the horizontalness. Do this by placing a 2 meter rule directly on the surface in different directions. Identified bumps and bulges must be cut off, places with gaps under the rule of more than 2 mm should be filled with mortar and rubbed.
Note. You can carefully move along the laid cement layer every other day, putting on special concrete shoes with an increased sole area. You can lay out wide boards, and carefully step over them.
After a week, the screed is usually walked on without much concern, since the hardening of the upper layer has already occurred. However, it is possible to start laying the coating only after a month, preferably 35-40 days, although they consider 28 days to be ready for the cement-sand layer.
At the end of the process, the screed must be allowed to harden correctly, systematically losing the contained water. The next day after the device, its surface is plentifully irrigated with water supplied by a hose with a sprinkler, and covered with polyethylene. Irrigation is carried out evenly without puddles. Wetting the surface, but already in the spray version, is regularly carried out for the next 10 days. It is necessary to cover the leveling layer with polyethylene, which excludes premature loss of moisture, for 4 days.
Attention. The room with the arranged cement screed must be protected from sun rays and be sure to turn off the heating and forced ventilation devices. Due to the influence of batteries, fans, sunlight, the solution will harden unevenly.
Unbonded type of cement-sand leveling
In the unrelated "case", adhesion and its optimization are absolutely unnecessary. On the contrary, a smooth concrete base is required with excellent waterproofing properties that prevent moisture from being sucked out of the hardening screed. You need to try to keep the top layer of concrete, especially if it is treated with water-repellent impregnation. A smooth top barrier will prevent bonding and pitting in the screed being formed. The optimal power of an unbound screed is 5 cm. The laying technology is similar to the method described above.
Attention. The use of primers and other means that increase adhesion is strictly prohibited with this technological scheme.
The principle of the floating screed device
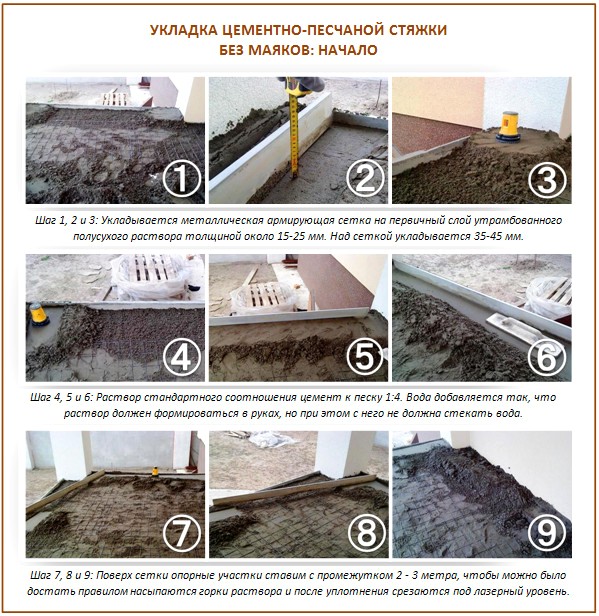
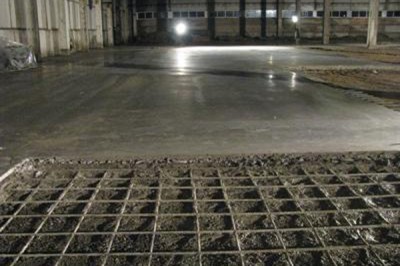
The method of creating a floating base is used if the thickness of the leveling layer is 5-7 cm. The screed is cut off from the rough base by laying waterproofing, from the walls with a foam polystyrene damper tape. Due to the rather large thickness of the leveling layer, the floating cement-sand screed device is reinforced either with a metal mesh or by introducing a fiber filler into the solution, which prevents the appearance of cracks during shrinkage and subsequent operation.
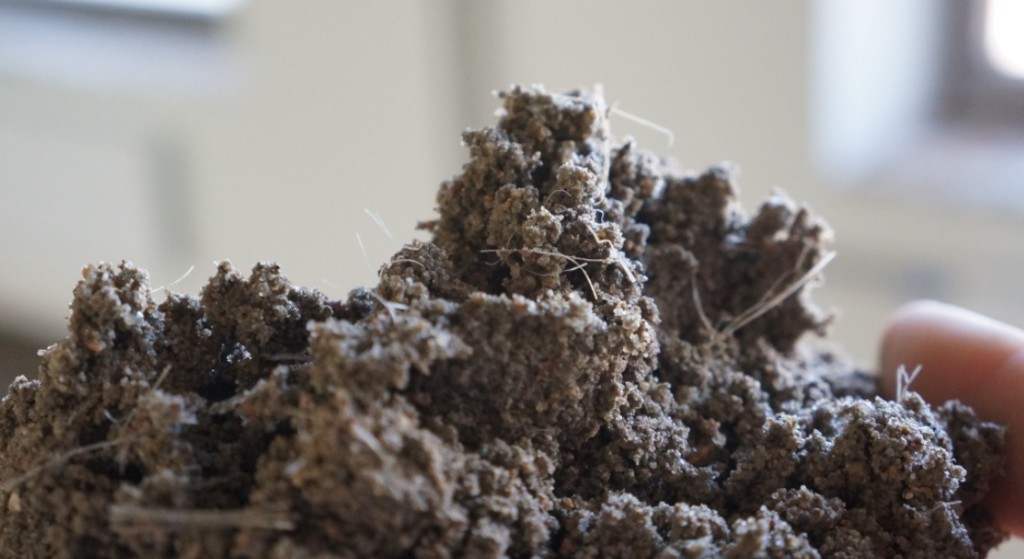
Since the screed is thick and therefore heavy, semi-dry technology was invented to reduce its weight. It consists in mixing the solution with a reduced amount of water, due to which, at the same time, the hydration of the mixture is 7 times faster. By appearance the finished solution resembles wet sand or sandy loam. The readiness of the solution for a semi-dry screed is checked by rolling. A non-crushing, but not dense ball should form.
Polypropylene fibers are responsible for the strength properties in the semi-dry version, metal analogues are less commonly used. They are introduced into the solution during the preparation period at the rate of 0.7 kg per cubic meter of the mixture. Due to the random arrangement of polymer "threads" in the floating plate, reinforcing bonds are created in all directions.
The cement-sand screed reinforced with strong fibers does not shrink and does not lose its technical performance in subsequent years. Cracks and shells in it appear extremely rarely due to the insignificant volume of moisture evaporating from the screed. To increase the plasticity and to reduce the solidification time of the solution, polymeric substances are added to it. fine finish ceramic tiles according to the semi-dry version, it can be produced in four days.
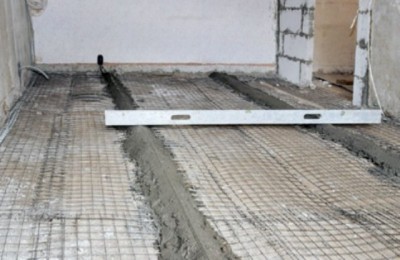
Most often, a thick floating slab is made in two steps:
- First, a 2 cm layer is poured over insulating mats or over ceilings and left to spontaneously compact and shrink for 24 hours.
- A day later, the mixture is backfilled to the level of the beacons and leveled in the usual way.
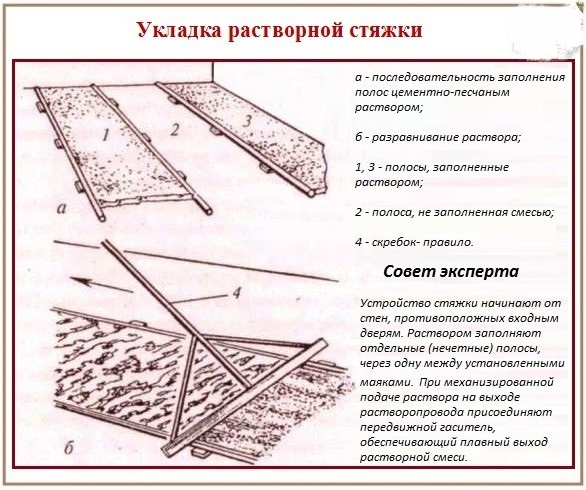
Two-stage production will eliminate the formation of rounded edges around the perimeter and at the junctions of the cards, that is, on the lines connecting partial sections of the fill. This happens because of the considerable power of the screed and because of the consistency. The map is a strip between opposite walls, you need to arrange it in one go without daily breaks. Stripes level the floor if it is not possible to complete the entire amount of work in one day.

The attractiveness of the semi-dry method is somewhat overshadowed by the need to use small-scale mechanization tools that knead and supply the solution to the place of direct installation. True, the Mixocret mobile unit intended for concrete work can be rented. The machine moves the mixture along the hose, so that there is practically no dirt traditional for concrete work.
You will also need a “helicopter” with grout discs and blades if the owner plans to wipe the floor to a “mirror” surface without further finishing. Processing with a concrete finishing machine is carried out as soon as the surface begins to darken. This means that the solution has begun to set. The signal to start grouting appears after 2 - 7 hours, depending on the humidity of the air and the temperature background.
Otherwise, the sequence of work on the installation of a semi-dry cement mortar screed is practically no different from the usual technological standards.
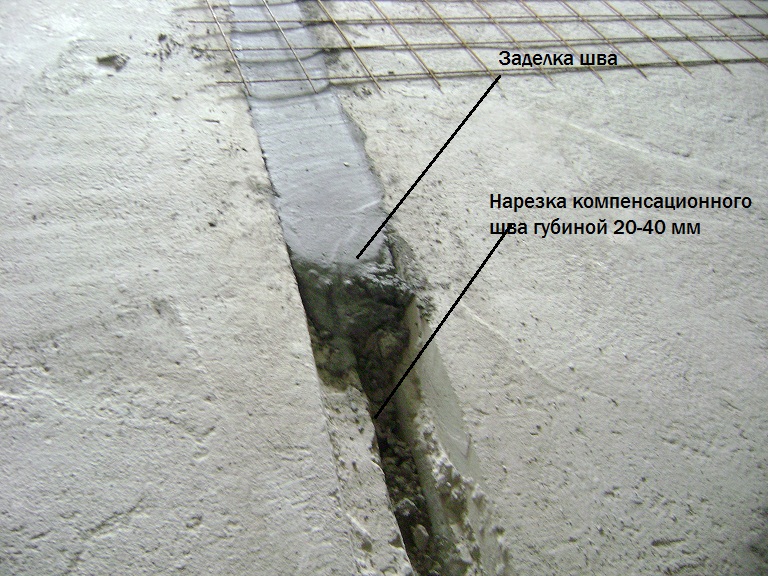
Rules for cutting damper joints
Approximately 48-72 hours after the installation of the cement screed, regardless of the degree of humidity of the initial mixture, damper joints must be cut. Peculiar grooves in a monolithic slab will prevent the appearance of cracks during linear expansion.
Note. Damper joints are cut if the screed area is equal to or exceeds 30 m². It is also recommended to form seams between rooms if the alignment was carried out in several rooms.
To create a damper mesh, you will need to “divide” the slab into original rectangles with a minimum area of 10 m². According to the rules, the seams must be timed to the connecting lines between the floor slabs, to the border of the reinforcing mesh, if it was used. The approximate width of the damper "groove" is 3 mm, the depth is 1/3 of the thickness of the leveling layer. After cutting, a cord is placed in the grooves, and then the remaining cavity is filled with sealant. The location of the seams must be taken into account when laying the coating.
Video about the screed device over the "warm floor"
A screed device from a solution of cement with sand is not an easy job. It will require, in addition to diligence, a considerable investment of time and physical effort. Even having thoroughly clarified the technological aspects, few will undertake a difficult task in all respects. However, knowledge of how to competently make a strong cement screed is needed not only by independent craftsmen, but also by owners who entrusted the alignment to a team of builders. For control, technical information is required no less than for do-it-yourself styling.
A cement screed made in compliance with the technology is a universal, even, strong and durable base that is not afraid of moisture and temperature changes.
Leveling the surface with cement and sand is most often used in construction, because: it is cheap, suitable for any premises and does not deteriorate from frost, it is used for any topcoat, provides the desired slope and can serve as the basis for warm water floors. The cement floor withstands without damage alkaline attacks, the effects of fats and acids, and conducts heat.

Making a do-it-yourself cement floor screed is a laborious process, but quite affordable even for a novice builder.
The manufacturing technology and installation of a cement-sand screed is extremely simple. The solution consists of cement grade 300 and above, sand and water. The ratio of components is 1:3:2. In order to increase the density of the screed, the solution is supplemented with a plasticizer or similar special adhesive. Ready-made self-levelling mixtures can also be used for screeding.

Cement-sand mortar is used on concrete, stone and brick bases. On average, on square meter subfloor after the screed device, a load of up to 90 kg will be distributed.
The thickness of the screed varies from 3 to 10 cm. If the coating in some areas is less than the minimum, be sure to add a plasticizer to the mixture so that the layer does not crack. If the thickness of the screed is more than 10 cm, it is necessary to reinforce the layer. Screeds over 10 cm high are unforgivably expensive.
Cement with brand 400 - perfect option for screed in a high-rise apartment. But cement M-500 does not mean at all that it is a more reliable ingredient. The meaning of this marking is the presence of specific additives in the composition of the cement that do not affect its durability.
Types of cement screeds
Laying a layer of cement on a subfloor can be carried out for different purposes. To create height, slope, thermal cushion, etc.
For different purposes, 3 types of screed are used:
- screed associated with the rough surface of the floor and walls;
- sand-cement screed independent of building surfaces;
- floating screed with insulating layers for walls and floors.
Surface preparation
Before working with a cement-sand mixture, you need to prepare the surface and install beacons.
First stage. The floor in the room where the screed is planned to be made must be flat and free of dirt. If work is carried out on the ground, then it should first be tamped and filled with bituminous composition so that the cement screed lies smoothly. Secondly, if there are dry mixes in the composition of the cement screed, then the surface must first be dedusted and coated with a primer so that the screed will better adhere to the floor surface.
The second stage is the installation of beacons. It is necessary to measure the space using a level and install beacons over the entire area of \u200b\u200bthe room, corresponding to the level of the future floor. This is done so that the surface of the screed is as horizontal and even as possible.
Installation of beacons
The installation of beacons in accordance with the measurements taken allows you to subsequently fill the room with a solution quickly and without much thought.
On the floor, every 30 centimeters, "chops" or cement (alabaster) columns are installed at such a height to which a specific section of the future floor needs to be raised. Then, beacon rails are laid and fixed on the "chopics".
The highest point of the rail is the height to which the level of cement mortar must reach. Experienced builders often do without beacons, setting the level with a thread or fishing line. However, for those who are doing the screed for the first time, we strongly recommend installing beacon rails - this is not fast, but visual and convenient. With a rail, you can be sure that there will be no significant differences on the surface, and also during pouring there will be no overspending of the solution. In addition, the rail allows you to accurately calculate the amount of solution.
Work progress
In cases where the leveling layer is not more than 4 cm, a bonded screed is used. The fill eventually forms a single whole with the rough base and the walls of the room. Before pouring, you need to repair the surface, remove cracks, holes, foreign elements. The screed should “stick” to the surface: for better adhesion to the mortar, the floor is cleaned with a metal brush and moistened.
Cement-sand leveling of unbonded type
If you need a screed with a thickness of 5 centimeters, choose an unbound type of alignment. In this case, the most even and waterproof surface is required. Do not use primers and other substances that increase the adhesion of the rough surface in order to avoid the formation of cracks and shells in the screed layer. Otherwise, the technology of the tie device is the same as in the connected type.
The floating type base is suitable for rooms where it is advisable to install a screed with a thickness of 5 to 10 cm. In this case, waterproofing measures for the rough base are necessary. And the screed layer is separated from the walls by a polystyrene barrier. With such a high power (5-10 cm), the screed is necessarily reinforced (mesh or fiber filler).
To reduce the weight of the resulting stone slab, the solution is prepared in a semi-dry way. In this case, the drying of the layer is also intensified by 5-7 times. The floating screed mortar should feel like sandy loam and, when rolled in the palm of your hand, should form a loose ball, which, however, does not crumble. Polymeric substances can also be introduced into the solution to make it more plastic. When using a semi-dry solution, a fine finish is possible after 4-5 days.
Filling is carried out in 2 stages so that the edges of the screed are not rounded during drying. First, a 2-centimeter layer is laid, which is given a day to shrink. Next, the solution is brought to the level of the beacons and leveled. Otherwise, the rules are the same as when working with conventional cement mortar.
Cutting damper seams
If the screed area exceeds 30 m2, then after the initial drying of the screed layer of any type, but not earlier than after 72 hours, damper joints are cut in it. These cavities in the cement monolith will help to avoid cracks. Seams must be made every 10 meters, taking into account the boundaries along the base plates and the reinforcing mesh inside the layer. A groove 3 mm wide and one third deep of the leveling layer is filled with sealant.
5 tips for the installation of cement-sand pavement
- Prepare the screed mortar in batches: liquid cement begins to harden already 20 minutes after mixing.
- You can control the density of the cement-sand layer by pressing on the wet screed area. A deep recess and a puddle indicate that the batch should be thicker.
- To check the horizontalness of the wet screed surface, you need to set the "rule" - level in different directions.
- You can step on the flooded floor in a day if you have special shoes with an increased surface of the foot to distribute weight. And after 7 days you can safely walk on the screed. Laying the finish coating is allowed no earlier than 40 days later.
- A week after pouring, the screed must be moistened so that the cement gains strength. Moisture will help prevent peeling and cracking. It is important not to make puddles on the surface, but to spray water evenly. If possible, cover the screed with cellophane or any polymeric material so that it evaporates moisture as slowly as possible. During the drying period, the cement coating also requires protection from drafts, frost, direct sunlight. In the room, it is advisable to turn off the batteries and other heating elements so that the drying is uniform.
Video - Do-it-yourself cement floor screed