
What appliances are related to electricity. The history of the creation and development of home appliances
If we present our everyday life without all the electrical appliances, for many, this situation will seem like a catastrophe of a universal scale.
The absence of a dishwasher, air conditioner, tape recorder or microwave oven will simply make life less comfortable; but the lack of an iron, washing machine or refrigerator for housewives will be a difficult test; the absence of an electric soldering iron will deprive a radio amateur exciting hobby; without an electric drill, it is impossible to carry out an elementary repair of an apartment; etc.
It's definitely The best way than buying a hood for more power than you need. Suppose we have a kitchen measuring 3 x 3 meters and 2.8 meters high, and this is a fairly spacious kitchen. Here we can connect with any cheap hoods and we can't fail. If you have a kitchen connected to a dining or living room, you need to consider the entire area, not just the kitchen.
Don't underestimate energy consumption
Since the hood is an electrical appliance, it is good not to underestimate its consumption. True, these are not devices that have worked for a long time, however, you use them often and you need to understand that they are devices with a small savings. This is what the energy classes give the power and power of the device and which you read from the label. Simply put, we think about how much energy is needed for divers to maintain optimal performance. This means low energy-saving values, so we recommend caution.
Life modern man unthinkable without household electrical appliances.
But, unfortunately, nothing lasts forever, and household appliances fail sooner or later. Can they be repaired? The answer in most cases is yes: it all depends on what kind of malfunction happened and how difficult the repair is so that it can be done at home.
Hood performance from different perspectives
The annual electricity consumption is also expressed in a large part of the hood. This tells you how much power is being consumed. However, you need to be aware that such an indication cannot be exactly used for your consumption with a diameter of 120 minutes per day and 60 minutes per day. Your home may be different, so values may vary. You should also be interested in how efficient the hood is. It is not clear to answer. Of course, efficiency can be measured. But we can look at it from different points of view - from what?
In one book, it is, of course, impossible to tell about all electrical household appliances, about all the problems that happen to them. Therefore, here we talk about the most common technique, the most common breakdowns and available ways eliminate them on their own.
electric iron
The most commonly used electrical appliance is the electric iron. After all, indeed, for example, a refrigerator with a stretch can be replaced by a cellar, a washing machine - by a washboard and hard-working hands; but today hardly anyone knows how to use a rubel and a rolling pin for ironing, and it is dangerous to iron modern fabrics with a coal iron (even if someone inherited it).
Hood control should be simple and intuitive
Lighting Efficiency - We measure the amount of energy needed to light and control the light, of course, the lower the efficiency of the hood. Suction Efficiency - We determine how efficient this is at consuming air. It is true that the less energy consumed to suck in a certain amount of air, the more efficient the hood. Filter Efficiency - measure the effectiveness of grease filters in a hood. It is determined that the fat filter is weighed and examined again after a while. The difference in masses is delayed by dirt, the more the filter is captured at the same time, the more effective it is. In terms of control, our recommendations are clear in the future.
First, about what types of irons the industry offers us. Their characteristics are contained in the marking of irons. So, alphabetic characters are decoded as follows:
UT - iron with thermostat;
UTP - iron with thermostat and steam humidifier;
UTPR - iron with thermostat, steam humidifier and sprinkler;
The hood is a simple device, so the operation should not unnecessarily complicate the operation. The easier it is for you to choose the action you want, the better. Just because cooking often has dirty or greasy hands, and prolonged control of the hood will only have the effect of ruining it unnecessarily. The most common thing you can find on the market is sliding power control and push button on. More modern devices then use the display for control.
It should be perfectly touching, as simple as possible, and as possible as possible so that technically inferior people can find it. The best thing is if you can see the hood in the store live - then you can see everything and you can try and control it.
UTU - iron with a thermostat, weighted.
The meaning of digital characters is even easier to decipher: the first number following the alphabetic indicators indicates the power consumed by the iron (in W); the second number hides its mass (in kg). Example: marking UTP1000-1.4 means - "an iron with a thermostat and a steam humidifier with a power of 1000 W (1 kW) and a mass of 1.4 kg."
Hood noise is important to your comfort
Another parameter that will tell you about hoods is the noise of the device. Since it takes a lot of power to exhaust, make sure the hood is noisy. Besides, most of you can imagine it. Naturally, the noise rises with speed, so the more powerful the hood, the noisier. Typically, hood noise ranges from 55 to 70 dB, but you can get quieter and louder models. Of course, we recommend reducing the noise level as much as possible - this is ideal with 58 decibels, while the noise at work will be uncomfortable, and there is a certain risk of health problems.
It is no coincidence that increased attention is paid to the mass of the iron, because the maximum heating time of the sole depends on it; there is a pattern here: for light irons, for example, UT1000-1.2, the maximum heating time of the sole is 2.5 minutes; for heavier ones, such as, for example, UTU1000–2.5, up to 7.5 minutes.
On fig. 86 shows the device of an electric iron of the UT brand.
A lot depends on the design of the hood - for example, fume hoods are noisier than exhaust pipes. Moreover, the more filtering levels, the more noise will be. If you want to get some relief, you can buy shims that will close the hood, and its noise will decrease somewhat. Likewise, quieter units are built in that are largely insulated by a cabinet that absorbs a lot of noise. On the other hand, island excavators located freely in space are noisier.
Hood dimensions - the largest suction surface and the most compact dimensions
You certainly don't want the hood to take up more space in the kitchen than necessary. You will usually be looking for smaller and more compact models. If you have a kitchen and you just want to buy a new hood, you have the dimensions set by the kitchen structure. Also, don't forget that device sizes are very related. Let's leave the overall hood size aside so it's hard to consult here and it's up to you to decide how much you have in your kitchen and how much you want to suck. We will rather focus on energy-related parameters.
Rice . 86 . The device of the electric iron brand UT: 1 - sole; 2 – tubular electric heater (TEH); 3 - thermostat; 4 - heat-insulating gasket; 5 - cord; 6 - housing cover; 7 - handle; 8 - signal light; 9 - housing casing.
Structurally, the iron consists of an aluminum or cast iron sole, into which a tubular electric heater (TEN) is pressed; a casing made of heat-resistant plastic, separated from the sole by a heat-insulating gasket; handles and covers (casing, handle and cover form the body of the iron). Other additions - an automatic thermostat, a steam humidifier and a sprinkler (together with a water tank) - are also mounted under the cover of the iron body. To connect the iron to the electrical network, a connecting cord with a movable input is used.
Maintain the hood: try to keep it as simple as possible
The width of the hood - plays a big role, since the size of the suction surface depends on it. We will not consider the height of the hood, there is another choice depending on the space in your kitchen. We will focus on another parameter, and this is the diameter of the exhaust pipe. If you don't buy a recirculating hood, you will have to deal with one. It should be the same as the diameter of the exhaust pipe you have at home. Any difference affects both the performance and efficiency of the device, as well as its participation. Either it will require a restructuring, or at least a suitable reduction system, which would not be the easiest.
- The depth of the hood is usually very similar, but the width varies considerably.
- The usual width is 60 centimeters, the maximum is about 90 centimeters.
- The more, the better if such a hood is included in your kitchen.
- Pipe diameter.
Control over the state of the heating element is carried out visually using a signal light: when the heating element is turned off, the light goes out - this means that it has heated up to the temperature set by the thermostat. The 3.5 V signal light is powered by a voltage drop in a small section of a nichrome spiral connected in series with the heating element.
Then when choosing, try to pick a model that you don't have to worry about. Of course, the hood is a device in which trouble-free operation is almost impossible. Also, if you want your kitchen to look good all the way through, you need the hood to look clean and polished. And for efficient extraction, hold the inside of the hood. But, as we say, nothing should be exaggerated. From a maintenance point of view, you must first of all know that under all circumstances it is necessary to maintain the surface of the hood.
The basis of the thermostat is a bimetallic plate that controls the high-speed switch. The thermostat operates as follows: the bimetallic plate heats up from the soleplate of the iron; due to the difference in the coefficient of thermal expansion of the two metals, it bends and presses the contact plate; as a result, the circuit opens, the heating element turns off and starts to cool down. But, as soon as the bimetallic plate cools down to a certain temperature, its bend straightens out, releases the contact plate, and the heating element turns on again.
In the kitchen, you work with grease, you have dirty hands, when you achieve control, all this plays a role. In order to keep the hood looking good, it is necessary to clean the surface at least a little after each boil and polish it gently once in a while. Use a detergent designed for this surface. In this regard, it is very important that the hood be covered with anti-grease or fingerprint coating.
As for internal maintenance, it's good to digest the hood from time to time and clean it from the inside to prevent it from invading. We mean, in particular, the maintenance of filters. They occur regularly and at short intervals. This is best on fume hoods where you can clean the grease filter from time to time. Recycling is more difficult.
A common problem is a malfunction of the iron's power cord. A break in the cores of the power cord, as a rule, occurs at the point of its entry into the handle of the iron. Since the lead is movable, the cord is constantly subjected to bending during ironing. Such a breakdown does not at all require a complete replacement of the cord, the repair consists in restoring its integrity: the cord is cut off at the break point, the screw clamp is freed from pieces of cores, the end of the cord of the required length is re-stripped and re-embedded in the terminal block.
Design should not interfere with the appearance of the kitchen
Metal filter - just rinse with water and dry, it is no longer needed. The lubricant filter, often made of steel materials, can be washed by hand, often in a dishwasher, and does not need to be changed.
- The carbon filter is a filter with a limited life.
- It can be washed, but it is difficult because it is prone to damage.
- It is also more efficient to replace it in time.
An iron whose tubular electric heater has failed (burned out) cannot be repaired, since the heating element is pressed into the sole of the iron.
One of the malfunctions of the thermostat is its knocked down setting, which leads to insufficient heating or overheating of the iron. Restoring the setting is quite within the power of a home electrician. To do this, turn the thermostat knob counterclockwise until it stops (that is, set it to the minimum temperature), disassemble the iron and separate the casing from the soleplate with the thermostat. Then, with your finger, slightly raise and lower the end of the movable contact plate at the point of contact with the bimetallic plate: when the contacts are turned on and off, clicks will be heard that can even be felt tactilely.
In the case of built-in or basic models, it is even less visible, but it is also completely separated. Therefore, try to consider the design of the appliance if you want a stylish and sophisticated kitchen. First of all, the material is important, many of them are used. Of course, it depends on the color of the hood. It should match the rest of the kitchen - either look for the hood in a similar shade, or if you dare, in a contrasting shade. By the way, by the way, it would be incomplete and not quite good decision. It's good if you look at how the hood will fit into the kitchen in terms of size or overall design.
Next, you will have to work with both hands: continue to click the contacts with one, and with a screwdriver held in the other hand, turn the adjusting screw clockwise until the clicks stop, then turn the adjusting screw back (counterclockwise) half a turn - clicks should resume. This position of the thermostat will correspond to the setting for the minimum heating temperature of the sole. The repair is completed with the assembly of the iron.
Basic and extended functions of modern hoods
It's more detailed, and you'll probably be able to design it all the way through, but it's good to keep it from being forgotten. Time has passed, and therefore household appliances not only have to be carried out directly, but also more. No, today's trend is smart devices that can offer their users much more and help increase their comfort. Hoods are no exception in this regard.
Lighting is now almost a basic hood. It is all the more surprising that he does not have all the hoods. And that's very good - you have an overview of cooking, although the hood protects you. In addition, with the help of more economical light, the light often reaches a much greater intensity than the bulbs distributed throughout the kitchen. Our advice is that you need hood lighting, it really pays off.
The conclusions of all the electric elements of the iron - the heating element, the spiral, the signal lamp cartridge and the power cord - are located on the block at the back of the iron and are closed with a removable cover. When disassembling the iron, you first need to unscrew the bolts holding the cover, remove the cover itself and release the terminal block from the wires connected to it, and then unscrew the screws securing the case to the sole.
This is an appetizer of the highest quality extracts that are on the market. The fact is that the sensors themselves can start the suction process, depending on what they detect on the kettle, and then, depending on the amount of vapor produced and its composition, regulate the suction intensity. It's definitely more efficient than switching to cooking yourself. Plus, sometimes you don't even have free hands.
A lot of modern hood comes from control buttons for control via display. This is most often the case, and in addition to the hood control, you can also read some operating values. However, caution should be exercised in this matter. From our point of view, remote control of the hood is somewhat better. However, we look back at it somewhat reservedly. It's a good idea if something is cooked on a plate and you're sitting in the living room reading before the meal is complete. Then, of course, it is worth remotely controlling the hood without standing in front of it.
When disassembling the iron for troubleshooting, it is possible to perform a preventive tightening of all fasteners (bolted, screw, nut) that are inside the case. It is recommended at the same time to clean the contacts of the thermostat by stretching a small strip of fine-grained sandpaper between them several times.
The body of the iron is not connected to the entire plane of the sole, but is in contact with it only at a few points, which reduces its heating from the sole; therefore, there is a gap between the casing of the case and the soleplate, into which fabric fibers fall during the operation of the iron. If you do not regularly clean this gap, the fibers clog the contacts of the thermostat and it may fail (besides, the fibers burn on the sole, spreading the smell of burning). As a preventive measure to prevent problems of this nature, it is recommended to clean the iron once every 1.5–2 years.
The sole of the iron also needs care:
- brown plaque, which often appears on the working surface of the iron from woolen and synthetic fabrics, can be removed by wiping it with a damp cloth sprinkled with baking soda. But this should not be done if the sole has a Teflon or nickel-plated coating; there are special pastes for cleaning such irons;
– Under no circumstances should the soleplate be cleaned with sharp objects or abrasive materials: the resulting scratches will accelerate the formation of brown deposits. In addition, it is not possible to remove plaque from scratches;
- you can protect the surface of the sole of the iron from contamination by treating it with paraffin: grated paraffin is poured between two pieces of cotton fabric and ironed with a slightly heated iron.
Fridge
Refrigerators are number two on the list of home electrical appliances.
The main feature of the classification of refrigerators is the principle of cold generation. Depending on this, all refrigerators are divided into absorption and compression.
Absorption refrigerators, the principle of operation of which is based on physical property an aqueous solution of the refrigerant (ammonia) absorb a large amount of heat during evaporation, have excellent consumer characteristics: they are quite easy to repair and extremely reliable in operation; they work almost silently.
Their only drawback is their high energy consumption: the annual electricity demand of an absorption refrigerator is about 1400 kW/h (for comparison: a compression refrigerator consumes only about 400 kW/h over the same period). The disadvantage, although the only one, is quite significant; that is why this type of refrigerator is not widely used.
The cooling circuit in compression-type refrigerators (Fig. 87) is a closed system filled with refrigerant.

Rice. 87. Compression-type refrigerator device: a - rear panel; b - diagram of the refrigerator; 1 – motor-compressor; 2 - capacitor; 3 - part pipe; 4 - tube; 5 – start-protective relay; 6 - a vessel for collecting water; 7 - evaporator; A - refrigerant vapor high pressure; B - liquid refrigerant; B - a mixture of liquid refrigerant with its vapor; G - refrigerant vapor low pressure.
The components of the cooling system are: the motor-compressor, the evaporator, the condenser, the control valve and the pipelines by which these elements are connected to each other.
In refrigerators of compression type, two types of compressors are used: with an external casing suspension and with a compressor suspension inside the casing - next to the motor.
The cooling system works as follows: the motor-compressor draws refrigerant vapor from the evaporator, as a result, low pressure is created in the evaporator. In the compressor, the refrigerant vapors are compressed and fed into the condenser, where, as they cool, they turn into a liquid, which again enters the evaporator and again turns into vapor in it.
The entire process of heat exchange of the cooling system takes place directly in the evaporator and condenser: turning into vapor, the refrigerant absorbs heat through the surface of the evaporator (which is located in the freezer of the refrigerator), and turning into a liquid, gives off excess heat through the surface of the condenser (which is located outside the refrigerator, on its back panel). The evaporator and condenser are interconnected by a control valve; it has a small flow area, which does not lead to equalization of pressure and allows you to always keep rarefied in the evaporator, and increased pressure in the condenser.
The compressor is driven by an electric motor, which is the consumer of electricity.
The breakdown of the refrigerator causes the housewives not just a feeling of discomfort, the question arises of preserving perishable products: it’s good if it’s winter outside and you can save them on the balcony; and if it's summer outside and even the heat is 35 ° C? That's when you need maximum efficiency in fixing problems.
Of course, the device of the refrigerator is quite complicated, not every malfunction can be fixed at home (for example, to repair the cooling system, you need not only extensive special knowledge, not only certain skills, but also very specific devices that are hardly available to a home master). If the breakdown touched the electrical economy, then here you can try to cope on your own.
The first thing to check in a broken refrigerator is the serviceability of the wiring: if the light bulb is on when the door of the refrigerator connected to the mains is open, then the wiring is intact. If the light does not light up, you need to check the serviceability of the cord and plug connection (both plugs and sockets); how to do it - has been said more than once.
The next part of the refrigerator that is tested (with a good cord and plug connection) is the start-up relay. Check the reliability of the connection of wires with the terminals of the relay and the temperature controller and the connection between the feed-through contacts and the sockets of the relay. Then they check the relay itself - they call it with a tester; often it is the culprit of the malfunction.
Next on the list is checking the thermostat: turn it on and off several times. If a characteristic click is heard when the thermostat is turned on, then the thermostat is normal. If there is no click, then this means that the thermostat is faulty; it should be replaced.
If the refrigerator is working properly, but the light is open door may not light up. light bulb burned out. To replace it, compress the horizontal walls of the ceiling in the back and disengage it from the walls of the cabinet, replace the light bulb and install the ceiling in place.
If the situation is exactly the opposite: the light bulb is on even when the refrigerator door is closed, then the switch button spring has most likely weakened. It is unlikely that it will be possible to replace the spring on your own (for this you will have to remove the inner lining of the cabinet, which can violate its tightness), so you can use this advice: cut a small circle 1 mm thick, 15–20 mm in diameter from plastic (textolite, copolymer, etc.) and stick it on the door panel opposite the switch button with universal glue.
If the electric motor hums, but does not start (thermal relay trips), then the voltage in the electrical network may be lowered by more than 15% relative to the nominal value. It is necessary to turn off the refrigerator and check the voltage in the network with a voltmeter, and if it is really less than permissible, you should refrain from using the refrigerator.
In fact, the stability of the mains voltage affects the correct operation and life of the refrigerator to a large extent, therefore, if the mains voltage fluctuates strongly, it is necessary to use a voltage stabilizer to connect the refrigerator, without waiting until the refrigerator starts to malfunction.
A metallic knock when the compressor is turned on, turned off and running, accompanied by cabinet vibration, is not normal for a working refrigerator - this indicates that the pipes of the cooling system touch the cabinet. To eliminate this drawback, it is necessary to turn the refrigerator with the back wall and examine the panel; having found the place where the tube touches, you need to carefully bend it.
Sometimes knocking can be caused by a completely different reason - strong rocking of the compressor casing. Repair consists in tightening (or loosening) the bolts on the suspension springs or in laying gaskets under the supports.
Sometimes the cause of knocking is not a problem, but a loosening of the capacitor mounting screws or a foreign object that has fallen behind the back panel, behind the capacitor or behind the motor-compressor.
A refrigerator delivers a lot of trouble, the evaporator of which quickly freezes up, and it often turns on (which leads to wasteful energy consumption). As a rule, the reason for this is a violation of the tightness of the door. Adjusting the hinges of the door will help to restore the tightness, and you can check the quality of the tightness using a strip of thick paper. It is placed between the door seal and the cabinet itself anywhere around the perimeter, close the door and try to pull out the strip: if the paper is clamped tightly, then the tightness has been restored (it is preferable to check the entire perimeter of the seal).
Damage to the paint layer on the cabinet and refrigerator door can lead to corrosion of the metal from which they are made, therefore, if scratches are found on the outer surface of the refrigerator, they should be eliminated in a timely manner. With a shallow scratch, when the metal of the case is not visible, it is simply painted over with white enamel. If the depth of the scratch reaches the metal, then it must first be cleaned with an emery cloth, degreased with a swab dipped in acetone, dry the surface thoroughly and only then apply a layer of white enamel (if necessary, after it has completely dried, another layer can be applied).
You can significantly extend the life of the refrigerator, if you strictly follow all the recommendations for the operation and care of it. What are they?
Firstly, the refrigerator is not recommended to be placed in close proximity to heat sources (stoves, stoves, heating appliances etc.). In addition, it is advisable to choose a shaded place for it - this will reduce the flow of heat into the refrigerator and reduce energy consumption. And in order for the rear panel to be available for free air circulation (which prevents the engine from overheating), the distance between the wall and the rear panel must be at least 3–4 cm.
Secondly, it is necessary to ensure the complete stability of the refrigerator during its installation; this can be achieved with the help of adjusting feet screwed into the rear and front heels. The adjustment should be made in such a way that the cabinet has a slight (no more than 1°) deviation from the vertical towards the rear wall; in this case, the refrigerator door will close with a slight push.
Thirdly, it is recommended to turn on and off the refrigerator only with the thermostat knob; therefore, before plugging the power cord into a power outlet, make sure that the thermostat knob is set to the “off” position. When checking the operability of the refrigerator, it can be forcibly turned on again no earlier than 5 minutes after it was turned off (if you do not withstand this time, the refrigerator will not turn on - the thermal relay will work).
Fourthly, if a snow coat of more than 5 mm is formed on the evaporator, it is necessary to turn off the freezer (freezer). With proper operation of the refrigerator and normal tightness, defrosting is performed once every 2-3 weeks.
The refrigerator is turned off (by setting the thermostat knob to the “Off” position), and for faster defrosting, the refrigerator and freezer doors are left open. There are several ways to speed up this process: place a vessel with hot water, send warm air into it from a vacuum cleaner or hair dryer, in the summer a jet of air from a fan is used, etc.
But it is forbidden to use sharp metal objects to remove ice: there is a possibility of damage to the walls of the evaporator, this will render it unusable, and a complete replacement of the evaporator will be required.
After the snow cover has thawed, the inner surfaces of the evaporator and refrigerator are wiped with a soft cloth moistened with slightly soapy water or soda solution (water should not get behind the inner lining of the cabinet and the door), dried and ventilated for 30–40 minutes.
Before loading the freezer after it has been thawed, it is necessary to cover its bottom with a plastic bag, and also place portions of perishable products in the bags; otherwise, the products may freeze to the bottom of the freezer, which will make it difficult to remove them from there, and if excessive force is applied, microcracks may appear in the walls of the evaporator.
Washing machine
By and large, in everyday life you can do without a washing machine: you can, for example, wash clothes by hand, or use laundry services. But for many, this prospect does not seem rosy, so a washing machine is an indispensable attribute of almost every apartment or house.
Depending on the degree of automation of the washing process, all washing machines are divided into four types: CM - washing machine without spinning; CMP - washing machine with manual spin; SMP - a semi-automatic washing machine in which washing, rinsing, spinning, pumping out water are mechanized, some models also include automatic devices for regulating the washing and spinning times; SMA is an automatic washing machine, in which the processes of supplying water, washing, rinsing, pumping water and spinning are not only mechanized, but also automated.
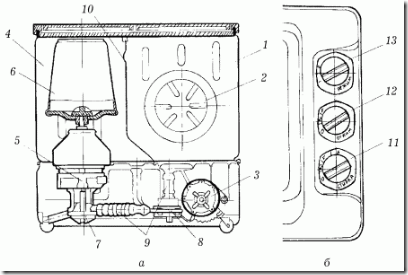
A washing machine without spinning has the simplest device (Fig. 88).

Rice. 88. The device of the washing machine type SM: 1 - washing tank; 2 - tank cover; 3 – time relay handle; 4 - time relay; 5 - capacitor; 6 - electric motor; 7 - cord; 8 - belt drive; 9 - pulley; 10 - activator; 11 - cover with a scale; 12 - thermal relay.
Machines of the SM type ("Baby", "Fairy", "Alesya", etc.) belong to the class of small-sized ones. Machines of this type are installed on special stand put on the sides of the bath. Such machines are simple both in design and in operation. They are equipped with a reversible cyclic time relay, which ensures the operation of the machine in the following cycle: operating period of rotation of the electric motor in one direction (50 s) - pause (10 s) - operating period of rotation of the electric motor in the opposite direction (50 s) - pause (10 s) . The relay allows you to adjust the washing time in the range of 1-6 minutes.
The motor is protected by a thermal relay; it stops the motor when the machine is overloaded or the activator is jammed.
The device of the CMP type washing machine (Fig. 89) is similar to the device of the CM type machine.

Rice. 89. The device of the CMP type washing machine: a - general form; b - longitudinal section; 1 - body; 2 - washing tank; 3 - the level of filling the tank with water; 4 - handle; 5 - manual pressing rollers; 6 - adjusting screw of the spin; 7 - spring; 8 – wringer handle; 9 - relay; 10 - activator; 11, 12 - drain and connecting hoses; 13 - cord; 14 - lattice; 15 - pump; 16 - electric motor; 17 - frame; 18 - bracket for holding the machine during the spin cycle; 19 - roller.
The design and principle of operation of the SMR are as follows. The upper 2/3 of the body is occupied by a washing tank, in which a disk activator is installed on the shaft, which sets the water in rotational motion. At the other end of the shaft holding the activator is located centrifugal pump, which, if necessary, pumps out water from the tank; The shaft is driven by an electric motor through a belt drive. The electric motor is mounted on an inclined frame in such a way that it can be moved along it by adjusting the tension of the drive belt.
The electric motor of the washing machine is connected to the network using a cord with a plug, and turned on by pressing the start relay, which stops the electric motor after a certain period of time. For ease of transportation, the machine is equipped with carrying handles and rollers for rolling, and in order for it to remain stable during the spin cycle, it is held by the foot by the bracket.
The manual wringer is mounted on the machine body from above. It consists of two rollers with a rubber coating, pressed against each other by a flat spring. The rollers are set in motion with the help of a handle.
The dimensions of the washing tub and the motor power (350 W) are designed for the simultaneous loading of up to 1.5 kg of dry laundry.
The device of semi-automatic machines of the SMP type (Fig. 90) is somewhat more complicated, since they have a higher level of mechanization of the processes of washing, squeezing and pumping out water.
Rice. 90. The device of the SMP type washing machine: a - longitudinal section; b - control panel; 1 - washing tank; 2 - activator; 3 – activator drive electric motor; 4 – centrifuge tank; 5 – centrifuge drive electric motor; 6 - centrifuge; 7 - pump; 8 - valve; 9 - branch pipes; 10 - liquid level indicator; 11 - control knob for the operation of the washing unit; 12 - control knob of the spin unit; 13 - washing mode switching knob.
Structurally, the semi-automatic washing machine is divided into two units: washing and spinning. The washing unit consists of a washing tank with a tray, an activator (paddle disk), which is fixed on the side wall of the washing tank; an activator drive with an electric motor is installed on the pallet. Rotational movements the activator is transmitted from the electric motor by means of a belt drive.
The centrifuge tank includes the centrifuge tank, to the bottom of which the centrifuge drive electric motor is suspended on shock absorbers, the centrifuge itself, fixed on the motor shaft, and the pump installed on the bottom shield of the electric motor.
The nodes are interconnected by a system of branch pipes with a valve.
To control the washing and spinning processes, three handles are installed on the top cover of the case: washing and spinning control handles, which are equipped with clock mechanisms (time relays) that automatically turn off the corresponding electric motors after a certain time, and a washing mode setting knob.
The total power of electric motors is 500–600 W. The activator engine develops a rotation speed from 600 to 1500 rpm.; centrifuge speed up to 3000 rpm. If during operation it becomes necessary to dismantle the electric motors (for repair work), then they can be connected again, guided by the diagram shown in Fig. 91.

Rice. 91. circuit diagram connection of electric motors of the SMP type washing machine.
Due to the special design of the activator blades, when it rotates clockwise or counterclockwise, a solution flow of different power (different degree of activation) is created in the washing tub. Therefore, the SMP provides two washing modes:
– hard (I) – a more intense solution flow created by counterclockwise rotation of the activator;
– gentle (II) – less intense solution flow created by clockwise rotation of the activator.
The maximum one-time load depends on the brand of the machine and reaches 3 kg of dry laundry with hard and 2 kg of dry laundry with gentle washing.
The most advanced household washing machines today are CMA machines. Domestic automatic machines provide up to 12 programs that allow you to automate the processes of filling and pumping out water, heating it to a predetermined temperature, soaking laundry, and introducing the right amount of detergent. Such machines independently (in accordance with a given program) wash, rinse and wring out linen.
According to the existing rules for connecting automatic washing machines to the electrical network and the water supply system, it is necessary to obtain permission from the electricity supply and utilities.
As a rule, the more operations a particular washing machine can perform, the more complex its device and, accordingly, the more difficult it is to repair it. But there are a number of problems that are standard for machines of all types, which a home master can handle.
If the electric motor (motors) does not work when the time relay is turned on, then there may be no voltage in the network or the socket outlet is faulty (you need to check with an indicator screwdriver or by plugging a known-good electrical appliance into the same socket); or maybe there are problems with the power cord (you need to ring the cord with a tester - there may be a break in the core); possible malfunctions in the time relay itself (it should be replaced).
If, when the relay is turned on to the “Wash” position, the electric motor hums, but the activator does not rotate, then the position of the “Mode” knob is most likely not fixed. To eliminate this malfunction, turn off the washing relay, set the “Mode” knob strictly to the required number and start the electric motor again.
If during the washing process in the centrifuge tank the level of foam of the solution reaches the bottom of the centrifuge itself, then it will not gain momentum. To eliminate such a malfunction, it is necessary to remove the centrifuge neck insert, unscrew the fastening nut (turn counterclockwise), remove the washer and the centrifuge itself and remove the pin from the shaft hole. After that, you need to pump out the water from the centrifuge tank to the washing tank, remove the foam and install all the removed parts in place (in reverse order). Attention! Before disassembling and assembling, be sure to disconnect the machine from the mains.
A clogged valve may be to blame for the solution flowing from the washing tub into the centrifuge tub. It should be washed, for which 4-5 liters are poured into both tanks hot water and turn on the spin relay for 2-3 minutes. If it is not possible to eliminate the overflow by flushing the valve, then most likely the valve membrane has become inverted. To restore the normal operation of the pump, it is necessary to remove water from the machine, disconnect it from the electrical network, disassemble the valve and install the membrane in the correct position.
If there are signs of leakage of the solution from the machine, it is necessary to establish its cause: if the connections of hoses and pipes are leaking, then to eliminate the leak, it is enough to tighten the clamps at the joints; if the cause of the leak is a leaky hose, it should be replaced with a new one. If a leak occurs due to a breach in the tightness of the diaphragm located under the bottom of the centrifuge tank, then in most cases it is impossible to fix such a problem on your own, so it is best to call the master.
Some vibration when starting and stopping the centrifuge is not a malfunction, it is quite normal.
Like any other electrical appliance, a washing machine needs to follow the rules of operation, namely:
– it is permissible to store and operate the washing machine in rooms with an ambient temperature of at least 5 °C;
– do not overload the machine beyond the norm;
- long-term operation of the machine without water is not allowed, since this significantly reduces the service life of the sealing cuffs of the machine components (the activator unit, the pump, and the diaphragm of the centrifuge tank);
- the electrical equipment of the machine should be protected from the penetration of soapy water, water;
– after using the machine, its tank (or tanks) should be rinsed with clean hot water to remove detergent residues and thoroughly wiped dry;
- in order to avoid jamming of the washing and spinning units, it is recommended to lubricate the bearings of the electric motors once every 2-3 months.
Appliances for heating water
The principle of the device and operation of devices united by a common purpose - to heat water, is the same. The difference lies only in their design features.
The basis of these devices is a tubular electric heater - a heating element (Fig. 92), which is a thin-walled metal tube made of carbon steel grade 10 or 20 with a wire spiral with a very high electrical resistivity enclosed in it.

Rice. 92. The device of a tubular electric heater (TENA): 1 - a thin-walled tube (shell); 2 - spiral; 3 - contact rod; 4 - insulator; 5 - a layer of mastic; 6 - porcelain sleeve; 7 - contact nut; L is the total length of the heating element; I act - active (working) length of the heating element; I to - the length of the contact rod; d tr is the inner diameter of the tube; d cn is the diameter of the spiral; d sp. nar. is the outer diameter of the spiral; d is the wire diameter; h is the pitch of the helix.
The ends of the spiral are connected to the rods that come out of the hermetically sealed tube and serve as contacts for connecting the heating element to the network. In order to avoid closing the spiral on the body of the tube, the latter is filled with a loose insulator that conducts heat well and does not conduct electricity at all (quartz sand or crystalline magnesium oxide - the so-called periclase). The insulator filling the tube under high pressure turns into a monolith, so it not only performs an insulating function, but also securely fixes the spiral along the axis of the tube.
The heating element is a fairly versatile device designed for use in various water heating devices. Therefore, depending on the purpose, heating elements are made of various materials (including refractory ones) and various shapes (after crimping, the tube can be bent in any way).
The temperature of the working surface of heating elements has a fairly wide range: from 450 ° C (for household electric heaters) to 800 ° C (for heating fats, oils, low-melting metals in industrial installations). The average service life of heating elements with proper operation is up to 10,000 hours of continuous operation.
Since, as already mentioned, there are a large number of types of heating elements, when buying them, special attention should be paid to the marking, which indicates not only the metric parameters of its elements, but also the rated power in kW and voltage in V, the tube material, the environment for which The heating element is intended, as well as the type of climatic modification in accordance with GOST.
Among the shortcomings of heating elements, their high metal consumption, the use of expensive materials (nichrome, stainless steel) and, as a result, their high cost should be noted. In addition, heating elements are not subject to repair.
The simplest household water heater that uses a heating element is an electric boiler; in fact, a boiler is a heating element with a handle and a cord. The handle of the boiler has a hook (or is itself made in the form of a hook), due to which the boiler is fixed on the edge of the container in which the water is heated.
All kinds of electric kettles, samovars, coffee pots are containers for heating water, in the lower part of which a heating element of one form or another is mounted.
When device is on suburban area hot showers often use low-pressure storage water heaters (EVAN type) with the same tubular heating element with a power of up to 1.24 kW. Diagram of its connection to water pipe and sprinkler shower is shown in fig. 93.

Rice. 93. The device of an electric water heater of the EVAN type: 1 - water tank; 2 - heat-insulating casing; 3 – mixer tube; 4 - thermostat; 5 - mixer; 6 - branch pipe for entering cold water; 7 - signal lamp; 8 - electric cord; 9 – temperature regulator knob; 10 - heating element.
EVAN heaters are produced with a capacity of 10, 40 and 100 liters. Warming up the water to the temperature at which the thermostat knob is set occurs, respectively, in 1, 2, 3, and 7, 8 hours.
The serviceability and duration of the service life of electric water heaters depends on how correctly they are operated and looked after. The rules for operating such devices are simple, so remembering and adhering to them will not be difficult.
It should be remembered that devices intended for heating water (electric kettles, coffee pots, etc.) can only be connected to the mains if they are filled with water by at least 1/3 of their volume, otherwise the heating element will burn out (and repair , as you know, it is not subject).
There are special marks on the heating tube of the boiler, indicating the lower and upper limits of filling the tank with water before turning on the boiler in the mains. If the water does not reach the lower risk, then you can burn the device; if the water rises above the upper risks, then there is a possibility of a short circuit.
A sharp temperature drop adversely affects the coil of the heating element, so you can not pour water from the kettle, samovar, etc. until the heating element is exposed, until it has cooled down. Also, do not pour or top up cold water on the heated surface of the tubular heater.
Long-term operation of water heaters (especially with hard water) leads to the formation of scale (precipitation of mineral salts) on the surface of the heating element, which reduces thermal conductivity and leads to wasteful energy consumption. Therefore, scale should be removed periodically using one of the proposed recipes:
- carefully pour 4 volume parts of water into 1 volume part of hydrochloric acid; rinse the inner surface of the device container and the surface of the heating element with the resulting solution, after which the device is thoroughly rinsed with clean water;
- if the kettle is plastic, then instead of rather aggressive hydrochloric acid, it is better to use soft citric acid. To do this, boil 0.5 l of water in a kettle and add 25 g of powder citric acid. Leave to soak for 15 minutes, then rinse the kettle thoroughly with clean water;
- you can pour 0.5 l into the kettle (or until the heating element is completely covered) 8% white vinegar, leave for 1 hour without boiling, then drain the liquid, and rinse the kettle with clean water;
- can also be used folk remedy- pour clean potato peelings into the container and pour water, boil, remove the peels and rinse the container with the heating element with plenty of clean water.
And now about the malfunctions of electric water heaters.
If the device is connected to the mains, its cord, plug and socket are working, but the water does not heat up, you need to check the heating element (heater), or rather, the serviceability of its contact connections. To do this, disconnect the device from the network, remove all water from the container, and dry it. Then you should unscrew the screws securing the tray and remove it (so the heating element will be more accessible).
Very often, the cause of the malfunction is hidden in a broken contact at the connection points of the heating element leads; therefore, it is they who are checked first of all: the fixing screws are unscrewed and the clamping washer is removed. If the connections are really broken, then they are restored.
If everything is in order with the contacts, then the heating element itself may be faulty, it should be replaced: the contacts of the heating element leads are opened, the heating element is replaced with a new one.
A vacuum cleaner
The vacuum cleaner does not apply to electrical appliances basic necessities, such as, for example, an iron or a refrigerator. And yet, the presence of a vacuum cleaner in a house or apartment makes life much easier for housewives, helping them with cleaning.
But a little more than a century ago, people had no idea that there could be any other devices for cleaning a home, in addition to a broom and a damp cloth. Therefore, the appearance at the very end of the last century in the United States of a device, which is a pump with a manual drive and a dust collector nozzle, was a truly revolutionary event. Two people served the first vacuum cleaner: one was responsible for the operation of the pump - he turned the handle, the other - he collected dust with a whisk nozzle; the size of such a vacuum cleaner was impressive: its height reached 1.5 m.
A modern vacuum cleaner is a fairly portable (compared to the first) device. Its air intake apparatus consists of a fan rotated by a collector motor and a chamber with an air intake hole. The suction of dust occurs due to the fact that the fan creates a rarefaction of air inside the chamber.
Depending on the path that the air flow passes inside the vacuum cleaner body, they are direct-flow and vortex.
In straight-through vacuum cleaners, the suction air carrying dust and small debris enters directly into the fabric filter (garbage bag). Leaving all the garbage on the filter, both large and small fractions, the air flow enters the electric motor, cooling it. The air is then sucked out of the chamber by a fan.
Throughout the entire path of the air flow (from the inlet to the outlet), its direction does not change, hence the name of this type of vacuum cleaners - direct-flow.
In vortex-type vacuum cleaners, the air flow, together with the suction debris, flows around the lower part of the electric motor and, under the action of centrifugal force, is freed from debris and the heaviest dust particles. Then the air flow enters the filter, where it is finally cleaned, after which the air is discharged outside.
Often used in modern vacuum cleaners dual system cleaning: instead of one cloth filter, double filters are used, which are arranged in a series circuit. The first filter - flannel - retains debris and large dust particles; the second - calico - frees the air flow from small dust particles. Of course, the quality of air jet cleaning in such vacuum cleaners is much higher.
According to their functional purpose, they are divided into hand-held brush vacuum cleaners, car vacuum cleaners and floor vacuum cleaners. They differ from each other in size, power and number of nozzles, but their principle of operation is basically the same, with the exception of some points. Car vacuum cleaners have a device that allows you to connect them to the car battery.
And floor vacuum cleaners, in addition to their direct purpose, are used as a blowing compressor: if the corrugated hose is connected not to the inlet, but to the outlet, then with the help of a special nozzle included in the vacuum cleaner kit, you can perform painting work (whitewashing and painting).
What problems can be encountered during the operation of vacuum cleaners?
After 250-300 hours of operation of the vacuum cleaner, the brushes of the electric motor wear out. To replace them, you need to disconnect the vacuum cleaner from the mains, disassemble it, remove the brush holder caps from the electric motor, remove the worn brushes, and install new ones in their place (if the old brushes were connected to the motor contacts by twisting, then the same type of connection should be used; if the connections were soldered, it is best to use an electric soldering iron). For preventive purposes, it is necessary to wipe the collector of the armature of the electric motor with gasoline.
The vacuum cleaner may have a clogged hose, pipe, or nozzle nozzle, so the vacuum cleaner stops sucking air and picking up debris and dust. It is very easy to fix such a problem: each of these parts can be cleaned with a long, smooth rod. To prevent clogging of the hose, pipe or nozzle, before you start cleaning with a vacuum cleaner, you need to collect large debris with a broom or brush.
The service life of the vacuum cleaner depends on its correct use.
Particular attention should be paid to the care of the filters: their surface must be constantly clean so that dust does not clog the electric motor, so they must be cleaned after each use of the vacuum cleaner; washing filters (dust collectors) is not recommended, dry brushing is preferable; Do not use a damaged dust collector; if a tear has formed on it, a patch must be put on it, preferably from the same material.
The design of many modern vacuum cleaners involves the use of replaceable disposable paper filters, which are thrown away immediately after filling. If disposable filters are not provided in the vacuum cleaner, some similarity can be made independently: for this, a piece is cut off from an old nylon stocking a little longer than the length of the dust collector, one end is tied in a knot; the resulting filter is placed in a dust collector. Now it takes much less time to clean the vacuum cleaner.
Do not overload the motor: if cleaning involves prolonged use of the vacuum cleaner, it is recommended to take 10-minute breaks every 30 minutes to cool the motor.
The corrugated vacuum cleaner hose can also become unusable from improper storage: it cannot be folded at an angle; it is better to store it folded into a snail.
The motor of the vacuum cleaner must be protected from moisture: it is strictly forbidden to collect spilled water and other liquids with a vacuum cleaner.
Electric floor polisher
To care for parquet, linoleum and painted floors, an electric polisher is often used, equipped with hair brushes rotated by an electric motor that develops a high speed of rotation.
The motor is mounted in one housing with a brush holder.
The floor polishers also provide for the suction of dust, which rises with rotating brushes when rubbing the floors.
Before rubbing, mastic is first applied to the floor and kept for half an hour, then a second layer is applied and again allowed to dry for half an hour. If necessary, apply a third coat at the same interval. Then proceed to rubbing with a polisher.
The polisher has a high performance. With it, you can process about 80 m 2 of the floor in 1 hour. You should not press the floor polisher bar during operation, the working polisher unit is moved along the rubbed surface with smooth reciprocating movements.
After rubbing, you can polish the floor, for which polishing washers are fixed on the brushes and the process of processing the floor is repeated until the desired shine is obtained. When dirty, the rubbing brushes and polishing washers are washed with soap and water or detergent, rinsed and dried. This procedure is repeated periodically.
The powerful electric motor of the floor polisher heats up during prolonged use, so every 30–40 minutes of continuous operation it must be turned off for 20 minutes. After the engine has cooled down, you can continue to work.
To prevent the brushes from becoming contaminated with dust during storage, it is recommended to store the polisher in a case. At the same time, it is impossible to put the floor polisher on hair brushes, which will doubt during long-term storage, which will affect the quality of floor polishing.
Once a year, the bearings of the moving parts of the polisher must be lubricated, this is done by a specialist mechanic in the workshop.
Microwave ovens
Microwave ovens are widely used today, which use a completely different method of heat treatment of products than in ovens, gas or electric stoves. Microwave ovens use the energy of ultra-high frequency electromagnetic waves (MWs) generated by a magnetron.
The advantages of microwave ovens are widely known: food cooked in them does not burn, completely retains vitamins, does not dehydrate and does not fry. The cooking process itself is 4-8 times faster than, for example, on a gas stove.
The microwave oven at the same time does not heat up, does not emit any products of combustion, the air in the kitchen remains fresh and clean.
An attractive point for many is the fact that cooking in a microwave oven can significantly reduce fat intake, which is often an important condition for dietary nutrition.
In the microwave oven, you can not only cook, but also reheat dishes. Warming up is done on plates immediately before serving. Sometimes closed dishes are used, since the product may boil away and the oven walls may be contaminated.
There is one restriction regarding utensils used for microwave cooking. It is forbidden to use metal utensils for this purpose. This prohibition also applies to dishes that have metal decorations (for example, gold rims on the edges of plates or cups). You can use any other dishes - glass, porcelain, faience, plastic, paper, ceramic, etc.
The microwave oven allows you to cook meat dishes with different depth of processing of the product, that is, light, medium and deep fried. This is explained by the fact that the working chambers of microwave ovens are made in such a shape that the microwave waves generated by the magnetron are repeatedly reflected from the walls and bottom and freely propagate throughout the entire volume of the chamber. This ensures that the food is heated evenly from all sides. But, penetrating into food, the waves are weakened, so the outer layers of the processed product warm up somewhat faster than the inner ones, which makes it possible, by changing the cooking time, to obtain different processing depths.
The range of household electrical appliances produced by the industry is extremely diverse. They serve for long-term storage of food (refrigerators, freezers) and their processing (electric meat grinders, juicers, coffee grinders, mixers, food processors, etc.), cooking hot food (electric stoves and hotplates, coffee makers, microwave ovens, etc.) , creating comfortable conditions in the room (fans, air humidifiers, over-stove air cleaners, air conditioners, etc.), heating the home (convectors, electric fireplaces, radiators, etc.), processing laundry (washing machines, centrifuges, irons), cleaning the premises and cleaning clothes (vacuum cleaners, polishers, electric brushes, etc.), heating water (electric kettles, samovars, submersible boilers, storage water heaters, etc.), etc.
Specifications of household electrical appliances
Rated parameters. On the cases of devices, in their passports and operating instructions indicate: rated voltage in volts; type of current (alternating, direct); rated power in watts or kilowatts; current strength in amperes.
isolation classes. For household electrical appliances, five classes of insulation are standardized, denoted by Roman numerals 0, 0I, I, II, III. Devices with insulation class 0 have working insulation, but without elements for grounding (grounding); in other words, they do not have a clamp for connecting the protective conductor. Devices with insulation class 0I have working insulation and an element for grounding (grounding), but the wire for connecting to the power source does not have a grounding (grounding) core. Appliances with class I insulation have a three-wire cord and a three-prong plug (such appliances include, for example, a stationary kitchen stove). Many household electrical appliances have class II insulation, i.e. double or reinforced. Such insulation is designed to protect against electric shock in case of damage to the main (working) insulation. Devices with double insulation are also marked with the symbol B (insulation in insulation). It is impossible to ground and neutralize double-insulated devices. Electrical appliances with class III insulation are designed for mains voltages up to 42 V.
Moisture protection is indicated by the signs: " - drip-proof design; Δ - splash-proof; " - waterproof. The designation of the clamp is only for zeroing (grounding) - either the letter N(neutral), or the sign "grounding".
When buying an electrical appliance, the home master must take into account the following basic requirements.
From several options for the execution of an electrical appliance, it is necessary to choose the one that corresponds to the operating conditions. For example, when choosing a refrigerator, one should take into account its overall dimensions (width, depth, height), which determine the placement of the refrigerator (especially in small apartments); The performance of the air conditioner must match the volume of the room.
Evaluate whether it is possible to connect the device to an existing network or whether it is necessary to finish something in it, for example, lay a protective conductor for grounding and replace a two-wire socket with a three-wire one.
When placing an electrical appliance, firstly, adverse effects on the appliance should be excluded. So, the refrigerator can not be installed near heating battery, stoves, by the south window, but if there is no other place, then a simple screen should be made between the refrigerator and the heat source. Secondly, it is necessary to ensure the convenience of control by installing, for example, an air conditioner so that its control knobs (for setting the mode) are at an accessible height.
During the operation of electrical appliances, it is important to regularly perform minor repair and maintenance work, strictly observing electrical safety and fire safety measures: a) fix burnt contacts; isolate places where the insulation is damaged; replace faulty sockets, switches, plugs and plugs; b) repair household electrical appliances to the extent possible at home - replace the cord of the iron, stove, etc. or shorten it to remove the frayed area, recharge the plug, replace the heating element of the iron, electric kettle, replace the brushes of the commutator motor, for example, the sewing machine drive, strictly following the manufacturer's instructions; c) check whether the current-carrying parts of the device are sufficiently well isolated from its case. This is especially important because housings of household electrical appliances are accessible to touch. Manufacturers and specialized repair shops check the insulation with megger meters that develop voltages up to 1000 V. As a rule, they do not use a megger at home, and you can make sure that the insulation is working in a simpler way (see. electrician).
Troubleshooting. Making a diagnosis is the most important task of a home master. In order to correctly determine the malfunction, one must have a good idea of the principle of operation of the device, know its features and signs of unstable operation. Usually it is enough to observe the operation of the device. For example, when you turn on the iron, you need to make sure that the signal light comes on and goes out and that it burns the longer, the more high temperature regulator installed. When observing the operation of the refrigerator, you should make sure that when turned on, the refrigerator compressor motor starts immediately, and then periodically turns on and off. The back wall of the refrigerator should heat up during the operation of the compressor, and cool down when it stops. By placing your hands on the nozzle of a working vacuum cleaner, you can check whether it “pulls”, etc. In the absence of signs of normal operation, it is necessary to look for the cause of the malfunction.