
Ballu infrared heater connection diagram. Features of connecting a thermostat to an infrared heater
Since the temperature controller allows you to save more than 25% of electricity and at the same time make heating as efficient as possible, in this article we will consider the rules for connecting an infrared heater through a thermostat. Electrical work is quite simple, and now you will see it.
Necessary tools and materials
In order to quickly and easily install an infrared heater on the ceiling, you will need the following tools:
- Drill or screwdriver (drill holes for fasteners).
- Pliers (for shortening wires).
- Indicator screwdriver (determine phase and zero).
- Metal detector (optional, used to search for wiring and metal objects in the wall, so as not to accidentally get into these objects when drilling holes. You can do it yourself from improvised means.
- A simple pencil and construction tape (mark the attachment points on the wall).
As for additional materials, to install and connect an infrared heater, you may need:
- Detachable electrical plug.
- Three-core copper cable, section 2.5 mm.kv.
- Wall mounts (purchased as needed, as only ceiling brackets are included).
Having collected all required list materials and tools, you can proceed to mounting and connecting the heater.
Main Process
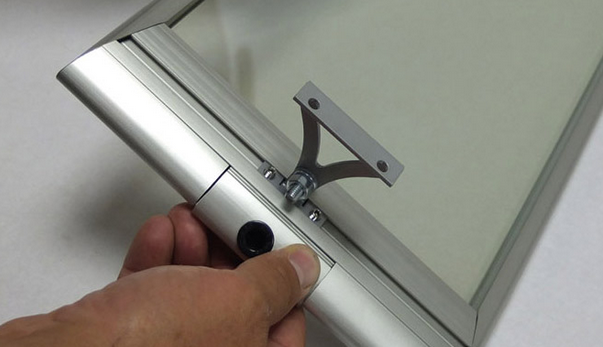
Chassis suspension
First you need to determine the installation location of the infrared heater in the house (or apartment). As we said above, the case can be placed both on the ceiling and on the walls, depending on the individual preferences of the owners.
First of all, you need to mark the places for installing the fasteners yourself. To do this, use a tape measure, which measure the same distance from the ceiling to the selected area. It is also recommended to use a building level, with which you can evenly set the brackets in a horizontal plane.
After marking, proceed to drilling. If the ceiling (or wall) is made of wood, drill holes with a drill. If you have to deal with concrete, you can not do without a puncher. It is necessary to drive dowels into the created holes and screw in the brackets, after which you can install the infrared heater in its place.
We draw your attention to the fact that the design of the unit is different. Some products have guides fixed in brackets. A simpler option is chains fixed in the ceiling (special holders cling to them). Also on the market you can see infrared heaters on the leg, which are simply placed on the floor.

Electric installation work
As we said at the beginning, the process of connecting an infrared heater to the network will be carried out using a temperature controller. 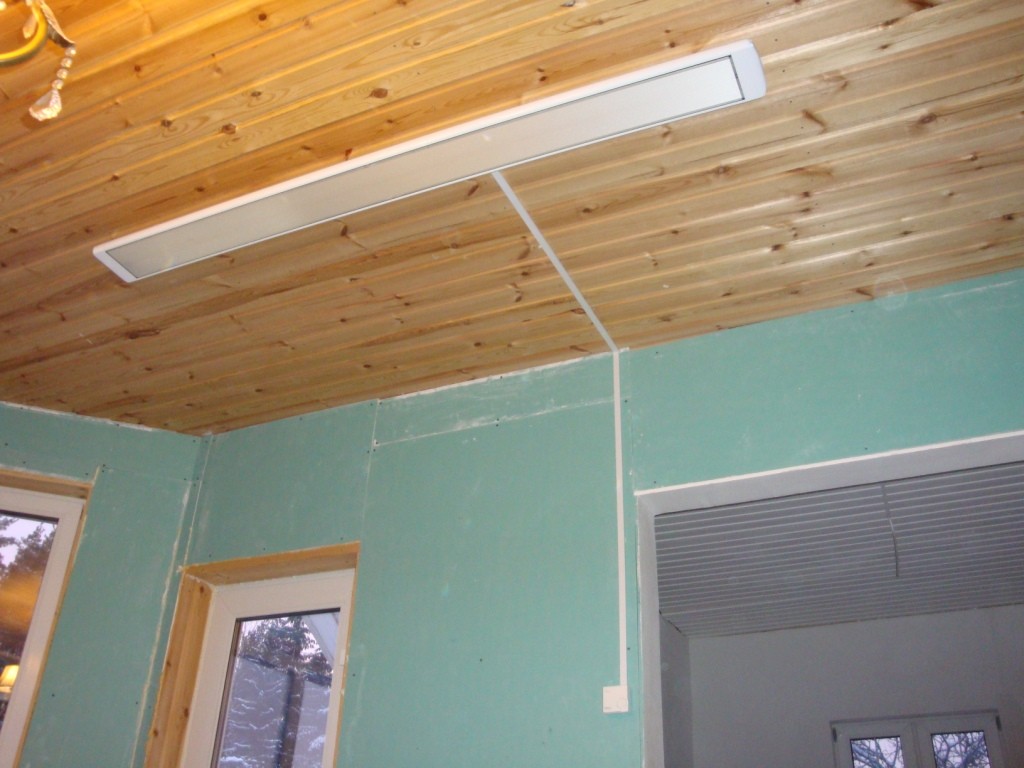
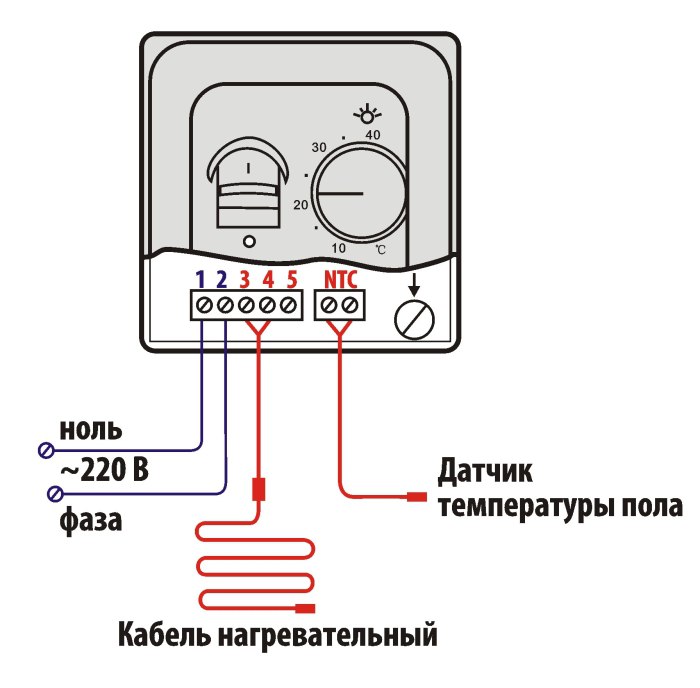
First you need to connect the contacts of the collapsible electrical plug to the terminal blocks of the thermostat, which are installed in the product case. Each "socket" has its own designation: N - zero, L - phase. It should be noted that there are at least two zero and phase terminals each (from the network to the regulator and from the regulator to the heater). Everything is quite simple - you strip the wires, insert them into the seats until they click (or tighten the screws). Be sure to follow so that the connection is correct. 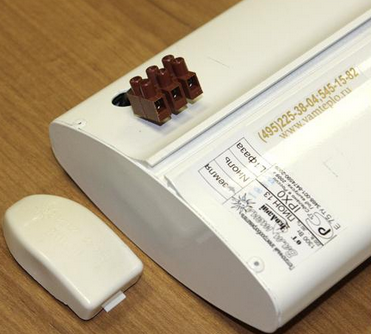
To your attention schemes of the correct connection:
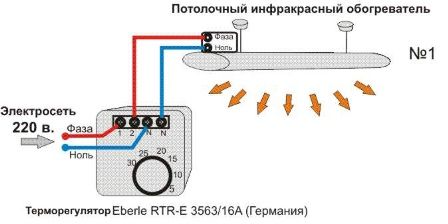
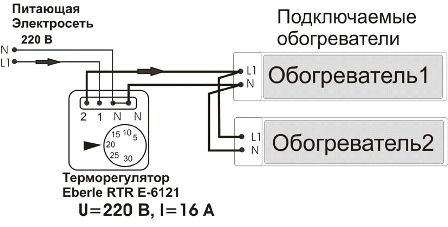
As you can see, connecting an infrared heater through a thermostat is quite simple, the main thing is not to confuse the wires and carefully tighten them in the terminal blocks.
A very important nuance is the correct choice of the location of the regulator. Do not install the product next to a heater, as in this case, warm air entering will adversely affect the measurement accuracy. It is best to place the device in a more remote area, at a height of one and a half meters above the floor.
Also note that you need to install the controller in the coldest room, otherwise the problem will not be completely solved. As for the number of infrared devices serviced by one temperature controller, it all depends on the power of the heaters. Usually one 3 kW controller is used for several products, the total power is not more than 2.5 kW (so that there is a margin of at least 15%).
So that you can clearly see the whole process of connecting with your own hands, we provide these lessons for viewing:
Video instruction: do-it-yourself infrared heater connection
If you have at home infrared heater, then a thermostat is simply necessary for it. The temperature controller for is able to control and maintain the set temperature values for a long time. In addition, it will allow you to warm up the rooms in advance, reduce the risk of fire and make the atmosphere in your home as comfortable as possible. To understand the intricacies of connecting the thermostat to infrared heater, we first consider the principle of its operation, the mechanism of operation and highlight the main types of thermostats.
Normally, the thermostat works cyclically, while opening and closing the power supply. At this time, the temperature sensor sends signals and thus controls the temperature.
If the temperature rises, the resistance of the internal sensor decreases. If the resistance rises again, the desired temperature is reached, the thermostat starts and the circuit opens. When the temperature drops and the sensor cools down, the reverse process occurs: the resistance rises, the thermostat turns on again, but this time there is a circuit closure. Next, the thermostat is connected directly to the infrared heater and the temperature in the room is set automatically.
The thermostat controls the climate in the room and the main source of heat. It turns itself on and off when needed.
- As a rule, a mikathermic heater is connected to a standard socket or using a dedicated line from the machine on the electrical panel. The thermostat is built into the network between the heater and the machine.
- Pay attention to the design of the thermostat. It has four terminals: two at the input and, accordingly, the same number at the output.
- If one heater is connected, then two wires go from the electrical panel to the terminals of the device. Two wires are connected to the terminals that are located at the output (positive and negative). In this case, it is important to consider polarity. The terminals are connected directly to the mikathermic heater.
- If two heaters are installed, then a pair of wires is again connected from the machine to the regulator: neutral and phase, and wiring from the regulator to a pair of heaters is already being done. The type of connection in this case is parallel.
Sometimes infrared heaters with a thermostat require a more complex connection. To correctly complete each step, it is better to follow the recommendations of the video, where everything is clearly shown and supplemented with comments. It all depends on the design of the thermostat and the IR heater itself:
- The thermostat is connected to the machine on the electrical panel.
- The output terminals (+ and -) are connected to the magnetic starter.
- The starter contacts are connected directly to the infrared heater.

It should be noted that this algorithm is also suitable for the controller of industrial heating devices.
Infrared heaters with a thermostat require compliance with safety rules. When working with a thermostat, remember about grounding. The ground loop of your climate control device must have conductors of a certain thickness and with little resistance.
It is best to place the thermostats on the wall. One controller is enough for one room. It is undesirable to cover the device with something: cloth, curtains, interior items.

Conclusion
Why are infrared heaters with a thermostat so good? They greatly facilitate the process of climate control in the room, save energy and preheat the room even if you are far from home. There are a lot of advantages, the only difficulty is to correctly connect the thermostat to the heating equipment. Therefore, it is important to follow the instructions in the manual step by step and observe safety precautions.
What if the heater does not have a thermostat?
- To create cozy warmth, you need to turn such a device on and off - this is inconvenient;
- You can not warm up the room in advance, for example, in the cold before returning from work;
- An unattended heater may cause a fire;
- It is impossible, when leaving for the weekend, to leave the heater on so that it does not work at full strength, but only warms the indoor flowers a little;
- The temperature in the room will sometimes be excessive, and the electricity bills are considerable.
The conclusion is obvious: a thermostat for an infrared heater is a useful attribute!
Learn how it works, how it connects and how much it costs.
Infrared heaters win the love of consumers. If we compare them with oil coolers, then the “home sun” heats up faster, it can be placed under the ceiling, and certain types of radiation are even considered therapeutic!
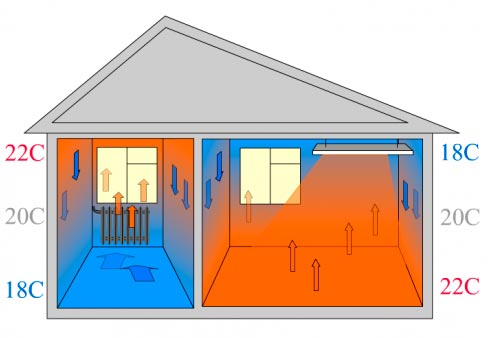
In addition, as you know, IR rays heat objects, not air.
This means that having successfully positioned the device, you can go to a warm bed in the evening.
Infrared heaters (ceiling and wall) with a thermostat are perfect for a country house where they do not live, but only visit on weekends and holidays.
In the absence of the owners, you can set t to 5 0С - just so that the systems do not freeze. When the owners arrive, the IR will warm up the house in 15 minutes!
The principle of operation of thermostats
We can say that an infrared heater with a thermal relay is not a simple household appliance, but an intelligent climate system.The essence of the thermostat is to measure the temperature, and then turn the device on and off when the indicators in the room reach certain values.
But the thermostat for an IR heater has a difference from classic devices.
Typically, the thermostat measures t near heaters, which means it cannot adequately assess the temperature in the room.
For IKO, the thermal relay comes in a separate case and is attached, at the request of the owner, to any point in the house.
With thermostats, you can:
- Set the heating delay program to the specified hour;
- Programmable shutdown after several hours of operation;
- Maintain the selected temperature;
- And even create cyclic programs, for example, for a week.
About the thermostat device
Depending on the design, all devices can be divided into:
- Mechanical.
- Electronic.
Mechanical
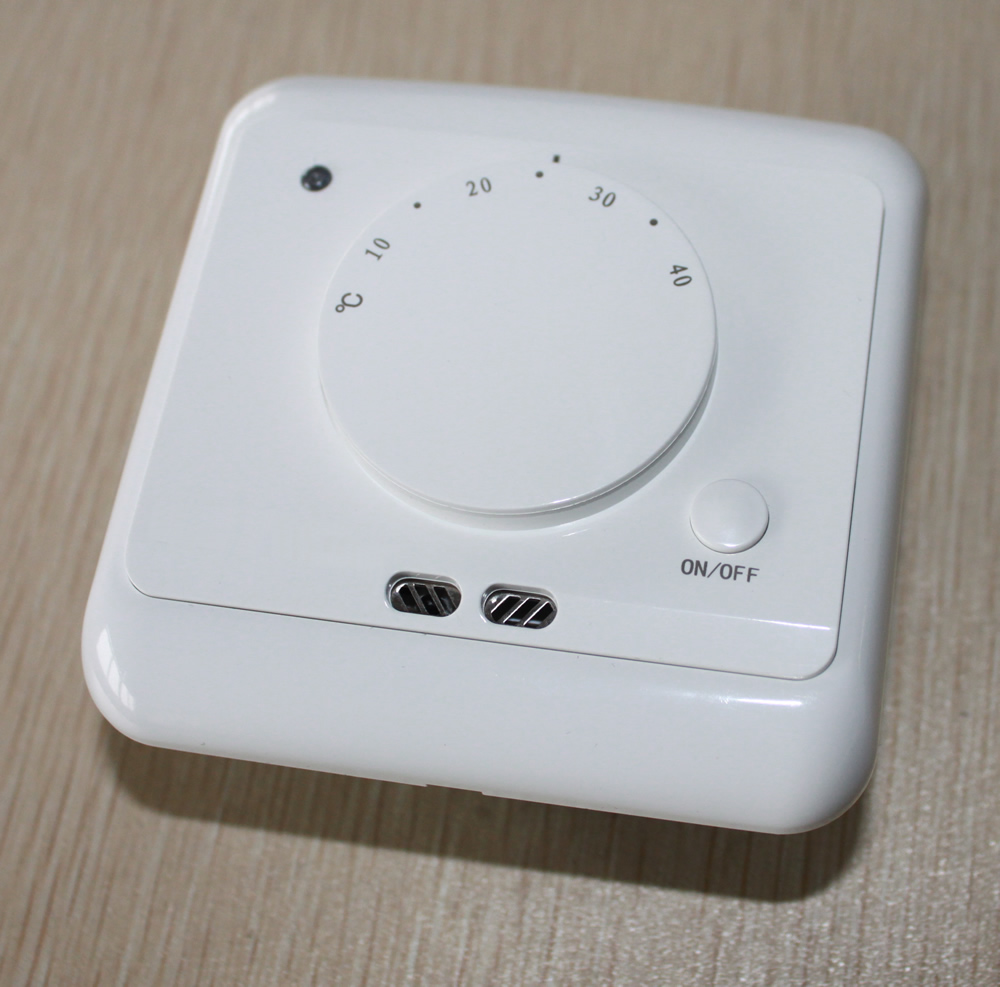
This is a plastic box slightly larger than the outlet. It has an on/off button. and a wheel, with a printed temperature scale.
On some models, there is also an LED that indicates whether the device is currently working. Other manufacturers have provided their creations with an LCD display on which data is displayed.
The number "20 0С" on the wheel of individual devices has a bulge - it is easy to find it in the dark or with poor eyesight.
There are thermostats
- Mortise (you can "drown" in the wall).
- Overhead (mounted on the wall).
Such devices do not consume electricity: the principle of operation is based on the property of different materials to react differently to temperature changes.
The degree of heating varies depending on the pressure level of the contact group. Usually, mechanical thermostats for a heater operate within 5 - 30 0С, if the device is in good condition, the error will be from 0.5 to 2 degrees.
Mechanics remains in demand for a number of reasons:
- It is easy to understand the management even for those who are far from technology;
- Simple design gives reliability and durability;
- The price is lower than electronic ones.
If we talk about maximum comfort, then the mechanical option is not suitable. It has only one temperature setting.
Electronic (programmable)
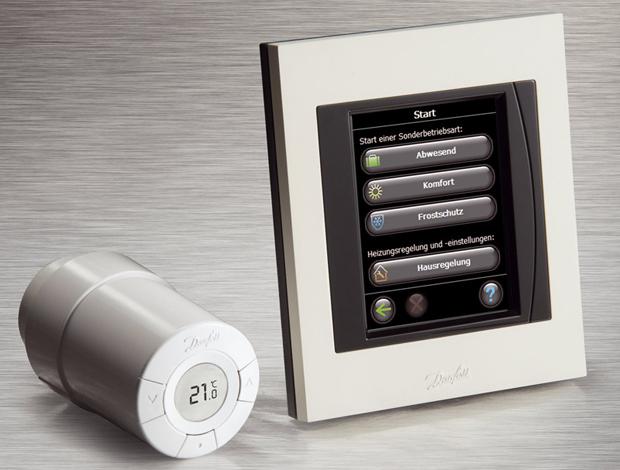
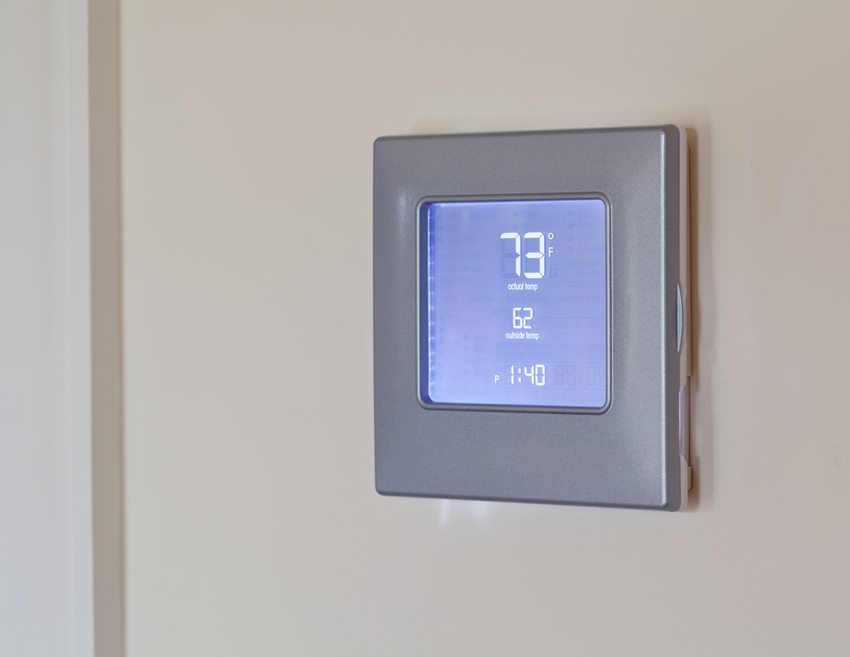
Electronic thermostat
This is a mini computer with a screen and a keypad (or touch screen). There are a lot of design options here. The front side can be hidden under a plastic cover.
Many of the thermostats are suitable not only for IR heaters. They are universal and if the owner decides to install, for example, underfloor heating, you won’t have to buy a new device specifically.
The self-monitoring function diagnoses the state of the regulator and, if it detects a breakdown, puts the device into a reduced activity mode (30%).
The electronic thermostat will provide a full range of programming possibilities. And even remotely controlled with mobile devices.
The owner will be able to turn on the heating before his arrival home and not worry if he forgot to turn off the heater in a hurry.
Price overview
Some models of mechanical thermostats for infrared heaters and approximate prices:- Eberle rtr-e 6163 - about 900 -1200 rubles.
- Eberle rtr-e 6121 - 900 - 1100 rubles.
- Mr. Hit CEWAL RQ10 - 900 rubles.
- Ballu BMT-1 - 900-1000 rubles.
- Aox t25 (aox t25) - 800 r.
Selected examples of electronic thermostats:
- Vilux T5 - 10,000 rubles.
- Uth-10 a - 8500 rubles.
- Vilux gsm t9 - 6500 rubles.
- Devireg touch - about 6500 rubles.
- Eberle Instat + 3R - 5000 - 6000 rubles.
- Electrolux thermotronic touch ett-16 - 4500 r.
- Frontier th-0108F - 4000 rubles.
- Vilux T02 - 3600 rubles.
Connecting the thermostat to an infrared heater
It is important to choose the right place to fix the temperature sensor:
To turn on the IR heater through the thermostat, you need to connect the relay to the circuit breaker. Then power the heater from it.
There are several connection schemes:
- To the regulator - 1 heater. Two wires (phase and zero) are carried out from the machine to the thermostat. The second pair of wires is connected to the PPI in the same way.
- To the regulator - 2 heaters. Zero and phase are supplied from the machine to the regulator, then wiring is made from it to two heaters. Parallel connection.
- To the regulator - more than two heaters or one industrial heater. Devices are connected through a magnetic starter. The scheme is selected for each case separately.
How to connect a thermostat for an infrared heater: diagram, video instruction. Modern developments aimed at reducing energy costs have become especially popular in last years. At the same time, such devices can also increase efficiency. heating appliances controlling their work. A common example of this is a thermostat for an infrared heater. Consider the features of its selection, connection and operation.
The thermostat regulates the operation of the heaters, thereby significantly reducing electricity costs.
Varieties and characteristics of thermostats
A thermostat is a device that periodically measures the air temperature in a room and, depending on the results obtained, corrects the operation of the heater. That is, if the air temperature has reached the set mark, the power supply is limited and the heater stops working. As soon as the air cools down, the device enters the active phase again, thus constantly maintaining the desired level of heat in the room.
The design and principle of operation of devices that regulate temperature can differ significantly from each other. There are two main types of thermostats:
- Mechanical.
- Electronic.

Mechanical type thermostat for infrared heater
The first version of thermostats is a small plastic box, the outer part of which is equipped with a switch. As a rule, it is round, which allows you to smoothly change its position. The division value can be different, for example, in some models it is 1°, while in others the transition occurs immediately from 2° to 5°, etc. In addition, there is a power button and a light indicator on the case that shows whether the device is active at a given time. moment.
There are also more modern mechanical models of thermostats that are equipped with a display. True, there is not so much data displayed there, and the temperature is controlled using just two control buttons.
Useful advice! It is convenient to use a mechanical thermostat only if one of the residents is present in the house for a considerable time. it important point, since in the absence of people it is better to turn off the device. The remote control function is not provided.

An electronic version of a thermostat that controls the operation of an IR heater
Electronic thermostats have much greater control capabilities. The design and construction of these devices are constantly being upgraded - to manufacture modern models even LCD screens are used.
Depending on the selected model, configuration and control can be carried out both using buttons and touch. In some devices, to protect the screen, as well as create a more attractive appearance, use special hinged covers.
Such devices can be used without problems even in those houses where the owners are often absent or live seasonally. The device is easy to program and can be easily controlled remotely using mobile devices. The only difficulty in acquiring such a thermostat is the rather high cost.
How to connect a thermostat to an infrared heater
Whichever of the above options you choose, it requires correct installation. First of all, this is due to the choice of a suitable place, when making which you must consider the following factors:
- high humidity can harm the device;
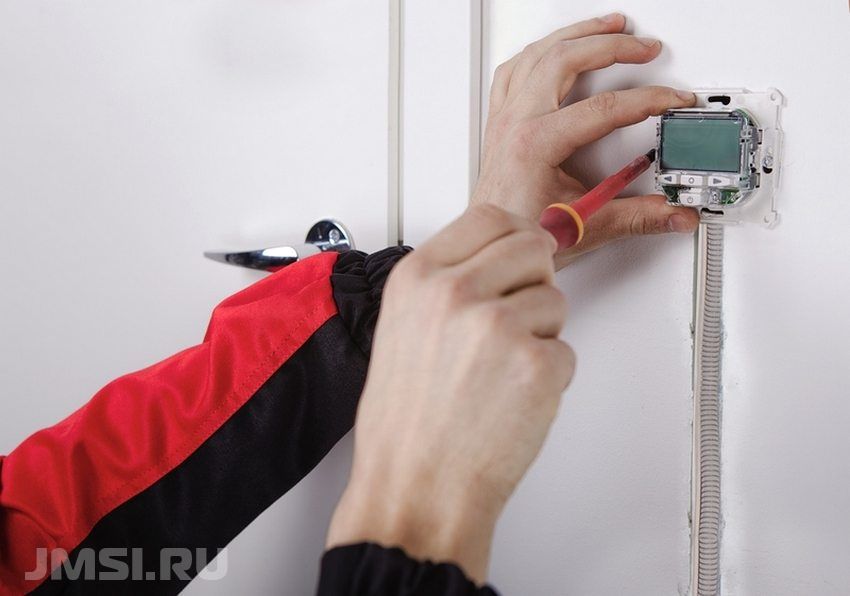
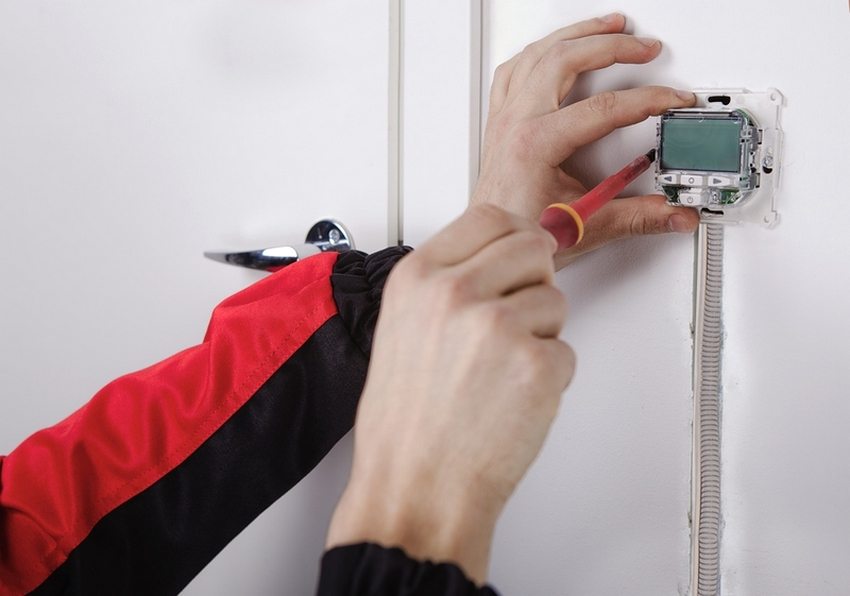
Do-it-yourself thermostat installation process
- there should be no sources of heat or sunlight nearby.
If these factors are not taken into account, temperature measurements will be inaccurate, which will lead to incorrect operation of the heater and its inability to maintain the required temperature in the house.
A separate issue is the connection of the device itself to the network and an infrared heater. In order to connect all these elements to each other, it is necessary to use an automatic relay. It will serve as a power source for the heater. Consider some of the most common connection options.
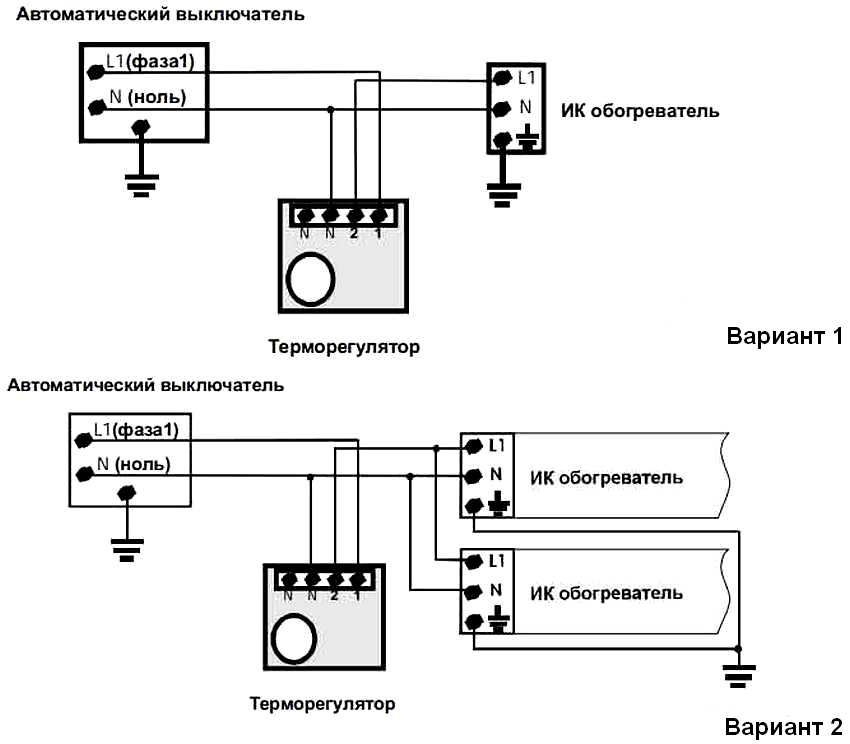
Diagrams for connecting an infrared heater through a thermostat
The fastest and most understandable scheme for connecting a thermostat to an infrared heater is to use 1 thermostat per 1 heater. In this case, the connection diagram is as simple as possible: the machine has 2 pairs of wires, one of which goes to the thermostat. One wire is zero, the other is phase. And you need to connect them accordingly. Using the second pair of wires, a connection is made to the heater itself.

Options for connecting infrared heaters through a thermostat
The second, a little more complicated, way to connect an infrared heater through a thermostat involves using parallel connection. Thus, two heaters can be connected to one thermostat at once. One pair of wires from the machine is connected to a thermostat, from which, in turn, wiring is made to two different heaters.
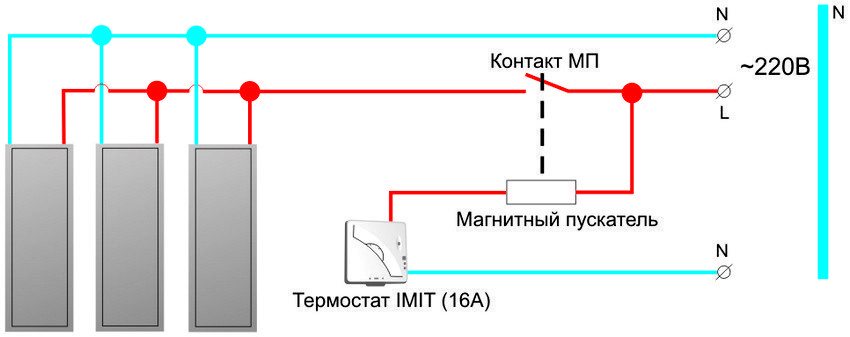
The most difficult, but at the same time the most practical option is to use one thermostat for several household heaters. For this purpose, it is necessary to use a magnetic starter, and develop the connection diagram individually. Of course, you can try to find a ready-made one, but this method cannot absolutely guarantee the smooth operation of the system.
Useful advice! It is also worth paying special attention to calculations and developing an individual plan because your safety depends on it. Faults in the heating system can lead to fire hazards.
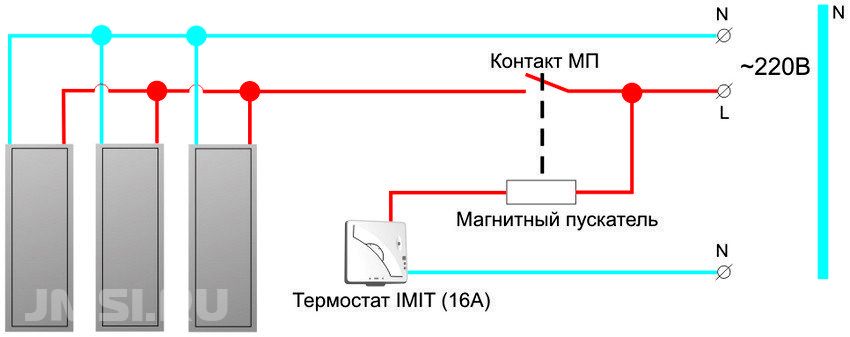
To connect several heaters, you must use a magnetic starter
There are even manufacturers who produce original magnetic starters for their devices, as well as sets of wires necessary to connect them. Thanks to this, it is much easier to connect, and the quality of such goods is considered higher. But in any case, if you have not dealt with electricity before, it is better to entrust the development of the circuit and the connection of the system to professionals.
Infrared heater with thermostat: prices and characteristics of three popular models
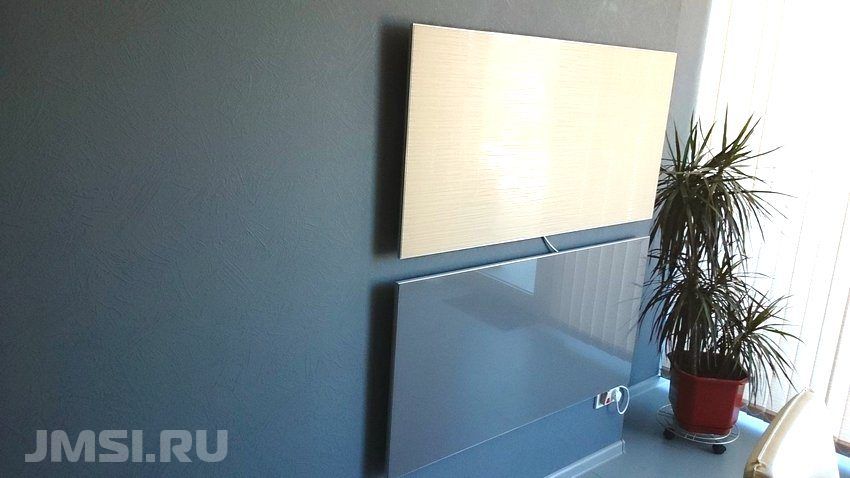
Wall-mounted and are quite in demand, their main advantage is their compact size. In addition, buyers are attracted by the design and the ability to choose a model for the interior of the room. Below you can find the characteristics and prices of several popular infrared heaters with a thermostat.
Nikaten 200- one of the most modern infrared heating plates. The control of the dynamics of changes in the temperature regime is regulated by a built-in thermostat. In addition, there is a security system that automatically turns off the device in the event of an accident. dangerous situation or fire hazard.
Changing the temperature regime of the heater Nikaten 200 regulates the thermostat built into the design
The main characteristics of the Nikaten 200 heater:
- ceramic panel;
- size - 30x60 cm;
- cools down within 90 minutes, continuing to emit heat;
- silent operation;
- the easiest possible installation.
The distinctive qualities of this panel include a huge selection of colors, as well as a very affordable price - about 3500 rubles.
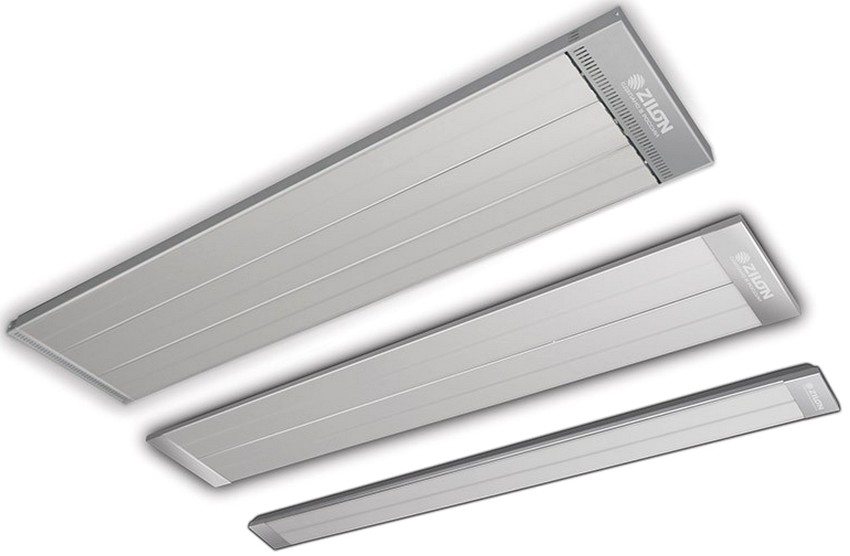
Heater Zilon IR-0.8S was designed as wall-ceiling. This model can be mounted on any suitable surface. The set includes a thermostat that regulates the correspondence between the set and actual temperature parameters. To protect the device, an automatic shutdown is provided in case of overheating.
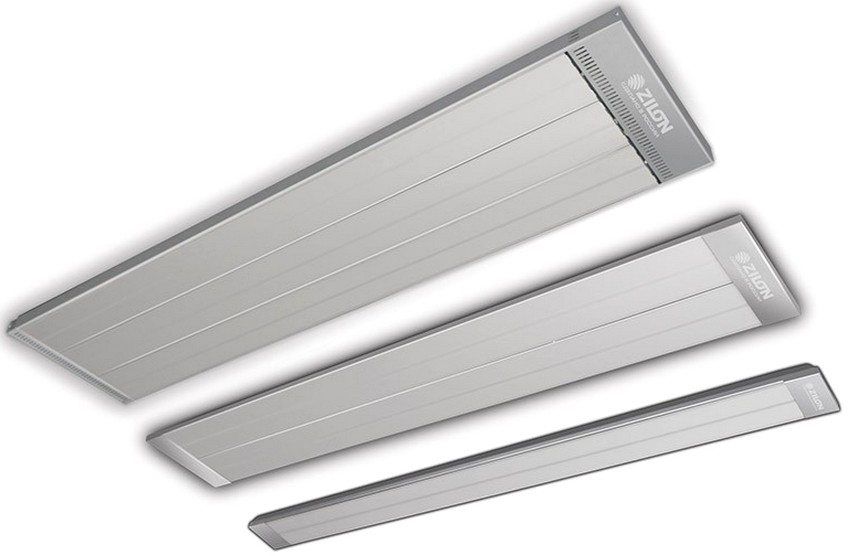
Complete with Zilon IR-0.8 S panels, the manufacturer provides a thermostat that helps maintain a comfortable temperature in the room
Main characteristics of Zilon IR-0.8S:
- power - 0.8 kW;
- size - 119x13x4 cm;
- weight - 3.2 kg;
- does not affect the content of carbon dioxide in the air;
- consumes the minimum amount of electricity.
However, users point out some disadvantages of using this model. So, during warming up or cooling down, the device emits a characteristic crackle, which not everyone likes. And being located on the ceiling, it is not always good enough to warm the floor. And yet, given that the cost of such a heater is only 2400 rubles, the device can be called one of the most worthy.
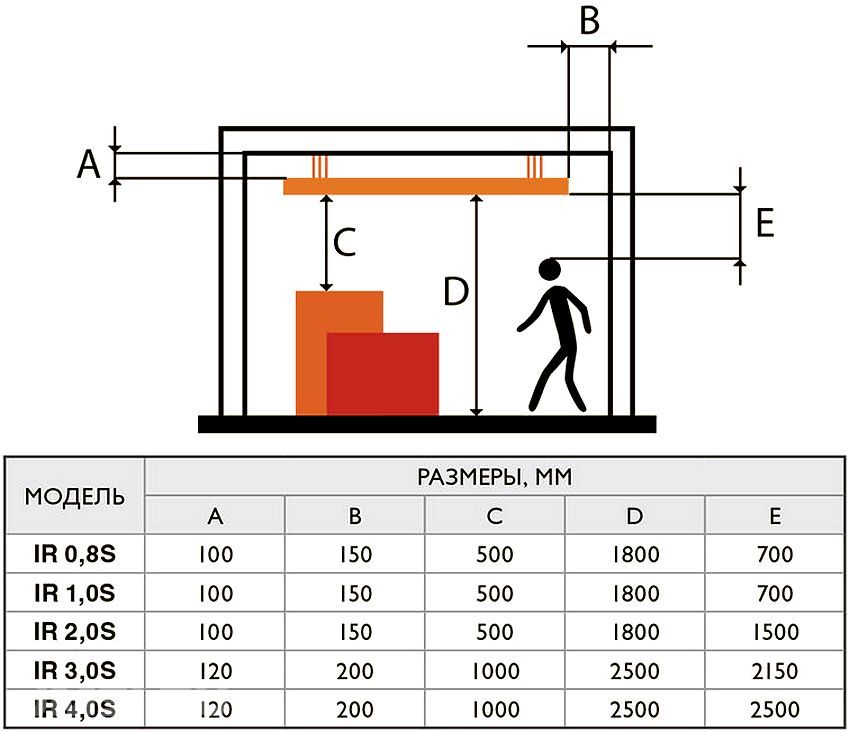
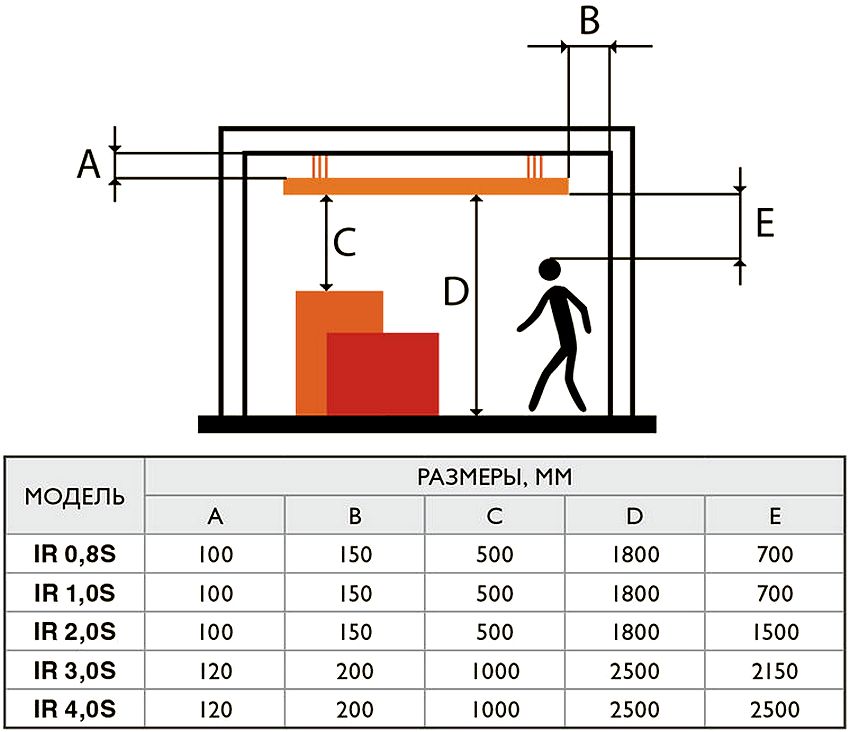
Layout of Zilon IR heaters
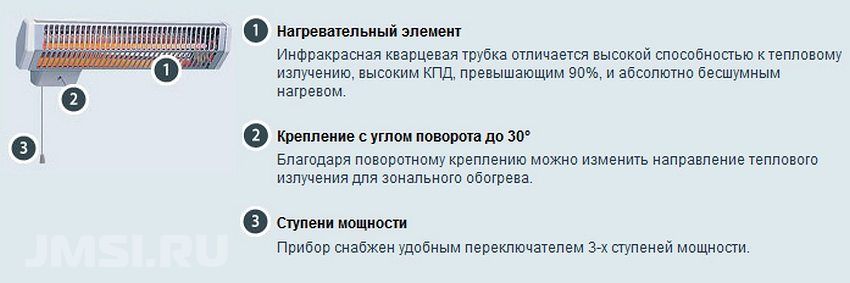
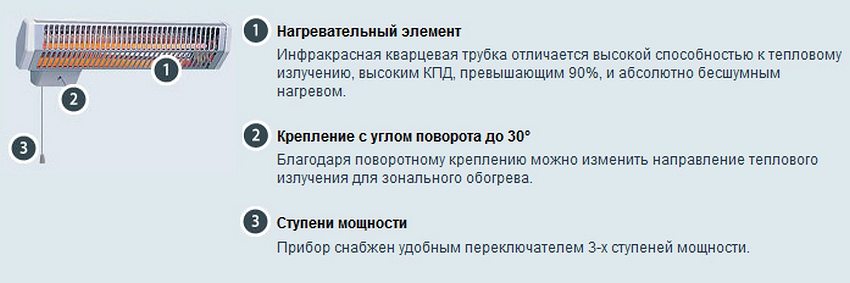
Noirot Royat 2 1200– universal wall heater, equipped with three modes at once, which makes it convenient to use throughout the year and in any room. The direction of the heat flow can also be adjusted by turning the surface at different angles (up to 30°). In order for the regulation to be carried out as conveniently as possible, the developers took care of the possibility of mounting the control unit both on the right side and on the left.
Main characteristics of Noirot Royat 2 1200:
- quartz heating element;
- three power modes - 0.3 / 0.6 / 1.2 kW;
- size - 45x12x11 cm;
- there is a thermostat and a fuse against overheating;
- works silently.
Perhaps the only drawback of this device is the rather high cost - about 9700 rubles. Otherwise, the appliance is considered reliable and is often used to heat rooms such as a bathroom.
The infrared heater Noirot Royat 2 1200 is equipped with a thermostat, as well as an overheating protection system.
Floor infrared heaters with thermostat
Another popular type of device is floor infrared heaters with a thermostat. The price of such devices is not much different from other options, however, due to their mobility, they are often more convenient. If you want to buy an infrared floor heater with a thermostat, you can easily choose the model that suits your conditions specifically from a wide range of offers.
As an example, let's consider such a popular line as Ballu infrared heaters, to which you cannot connect a thermostat on your own, but it is very easy to choose an already equipped model.
The connection of the infrared heater Ballu through the thermostat is carried out according to standard schemes. The control device is built into the heater housing.
One of the most popular models of these heaters is the BALLU BIH-L Bali series. Included with this device is a modern steel telescopic tripod BIH-LS-210. It provides a strong fixation of the device and allows you to use it on summer grounds, verandas, in the garden.
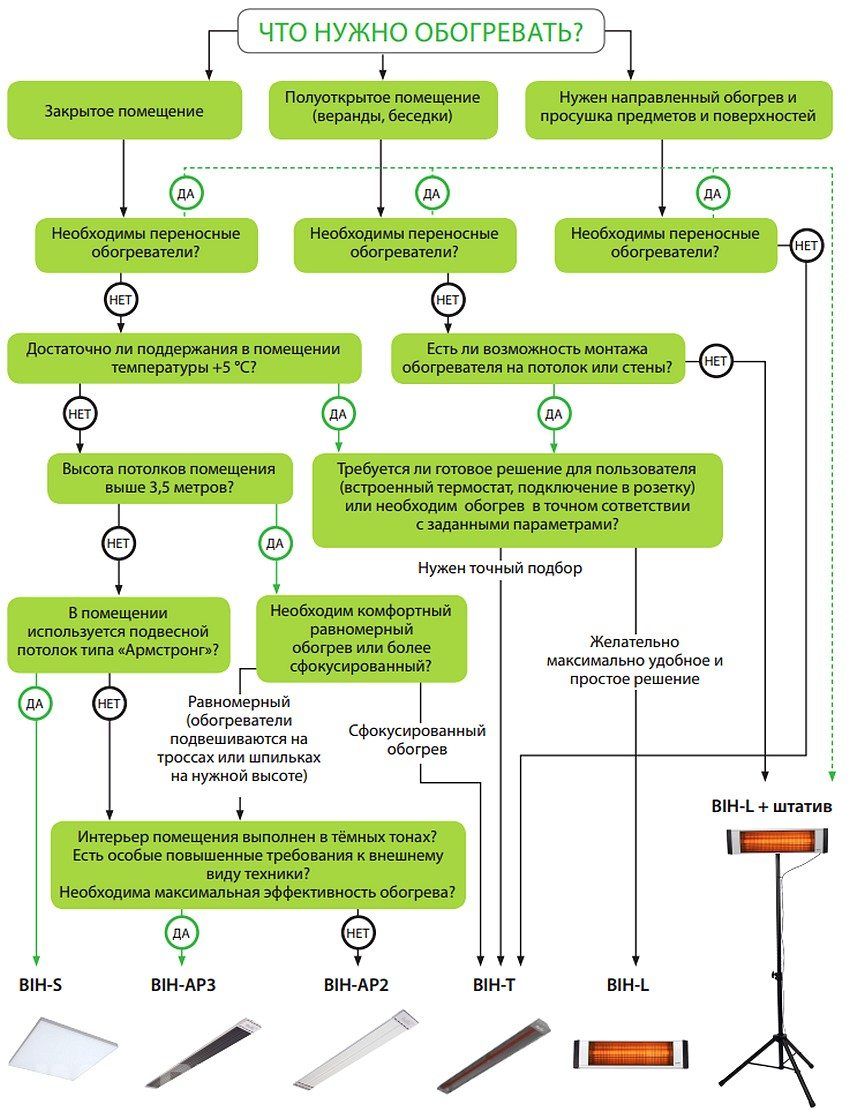
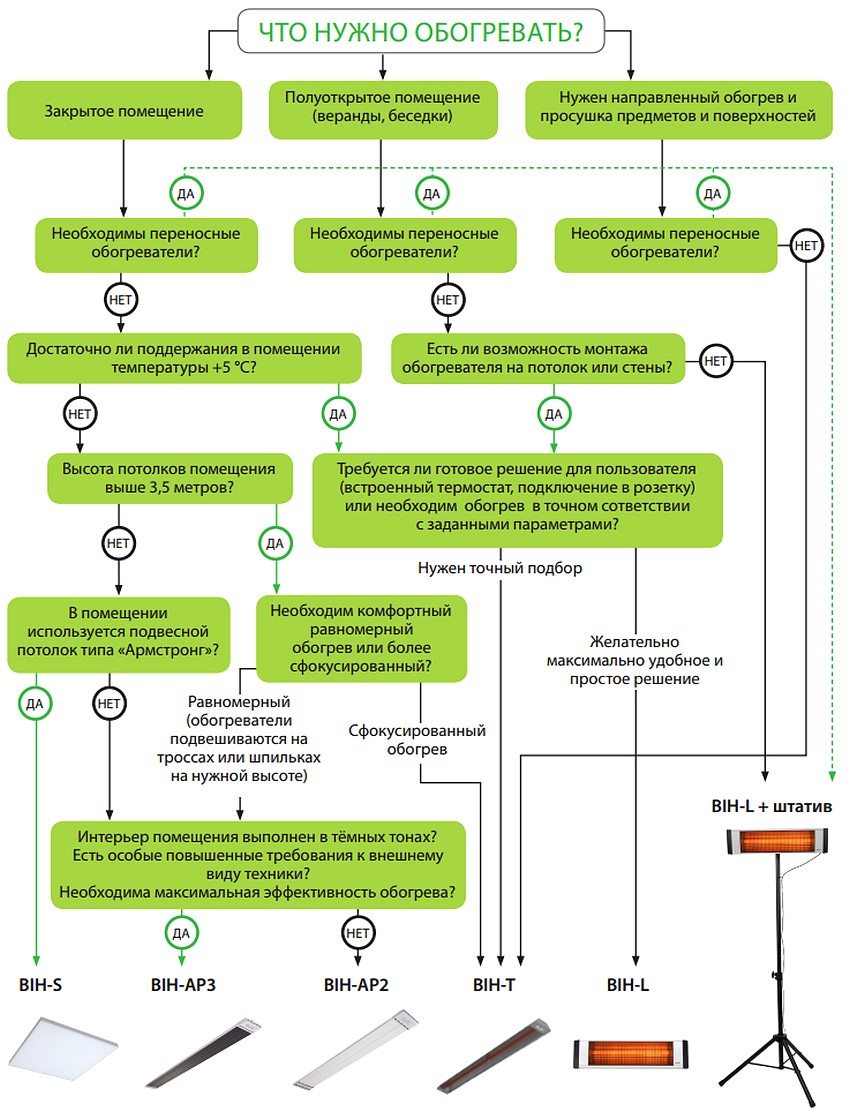
Selection Chart for BALLU Electric Infrared Heaters
The main characteristics of the heater BALLU BIH-L:
- power 2-3 kW;
- installation height on a tripod up to 4.5 m;
- for uniform heating it is equipped with a special reflector with fins;
- brackets for fixing to the surface are provided in the kit;
- the body is made of steel;
- the connection of the thermostat to the infrared heater Ballu is made by the manufacturer;
- there is a function to control the heating of the device.
This model is considered the most versatile, as it can be installed almost anywhere: in the house, on the street or on the veranda. Providing uniform heating, it creates a comfortable temperature for everyone who is in range, while not spending extra energy on heating the air.

Electronic thermostats are easy to program and can be easily controlled remotely using mobile devices
Useful advice! As a stationary outdoor heater, you can consider purchasing an infrared umbrella, designed specifically to create comfortable conditions in the yard.
Choosing a thermostat for an infrared heater
If we talk about purchasing and connecting a thermostat to an infrared heater as a separate element, then the main thing here is to do right choice at the time of buying. With the help of a small table, you can compare several of the most affordable models.
Brief description and cost of thermostats for heaters:
| Model name | Features and Specifications | Cost, rub. |
| Ballu RTR-E 6202 | Simple mechanical control. It is universal for use with any devices, and in any rooms. | 1100 |
| Ballu TA2N-S | mechanical adjustment temperature conditions combined with the on/off function. There is a diode light bulb indicating the current state of the device. | 700 |
| Eberle RTR - E6163 | Universal device, suitable not only for heaters, but also for connection to a floor heating system. It has a temperature adjustment range from +5 to +30°. | 1150 |
| Eberle Instata 2 | A push-button model equipped with a small black and white display for setting the temperature. | 2850 |
| Eberle Instat +3r | A modern model of an electronic thermostat that can be programmed. | 3600 |
Which model you want to purchase depends only on your desires and capabilities. The variety and functionality of the devices presented for sale can satisfy the requirements of even the most demanding customer. Today, you can easily purchase devices for your home or garden, as well as, for example, infrared heaters with a thermostat for a chicken coop or any other purpose.
It is difficult to underestimate the importance of using thermostats in the operation of heating appliances. After all, we are talking not only about maintaining a comfortable temperature at any time of the year, but also about significant savings and safety. Especially considering the fact that everyone can afford to purchase the simplest mechanical thermostat.
Modern developments aimed at reducing energy costs have become especially popular in recent years. At the same time, such devices also make it possible to increase the efficiency of heating devices by controlling their operation. A common example of this is a thermostat for an infrared heater. Consider the features of its selection, connection and operation.
- 1 Varieties and characteristics of thermostats
- 2 How to connect a thermostat to an infrared heater
- 2.1 Schemes for connecting an infrared heater through a thermostat
- 3 Infrared heater with thermostat: prices and features of three popular models
- 3.1 Floor infrared heaters with thermostat
- 4 Choosing a thermostat for an infrared heater
Varieties and characteristics of thermostats
A thermostat is a device that periodically measures the air temperature in a room and, depending on the results obtained, corrects the operation of the heater. That is, if the air temperature has reached the set mark, the power supply is limited and the heater stops working. As soon as the air cools down, the device enters the active phase again, thus constantly maintaining the desired level of heat in the room.
The design and principle of operation of devices that regulate temperature can differ significantly from each other. There are two main types of thermostats:

The first version of thermostats is a small plastic box, the outer part of which is equipped with a switch. As a rule, it is round, which allows you to smoothly change its position. The division value can be different, for example, in some models it is 1°, while in others the transition occurs immediately from 2° to 5°, etc. In addition, there is a power button and a light indicator on the case that shows whether the device is active at a given time. moment.
There are also more modern mechanical models of thermostats that are equipped with a display. True, there is not so much data displayed there, and the temperature is controlled using just two control buttons.
Electronic thermostats have much greater control capabilities. The design and construction of these devices are constantly being upgraded - even liquid crystal screens are used to manufacture modern models.
Depending on the selected model, configuration and control can be carried out both using buttons and touch. In some devices, special flip covers are used to protect the screen, as well as create a more attractive appearance.
Such devices can be used without problems even in those houses where the owners are often absent or live seasonally. The device is easy to program and can be easily controlled remotely using mobile devices. The only difficulty in acquiring such a thermostat is the rather high cost.
How to connect a thermostat to an infrared heater
Whichever of the above options you choose, it requires proper installation for its accurate and correct operation. First of all, this is due to the choice of a suitable place, when making which you must consider the following factors:
- high humidity can harm the device;
- there should be no sources of heat or sunlight nearby.
If these factors are not taken into account, temperature measurements will be inaccurate, which will lead to incorrect operation of the heater and its inability to maintain the required temperature in the house.
A separate issue is the connection of the device itself to the network and an infrared heater. In order to connect all these elements to each other, it is necessary to use an automatic relay. It will serve as a power source for the heater. Consider some of the most common connection options.
Diagrams for connecting an infrared heater through a thermostat
The fastest and most understandable scheme for connecting a thermostat to an infrared heater is to use 1 thermostat per 1 heater. In this case, the connection diagram is as simple as possible: the machine has 2 pairs of wires, one of which goes to the thermostat. One wire is zero, the other is phase. And you need to connect them accordingly. Using the second pair of wires, a connection is made to the heater itself.
The second, slightly more complicated, way to connect an infrared heater through a thermostat involves using a parallel connection. Thus, two heaters can be connected to one thermostat at once. One pair of wires from the machine is connected to a thermostat, from which, in turn, wiring is made to two different heaters.
The most difficult, but at the same time the most practical option is to use one thermostat for several household heaters. For this purpose, it is necessary to use a magnetic starter, and develop the connection diagram individually. Of course, you can try to find a ready-made one, but this method cannot absolutely guarantee the smooth operation of the system.
There are even manufacturers who produce original magnetic starters for their devices, as well as sets of wires necessary to connect them. Thanks to this, it is much easier to connect, and the quality of such goods is considered higher. But in any case, if you have not dealt with electricity before, it is better to entrust the development of the circuit and the connection of the system to professionals.
Infrared heater with thermostat: prices and characteristics of three popular models
Wall and ceiling models of infrared heaters are quite in demand, their main advantage is their compact size. In addition, buyers are attracted by the design and the ability to choose a model for the interior of the room. Below you can find the characteristics and prices of several popular infrared heaters with a thermostat.
Nikaten 200- one of the most modern infrared heating plates. The control of the dynamics of changes in the temperature regime is regulated by a built-in thermostat. In addition, there is a safety system that automatically turns off the device in the event of a dangerous situation or a fire threat.

The main characteristics of the Nikaten 200 heater:
- ceramic panel;
- size - 30x60 cm;
- cools down within 90 minutes, continuing to emit heat;
- silent operation;
- the easiest possible installation.
The distinctive qualities of this panel include a huge selection of colors, as well as a very affordable price - about 3500 rubles.
Heater Zilon IR-0.8S was designed as wall-ceiling. This model can be mounted on any suitable surface. The set includes a thermostat that regulates the correspondence between the set and actual temperature parameters. To protect the device, an automatic shutdown is provided in case of overheating.
Main characteristics of Zilon IR-0.8S:
- power - 0.8 kW;
- size - 119x13x4 cm;
- weight - 3.2 kg;
- does not affect the content of carbon dioxide in the air;
- consumes the minimum amount of electricity.
However, users point out some disadvantages of using this model. So, during warming up or cooling down, the device emits a characteristic crackle, which not everyone likes. And being located on the ceiling, it is not always good enough to warm the floor. And yet, given that the cost of such a heater is only 2400 rubles, the device can be called one of the most worthy.
Noirot Royat 2 1200- a universal wall heater equipped with three modes at once, which makes it convenient to use throughout the year and in any room. The direction of the heat flow can also be adjusted by turning the surface at different angles (up to 30°). In order for the regulation to be carried out as conveniently as possible, the developers took care of the possibility of mounting the control unit both on the right side and on the left.
Main characteristics of Noirot Royat 2 1200:
- quartz heating element;
- three power modes - 0.3 / 0.6 / 1.2 kW;
- size - 45x12x11 cm;
- there is a thermostat and a fuse against overheating;
- works silently.
Perhaps the only drawback of this device is the rather high cost - about 9700 rubles. Otherwise, the appliance is considered reliable and is often used to heat rooms such as a bathroom.
Floor infrared heaters with thermostat
Another popular type of device is floor infrared heaters with a thermostat. The price of such devices is not much different from other options, however, due to their mobility, they are often more convenient. If you want to buy an infrared floor heater with a thermostat, you can easily choose the model that suits your conditions specifically from a wide range of offers.
As an example, let's consider such a popular line as Ballu infrared heaters, to which you cannot connect a thermostat on your own, but it is very easy to choose an already equipped model.
The connection of the infrared heater Ballu through the thermostat is carried out according to standard schemes. The control device is built into the heater housing.
One of the most popular models of these heaters is the BALLU BIH-L Bali series. Included with this device is a modern steel telescopic tripod BIH-LS-210. It provides a strong fixation of the device and allows you to use it on summer grounds, verandas, in the garden.
The main characteristics of the heater BALLU BIH-L:
- power 2-3 kW;
- installation height on a tripod up to 4.5 m;
- for uniform heating it is equipped with a special reflector with fins;
- brackets for fixing to the surface are provided in the kit;
- the body is made of steel;
- the connection of the thermostat to the infrared heater Ballu is made by the manufacturer;
- there is a function to control the heating of the device.
This model is considered the most versatile, as it can be installed almost anywhere: in the house, on the street or on the veranda. Providing uniform heating, it creates a comfortable temperature for everyone who is in range, while not spending extra energy on heating the air.
Choosing a thermostat for an infrared heater
If we talk about purchasing and connecting a thermostat to an infrared heater as a separate element, then the main thing here is to make the right choice when buying. With the help of a small table, you can compare several of the most affordable models.
Brief description and cost of thermostats for heaters:
| Model name | Features and Specifications | Cost, rub. |
| Ballu RTR-E 6202 | Simple mechanical control. It is universal for use with any devices, and in any rooms. | 1100 |
| Ballu TA2N-S | Mechanical adjustment of temperature conditions is combined with the function of switching on and off. There is a diode light bulb indicating the current state of the device. | 700 |
| Eberle RTR - E6163 | Universal device, suitable not only for heaters, but also for connection to a floor heating system. It has a temperature adjustment range from +5 to +30°. | 1150 |
| Eberle Instata 2 | A push-button model equipped with a small black and white display for setting the temperature. | 2850 |
| Eberle Instat +3r | A modern model of an electronic thermostat that can be programmed. | 3600 |
Which model you want to purchase depends only on your desires and capabilities. The variety and functionality of the devices presented for sale can satisfy the requirements of even the most demanding customer. Today, you can easily purchase devices for your home or garden, as well as, for example, infrared heaters with a thermostat for a chicken coop or any other purpose.
It is difficult to underestimate the importance of using thermostats in the operation of heating appliances. After all, we are talking not only about maintaining a comfortable temperature at any time of the year, but also about significant savings and safety. Especially considering the fact that everyone can afford to purchase the simplest mechanical thermostat.