
Furnace stove bench ordering. Modern heating and cooking stoves with a bench: maximum efficiency and comfort
Do not think that a heating and cooking stove with a stove bench is yesterday, because you can cook on an electric stove and sleep on the couch. The presence of a trestle bed slightly increases fuel consumption, but significantly increases the efficiency of furnace equipment. A hob is a practical solution, why give up the opportunity to cook food on the stove without spending money on energy resources? The lounger can be used for rest and for various household needs. Nothing extra!
Construction of a multifunctional oven
The combined design is more massive than the compact "Dutch" and requires more bricks for construction, but it is more efficient, in the future you will not have to regret the extra expenses and the work done. Modern models home hearths with a stove and a stove bench are different from traditional bulky Russian stoves.
Design features and important rules
Today, multifunctional ovens are fuel efficient, have high heat transfer look stylish and last a long time. To build a hearth with your own hands, it is enough to have basic knowledge of laying stoves, to clearly follow the recommendations and procedures drawn up by professionals.
- The height of the couch should not exceed 90 cm from the floor - this contributes to more efficient heating of the lower part of the room and makes the resting place comfortable for people of any height.
- Under the trestle bed, it is recommended not to make a channel chimney, but to give preference to a cap - this design increases the cooling time of the furnace.
- Heating and cooking stoves with a bench weigh from three tons or more, so they require a powerful foundation - a deepened concrete slab reinforced with metal reinforcement.
- To use the stove in the warm season, you need to choose models with a summer mode, in which the design of the chimney is thought out and there are dampers that block the movement of gases.
- During the construction of the oven two-story house a stove bench and a stove are always planned on the lower floor.
Required materials and masonry scheme
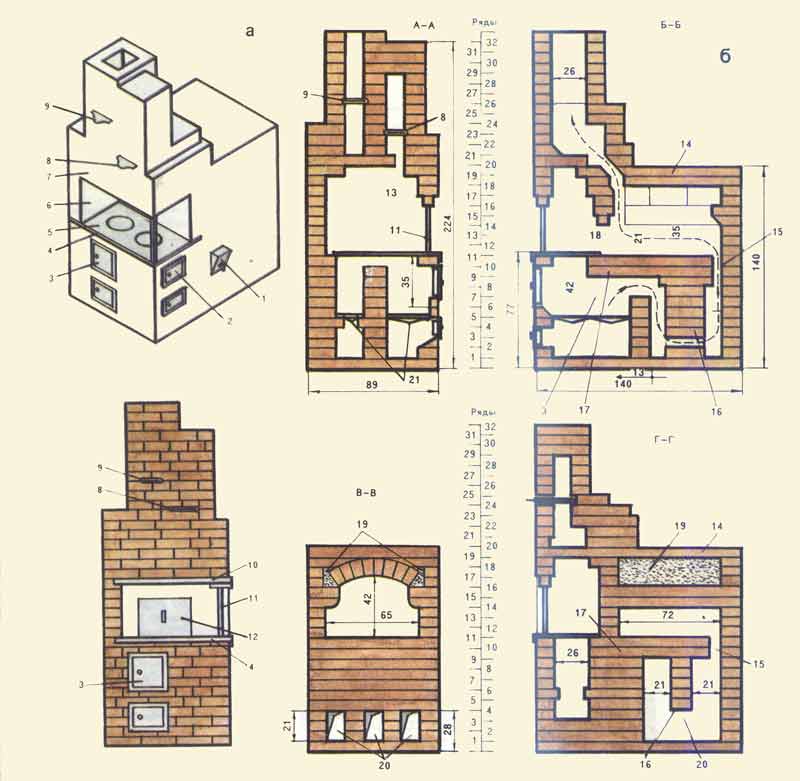
The proposed scheme of the heating and cooking stove is suitable for small houses, country houses and summer kitchens with an area of \u200b\u200bno more than 28 square meters. meters. Construction dimensions: 178*128 cm, bench area - 178*63 cm.
Model with winter and summer operation. The summer mode valve is located on the 17th row, in winter it is closed 5-10 minutes after kindling in order to release hot gases through the full smoke circulation. In cold seasons, two fireboxes per day are required.
It takes about 2.5 hours to heat the trestle bed, it retains heat for a long time and helps to solve the problem of a cold floor. In addition to its direct purpose, the extension is used for drying fruits and mushrooms, shoes, clothes, linen, by installing a folding metal dryer on top.
For work, you will need such materials and stove appliances:
- red ceramic single brick - 800 pieces;
- fireclay bricks for lining the furnace;
- thick-walled furnace door;
- blower door;
- cast iron stove 41*71 cm;
- grate;
- oven with a wall thickness of 4-6 mm;
- steel corners 45*45, 50*50 cm.
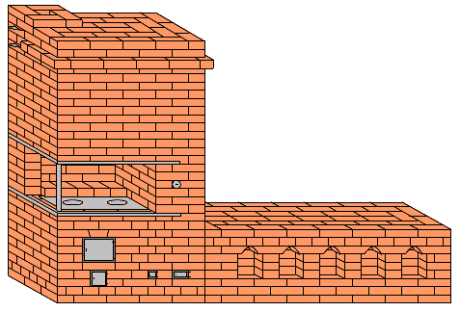
Scheme of a heating and cooking stove with a bench
Modern solutions for furnace heating
At the heart of modern heating and cooking stoves with a stove bench is most often a compact "Swede" - it takes up less space than a Russian stove and works great in summer mode. Often in projects you can find fireplace inserts with glass doors - this option is decorative and fits perfectly into any design.
Ideas for home and garden
Model with trestle bed and glazed plate
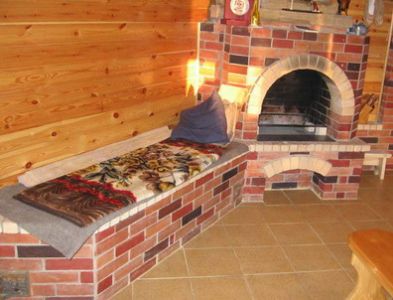
A small wall-mounted stove with a fireplace insert and a stove, closed with glass doors. On a low trestle bed it is convenient to sit for adults and children.

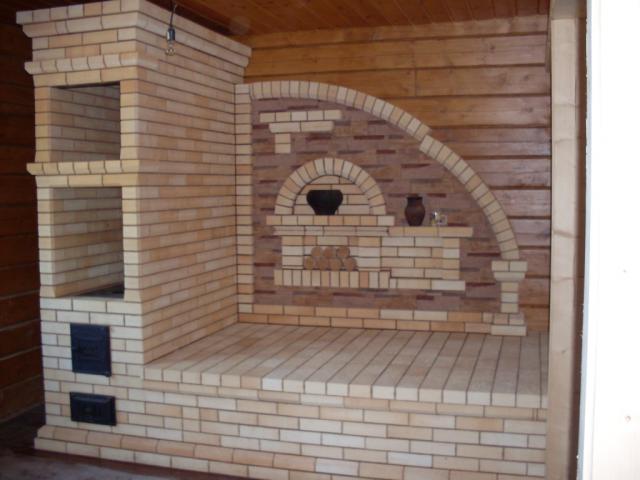
Multifunctional oven complex for summer kitchen
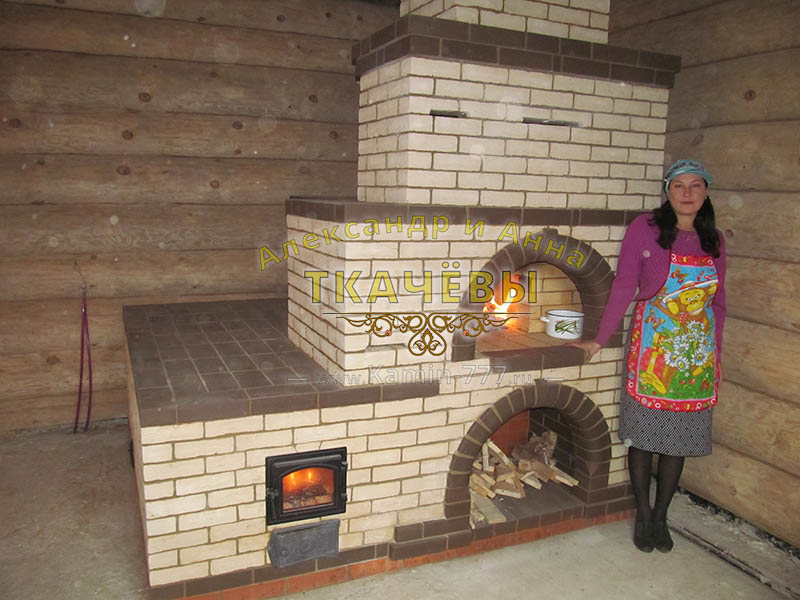
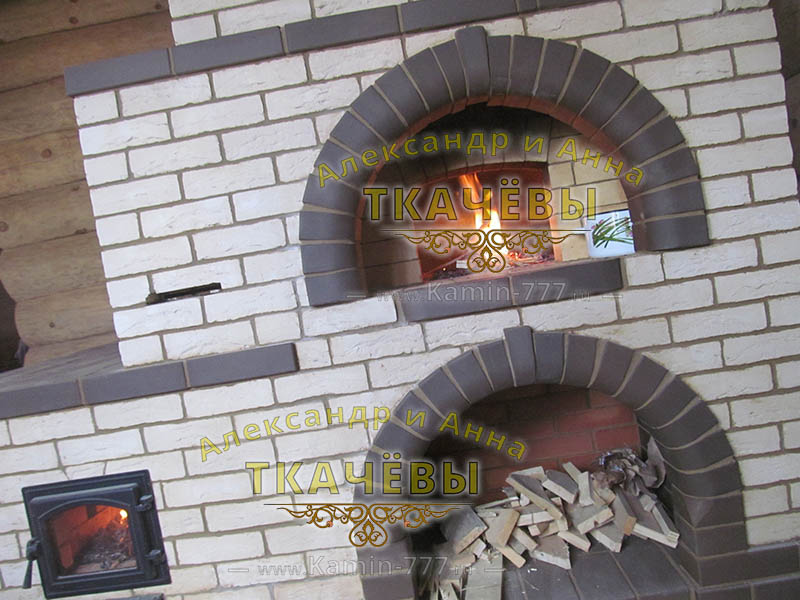
This complex has everything you need for a summer kitchen and gazebo: oven, stove, dryer, bread chamber. There is a separate firebox for the hob. The bench can be used as a desktop.

Upgraded Russian stove tiled
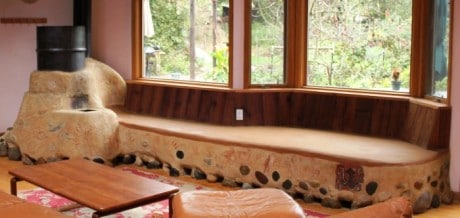
Clay oven with burner and stove bench
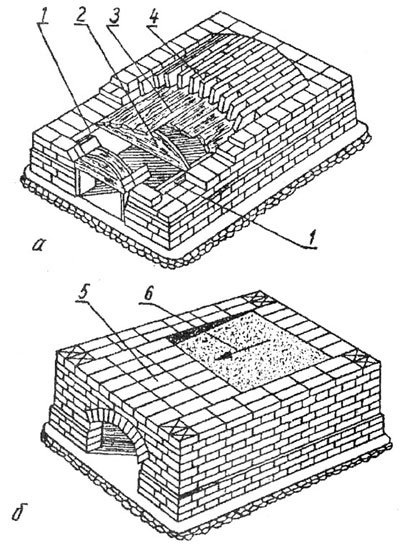
The last photo shows a modern jet stove made of clay, which works on the principle of gas-generating furnaces, in which not only fuel is burned, but also gases that are formed during the combustion of firewood. The design is characterized by high thermal efficiency, economical fuel consumption, and a minimum amount of soot in the chimney. The main advantage is the rapid heating of the room.
Projects of brick ovens for the home

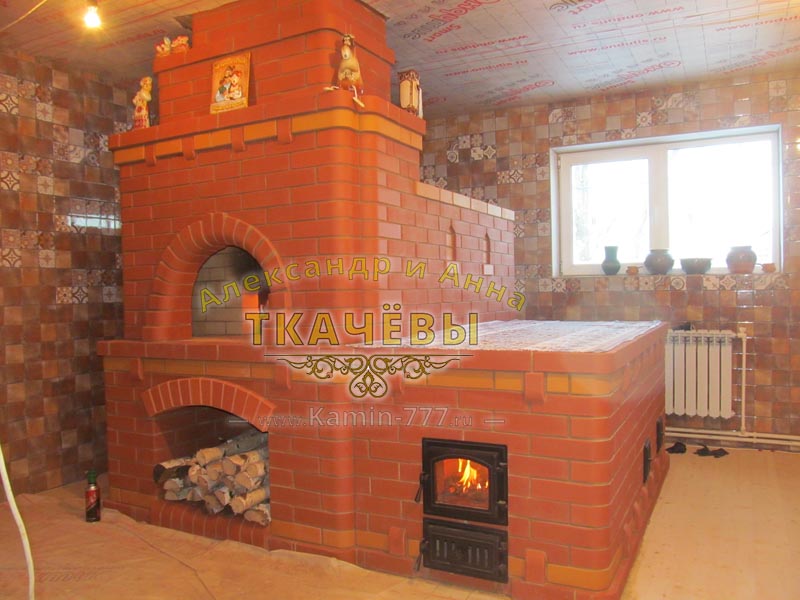
Bell-type oven with bench and stove
The design of this multifunctional hearth includes a two-burner cooking stove, an oven and a drying chamber. The cooking compartment is closed with glass refractory doors, which speeds up cooking and creates the effect of a Russian stove.
Combined design for giving and country house
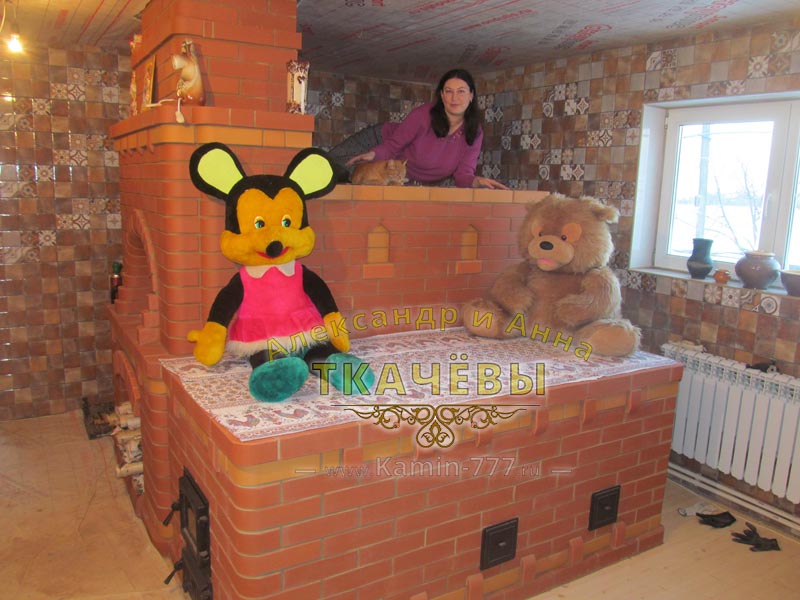
Another modernized model with a stove and trestle bed. At the bottom of the couch there are stoves that increase heat transfer and warming up in the floor area.
You need to order individual drawings of heating and cooking stoves from professionals who can boast of finished work. If you don’t have your own experience in the furnace business, then it’s better to entrust the whole process to specialists - from building a foundation to laying a pipe ridge.
Why does a classic Russian stove have a very low efficiency?
Dear customers, I would like to sort out the issue of the effectiveness of Russian stoves and offer the most effective solutions in the field of home heating. I would like to build this article according to the principle: problem + solution. In total, there are 3 main problem areas of Russian stoves and stoves with stove benches - for each problem area I will offer a solution. Some of the solutions were not invented by me, but there are also my personal developments.
Problem #1: It takes a lot of time to kindle.
Solution #1
Problem #2: Food takes a long time to cook
Solution #2
Solving Problem #3
Problem #1: It takes a lot of time to kindle a Russian stove.
A bit of history and technical facts: We know a lot from history that in Russia such a stove was used everywhere: it will heat the house, and you can cook food in it and sleep on a warm couch. modern people attracts contact with traditions.
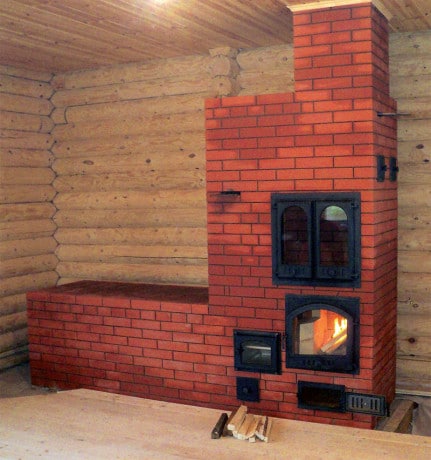
However, the principle masonry of the Russian brick oven pretty unpretentious. Imagine a fireplace: you throw firewood into the fireplace, the smoke immediately flies into the chimney - you sit and warm yourself by an open fire, the chimney heats up a little from hot flue gases. Here's what it looks like Russian stove with stove bench, stove and lower firebox. This is my job, no. 164. You can see the current cost in the gallery of works.

The principle of ancient Russian buildings for heating is similar to fireplaces - you throw a bunch of firewood into the furnace, and the flue gases immediately escape into the chimney. And in order to heat all this colossus, you will need a lot of firewood, and most importantly, time. As a result, there are large heat losses. In this embodiment, the crucible is both a firebox and an oven. However, the entire part of the Russian stove, which is below the crucible, will heat up very slowly.
Note:
The physics of removing flue gases from any furnace is quite simple: the movement of smoke must be strictly vertical.
Since the main furnace of our Russian oven with stove bench is at a height of 70-90 cm, then the smoke will rush straight up. On some sites, I have seen designs and arrangements of stoves that allegedly create channels through which smoke is discharged down to warm up the bottom of the stove. This is possible in theory, but in practice, the smoke will constantly try to rush up, as a result you will get a constantly smoking stove.
Solution No. 1: Russian Stove with a Stove
Everything is pretty simple. I'm putting Russian furnaces with a firebox. What is a subfloor? Look at the photo of my recent project: there is an additional firebox at the bottom of the Russian stove. Its purpose is to run flue gases along the bottom of the furnace. The smoke will tend upwards, therefore, along the path of its movement, hot air will be able to heat the entire bottom of the furnace structure. The next photo is my work, Russian stove with a stove bench and a lower firebox № 160.
Insanely interesting work, in my opinion. For several weeks we were designing with the customer such a task - a family of 4 people, and the requirement was that the couch could accommodate the whole family. Here's what happened in the end.

The fact is that heat always accumulates under the ceiling, no matter how hard we heat the stove, hot air will rise up. I honestly don't know how people slept on Russian ovens in ancient rus because it is impossible to sleep there for a long time! I can’t stand it for more than an hour, it’s very stuffy and hot ... Although, of course, there were much fewer amenities in Russia than now ... So, I offered a modern family a solution that they really liked - to build an additional couch, but not on level classic stove bench of the Russian stove, and lower. This made it possible to expand the area of the warm bed, and even allows you to sleep in the lower part.
Problem number 2: food takes a long time to cook in the Russian oven
The second main disadvantage Russian stoves that the formation of coal is a long process. In order to form the necessary mass of coals on which you can bake food, this is 1.5-2 hours.
And most importantly, I'm going to Russian brick oven must be cooked in a cast iron cookware. Any other material may partially melt. Not to mention the plastic handles on the pans. Agree, it is quite inconvenient to heat a kettle in a clay pot, while heating the main source of water heating for two hours?
Solving Problem #2 Russian Stove with Stove
For fast food there is a modern solution in the Russian oven - Russian oven with stove! And on such a surface, you can calmly and quickly heat up food, boil water - in general, use a Russian stove as a regular heating and cooking stove. The heating time of such a stove is on average 10-15 minutes.
The next photo is my work, Russian stove No. 162, from this angle you can clearly see the stove and burners, on which you can easily quickly heat something up without even melting Russian stove through the main furnace. Kindling takes place through the lower firebox, which is located exactly under the stove. Agree that such a decision makes such a stove very convenient, which makes it possible not to deviate from our traditions and preserve the spirit of our ancestors! Let me summarize - laying a Russian stove with a stove- this is the most efficient solution with high efficiency of cooking.

Problem #3: Nowhere to put large stocks of firewood
For some time I lived in the village and I know perfectly well that Russian stove work is constantly being carried out to kindle the furnace. Near Russian stove constantly paper, garbage and even an ax with a stump for chopping firewood. And most importantly - firewood. They are dumped in a pile right next to the stove, or laid out wherever possible - under the table, under the benches, on the stove and in other corners.
In winter, at a temperature of minus 20 and above, you really don’t want to go outside from a warm room especially for firewood, therefore, to kindle the stove in the morning, they stock up on firewood in the evening.
In classical Russian stove there are no large niches for storing firewood. If we look at the image of a classic Russian stove, we will see a small niche two bricks high.
Solving the problem No. Big firewood
I propose the following solution. At the bottom of my unique Russian oven with stove bench you can see a huge capacity for firewood, which is huge by the standards of this design. This is not a fireplace, but a firewood shed. There can be located a stump with an ax and paper for ignition and a large supply of firewood for a couple of days. I try to incorporate firewood into all my work, if space allows, here, for example, on Russian stove with stove bench, stove and lower firebox No. 160 - decoratively decorated chic firewood!
Main conclusions
1. For efficient heat transfer and saving thermal energy, it is necessary to order Russian stove with firebox
2. For fast food, it is important to order masonry of a Russian oven with a stove.
3. Large firewood rack In order not to litter the room with firewood debris, it is important to add a large niche for firewood at the design stage.
Dear customers, then I would like to show you my work on this topic. If you want to see all my work (and I highlight 5 main areas - Barbecue stoves, brick fireplaces, heating and cooking stoves, fireplace stoves and Russian stoves) - then go to the photo gallery by clicking the button:
Stoves with stove bench No. 164
Stoves with stove bench No. 164
Cost of work by phone: 8 903 687 25 03
The cost of materials: from 220,000 rubles.
Stoves with stove bench No. 164
Cost of work by phone: 8 903 687 25 03
The cost of materials: from 220,000 rubles.
Stoves with stove bench No. 164
Cost of work by phone: 8 903 687 25 03
Cozy and comfortable
Since ancient times, people have used stoves to heat their homes and cook food. Over time, their design gradually changed, but the purpose remained the same. Very effective and practical at the present time is a heating stove with a stove bench called "Swede". It was first developed by the designer G. Reznik and presented in 2010 in the Dom magazine.
Advantages and disadvantages of the furnace
This design has a lot of positive aspects:
- Small size, which makes it possible to install it in a small house.
- The power of the device allows you to heat an area up to 35 m 2. Has "summer" and "winter" modes.
- To increase the reliability of the furnace, the firebox and channels are lined with refractory bricks.
- The Swede oven is designed for location in the wall between the kitchen and the room. Thus, there is a rapid heating of the kitchen and dining room, and the living room gradually warms up.
- The materials and equipment for mounting the product are quite simple and inexpensive.
- It is possible to attach a cozy and comfortable stove bench to the stove.
- The whole design of the stove can be made decorative, and it will perfectly fit into the interior of the house.
With a lot of advantages, the oven also has some disadvantages:
- The firebox of the product is made in the width of the furnace, and this is very inconvenient in terms of stacking firewood in such a long space.
- It takes a lot of time for installation and drying of brickwork.
Device and principle of operation
The Swede has a large oven, which does not reach the flame. It is intended not only for baking, since the furnace part in the furnace is necessary for chemical afterburning of fuel. A metal oven quickly heats up when the first heat appears. After kindling, when you open its door after 3 minutes, you can hear how warm air comes from it, because the stove starts to heat from the floor, and not from above. Flue gases go from top to bottom from the firebox to heat the oven.
The heating device has an upper niche of a sufficiently large size - two people can put winter clothes here. Niche heating comes from the first heat and the second. The Swede also provides a niche above the stove. It is covered with a wooden lid. And due to this, the food left in the oven remains warm for a long time.
The designers did not make an outlet between the smoke circulation and the furnace, as this complicates the product, and its price increases. They got out of the situation by making an overflow at the bottom under the oven.
When using such a device, if you do not close the view, the stove will cool down quickly. Therefore, it is necessary to monitor the condition of the fuel in the furnace in order to close the view in time, preventing carbon monoxide from entering the room, which can lead to sad results.
Tasteful design
The heating of the entire furnace is carried out according to the well-known channel scheme. That is, heating is carried out by the second heat and the heat of ember. When using vertical channels, heating from below is worse, but soot accumulates less. And this is quite important when using different fuels. It is also possible to use horizontal channels. At the same time, the oven heats better from below, but it is necessary to clean it often.
In the product, the channel smoke circulation is made simple, so the order of the furnace can be changed depending on the requirements, and at the same time the quality of the product does not deteriorate. The heating and cooking stove in the 3rd row lies as the order indicates. The back of the stove goes into the living room, where you can attach a stove bench. It turns out to be quite large - 180 × 66 cm, and a tall person will be completely accommodated on it.
Swedish development is very good decision. It has an efficiency slightly less than in a Russian stove, but exceeds the heat transfer of a Dutch stove. From the material that needs to be spent on the construction of a Dutch woman with a capacity of 2500 Kcal / hour, you can build a Swede, whose capacity will be 3500 Kcal / hour, and at the same time it is necessary to heat it 2 times a day. AT swedish oven very convenient to cook food. You don't have to bend over, and you don't need a grip.
To make a Swede, it is necessary to use high quality material and do the work carefully, observing the order, all sizes and rules during construction.
The subtleties of building a stove
The quality of heating is determined by the proportions of the fuel part. All its dimensions must strictly comply with the drawings, otherwise there will be violations when using the device. The designers approved the following dimensions:
- Plate - 710 × 410 mm.
- Furnace compartment - 330x356x506 mm.
- Oven - 305x381x506 mm.
- The thickness of the metal walls of the oven is within 4–6 mm. This size is of great importance, since when it is reduced, the walls will quickly burn through. And thick walls will quickly remove heat, and their warm-up time will increase. These moments will lead to fuel underburning and soot deposition, and at the same time efficiency will drop. These points also apply to the plate, so cast iron or special steel is the best option for it.

Design planning
If you want to build such an efficient stove with your own hands, then you must follow the recommended proportions. The oven is heated from all sides by hot gases. Therefore, from its back to the wall of the furnace, it is necessary to make a gap of one and a half bricks. You can make a firebox close to the oven by isolating the near wall from the fire with asbestos.
An important element of the furnace device is the door. It is also his weak point. If it is made of thin low-quality material, then it is loosened from thermal loads and may fall out. It is advisable to immediately insert a cast iron door with a mustache immured in the masonry. If there is no mustache in the purchased door, do not be discouraged - you can make them yourself by welding 60 mm long wire to the corners of the door. And do not forget to part it in the form of the letter V, and also wall it up. To keep the finished door with a mustache for a long time, it must be reinforced with a steel strip or corner.
Building a Swede is not so easy. When heated, all the heat goes towards the floor, so it is necessary to make it well insulated. At the present time, there are quite a lot of high quality materials. We will use one of them - this is basalt cardboard. It is laid in three layers. It turns out insulation of 15 mm. A foil sheet is also laid in the middle and top layer.
The foot of the furnace is laid with wide seams - 6–13 mm. Due to this, a protrusion in the form of a pedestal is obtained. All bricks must be soaked in water before laying. This removes dust and increases their adhesion. This is necessary because the stove has a large thermal stress, and the use of dry and dusty material will lead to fragility of the structure. The masonry mortar must also be of excellent quality on marl clay.
When building a firebox, it is necessary to use yellow brick. This is fireclay construction material which can withstand very high temperature. The solution is also used using fireclay clay. The smallest joint width between fireclay and ordinary masonry is 6 mm. Only the firebox is laid out of fireclay, although ideally it would be necessary to lay out the entire furnace. But this is an expensive material, so they save it.
Comfort in a wooden house
When laying out the design of the Swedish oven, it is necessary to cut the bricks evenly to the desired size. This can be done with a grinder. You can see in the drawing that some of the corners are rounded. This must be done, as the corners will weaken the draft due to the resulting flue gas swirls.
It is generally undesirable to use metal in a furnace. But in Swede, they decided to use it initially to reduce the cost of the product. A layer of mortar of 6 mm is applied to metal parts from all sides.
Furnace start
It is strictly forbidden to put a wet structure into operation. The oven needs to be completely dry. This lasts approximately 4 weeks. Two weeks of "cold drying" and the rest of the time "warm". During the “warm” drying, crumpled dry newspapers are placed in the cleaning doors. An indicator of a dried oven is the cessation of paper dampening.
It is also necessary to carry out "hot" drying, in which the furnace is heated with a gradual increase in the amount of furnace material.
Conclusion
Building a stove with a stove bench with your own hands is not as difficult as it might seem at first glance. Moreover, such a design is necessary for a dwelling of a small area where people live all year round. After all, with irregular heating, the device becomes damp, and it requires a long drying time. If you constantly heat the stove, then in terms of quality and size it becomes a good heating and cooking household appliance, economical and convenient.
In many fairy tales known to us since childhood, a Russian stove appears, on which they rest, bake bread and cook food, cure diseases of the respiratory system, musculoskeletal system. And these functions are not empty tales at all. The brick perfectly accumulates heat, evenly distributing it, so it is always warm and comfortable on the couch.
The Russian stove is beautiful and multifunctional. It is not only good to relax on a stove bench (horizontal overlap of the top of the Russian stove), it is suitable for drying clothes, shoes, herbs and fruits, this becomes especially important in the fall, during the rainy season and stockpiling for the winter.
Sometimes the couch (bed) was made bunk. Adults settled on the lower shelf, and children were laid down on the upper one, where warm air created an atmosphere of comfort. In the oven itself, insanely delicious bread and various food are obtained, which are fried, boiled or simmered. Craftsmen adapted the Russian stove for firing clay toys and dishes. The most interesting use of large-sized stoves is instead of a bath. A vat of water was placed in the firebox, the bottom was thoroughly cleaned, lined with straw, and then hygienic procedures were performed.
Currently, furnaces with a stove bench are built as in country houses as well as in cottages. But if earlier, in order to climb onto the stove bench, you had to use a ladder, now the furnace design has been modernized and the stove bench is placed at a height of about one meter from the floor level. This is especially true in families with children and the elderly.
In the modernized designs of the furnace, beautiful fireplaces are equipped. And externally, the decoration is made with decorative embossed tiles - tiles, turning stoves into a real treasure.
Let's summarize the pros and cons of a stove with a stove bench.
Advantages of the furnace:
- - high efficiency;
- - good heat accumulation and uniform heat transfer;
- - ease of operation;
- - safety;
- - long service life - up to 30 years or more;
- - therapeutic effect;
- - with the right location, the stove with a stove bench does not take up much space and allows you to heat several rooms at the same time;
- - the oven retains heat well after heating;
- - the stove with a bench aesthetically fits into any interior.
- Flaws:
- - masonry requires skill and professionalism;
- — solid fuel used in a Russian stove - the reason for the appearance of garbage in the house, takes up space, takes time to harvest it (chopping firewood);
- — high fuel consumption;
- - in the classical design, only the upper and middle parts were warm, while the lower part of the furnace remained cold, which required modernization and improvement of the furnace model with a stove bench.
Description of the Russian stove with a stove bench
Classic oven dimensions: width about one and a half meters (two arshins); length - a little more than two meters (three arshins); the couch was placed at a height of approximately human height - approximately 180 centimeters (or two and a half arshins), the height of the hearth was approximately 45 cm, the height of the hearth was taken equal to the height of the table.
The furnace was erected on a foundation of small fragments of bricks, stones, less often on a log foundation (oak, pine and other species). The structure was erected simultaneously with the house, but their foundations are by no means built together, isolation is required. The stove itself was built either from baked bricks or from raw bricks (in those families where income did not allow using red brick for construction). The first "smokers" (chimneys) were made of wood, then, due to the fire hazard of the material, the wood was replaced with stone and brick.
Furnace construction: crucible - a firebox, a place where fuel is burned; a sixth and a subsheath - an auxiliary table for dishes and a niche under it; under - the bottom of the firebox; hailo - a hole for the release of smoke into the hut; podpeche - space for storing firewood; mouth - a hole for laying firewood, closed by a damper.

Operating principle
The fuel placed in the front part of the combustion chamber releases heat during combustion. To maintain the process of uniform combustion, air enters through the lower plane. Hot flue gases go up into chimney, bypassing the mouth, shield, hailo and a special threshold in front of the shield, designed to keep hot gases in the crucible. The walls of the structure heat up very slowly and cool down just as slowly.
Russian stove with a do-it-yourself stove bench
Before engaging in the preparation of materials and tools, we prepare drawings with order. The drawings should reflect the number of bricks, fittings, dimensions.
Foundation
Foundation options:
- rubble concrete;
- brick;
- reinforced concrete from blocks 40x20x20;
- monolithic reinforced - the most common and simple.
1. We dig a foundation pit. The size of the foundation is equal to the size of the base of the furnace, plus 15-20 cm.
2. Lay the filter pad. We lay wet sand on the bottom of the pit. We tamp it down until it stops settling, periodically pouring a new portion.
3. We lay gravel on a layer of sand, medium-sized pieces of broken bricks, again a thin layer of sand, moisten, tamp. Next, we pour another layer of rubble about ten centimeters thick, we tamp it down.
4. We cover the rubble with two sheets of waterproofing.
5. Install the formwork. To do this, we install boards or plywood in the pit. At the same time, we leave a distance of 10 cm between the walls of the pit and the “box”. We insure the boards with supports and strongly moisten them so that the wood does not draw moisture out of the solution.
6. To lay the reinforcement, pour 4-5 cm of cement mortar into the formwork. While the cement sets, we tie the metal rods with wire strictly perpendicular. The distance from the ends of the rods to the formwork is 1-2 cm.

7. We knead a solution of cement (1 part), sand (3 parts) and crushed stone (5 parts). The solution is poured in layers of 20 cm. We tamp each of them using a vibropress or a manual tamper.
8. When the solution sets, cover it with waterproofing (tarpaulin, roofing felt, etc.).
Important! Be sure to check the horizontality of the filled solution. We use the building level. In case of improper pouring of the foundation, the design of the furnace may warp or crack.
We prepare materials
In order to build a classic stove, you will need: about eighty buckets of cement, the corresponding amount of fine sand, clay, 1700 bricks, a view with a half-door and a valve (the hole inside is 26x24 cm).
Ordinal guide to the construction of the Russian furnace

1) We use refractory fireclay bricks. To achieve the correct dressing (brick seams), we cut each brick by ¾ and install three such bricks in the corners of the masonry so that they exactly adjoin each other.
2) We are building the walls of the future guardianship.
3) In this row, we use four ¾ bricks.
4) We build row number 4 from solid bricks. For those bricks that will be located at the base of the oven, we break off the corners. These bricks will become supports (heels) at the arch. We install a wooden form for laying the arch, then we make the laying of the arch. We cut the bricks, for accuracy using a thread stretched from the center of the formwork to the upper edge of the brick.
5) In this row, it is necessary to mow 20 bricks at an angle. This angle is necessary for the construction of the vault of the furnace.

6) We make the walls from the sides one brick thick. We lay out the front and rear walls in two layers thick. We insert a wooden semicircular formwork between the side walls. According to this form, we lay out the arch of the furnace. In the future, the formwork will need to be removed, so it must be collapsible.
Let's start laying the vault. We make the gaps between bricks the same, fill them with mortar. For strength, you can put a small piece of brick into the gaps.
7-8) We carry out construction, strictly observing the dressing. We use plumb lines to check the verticality of the faces. In the eighth row we make the base for the cold stove.
9) We build a stove, a row of solid fireclay, at the corners of 1/2 and 3/4 parts.
10) We line up a row, between the walls we fill up a layer of fine sand.
11) We make a continuous laying-overlap on top of the sand backfill.
12) We build under the furnace and hearth. Chamottes forming under the stoves do not need to be fastened with cement. We cover the space (slots) between them with sand. In the left corner of the hearth we make a furnace - a recess for hot coals.
13) We build the walls of the cooking chamber and the walls of the hearth. For the mouth of the furnace, we install a metal perforated arc between the crucible and the hearth. We insert a plastic iron or copper wire into the perforation, which is then embedded in the mortar between the brickwork.
14-16) We build rows of crucible and hearth.
17) We lay the supports for the vault of the crucible - 8 beveled chamottes. We fix wooden formwork on them. We lay out an arch of ½ bricks.
18) We are building an arch.
19-22) We lay out solid rows (we build an overlap on which it will be arranged couch). Before 22, we fill up the sand nearby. We leave an open opening above the pole.
23) Building up the walls. On the right we make a hole for the convenience of cleaning the furnace from ash.
24-26) We block the overtube. We leave an opening for the chimney and the view.
27-28) We install a half-door opposite the view.
29-30) We are still building the walls of the overtube.
31) We make a number of additional bricks (3 pcs).
32) We make the overlap of the overtube, on the right we fasten the valve.
33) Building a chimney. All rows are the same, six bricks each. At the ceiling we make a brick overlap.
After construction, we let the stoves dry, check the draft and produce the exterior finish.
Video - Russian stove with stove bench