
Chimney through the roof of soft tiles. Elements for insulation of round pipes. How to equip the passage of a steel pipe through the roof
When installing a fireplace or stove in the house, you must immediately worry about exactly how and where the chimney will go to the roof. Many people think that it is quite possible to do it yourself, but experts do not recommend it, since in this case the exit of the pipe to the roof surface is a complex process. The safety of people in the house, the safety of all building structures depends on the correct installation.
Before you start laying a stove or fireplace, you need to decide on the place through which the pipe will go to the roof.
It is important to immediately determine at the stage of designing a house where the stove or fireplace will stand, since it is impossible to make a chimney winding. It is best if it goes vertically upwards. This will not only allow you to simply enter it through the roof, but also ensure safety - smoke and other combustion products will be removed as efficiently as possible.
Rules for installing pipes on the roof
Outlet through the roofing
The exit of the pipe through the roof and floors of the house is an important and responsible matter, it is best to entrust it to specialists who will not only quickly and competently perform the work, but also ensure the safety of the structures, since the chimney can get quite hot during use. Materials for installation through the roof are used only fireproof, non-combustible.
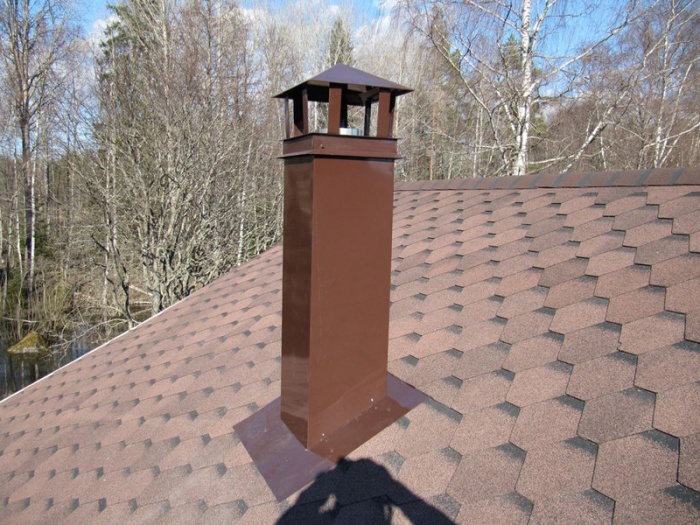
Installation is carried out strictly according to the instructions for a particular type of pipe. Consider two installation options that are most common: for a round insulated steel structure (the so-called sandwich pipe) and a square and rectangular chimney, most often constructed from ordinary red refractory bricks.
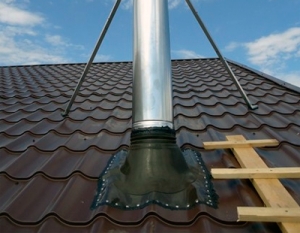
To bring the sandwich pipe to the roof, use a steel sheet with an apron, which will allow you to create a tight connection.
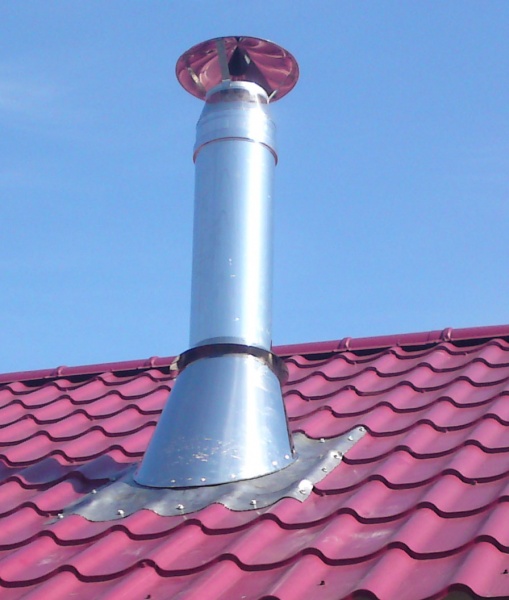
If a round pipe is passed through the roof, then its installation can be done by hand. A chimney made of steel with several layers of insulation, the so-called sandwich pipe, is used for this. Today, the construction market offers a large number of various models of such chimneys, and auxiliary materials can be purchased with them, in the form of aprons, caps for installation.
To bring such a pipe to the roof, it is necessary to use a special steel sheet with an apron, which allows you to create a tight connection. After the pipe is passed through this cap, a “skirt” is put on it, completely hiding the junction, which greatly increases the reliability of such an installation. Experts recommend using a rubber pad made of heat-resistant material for installation, which increases the reliability and quality of all fasteners.
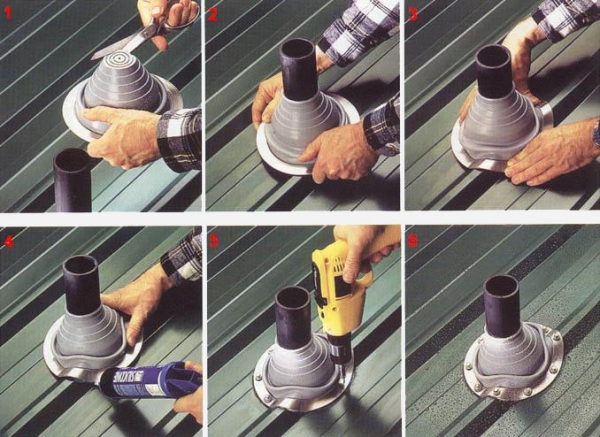
Usually, penetrations for passing a chimney through the roof can be purchased immediately with a pipe, but you can also make them yourself. For this, a heat-resistant rubber ring is taken according to the size of the pipe, it is put on its surface at the junction with the roof. Silicone sealant is applied under the edges of this ring, the penetration itself is attached to the roof with self-tapping screws.
Such installation is simpler, but all consumables and auxiliary materials that are used to install the passage through the roof must be specially designed for such work. Even when using a sandwich pipe, all safety measures must be observed.
Rectangular and square pipes
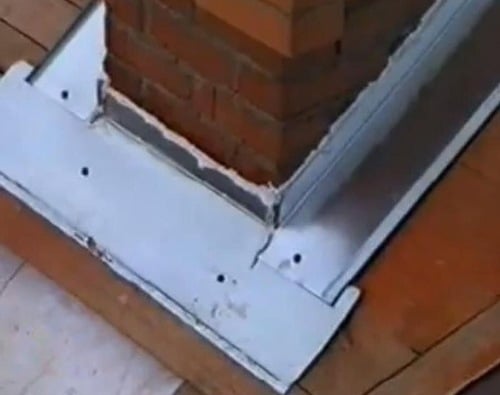
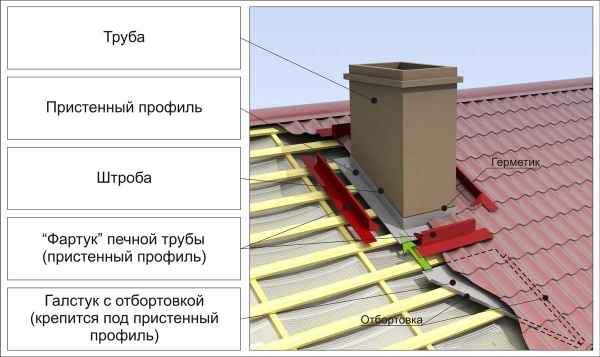
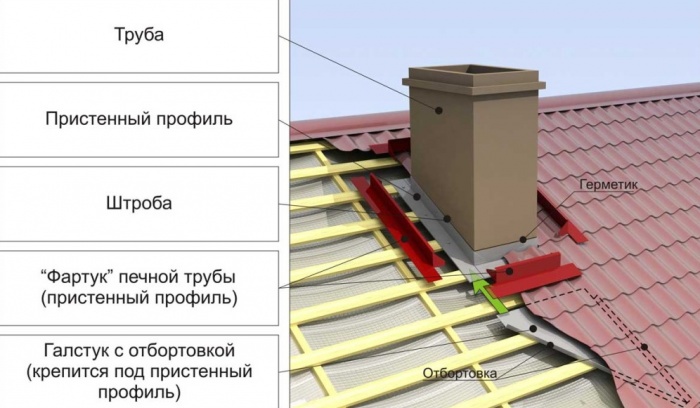
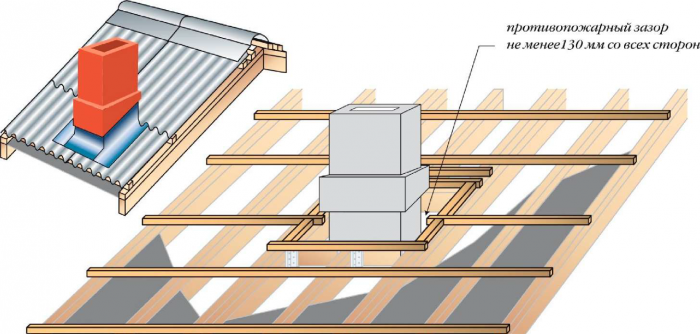
For chimney pipes of square or rectangular section, it is necessary to prepare a special frame, which will be mounted when the chimney passes through the rafter system. It is formed by the rafter legs of the structure, transverse beams, which are placed on the rafters from below and above the pipes, while the distance is regulated by the relevant SNiP. Everything here depends on what material the chimney is made of, the distance can be from 13 to 25 cm.
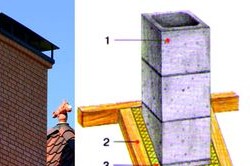
When the chimney passes through the rafter system, a special frame for square and rectangular pipes is mounted.
Around the pipes, the entire space should be filled with mineral wool, which has a high density, hydro- and vapor barrier is not additionally needed, since wool is not very susceptible to getting wet. But at the box such membranes must be installed. Suitable for this roll materials cut out in the form of an envelope. The ends of the material must be fixed on the rafters and beams, using staples of a construction stapler or galvanized nails for this. It is recommended to use special adhesive tapes or sealants to fasten individual pieces.
above square chimney a drainage gutter must be installed to ensure that condensate and sedimentary water drain onto the roof surface. Such a gutter can be made from specially designed metal parts or a conventional waterproofing film.
But this option is suitable if the chimney is made of traditional materials, that is, brick or metal. For modern pipes, all heaters and films can be mounted directly on the surfacewithout fear for safety (films do not ignite in this case). All materials are attached to the surface of the chimney using construction tape, but on top it is necessary to make a clamping bar that closes the connecting points.
The exit of a square or rectangular pipe is carried out in this way: the junction must be arranged from the lower and upper apron, which is made of galvanized iron. The edges of such an apron are inserted into a special gutter, which is nailed to the wall surface, sealed, and then fixed with self-tapping screws to the roof directly through the roofing.
When withdrawing through the ceiling and the roof of the chimney, safety must be taken care of. It is necessary to take into account what material the chimney is made of, what section the pipe has, the features of the roofing through which the pipe will be removed. Only after that you can start working.
As a rule, when installing internal chimneys, the most serious difficulties arise when it is necessary to arrange a chimney passage through the roof and ceilings. If in the second case the passage through the ceilings should mainly ensure the fire safety of the building, then the passage through the roof, in addition to fire safety, must be completely sealed from moisture penetration.
The main issue is moisture.
If the passage of the chimney through the roof is made incorrectly, then moisture cannot be avoided in the leaky joints of the chimney, which will lead to wetting load-bearing wooden structures, the formation of dampness, harmful fungal molds and over time can completely destroy the supporting structure of the roof. To avoid this, the exit of the chimney through the ceiling to the roof must be done correctly and accurately.
What a chimney - such a passage
Considering this issue, it is worth considering that there are many ways to organize the exit of the pipe to the roof. Its device is affected, first of all, by the type of chimney itself, its method exterior finish.
- After all, if, for example, a ceramic chimney is being installed and led to the roof, then this is one option, but if the chimney is a simple brick or sandwich pipe, this is completely different.
- A ceramic chimney can also have several options for exterior finishes.
- If, for example, the part of the chimney above the roof is lined with brick, then the installation is carried out according to one scheme, and if it is simply plastered, this is already according to another.
Indeed, if in the first variant, directly with the roof, the outer concrete blocks of the chimney will come into contact, then in the second variant, the brick, the installation of which begins with an intermediate crown located under load-bearing structure roofs.
Floor material and roofing - an important factor
The roof covering plays an important role in how the chimney passes through the roof. Most often, you have to work with a coating of corrugated board, metal tiles, ondulin. Often there is a need to bring the chimney to a soft roof.
Feed-through elements: different possibilities
Depending on the materials of the ceiling, the output of the sandwich pipe through the roof of the chimney can be arranged in various ways. On a soft roof, the output of a sandwich pipe with your own hands is carried out as follows:
There are passage elements that can be installed in any convenient place.
- A hole is faked in the roof through which, for example, a modular chimney pipe is output. Let's imagine that our roof covering does not have powerful beams for fastening the passage.
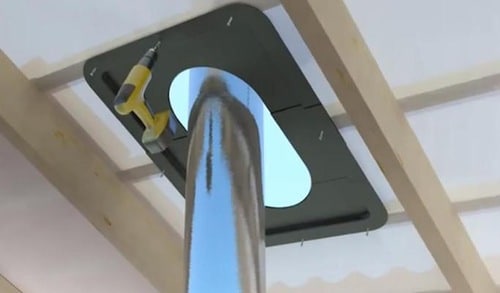
- In this case, we use a two-piece prefabricated passage, which is fixed with self-tapping screws from the inside, as shown in the picture.
- After that, a special rubber seal is glued to it from the outside with silicone.
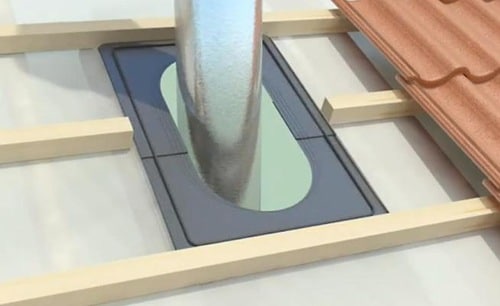
- A non-combustible insulation is laid on top in such a way as to fill the gap between the collection passage and the chimney pipe. In this case, the insulation material should not cover the rubber seal.
- Next, the roof cutting is attached, which comes complete with a prefabricated passage. Fastening is carried out using self-tapping screws.
Roof cutting: types and options
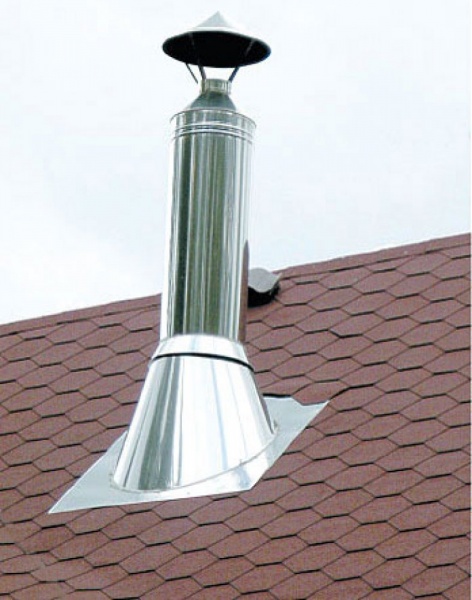
But we are also interested water protection. If we had a modular steel chimney from a sandwich pipe, we would use a special roof cut.
There are currently many various kinds roof cuttings according to the method of execution, material and angle of inclination. As a rule, they mostly come with a slope of 15-35° or 35-55°, depending on the angle of the roof slope.

Is it possible to apply this method in our case? You can, or you can use self-adhesive tape for adjoining.
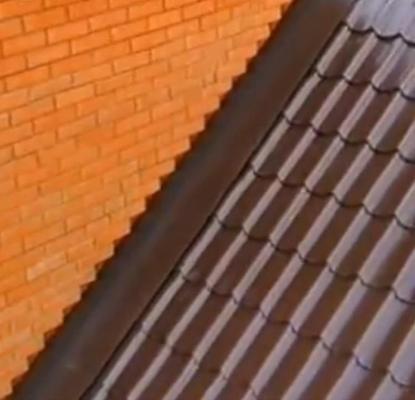
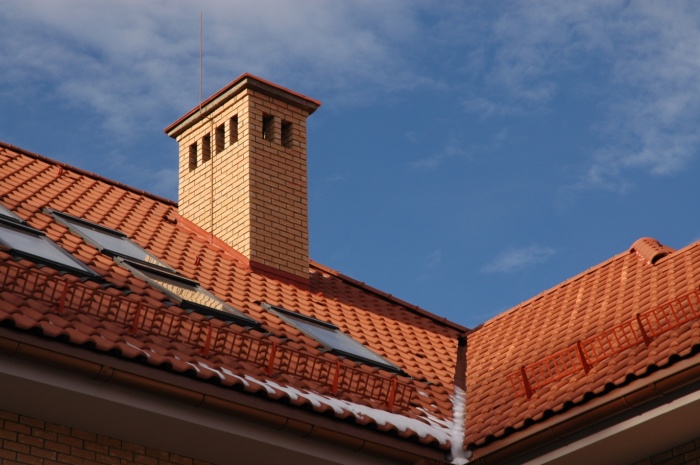
Tiled roofing - a special approach
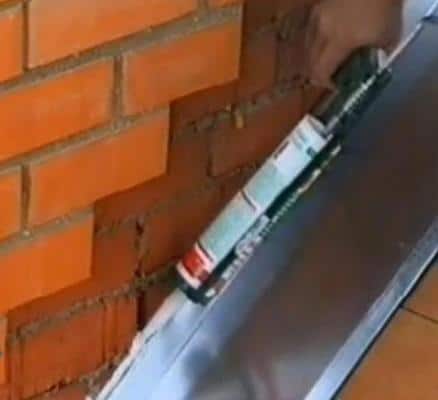
And if we have a roof made of tiles and a chimney lined with bricks? The processing of the external chimney is carried out with particular care. Corrugated, self-adhesive, aluminum sheet or self-adhesive lead sheet is used for processing the chimney.
Our reference: sheet aluminum or lead exists in the form of an insulating roll with a self-adhesive one side. The second side is covered with lead or aluminum foil to protect against various mechanical impacts and aggressive weather effects (snow, rain, hail, etc.).
Roofing from corrugated board
Corrugated roofing has earned the trust of consumers due to its reliability and attractive appearance. A metal sandwich pipe can be brought to the roof from corrugated board as follows:
- on the surface of the corrugated board, the installation site is marked;
- with the help of a grinder, they cut through the corrugated board, stepping back a couple of centimeters inward. It is necessary to cut the corrugated board very carefully so that notches form;
- having made cuts in the corners of the hole, bend the corrugated board up;
- now we cut through the overlap, making a similar hole;
- carry out the installation of a metal box through which it is necessary to bring the sandwich pipe;
- having completed the output of the sandwich pipe to the roof from corrugated board, mineral wool is placed in the box or expanded clay is poured;
- a silicone seal is put on the sandwich pipe and glued to the corrugated board, forming a sealed chimney outlet assembly.
Ondulin roofing
It is not easy to make a chimney pass through an ondulin roof, but you can still do the work yourself. The fact is that the ondulin coating is combustible. Therefore, in order to organize the outlet of the chimney, it is necessary to make a large hole in the ondulin coating.
So that the hole in the ondulin coating does not become a place of leaks, the installation of through-roofing parts is carried out, that is, the exit is organized through a metal roof cut with an apron. The angle of inclination of the cutting is selected depending on the steepness of the roof slopes from ondulin. When installing the cutting, its ends are inserted under the located sheets of ondulin
Metal tile: do it according to the rules
Well, if we have a metal tile coating? Most often, the passage of the chimney through the roof of metal tiles is arranged with a traditional, external cutting installation. However, this method is not entirely reliable and efficient.
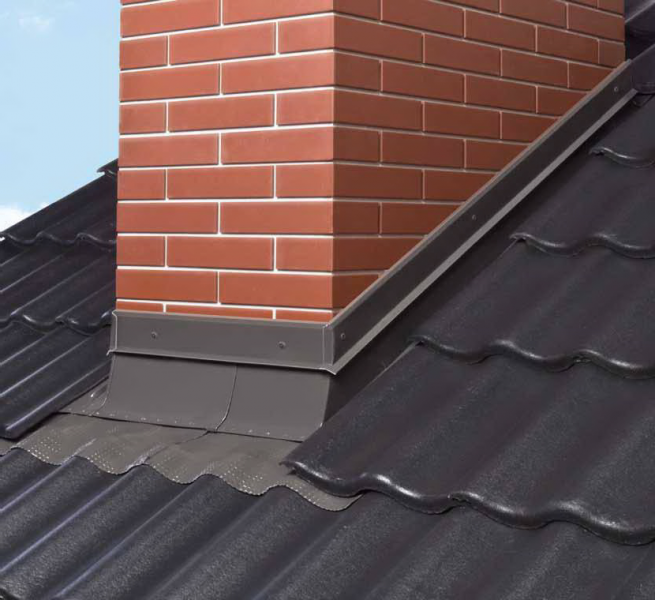
Now let's look at how to properly install the cutting around the chimney, lined with bricks on a metal roof.
- For hermetic adjoining of metal tiles with chimney pipes, above the roof slope, we use the so-called internal apron.
- The inner apron is arranged before laying the metal tiles around the chimney.
Inner apron - definitely strobe
It can be made of either coated or uncoated galvanized steel.
Do-it-yourself installation of the apron should be as follows:
- The steel profile must be attached to the pipe wall and mark the upper edge of the apron on it.
- Then, with the help of a grinder, it is necessary to pierce the pipe wall along the intended line.
- At the end of the strobe, it is necessary to remove the dust and rinse the strobe with water.
- Installation of the inner apron begins with its lower element. The steel profile must be cut in the right places. The element is installed in place and pressed tightly.
- Watch for the exact match of the top of the element with the strobe.
- Fastening is carried out with the help of self-tapping screws screwed through the lower part of the inner apron into the wooden elements of the roof.
Cut and install the side and top elements of the apron in a similar way. At the same time, do not forget to overlap the adjacent parts of the apron, at least 150 mm in size, in order to avoid water leaks.
- The edge of the steel profile inserted into the strobe must be sealed with a special sealant.
- A flat sheet, the so-called tie, is wound under the lower element of the apron, along which water will flow.
We carry out the installation of a tie with our own hands:
- A “tie” for water drainage is directed either into the valley or down to the roof eaves.
- A border is made along the edge of the tie. This is done by simply folding the edge with pliers and a hammer.
After sheets of roofing material are installed around the pipe, installation is carried out outdoor aprona . It is installed similarly to the inner apron, but its upper edge is not recessed into the strobe, but the joint is sealed with a special sealant.
Materials: the right choice is the basis of safety
We looked at a few of the many ways how the roof section of the chimney is arranged, which allows you to bring the pipe through the ceiling to the roof.
Now I want to draw your attention to something that should never be done when you need to run a chimney through the roof.
- As a rule, a modern roof is a kind of layer cake. Many of the materials used in this pie are completely unsuited to heat-prone elements.
- When choosing a chimney duct, first of all you should take care of the fire safety of the building and only secondly - about its tightness.
- You need to understand that the chimney on the roof is not just one of the decor elements of your building, but an operating unit, the safety of your property and your life in general may depend on the correct design and arrangement of which.
- Any materials, be it a sealant, a chimney cap, insulation, and much more, must fully comply with the chimney used.
- After all, the possibility of some elements of the passage or sealing of one chimney is completely unsuitable for use with another.
No guarantee - no material
Purchase materials only in specialized stores that have competent sales assistants who can correctly assess the device of your chimney and advise you on the purchase of one or another material, or, conversely, save you from rash actions.
Our advice: when purchasing chimney elements, passages, parts and parts of sealing and insulation, require sellers to present quality certificates for each type of product.
If for some reason you are not presented with certificates, refuse to purchase this product. Do not take a word about the available certificates, such as there are certificates, but the boss is not there now, and he has all the documents.
When arranging a chimney exit to the roof, purchase materials in places where quality certificates are available for such products, even if the price is slightly higher. Savings like this can cost you dearly in the long run.
Most stove builders will surely agree that installing a chimney on a roof is one of the most difficult jobs. In addition to professionalism, the implementation of this process requires: the ability to correctly calculate and determine the place for installing the pipe, understanding how the roofing pie is arranged and knowledge of the basic requirements regulated by GOST and SNiP.
You will also need to take care that the installation and fastening of the chimney to the roof is done in such a way that it can withstand the wind load. This raises several important questions:
- How to bring a chimney through the roof?
- What should be considered when using a metal chimney?
- How is waterproofing and thermal insulation of a roofing pie performed?
- Do SNiP and GOST regulate what height of the chimney above the roof is required?
- How to make a cut, and with what materials can a chimney be lined?
How to bring a brick chimney through the roof
In order for the work to be done efficiently, and not to have to redo your own mistakes, you need to follow a few simple recommendations:- Planning - even with a “spontaneous” repair, there should still be a time when you should stop and think: where exactly the stove will be located, how the smoke exhaust system will be made. Where will the chimney go on the roof? The calculation will make it possible to calculate what height of the chimney above the roof will be sufficient to provide the necessary traction.
- Pipe location - exists general rule, how better pipe blown by the wind, the stronger the draft in the furnace. The chimney, following this, they try to place as close as possible to the center of the roof - to the ridge. The height above the ridge depends on how far the pipe is from it.
- Sealing and insulating a chimney on the roof - a single-layer metal chimney can become hot during intense combustion, the brick does not heat up so intensively, but still requires the use of thermal insulation at the place where the roofing pie passes. The outlet through the roof of the chimney must be carefully insulated so that moisture does not pass through the opening.
These three tasks are the main and priority and the quality of their implementation depends on the professionalism of the master.
There are certain norms that regulate what should be the gap between the chimney and the roof. According to SNiP, the distance to hot materials from the chimney must be at least 13-25 cm.
The passage of a metal chimney through the roof
Installation and installation of an iron chimney through the roof is a process that does not tolerate haste. The master needs to understand the features of each roof with which he will have to work. The essence of the work is reduced to two important principles:- After installing the chimney, the integrity of the roof must not be lost, in other words, it is necessary to avoid a situation in which, after the first rain, the roof will leak. Often the water runs straight down installed chimney. At the same time, the waterproofing of a chimney on a slate roof differs significantly from how the same operation is performed on a metal tile or soft bituminous roof.
- A single-layer metal chimney gets very hot, so it is necessary to install a heat-insulating barrier or duct.
For chimneys made of different materials, there is a solution to this problem. Namely:
- Waterproofing a brick chimney - a special plate is used for it. For a slate roof, you will need to make a special pedestal around the chimney. A plate is laid on top of it on a sealant for sealing.
- Pipe box - used if the roof is made using a roofing cake. The fact is that violation of the integrity of the cake leads to the loss of waterproofing and heat-insulating properties. To avoid this, a special box is made. The design surrounds the chimney along the perimeter and a special heat-insulating composition is poured into it.
- Pipe protection on the roof can be done with a special insulating apron. The advantage of the apron is that it completely repeats the bends of the roofing material and fits snugly, protecting it from moisture. The apron is a rubber seal made of durable and weather-resistant material.
- Installing roofing around a round chimney is best solution. In this case, the laying of the material is carried out according to a completely finished structure. This allows you to narrow the required opening. For a roof made of metal tiles or corrugated board, the chimney hole can be made larger than the pipe diameter by only 0.5-1 cm.
The cutting of the roof must be carried out taking into account the material from which it is made, as well as specifications chimney.
What is the height of the chimney from the ridge
The presence of draft in the stove, the rapid heating of the pipe, and the slow settling of soot on the back of the structure depend on the correctly calculated height of the chimney. These norms are strictly regulated by GOST and SNiP. In particular, the regulations specify the following requirements:- Installation of the chimney at a distance of up to 1.5 m from the ridge. The edge of the chimney must protrude above the top of the roof by at least 0.5 m.
- The remoteness of the pipe outlet is 1.5-3 m from the ridge - the elevation above the roof will be optimal so that the chimney is approximately flush with the ridge.
- More than 3 meters from the ridge - the chimney must be 10 degrees lower than the ridge.
To increase traction, pipe heads are used. The head splits the air flow, directing it in two directions (down and up the pipe), thus, the thrust increases by 15-20%. The distance from the chimney to the ridge is an important requirement related to the safe operation of furnace equipment.
The connection of the pipe and the roof and its subsequent waterproofing can be performed both independently and with the help of ready-made structures. Each type of roofing material has its own way of performing these works.
The operated roof should be handled by a professional construction team, the rest of the work can be done independently.
Practice has shown that driving for a chimney through metal roof from corrugated board is best done using a lead apron worn on the roof cutting. The advantage of this solution is that the lead is soft and pliable, which allows it to completely follow the shape of the roofing material. The framing of the adjoining is done with a hammer. With gentle tapping, you can give the apron the desired shape. After that, the cutting is removed and abundantly smeared with special silicone. The upper part of the apron is laid under a sheet of roofing material.
The device of a soft roof around the chimney can also be carried out using a similar design or a special rubber insert.
It is possible to solve the problem of junction using other methods of laying a metal pipe, namely its lateral exit from the room.
The interface between the chimney and the metal roof also consists of an apron, but in this case the apron is made not of lead, but of galvanized metal, painted in the color of the roof. Most metal tile manufacturers will also blow out chimney structures. The exit node through the roof from ondulin is also sold ready-made. The apron of the product completely repeats the bending of the wave of the material. After installation, the apron is covered with sheets and then insulated with self-adhesive tape.
Additionally, it is recommended to use the following materials for cutting: 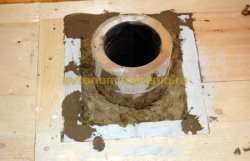
The easiest way to carry out the output of a metal sandwich chimney chimney of circular cross section through the roof. The surface of the sandwich pipe practically does not heat up, and in the place where the floor slabs and the roof pass, you will need to install a conventional sleeve.
Roof chimney lining
Finishing the pipe on the roof can be done with facing bricks. The resulting design will resemble a classic chimney. The only requirement will be to make a base for a chimney apron on a roof made of metal or other material. It is best that such a design comes from the very bottom, in extreme cases, rests on the floor slab.Heating costs by boiler and heat pump
Calculator for calculating the choice of heat gun
Selecting the power of the air conditioner
Metal roofing - reliable and durable protection houses from precipitation, wind and winter cold. The material is easy to use, has a fairly large selection of options - by manufacturer, color and type of metal. It is simple and quite accessible for independent implementation, but it requires taking into account some features of the material and preliminary familiarization with the rules for its installation and use.
In order to resolve this issue, the greatest attention must be paid the quality of the sealing of the pipe from the ridge side. It is recommended to equip the furnace passage as close as possible to the ridge, this will eliminate the possibility of accumulation of large masses of snow.
NOTE!
All elements of the pipe at the point of passage through the roof must be solid, without joints. All connections are made either before or after the pass.
To ensure fire safety, it is necessary to manufacture (or purchase if the pipe on the roof of the metal tile has a standard shape) special metal box, providing the necessary clearance and cut-off of the hot sections of the pipe from the material of the roofing pie and the truss system. The space between the box and the roof is filled with non-combustible material, glass wool or mineral wool. This will ensure the insulation of the passage section and will avoid the appearance of pockets of condensation.
metal roof chimney
So, how to bypass the pipe with a metal tile? We will talk about this further.
The passage of a square pipe through a metal tile
- The passage of the chimney through the roof of the metal tile begins with the installation of an internal apron. To do this, it is necessary to mark on the pipe the points of contact of the junction strips (elements of the inner apron), with the help of a grinder, pass a groove into which the upper edge of the strips will be inserted.
- Carry out the installation of junction strips. They are mounted on roofing screws with a step of no more than 25 cm.. Starting from the bottom side of the pipe, the strips are overlapped with an overlap of at least 15 cm. Joints and gaps (especially the girdle groove, where the edge of the abutment strips is inserted) are filled with sealant.
- A sheet of metal is installed under the bottom bar - bottom tie, providing water flow into a gutter or valley.
- An additional waterproofing shell of the inner part of the unit is equipped. You can do without it if all the work is done quite reliably, but in this case, additional insurance against leaks will not be superfluous. Its upper edge must overlap the cut of the adjoining strips by at least 5 cm.
- After that they start for the installation of metal roofing.
- On top of the finished roof, the exit point of the chimney through the metal tile must be surrounded by an upper apron. This will be the first layer of protection against rain or melt water. Fastening is made without grooving, therefore the joint of the pipe and the apron must be sealed.
junction with a metal tile pipe
CAREFULLY!
Install the apron carefully, avoid deformation of the metal and cracking (peeling) of the polymer layer. This will help to avoid corrosion of the elements and ensure maximum service life.
round chimney passage
If a round pipe is used, the best output option would be the use of roof penetrations of circular cross section.
They are made of rubber or thermosilicone, which ensures the elasticity of the material and the possibility of tight connection with any roof relief.
Mounted on top of an existing roof tightly stretched over the pipe and attached to the metal tile.
Thus, an elastic "cap" is obtained, tightly fitting the pipe and smoothly passing to the roof plane.
For reliability, the joints must be poured with sealant. Such a system reliably provides protection from rain, is not afraid of temperature changes and deformations.
The inside of the passage is filled with non-combustible insulation and covered with a sheet of metal.
round pipe installation
All places where the pipe adjoins the metal roofing must be insulated with silicone sealant. This applies to both the lower and upper aprons. Do not neglect the installation of an insulator layer between the aprons. After installing the top apron, it is necessary to carefully insulate all existing joints and connections of the elements.
Useful video
And now we invite you to watch a video on self-installation of the chimney:
Conclusion
In general, the equipment for the passage of the chimney requires accuracy and a complete understanding of the essence of the operations performed. Failure to comply with the rules entails the formation of leaks and the destruction of the roofing pie, threatening a fire. Compliance with the rules is the key to a long and reliable service of the roof.
The construction of a chimney is a rather complicated process that must be carried out in accordance with building codes. Often, when creating new houses, a pipe is laid through an already created roof. It is also possible to lead through the wall. Before installing a chimney through a finished roof, it is worth learning about the consequences of incorrect actions in order to be more attentive to each rule for performing work.
Consequences of incorrect pipe installation
It is worth remembering that many stove builders charge a fee for creating a stove, but do not carry out the removal of the chimney. Many owners have to do all the work themselves. Subject to certain rules, all work can be performed efficiently without the help of professionals. If the finishing of the chimney on the roof is carried out incorrectly, this can lead to certain consequences:
- Moisture will penetrate through the gaps between the roof and the pipe, destroying the chimney and the materials from which the roof is made.
- An increase in moisture inside the pipe, which can cause mold to appear in it. It is worth noting that the spores of some types of fungus are dangerous to human health, so ignoring the problem can lead to a deterioration in the condition of people in the house.
- Changes in the characteristics of the thermal insulation material due to the ingress of moisture on it. It is important to remember that after drying, the insulation does not restore performance.
- Violation of air circulation due to the presence of cracks near the chimney. Air penetration into winter time leads to an increase in heat loss.
To avoid the described problems, it is enough to correctly install the pipe and its thermal insulation, following the advice of professionals. It is worth remembering that the height of the chimney relative to the roof ridge should be at least 0.5 m if it is located at a close distance from the ridge.
Features of different types of chimneys
The following materials can be used to create a chimney:
- metal pipe;
- refractory brick;
- asbestos-cement pipes
For each type of pipe, different waterproofing materials are used. It is also important to consider the features of the removal of pipes through the roof. When choosing the type of chimney, the type of fuel used is taken into account, since the combustion temperature depends on it.
That is why, before starting the development of a chimney project, it is necessary to determine what type of fuel will be used to heat the house. metal pipes do not use in cases where the stove is heated with wood and coal. At the same time, the chimneys of such furnaces must be equipped with spark arresters.
How to choose a place for a pipe
Since the pipe heats up during the passage of smoke, fire safety requirements must be taken into account during its removal to the roof. It is best to place the chimney on the roof at a close distance from the ridge. This is due to several reasons:
- Elimination of leaks during rain. Also, due to the close location of the pipe from the ridge in winter, the accumulation of a minimum amount of snow occurs.
- Minimum formation of condensate in the pipe. If the chimney is located low and has a high height, a large amount of moisture will appear inside due to the temperature difference.
If the pipe is located at a distance of more than one and a half meters, it should not be below the line drawn from the ridge at an angle of 10 degrees to the horizon. When choosing a place to install a pipe, other tips from experienced builders must be taken into account:
- The pipe should not be placed at a close distance from the skylights. This is due to the fact that carbon monoxide can get into them.
- Also, the chimney should not be installed at the inner junction of the roof, as in the winter season a large amount of snow accumulates above the chimney.
- Do not rigidly connect the roof to the pipe, as the deformation of the roof will lead to the destruction of the pipe.
It is worth remembering that the pipe must be removed in such a way that the roofing materials are reliably protected from high temperatures.
Rules for creating a chimney box
To correctly lead the pipe through the roof, you need to create your own system of beams for it. It should be at a certain distance from the pipe. This parameter is indicated in the SNiP and depends on the characteristics of the chimney.
In order to insulate the structure, it is necessary to use non-combustible materials. Most often, glass wool or stone wool is installed. These materials are stuffed into the space between the pipe and the box.
It is worth noting that the waterproofing material is cut crosswise, after which the edges are tucked up and fixed on the rafter system. During the creation of the box, it is necessary to additionally seal the joints with sealing tape.
From the outside, elements are fixed above the roofing that protect the joints from moisture penetration. It should be borne in mind that one hundred creation of a box for a pipe can worsen air exchange under the roofing material. To prevent Negative consequences installation of such a system, it is worth making additional elements of the ventilation system.
Important! If the pipe has a width of more than 800 mm, a slope must be created on the roof above the slope.
Using elastic penetration
Many owners of private houses install round pipes. To ensure the tightness of the junction of the roof to the chimney, an elastic penetration is used. Such products are made of elastic silicone and represent a funnel. They can be adjusted to the angle of the slope, so they reliably protect the junction from moisture penetration.
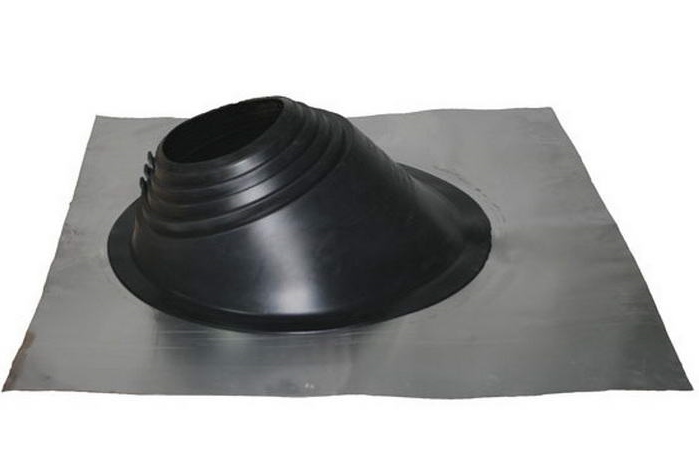
When buying an elastic penetration, it is necessary to be guided by such parameters as the diameter of the pipe and the color of the finishing material for the roof. Stepped products are suitable for almost all types of roofs and chimneys. Installation of such products is quite simple. To do this, you need to put an apron on the chimney, and then fix it on the roof with a metal circle with holes for fasteners. After that, you need to process the joints with sealant.
Installing a metal duct
In many hardware stores you can buy a pipe for round pipes made of metal. It is used to pass the chimney through a roof that does not have a relief. At the time of purchase, it is necessary to choose such products based on the angle of the roof.
To perform the installation, the following steps are performed:
- First, a hole is cut in the roof. To do this, using a marker, it is necessary to create markings on the roof surface. Cutting is done with a grinder and sharp scissors.
- After that, the thermally insulating and waterproofing material is removed. If necessary, it is worth removing some elements of the crate. If this affects the weakening of the structure, it must be strengthened by securing new boards.
- From the underside of the roof, a sheet of fire-resistant material is fixed. It is worth remembering that on each side of the product there was a margin equal to 15-20 cm.
- After that, the module is installed in the hole and docked with the laid chimney.
- After that, an outlet pipe is put on the pipe, which is then fixed with self-tapping screws and fire-resistant sealant.
- At the next stage, the pipe is built up to the required level.
Some builders pre-solder the chimney into the inlet pipe and cover it with thermally insulating material. The most commonly used stone wool. Only after that the structure is mounted in the passage. Before you bring the chimney through the roof, it is necessary to calculate the dimensions of the structure by drawing up a drawing. This will help to remove the chimney without making mistakes.
Conclusion through the roof of rectangular and square chimneys
The pipes, which are made of brick, are square in shape, therefore, the described methods cannot be used to seal them. When the chimney being created approaches the roof, a hole is created in it, the size of which will be approximately 2.5 cm larger than the pipe. From the outside, the chimney is lined with asbestos sheets. This is necessary to protect the roof from fire.
On the brick pipe the soft waterproofing of the chimney is fixed on the roof with a metal profile. The lower edge of the material is fixed on the roof with a sealant. After carrying out these works, a decorative apron is installed, which consists of additional elements and reliably protects the joints from moisture.
Before using the furnace, it is worth checking the reliability of the installed design. If the connections are defective, moisture will penetrate under the roofing material. Many builders who remove the chimney through the roof with their own hands make mistakes that later have to be corrected. In order to carry out all the actions correctly, it is necessary to prepare all the materials in advance and double-check the calculations made during the creation of the drawing.