
How to trim around a brick pipe. Finishing the pipe on the roof: methods available for do-it-yourself
How finishing is done chimney on the roof? How to seal the chimney with your own hands? What materials are used to carry out such work? How to line the pipe in order to maintain its performance?
These and similar questions are of considerable interest, both for owners of country houses and for compatriots who have decided to build a new house.
Features of sealing the passage assembly
The design of the passage assembly is determined by the fire safety rules. For example, if excessive flue gas temperatures are transferred to the roofing system, there is a high risk of fire.
Important: The risk is especially high in relation to roofing systems with a large number of wooden elements that have not undergone timely flame retardant treatment.
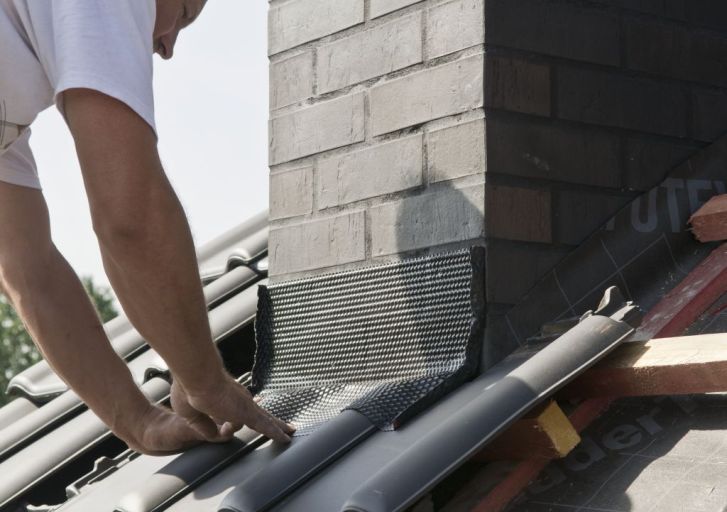
To prevent fire and damage to the roof, the chimney pipe is finished as follows:
- We maintain a gap between the flammable sections of the roof and the chimney, the width of which is regulated by building codes.
- At the junction, the chimney is treated with materials with a low degree of thermal conductivity, such as asbestos.
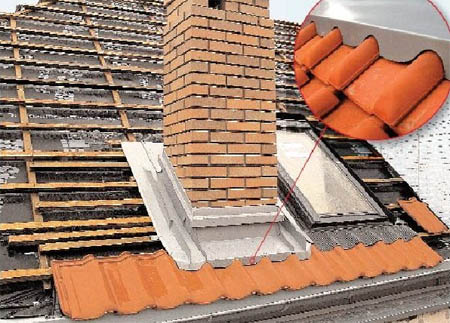
- The section of the passage of the chimney pipe through the roofing pie is performed using a box made of galvanized steel or corrugated board.
- The gap between the chimney and the steel box is filled with non-combustible heat-insulating materials, such as basalt wool plates.
This method of arranging a roof passage with equal success can be applied both on a slope and on a ridge. Both methods have characteristic features that need to be taken into account in a timely manner.
Old and modern chimney sealing technologies
If, relatively recently, the sealing of the junction of the chimney and the roof was carried out using improvised means, now such work is carried out using specialized materials and unified assemblies.
The choice of industrially manufactured means for sealing the passage in the construction market is wide. Therefore, everyone will be able to choose the option that is most suitable for arranging a particular chimney system.
Traditional finishing methods
As already mentioned, the finishing of the pipe on the second floor, in the attic and at the place of passage through the roofing pie was carried out with improvised means, and therefore it was not necessary to count on the optimal results of the work done.
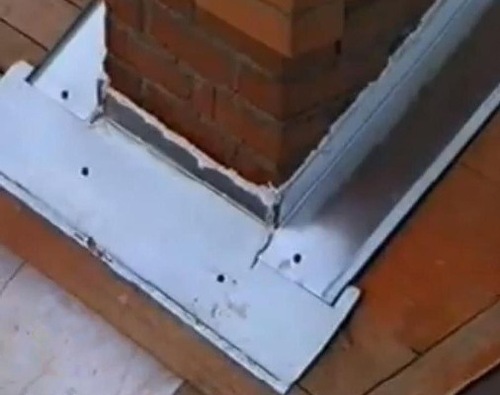
Finishing the chimney pipe on the roof was a metal structure, the so-called "collar" or "salary".
The "collar" is done as follows:
- rectangular strips up to 40 cm wide are cut from sheet steel with a thickness of 0.2-0.5 mm;
- the prepared strips are bent according to the shape of the junction of the chimney and the roof;
- finishing parameters are applied based on the size of the chimney, the angle of inclination of the slope, the type of finish used;
- the elements of the "collar" made of galvanized sheet are connected into one piece overlaid and carefully soldered;
- if the elements of the collar are cut from a steel sheet, they are installed with a double standing seam;
- a lying seam connection is used for finishing a chimney on a roof assembled from corrugated boards or tiles;
- on a pitched roof with a slope angle of more than 30 °, right behind the chimney, a “bumper” is mounted in the form of a bar or a metal threshold that will direct rainwater flows around the pipe.
Modern finishing methods
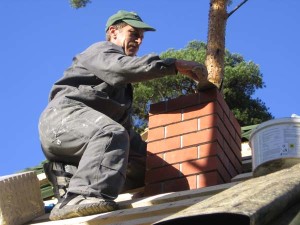
In the photo - installation of a prefabricated apron
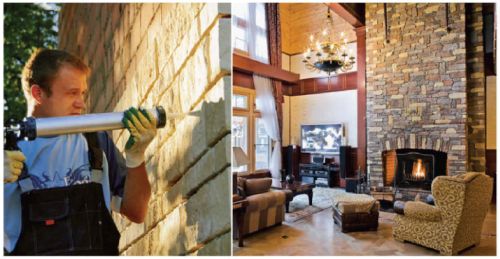
In order for the price of finishing to be relatively low, and the quality of the work done to be satisfactory, the chimney is sealed with a protective apron.
The apron is made in two ways:
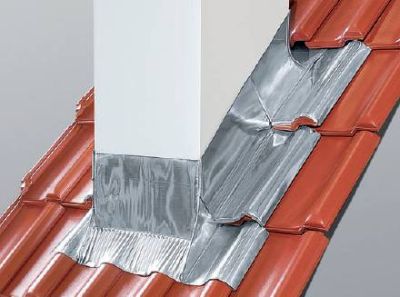
- using flexible aluminum or lead tape;
- using galvanized metal coated with protective polymer compositions.
An apron made of aluminum tape is mounted in two layers, which are wrapped around the pipe around the entire perimeter. Half of the tape is inserted into the gap between the pipe and the roofing, while the other half of the tape is folded over and laid over the roofing material.
Further, the junction of the apron to the roofing materials is carefully glued using bituminous mastic or alternative means. The apron at the junction with the chimney is closed with metal profiles.
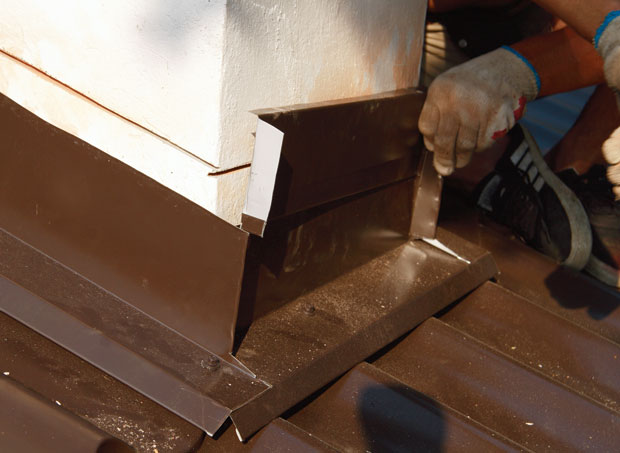
In the photo - an apron made of sheet steel
The sheet steel apron is installed as follows:
- The roof deck is insulated with roofing material with an overlap on the adjacent walls of the chimney;
- On top of the roofing material, pre-prepared apron elements are mounted;
- The gaps between the apron and the surface of the chimney are filled with roofing silicone or other polymeric sealants.
Important: Statistics show that the most reliable and durable solution is not one of the above methods, but a combination of them.
That is, it is advisable to finish using a flexible tape, and in addition to this, install a steel apron.
Features of the use of roofing chimney seals
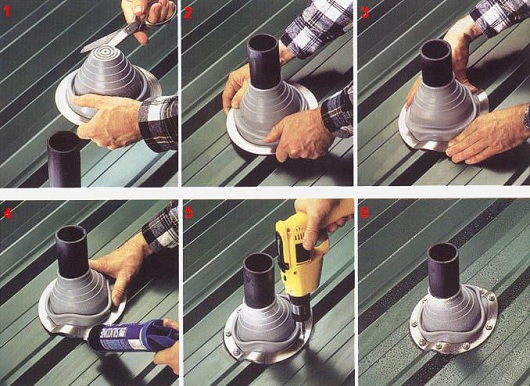
There is a universal tool with which the chimney finish is greatly simplified. We are talking about roofing sealants Master flush.
This type of insulation is suitable for most flue pipes, regardless of their diameter. Thanks to the use of this insulator, the chimney can be installed on the slopes of any roofing system with different angles of inclination.
Such amazing characteristics are provided due to the unique shape and elasticity of the insulator. Roof sealant Master-flash, as well as analogues, is made of special heat-resistant rubber or silicone with a working temperature range from -74 to +260 °.
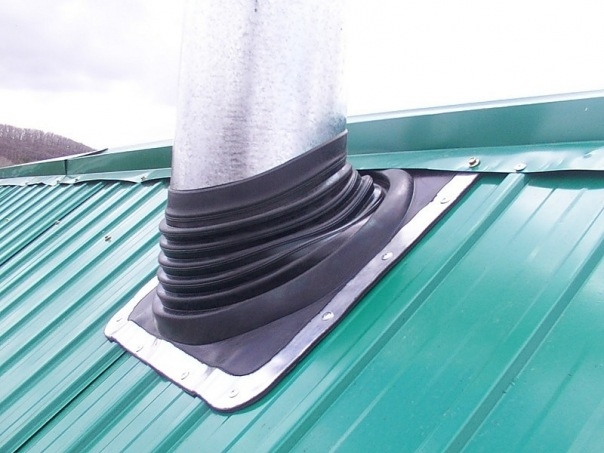
The installation instructions for the roof seal are as follows:
- Lubricate the inside of the seal ring with shampoo or wet soap;
- Next, we put it on the upper part of the chimney pipe and forcefully push it down;
- Having reached the roofing material, we dry the underside of the sealant from possible contamination;
- Next, we apply an insulating polymer composition to the cleaned surface and press the flange to the roof.
Conclusion
Within the framework of this article, we examined the most popular methods for protecting the chimney and adjoining the roofing system. In order for the result of the work carried out to be as effective as possible, it is advisable to apply the described methods not separately, but in a complex manner.
In order to simplify the finishing of the chimney and the adjacent roof, watch the video in this article.
Despite the fact that the chimney is a functional necessity heating furnace or a boiler in the house, it must not only fulfill its intended purpose, but also organically fit into the design of the interior or into the overall architectural appearance of the house. Therefore, the correct finishing of the chimney on the roof and in the house must first of all meet the building and fire regulations, be convenient for regular preventive maintenance work on inspection and from combustion products accumulated over heating season, but also be beautiful, so as not to spoil the impression of the house.
How to finish the chimney inside the premises?
First, I would like to remind you that the chimney can pass indoors in several ways:
- inside the walls of the house, if stoves or fireplaces are installed near any of them;
- in the middle of the room, if the stove or fireplace is an island-type installation.
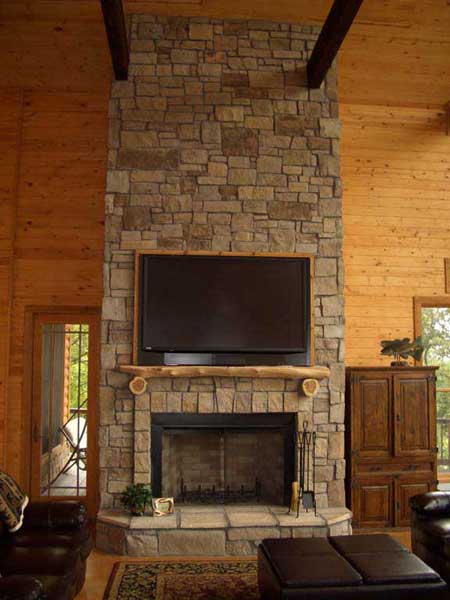
Inside the wall is possible only when it is made of wall blocks or bricks, in which case the chimney finish will consist in decorating the wall inside which it is located with non-combustible materials. What do domestic hardware stores offer for this? plaster, different kinds refractory tiles: terracotta, clinker, tiles, tiles and natural stone. Plastering is the oldest finishing method and one of the most budgetary, but its disadvantages include a short service life, since the plastered surface becomes covered with a network of cracks over time from constant heating and cooling. You can strengthen the plaster with a metal mesh, which is fixed on the surface of the walls before plastering. The chimney inside the wall can be laid not only from bricks, there are special blocks for chimneys made of expanded clay or cinder concrete, special sleeves are inserted into them - single-wall stainless steel pipes or a polymer liner, which is filled with hot air during installation, after it cools, the polymer bag hardens and becomes ordinary pipe. Such a sleeve can be installed even in a curved chimney, but it is necessary that the surface inside the chimney does not have sharp protrusions and the temperature of the combustion products at the outlet is not more than 180ºС. The lining of the chimney in the house can be done using various types of tiles, and it does not matter where the stove is located - against the wall or in the middle of the room. In any case, both the chimney and the stove must form a single unit, and their finish will be identical.
The most beautiful, but also the most expensive way is stove tiles, which are made individually for each stove and are mounted strictly during the construction of the heating unit. For already erected stoves and chimneys, cladding with various tiles is used. Tiles can be both expensive terracotta and more economical - tiled, the principle of working with it is not much different. If you use sandwich pipes, then they may not need finishing, since polished metal is well played up with interior solutions. How to make a chimney with your own hands from modules, you can read in the previous article. To increase the heat transfer of stoves, and not only baths, they are lined with natural stone - talcomagnesite, talcochlorite, jadeite, jade, etc.
Many manufacturers produce ready-made stone portals for fireplace inserts or stoves. How to build a chimney for such a furnace? Experts advise not to do this on your own, but to take a ready-made set of chimneys, which is recommended by the manufacturer for this model, while you can choose the option for both external and internal installation of the chimney. If you need to heat a house of several floors, then you will have to install two or three stoves, while building fire regulations prohibit all stoves from being led into one chimney. To heating system functioned normally and the house was not “stuffed” with pipes, a chimney is being laid from three wells, where each stove has its own smoke channel, but at the same time they are compactly located inside the house. For example, a stove with a hob is on one side of the chimney, a heating stove or fireplace is located in the room on the other side, and the third on the second floor has access to its channel. Another example is in the video:
Features of the device of the chimney removed outside the building
 Installation of an external chimney
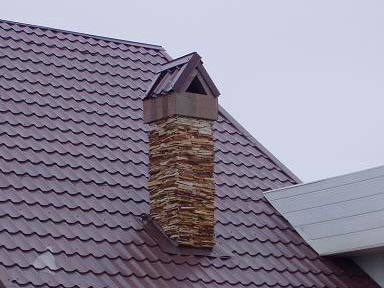
 Chimneys mounted inside the building are brought to the roof through the ceiling and attic. But you can assemble the chimney completely outside the house. For this, modular ceramic or metal double-circuit chimneys are used, which are installed next to the building, and combustion products from the furnace are discharged into such a chimney through a special module - a tee connecting the furnace and the chimney through the wall. According to existing standards, the pipe brought to the roof must have a certain height, which is determined by the distance from the ridge to the pipe. In particular, a chimney located 1.5 m from the ridge will rise 0.5 m above the roof, the farther the pipe is from the ridge, the higher it should be.
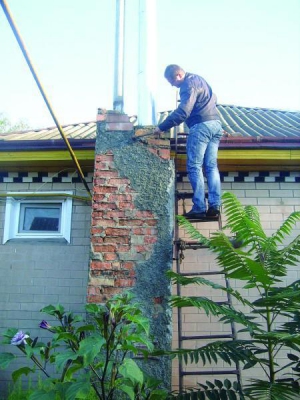
When the chimney passes through the ceilings and the roof, special protective structures must be installed, if the chimney is brick, then these are the so-called fluff and otter. The fluff is placed under the ceiling of the room, and the otter is placed when the pipe passes through the roof. In addition, it is necessary to carefully seal the joints between the chimney and the roof on the roof. To do this, each manufacturer of roofing material produces special additional elements called an apron or an adjoining element. To protect the upper part of the pipe from the effects of atmospheric phenomena, it is lined with clinker tiles or tiles made of natural stone. One of the budgetary ways to protect chimney- this is sheathing with corrugated board on a pre-installed frame or its simple plastering. However, the latter method is not so durable, therefore it is used less and less.
How to make a chimney for a potbelly stove? Potbelly stoves in everyday life are called factory metal ovens, the combustion products of which are usually discharged using modular sandwich pipes brought out through the wall. Despite the fact that both the stove and the chimney are factory-made, you need to be able to assemble them. In particular, the assembly of the chimney is possible by smoke or by water. In the first case, there is a condensate drain in the chimney, and the tube modules are inserted into each other in the direction of the smoke, in the second case there is no condensate drain, and the pipes are put on each other in the direction of the condensate flow. How to make sure that condensate does not flow from the joints of the chimney and smoke does not ooze, depends on the purpose of the furnace. Experts recommend collecting the chimneys of sauna stoves by smoke, and heating ones - by condensate.
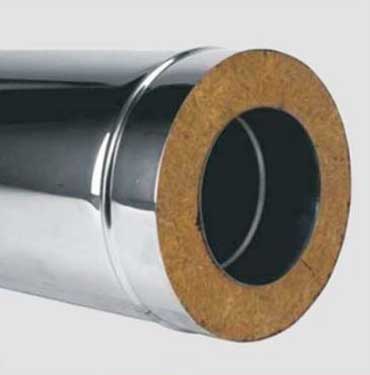
Double-circuit sandwich chimneys have a layer of insulation inside, so they are usually not additionally sheathed, and ceramic or thin-walled chimneys must be placed in a protective casing of their wall blocks or bricks. The distance from the wall of the house to the chimney must be at least 38 cm for protected pipes. To build such a chimney, they begin with a foundation, the masonry mortar may consist of cement, sand and clay or cement, lime and sand. By the way, the chimney must have the same section along its entire length, it cannot be narrowed categorically, otherwise it will not be able to function normally. Inside the chimney is inserted ceramic or metal pipe, and the sealing of the space between it and the box is made using a heat-insulating material.
What to cover the joints of the chimney? Experts advise using a heat-resistant sealant for fireplaces and stoves. There is another problem for outdoor chimneys - they need protection from snow falling off the roof. To do this, a special wedge is built on the roof or the stove is installed in the house in such a way that the outer chimney passes along the gable of the house.
Any fireplace has a chimney, but not every fireplace has it completely hidden in the wall. Often the chimney deliberately sticks out and is an interior decoration. However, how can you finish it, because this is not a simple, but a heating structure.
Finishing a fireplace chimney also depends on the material from which it is made. The oldest and accordingly proven design is brick chimney. One of traditional options The "finish" of such a chimney is the absence of any finish. Brickwork is already a decoration in itself, but if its natural look does not fit into the interior ensemble, then you can paint the brick with heat-resistant paint. But for this you will need not one, but 2-3 layers, between the application of which you need to wait for the previous one to dry completely. This design option brick chimney typical for country style and Provence, but can also be used with other styles.
But it also happens that the very texture of the brickwork is knocked out of the general interior ensemble, and then plastering the chimney may be one of the options. In this case, the plaster must be either lime-clay or lime-gypsum. So that it does not crack during the operation of the fireplace, the brickwork must be carefully prepared: clear the seams to a depth of 1 cm; clean and degrease the surface.
The plaster layer is applied in 2-3 doses. First, a liquid composition is sprayed, diluted to a creamy consistency; the second and third layers - with thicker plaster. The total thickness of the plaster coating should not exceed 15 mm - otherwise the plaster will inevitably crack and fall off in pieces. A well-plastered surface can be painted with ordinary water-based paint.
 The most popular way to finish a fireplace chimney is cladding. Since ancient times, not only chimneys, but also the fireplaces themselves were lined with tiles - the prototype of modern ceramic tiles. The tiles are a box (rumpa) open on one side, the front side of which is a decorative part. They are flat or textured, glazed or matte, plain or painted. Each locality had its own tile traditions, so there were a great many options for tiles.
But tiles are valued not only for their decorative qualities. The chimney lined with them becomes more heat-intensive, which has a positive effect on the heating efficiency.
Tiles are piece products, and each of them is made by hand. Their production is almost impossible to put on the conveyor, which is why the high price of such cladding. 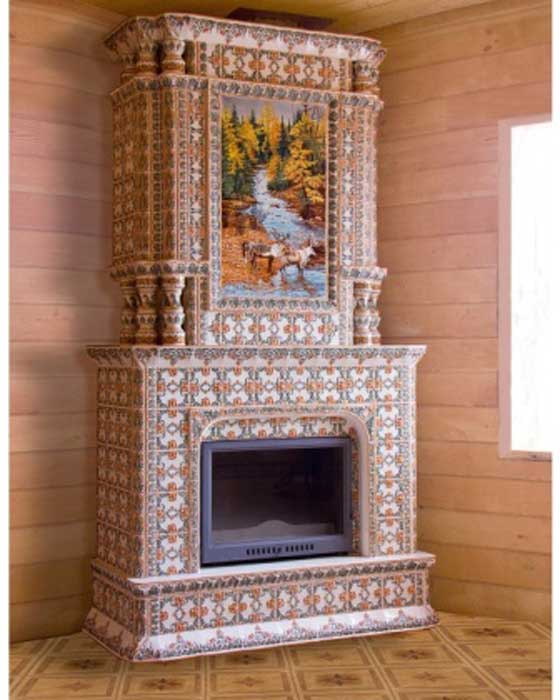
The painted tiles are works of art. Not only an ornament can be applied to them, but also scenes from rural life or hunting, fairy-tale characters, outlandish animals, victorious battles, heroes of Slavic mythology and much more. Russian tiled traditions are not forgotten today. This magnificent product is produced by such domestic companies as Tiled Fireplaces, Russian Tiles, Tiled Stoves, Vyalko and a number of small private workshops.
Speaking about the advantages of tiled cladding, one cannot but touch upon its disadvantages, the main of which is the high cost. Square meter tiled cladding, including work, costs about 12-40 thousand rubles. Pleasure is not cheap. Undoubtedly, tiles today belong to the elite types of finishes.
The disadvantages can also be attributed to the complexity of the installation of tiles. Since ancient times, tiles have been fastened with steel pins embedded in the brickwork during its execution. Such difficulties arose among our ancestors for the simple reason that adhesive solutions capable of holding tiles were not available at that time. However, even today there are “masters” who stick tiles to ordinary solutions, as a result of which it quickly disappears. This cannot be allowed with expensive and fragile tiles.
 However, at the end of the 20th century, it was possible to solve the problem of the difference in the thermal expansion of ceramics and the adhesive solution. Then there were modified special compounds that can hold the tile even when high temperature base heating. Today these are adhesives such as Refractory 26 0-2 (BIRSS), Kombi (Master Class), heat-resistant adhesive D-314 (Diola), Plitonit-VT (PLITONIT). For example, the last adhesive on this list provides reliable fastening up to a temperature of 1000 ° C.
By the way, with the advent of heat-resistant adhesives, the list of linings for fireplace chimneys has expanded significantly. In fact, any piece facings that are insensitive to thermal effects are suitable for this purpose. This is, first of all, ceramic tile, which can be not only in modern colors, but also in the style of traditional tiles. Manufacturers of such tiles today offer the widest choice, opening up a fantastic space for creativity. The cost of 1 m² of tiled tiles is from 1000 rubles, however, the upper limit is much higher.
Another popular option is stone cladding. For these purposes, both inexpensive rocks (shell rock, limestone, sandstone) and more refined marble, travertine, diabase, talcomagnesite and even onyx are used. In some cases, an ordinary cobblestone may also be suitable.
There are quite a few subtleties in working with stone. Many stones are heavy and require particularly secure fixation. In addition, not all rocks are able to withstand the cyclical temperature fluctuations that are typical for chimneys. For example, marble “wears out” over time, becoming loose and spongy, but talcomagnesite is not at all afraid of temperature - it is not for nothing that it is called a fire stone.
If you opted for a stone, then it is better to entrust the facing work to a specialist. Moreover, this should not be just a tiler, but a qualified stone cladding master. Finishing with stone is not cheap - from 5 to 10 rubles / m². 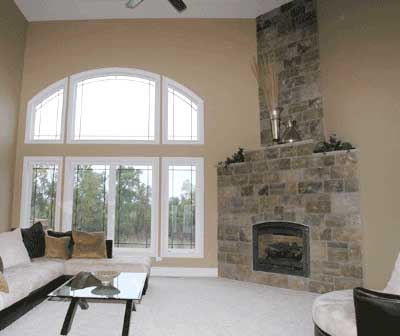
The most affordable type of cladding is an artificial stone made from concrete dyed in mass. Such products with a high degree of reliability reproduce various types of finishes - from natural stone to gypsum stucco. Companies that produce artificial facing stone offer a choice of 20-30 collections, among which there are both classic and modern. In addition, there are many companies that have successfully established the production of high-quality artificial stone in Russia. Today, there is practically no need to look for imported products, because. everything you need can be bought on the spot. The largest companies producing artificial facing stone: Stroymaster, Ecolit-Trade, Eurokam, CHELSEA STONE, KAMROCK, WHITE HILLS.
Finishing a ceramic chimney
This does not mean the already described method of finishing ceramic brick chimneys. We are talking about the lining of prefabricated chimneys, the elements of which are a fireclay module with thermal insulation. Such modules are suitable both for fireplace chimneys and for chimneys of all types of boilers and stoves. They can be placed inside or outside the building.
One of the properties of modular ceramic chimneys is that their outer shell does not heat up above 40-50°C, while the temperature inside the chimney can reach 600°C. This fact makes it possible to line such chimneys with rocks that cannot be used on "hot" chimneys. However, glue in any case should be used heat-resistant.
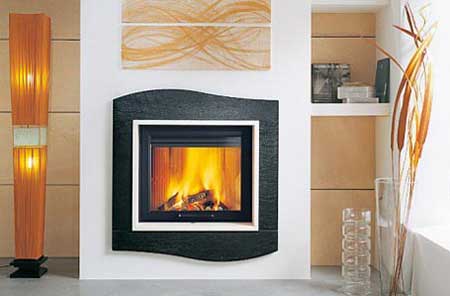
Finishing a metal chimney
AT recent times in Europe and in our country, metal thermally insulated modular chimneys designed like a sandwich have become popular. The outer and inner pipes of such chimneys are made of heat and acid resistant stainless steel, and the gap between them is filled with mineral wool. These modular chimneys are very easy to install, have good trafficability and are light in weight (approx. 10 kg/m.m.). In addition, they are also affordable - 8-10 thousand rubles / m. rm.).
 A shiny metal pipe fits quite well into modern minimalist styles, but in the same classics it will be difficult to explain. However, what if you want to use the advantages of a modular metal chimney in a classic interior?
The most common solution for such a case is to create a box around the modular pipe, which will become the basis for attaching the cladding. The most convenient material for lining the box is drywall. However, it will be necessary to solve the problem of its possible overheating. The fact is that the surface of the modular pipe can get quite hot, and already at 40 ° C, drywall loses moisture and becomes brittle. To prevent this from happening, the pipe must be additionally wrapped with a layer of foil heat insulator of the Isofon type, etc. It is important that there is an air gap between the insulator and the drywall.
A plasterboard box can be lined with all the methods described, as well as covered with a layer of plaster. However, even with such a thermally insulated version of the base, experts recommend using exclusively heat-resistant adhesives.
It must be warned that metal modular chimneys are not eternal. In ten years, you will have to change the pipe, which means breaking the lining.
7 June 2014 Alexei
Correct work heater possible only if there is a system for removing combustion products. But it involves the arrangement of a pipe passing through the ceiling and roof.
Moreover, the junction of the channel to the roof must be airtight, not have gaps, and to maintain the style of the building, it must be lined with the most suitable material.
The process of performing all these works or finishing the chimney must comply with fire safety rules, since the gases passing through it heat the structural elements to a temperature that can cause a fire.
Final assembly of the flue system
What needs to be done during the installation of the chimney so that the equipment works efficiently and is safe for others?
The sealing of the chimney on the roof requires the following conditions:
The passage of the chimney can be made on a ridge or a roof slope, while each of the methods has its own characteristics.
 The first option may lead to the need for a partial change in the rafter system, and the second one can become a pocket for snow. But these shortcomings can be easily solved by adding an element under the ridge bar, which will avoid leaks.
After the pipe passes through the roof, it is sealed. Market building materials offers a wide range of units that can be used in various conditions.
Of the traditional options, this is a salary of metal strips corresponding to the dimensions of the pipe.
For a roof made of tiles or a corrugated plate, the elements are fastened with a lying seam, and on pitched structures with a slope of more than 30 °. Behind the chimney, a special beam is installed. It serves as protection against rain water.
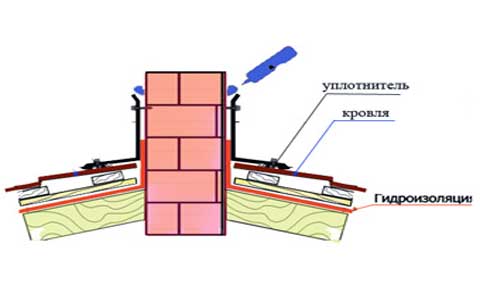
 Waterproofing the chimney on the roof involves the arrangement of a protective apron. It can be made of flexible tape or metal coated with a polymer composition.
An elastic apron is installed along the perimeter of the pipe in two layers, leading the lower one under the roofing, and mounting the upper one from above and closing it with metal profiles.
Insulation from steel sheets is placed on the roofing insulated with roofing material. Its individual elements are attached along the perimeter of the channel, starting from the bottom. The grooves are filled with silicone or polymer sealant.
Chimney lining and materials for it
Finishing work on the exhaust gas system is carried out before the roof is laid, which avoids damage or contamination. There are enough facing options to make right choice. Usually, the finish on the roof of the chimney pipe depends on the material from which the structure itself is made.
It could be:
- Clinker tiles or bricks
- Plaster
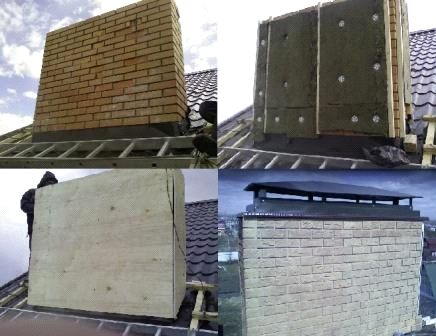
- Fiber cement boards
Consider the features of each material. Clinker bricks are durable, resistant to temperature changes and atmospheric precipitation. As a facing material, only solid brick is used, the laying of which is carried out on a special mortar. To fill the seams, grout compositions are used.
Watch the video, what material to line the chimney:
Clinker tiles are light, thin, and have excellent aesthetic properties. It is used when facing high chimneys.
Plastering is a simple and cheap way of finishing, but with a limited service life. The screed is made of cement mortar, sometimes with the addition of lime. But such a lining on top should have a decorative layer, for example, made of silicone paint.
Small-format plates are one of the most durable and resistant to aggressive environment materials. They are attractive appearance and nonflammable.
Finishing the pipe with slate: stages of work
Facing the chimney on the roof is necessary not only for better preservation of the chimney structure, but also as a decorative finish, so it is customary to make it from materials that are most suitable for roofing. One of the most durable, durable, and also very aesthetic is the stanets.
 Its color depends on the deposit and can be:
- Purple
- Green
- Graphite
It can be in the form of tiles or panels. Slate can be fastened with copper nails with a wide head with a diameter of 2.5 mm and a length of 40 mm.
When performing work, it should be borne in mind that deformation of materials is possible during temperature changes. Therefore, the nails are not nailed to the end; a small gap must be left between the cap and the tile.
The installation of tiles is carried out on the crate, the bars are fixed at the corners of the chimney, and if it is more than 60 cm wide, one more additional bar will be required.
 Finishing the chimney on the roof is carried out in several stages:
- The extreme guides are set according to their level, the rope is pulled (from above, below and in the middle - at a height of more than 2 m), and then intermediate bars are set
- If necessary, the smoke channel is insulated
- Plywood sheets are laid on the guides
- Tiles are being laid (its installation is carried out in such a way that one overlaps the other within 1.2, and the angle is not less than 22 °
There are several ways to lay slate - from the standard rectangular to resembling fish scales. They are selected taking into account the pattern of the roofing.
 The simplest and cheapest way of facing is to cover the surface of the smoke channel with a cement composition. But such a lining has an unpresentable appearance and, moreover, is short-lived. Therefore, it is recommended to apply marble or Venetian plaster on top of it.
The first is performed on a pre-primed surface. To do this, the dry mixture is diluted in a bucket with water in the proportions indicated on the package. Please note that it is usually sold in white, and color is added to obtain a color coating.
The diluted composition is applied in a thin layer and left to dry, and then cleaned with a steel brush. Then a second layer is applied - if necessary, but experts still recommend limiting themselves to one. The final touch is surface treatment with a grinder and grouting with an iron spatula.
Venetian plaster, unlike marble, is considered expensive, but it looks amazing. Moreover, if you do everything yourself, you can save a certain amount of money.
It is also sold in bags, has a white color and is diluted with water with the addition of color for application. Apply with a spatula or trowel. But to obtain a high-quality coating of Venetian plaster, the use of forced drying technology with a building dryer is required. The cracks that appear are treated with paint or varnish and, after drying, polished with a grinder.
Wild stone as a facing material
Another option for finishing the chimney can be the use of natural materials. In this role, a wild stone has proven itself well. It is laid on cement using a plaster mesh fixed to the surface for adhesion rigidity. The seams are sealed with cement with the addition of color to it.
 And the last stage of work related to the arrangement of the exhaust gas system is the finishing of the chimney inside the house. It can be made of various materials, the choice of which depends on the interior of the room.
The importance of chimney trim
In this article, we looked at the assembly, insulation, and cladding of a combustion exhaust system. Each of these stages is mandatory for the efficient operation of heating equipment, but can be performed using various materials. Which one is the best is up to you. After all, it depends both on the design features of the chimney and on the architectural style of the entire building.