
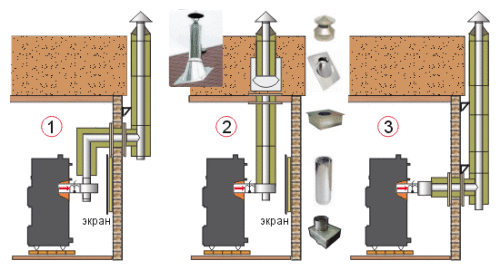
Do-it-yourself chimney pipe installation. Do-it-yourself chimney. Options for the correct design of chimneys
The heating system in any building includes two elements. This is the installation of the heat generating unit itself - a gas, liquid or solid fuel boiler, and a system that facilitates the removal of combustion products. The installation of these elements requires close attention. The heat supply in the house and the safety of people depend on the operation of the system as a whole.
In the article, we will look at how to properly install an outdoor chimney with our own hands, we will present a number of tips from a chimney wizard. If you install the chimney outside the house incorrectly, this can lead to unpleasant consequences: reverse thrust exhaust gas systems (combustion products entering the room), this may cause a fire and people may suffer. There may also be insufficient heating. If you have come to the conclusion that an outdoor chimney will suit you, it is possible to do it yourself without resorting to outside help and save a significant amount of money.
Currently, insulated outdoor chimneys are popular, they are usually called "sandwich" (see Installing a sandwich chimney).
They have their own advantages:
- Good traction (contributes increase in efficiency thermal plant).
- Rapid overcoming of the threshold of condensate formation.
- Minimal soot deposits on the walls.
- Structural durability.
- The outdoor chimney is easy to maintain.
- Minimum weight.
- Allowed to install in wooden houses.
- Complies with fire safety standards.
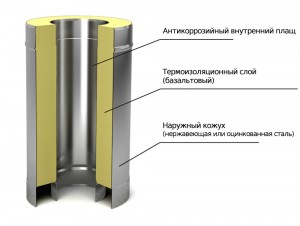
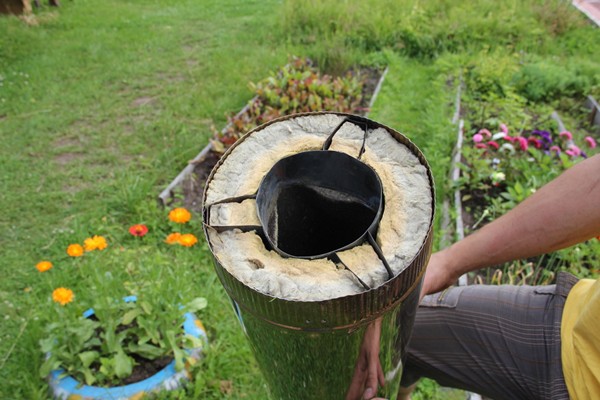
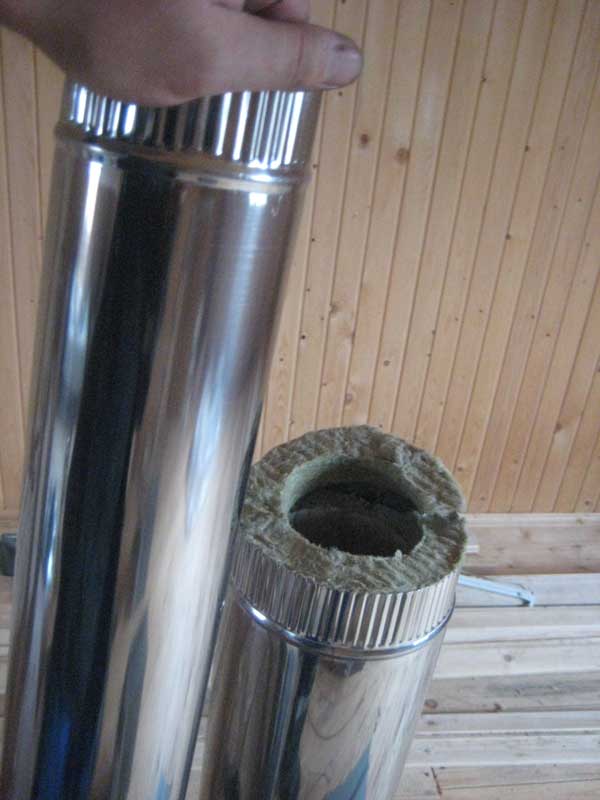
Sandwich chimney has three components:
- outer pipe;
- inner pipe;
- thermal insulation layer.
There are three types of connection of such systems:
- flanged;
- bayonet connection;
- type of connection "cold bridge".
Attention: The main requirement for all types of connections is the same: high tightness. Pay special attention to this.
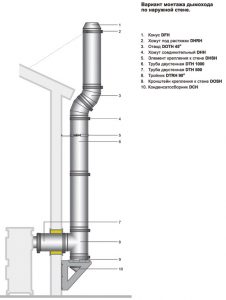
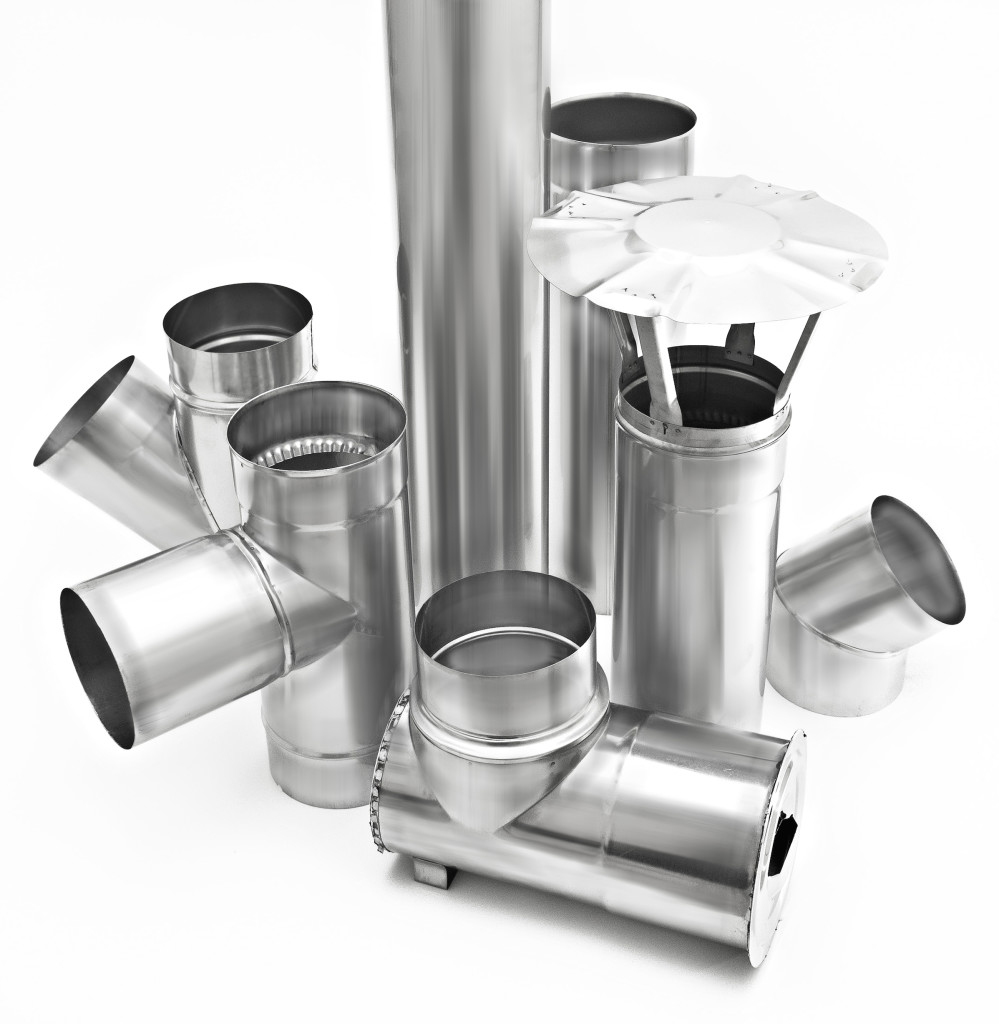
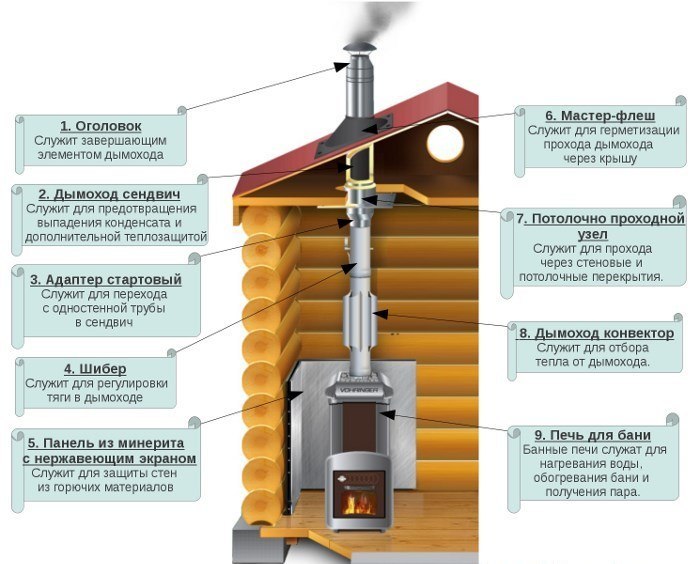
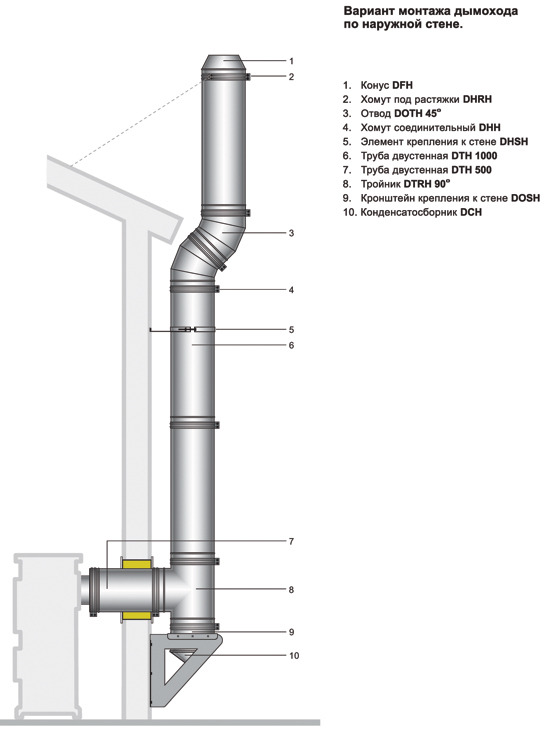
Structural elements
Before starting the installation with your own hands, you must know the device of the external chimney. The main thing is to decide what elements you need and their number. Make a drawing and list everything you need.
- Any unit t for heat production - boiler.
- Elbows- regulate the movement of exhaust gases. The name of the knee contains information about the angle of inclination. Branches are welded using argon welding or a tungsten electrode in an argon environment. It is possible to install dampers of various types and viewing windows in them.
- dampers, which are to be installed in bends, pipes, tees and transitions.
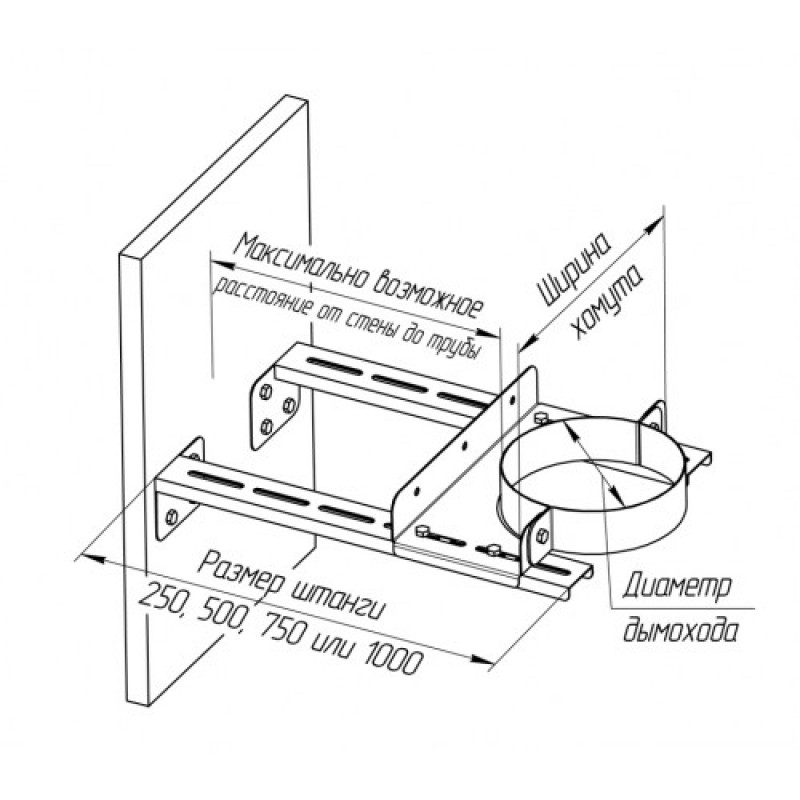
- Tee stand, is made from stainless steel square tube. Fastening to the wall is carried out using dowels. To properly install the chimney, you need the right support for the tee. Be sure to specify the distance between the chimney and the wall when ordering.
- Tee 45 thermally insulated, stainless, required to connect the boiler to the bottom of the chimney, vertical direction. A condensate drain pipe and an inspection window can be installed on the side of the structure, or at the bottom of the tee. To comply with all requirements for the installation of chimneys, after assembly, the viewing window door should be placed on silicone. There are continuous, solid and prefabricated tees, connections to them are made at various angles.
- brackets are made from stainless steel tube. Be sure to specify the distance from the wall to the chimney when ordering it (to comply with fire safety regulations).
- The external chimney must be thermally insulated. Chimney , together with thermal insulation, is placed in a protective casing and thus forms a so-called sandwich. The standard pipe size is half a meter or a meter; for the manufacture of the casing, not only stainless steel and galvanization are used, but also the material of the customer. Ceramic wool or basalt fiber is used for thermal insulation.
- dowel bracket reinforced, used for reinforced fastening. This helps with lateral loads; with their help, unloading and expansion glasses are mounted.
- tip, heat-insulating pipe in a protected casing. The diameter of the casing itself gradually decreases and approaches the diameter of the pipe, this allows you to protect the insulation from external influences.
- Cap, stainless steel, which is given the desired shape by welding with a tungsten electrode.
Now you have an idea about the components and will be able to correctly select all the details of the chimney for the heating boiler. Correctly calculate the length and cross section of the structure.
Attention: At the design stage of the chimney system, parameters such as section size and height should be taken into account. The thrust increases with greater length, the higher the pipe, the stronger the thrust. However, a very high chimney will create a large aerodynamic resistance to moving combustion products. The placement of flue pipes is clearly regulated SNiP 2.04.05-91. The section of the chimney is important. As a rule, it is determined: the ratio of the inner diameter of the chimney to the maximum dimensions of the opening of the fireplace insert (height / width) will be 10:1.
When choosing the diameter of the smoke channel, it should be noted that according to GOST 9817-95 the area of the smoke channel along the cross section of the pipe must be at least 8 cm 2 per kilowatt of power of the heating unit (fireplace, boiler or stove). And the calculated value of the velocity of exhaust gases in the boiler itself should have an interval of 0.15 - 0.6 m / s.
Assembly of the structure
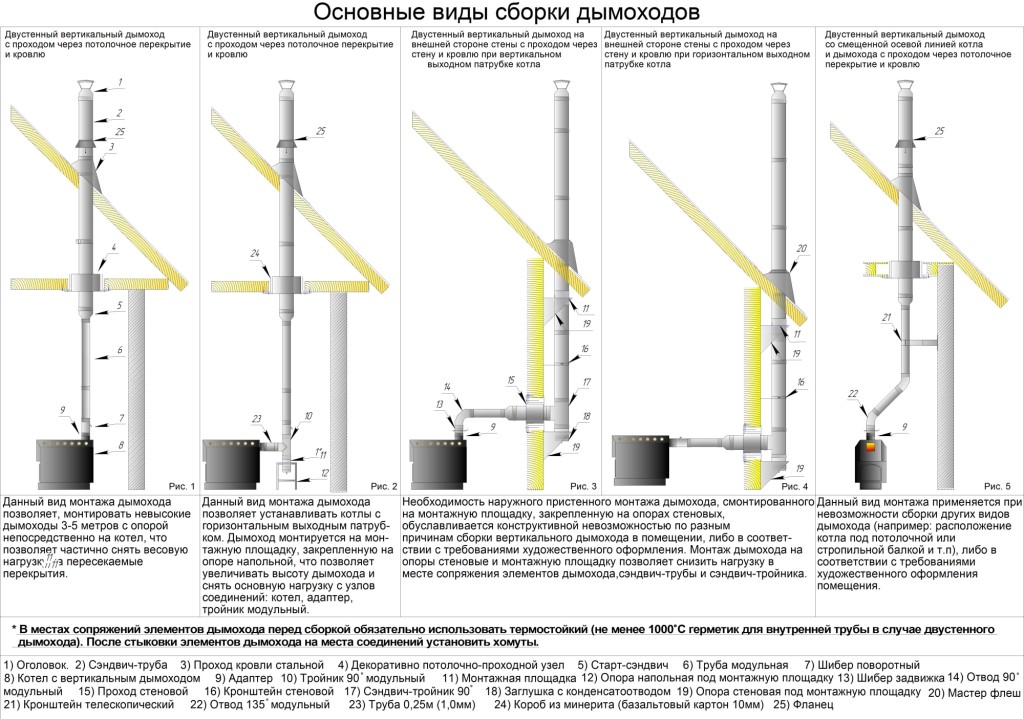
The external chimney (its main part) is installed outside the building, which is connected by a horizontal pipe through the wall of the building with a thermal unit. After installing the heating boiler, it must be connected to the chimney pipe, which will be located outside the building. It is not as difficult as it seems at first glance. However, some rules must be observed.
Work performance rules
The installation of the chimney is carried out in all cases from the heating boiler, or rather, from the chimney up. The gas exhaust pipe is always put on the previous one, this avoids the penetration of moisture into the insulation.
- A heat-resistant sealant is used for the tightness of the structure, not less than 1000*С.
- Clamps should be used on waste connections, tees and pipes.
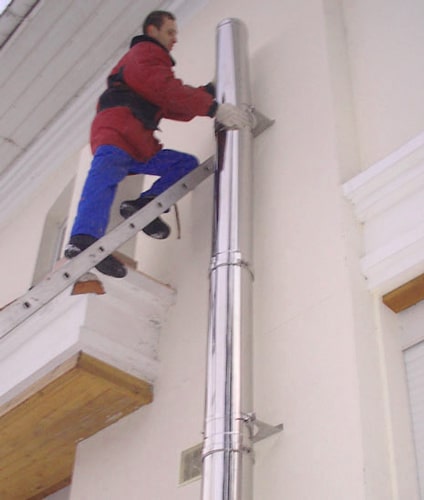
- At an interval of two meters, the external chimney must be rigidly attached to the wall with special brackets. They should also be used when fastening tees.
- Horizontal sections of the chimney pipe are not allowed to exceed one meter.
- Avoid contact gas pipes with chimney ducts and electrical wiring.
- When passing a pipe through a combustible structure, use special fire-fighting nozzles.
- Install a removable cleaning door (this must be done twice a season) of the structure, at the base of the chimney.
Installation
When everything is known about the design and the material is ready, you can proceed to the main work.
- We connect the chimney to the nozzle of the heating boiler using an elbow, pipe or tee (depending on the design).
- We join the pipe with the chimney with the necessary transition node.
- We process the joints with sealant and install clamps.
- We carry out the passage through the wall using a special passage pipe (docking is prohibited at the place where the wall passes).
Attention: All sections of the chimney pipe should be pushed tightly, without gaps, one into the other, the insertion distance should be at least 0.5 of the pipe section (planting depth).
- We are preparing the installation of the vertical part of the structure. At the end of a horizontal pipe led through the wall, we attach a tee with fasteners for a vertical pipe. If we use a knee, conditions should be created for cleaning the horizontal gap of the connection. When using a tee, the lower outlet is blocked by a plug, which is removed or we use a tee with revision. How and to what to attach the chimney depends on its location. The pipe is attached to the wall with wall brackets every 2 meters. If the main pipe is heavy, the elbow must be supported. It often happens that it is impossible to fasten to the wall along the entire length of the structure; in this case, stretch marks are used.
- We install a collar with ears, attach clamps to the ears and we already attach stretch marks of the required length to them. In this case, the cable for stretch marks must be at least 3 mm in diameter.
- In places of fastening of stretch marks, we install eye-studs or anchors (we choose based on the surface of the fastening).
The next step is to lift and fasten the entire structure of the vertical pipe. It is possible to install in parts, but this is unsafe work at height, and sometimes even impossible. As a rule, the pipe is assembled on the ground, fasten all parts with clamps, prepare fasteners for stretch marks and brackets.
- To facilitate this process, we use a hinge.
- We select the desired knee for connection and fasten the hinge to the edge outer pipe, weld it.
- We raise the finished end of the pipe at the level of the junction and also attach the hinge to the end of the elbow.
- We lift the entire structure with the help of attached cables and horns. This should be done in good weather, it is unacceptable to perform in gusty winds.
- We carry out fastening in accessible places.
- For stability, we fix slightly stretch marks.
- We unscrew the nuts that fastened the hinge. We cut off the bolts themselves with a grinder and knock out the endings.
- We knock out the hinge and make fasteners of the remaining bolts at the junction.
- We produce full tension stretch marks. We adjust the tension with lanyard screws.
Installation has come to an end. We make fasteners of the junction and sealing of the joint. After we carry out the insulation of the vertical pipe, we make insulation (this way we will avoid the appearance of condensate). Now for the heating of the house you can be calm.
Installation of a double-circuit sandwich pipe
Very often in country houses heating is carried out using a fireplace or a full-fledged stove, to which the piping and all the necessary heating equipment are connected. Such equipment needs a properly assembled chimney. It will ensure the removal of combustion products and carbon monoxide.
Mounting it without the involvement of specialists is not so difficult if you choose to install a chimney sandwich with your own hands. After all, the installation process is similar to working with a designer. The service life of the device is quite long, and care for it is practically not needed. Correct installation sandwich pipes implies the observance of some important technical nuances. Necessary:
- Competently calculate all the parameters and dimensions of pipes.
- Know what length to choose.
- Determine how to position the chimney in relation to the ridge.
- Have an idea of how to assemble a structure.
- Know how to go through floors, insulate the pipe and bring the pipe to the roof.
All this will be discussed.
Main parameters and dimensions
It is not so easy to assemble a chimney that operates according to all the rules. First you need to determine the diameter of the cross-section of the pipe and the length of the chimney. To do this, you need to use the existing norms of SNiP. The diameter of the chimney is selected taking into account the thermal power of the heating equipment:
- If this figure is not more than 3.5 kW, then the pipe section should be 14 cm.
- With a thermal power of 3.5 kW to 5.5 kW, the diameter increases to 20 cm.
- With a thermal power of 5.5 kW to 7.5 kW - 27 cm.
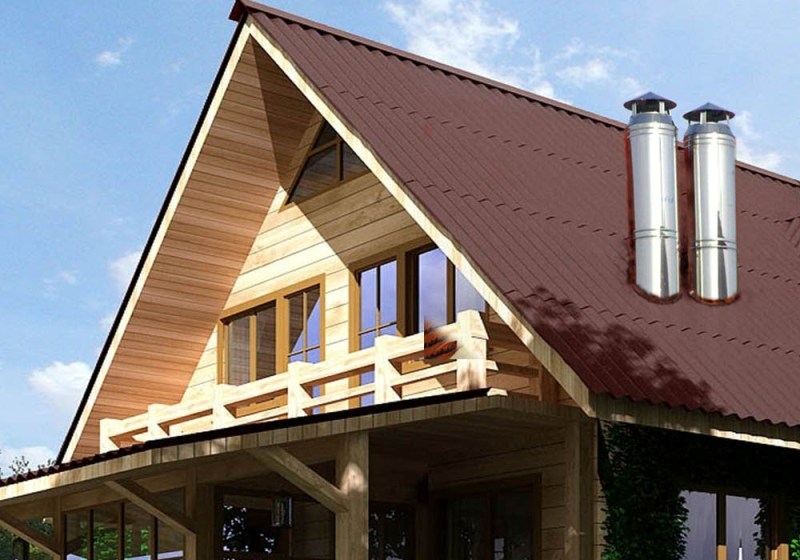
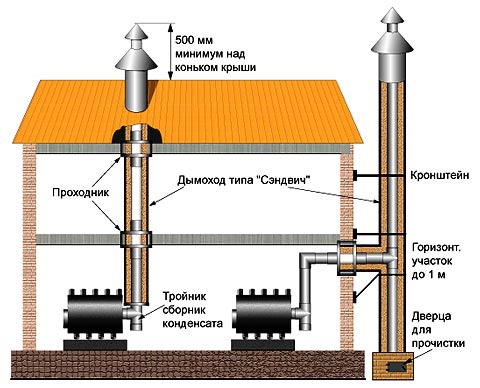
The length of the chimney is calculated according to the following rules:
- The minimum height that can create the necessary traction is 500 cm.
- You can also navigate along the roof ridge - the chimney pipe must be at least half a meter higher than the ridge.
- We pay attention to the material of the roof. If it is made of flammable components, the pipe above the roof should rise by a meter, and preferably one and a half.
Important! If there are technical buildings next to the house, the height of which is greater than that of a residential facility, then the chimney should be located 1 meter above the top point of the roof of the extensions.
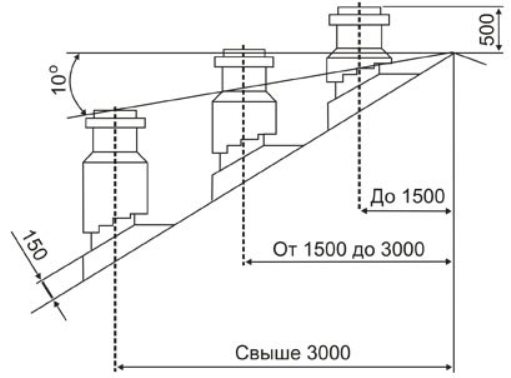
Pipe height depending on its location
When determining this parameter, it is important to consider the location of the chimney in relation to the roof ridge. Here, too, everything is simple:
- If there is only 1.5 m from the ridge to the pipe, then the upper part of the pipe should rise half a meter above the ridge.
- If the chimney is 3 meters from the ridge, then its height can be on the same level with it.
- If the distance between the chimney and the ridge is more than 3 meters, then its height may be at the level of the contour drawn at an angle of 10 degrees from the ridge horizon.
Assembling the structure
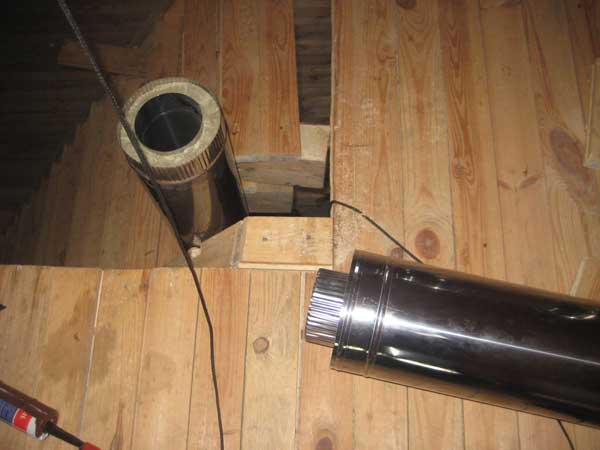
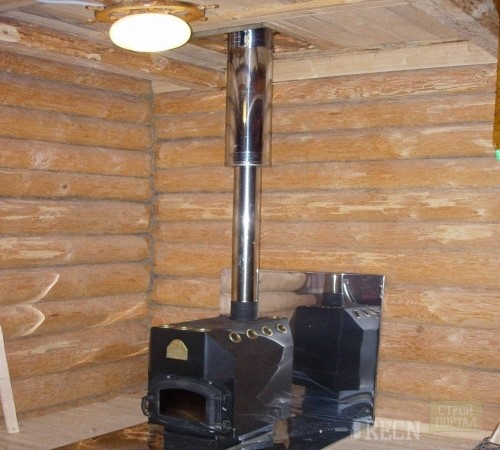
Installing a chimney through a stairwell
A conventional sandwich chimney is a structure that is assembled from separate segments. Each is a pipe, inside of which there is another one, but of a smaller diameter, and between them there is a dense heat-insulating material. The casing - the outer layer - is made of stainless steel. The inner layer is also made of steel with a protective anti-corrosion coating. There are other samples, for example, from copper, brass and aluminum. Copper is expensive, brass is also more expensive than stainless steel.
Aluminum is a cheap material and its use significantly reduces the cost of the chimney. But during operation, when heated, it expands, and when cooled, it narrows again. As a result, the tightness of the chimney may be broken. Therefore, experts advise purchasing sandwich works in which both iron parts are made of steel. In the middle between them is a basalt insulation.
Its use provides many benefits. Basalt wool is not afraid of temperature changes, chemical and physical influences, and also has excellent thermal insulation properties. At different manufacturers insulation has different thicknesses. The minimum value is 25 mm and the maximum is 60 mm. How is the installation? (3)
Installation is carried out as follows:
- The size of one sandwich segment is 1 meter. During installation, one is simply inserted into the other. Moreover, it is necessary to collect from the bottom of the furnace, gradually moving up. We take the first element of the pipe and connect it to the branch pipe of the furnace pipe. We cover the joint with a special plug covering the insulation. Next, separate meter segments are inserted one into the other.
Note! One end of the pipe is always narrowed. It is him who is inserted into the next pipe. All links must be assembled in such a way that the condensate that will accumulate during the operation of the chimney can flow down.
- Docking is carried out in such a way that the upper casing and the inner chimney pipe fit tightly into each other. Doing it right away with your own hands is quite difficult. Therefore, you can resort to one trick. The inner pipe must be pulled out by 15 centimeters, insert one pipe into the other, and only then connect the outer casings.
- Joints additionally need to be strengthened with clamps, which are attached to the standard package. We start and tighten them around the joints with ordinary steel wire. You must first treat the joints with sealant, especially since there are compounds on sale designed specifically for furnace equipment.
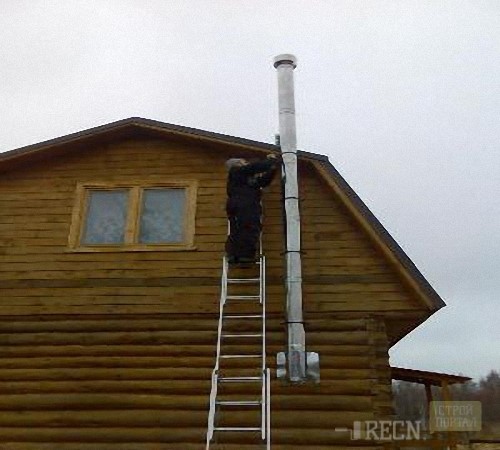
The chimney can be located inside the house, or it needs to be brought outside and attached to the wall.
How to ensure the stability of the structure when it is brought out?

Installation of steel chimneys
Every 2 meters for external assembly, the chimney is attached to the wall with brackets. If a tee or drive is provided, each such detail is also fixed to the wall. This allows you to keep the structure in an upright position and prevent its collapse in a strong gust of wind. And in this way, the load on the docking elements is reduced. In this case, it is imperative to observe a certain interval between the wall and the pipe.
The stove-makers call it retreat. Its value is strictly calculated. The calculations take into account the wall thickness of the boiler equipment or furnace, the presence of an open or closed firebox, as well as the degree of combustibility of the materials with which the walls are finished. So, for example, if the wall thickness of the boiler is 6.5 cm, there is a closed firebox, and the wall is not protected from fire by anything, the offset value will be 50 cm. And if the thickness of the furnace is 12 cm, and the wall is well protected from fire, the offset can be equal to 20 cm
Note! Some manufacturers pack their products in plastic wrap. Before starting the assembly of individual elements, it must be removed.
What if you need to install a chimney between two walls or inside a duct?
In this case, you need to make 2 windows on the outer wall. Each is 150 sq. see. It is advisable to place one hole at the bottom, and the other at the top. With a closed retreat option, it is imperative to collect flooring from non-flammable materials.
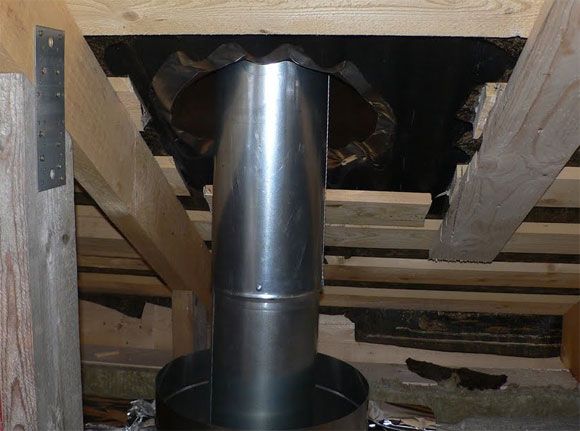
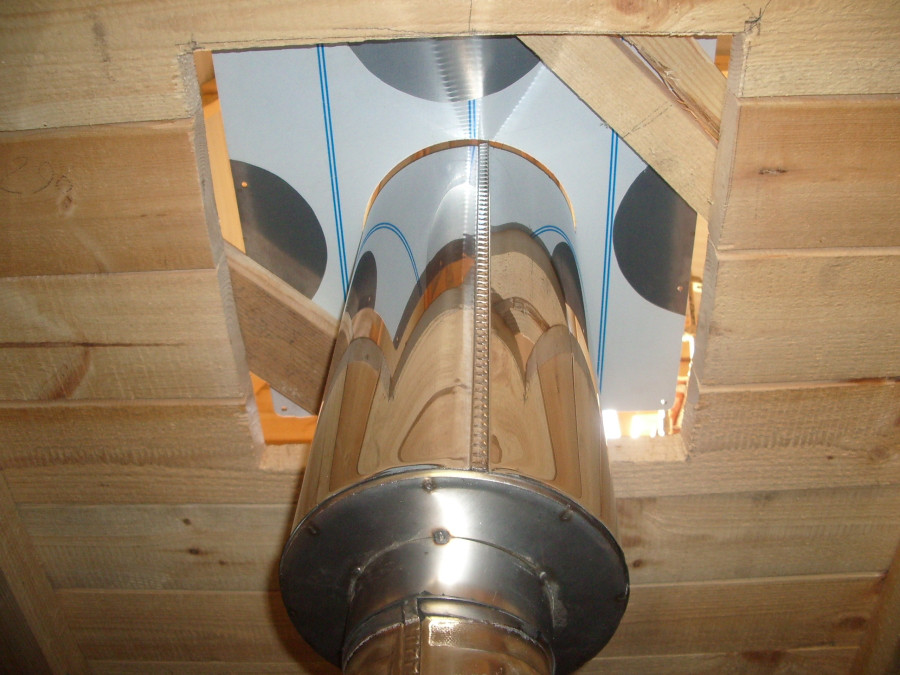
How to cross floors?
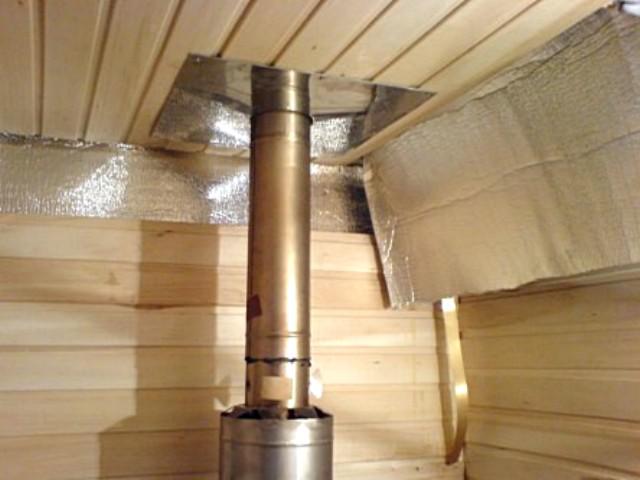
Chimney installation
Sometimes it is necessary to bring the pipe outside through the ceiling. This can be done using a box with a hole inside. A pipe is inserted into it - a special element used for the purposes described. The thickness of the box should be 7 cm more than the thickness of the floors. This is the only way to protect the roof from fire. But in order to ensure the safety of using the chimney, it is necessary to attach the box very firmly to the ceilings and connect it to their structures.
The branch pipe must not have joints. This is a very important point. Before installing the dividing box with your own hands, you need to make the correct markup with a marker. At this stage, the saying that you need to pre-measure 7 times and only then cut off is very relevant. It is possible to make holes in the ceilings only when the appropriate box is selected and the pipe is correctly located.
How to insulate a pipe
After installing the box and pipe, this element of the chimney must be carefully insulated. For these purposes, basalt-based foil mats treated with refractory mastic are used. It is also desirable to isolate the hole in the roof. In this case, it is worth using a mineral wool insulation. It is advisable for them to lay all the holes that are in contact with the nozzle.
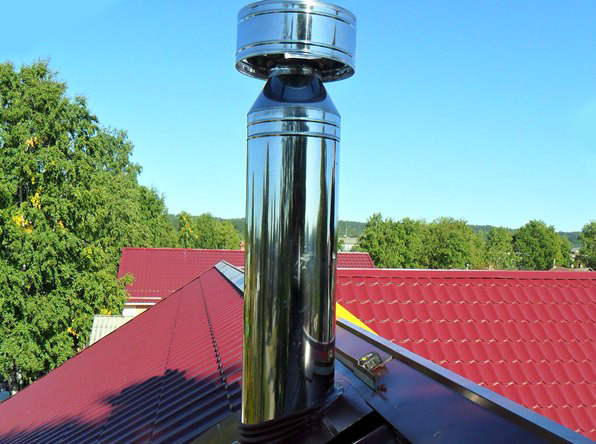
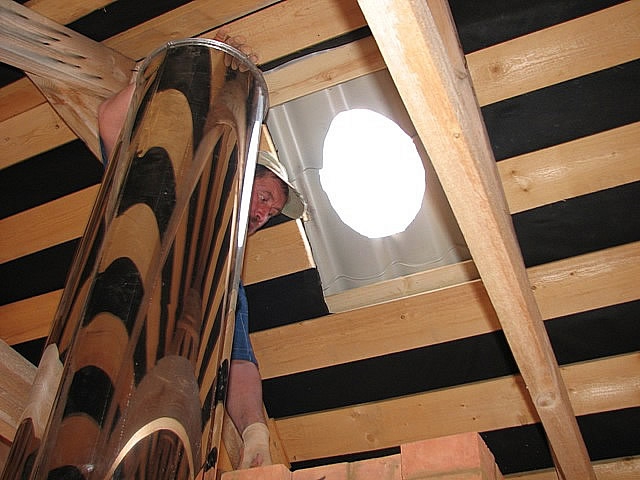
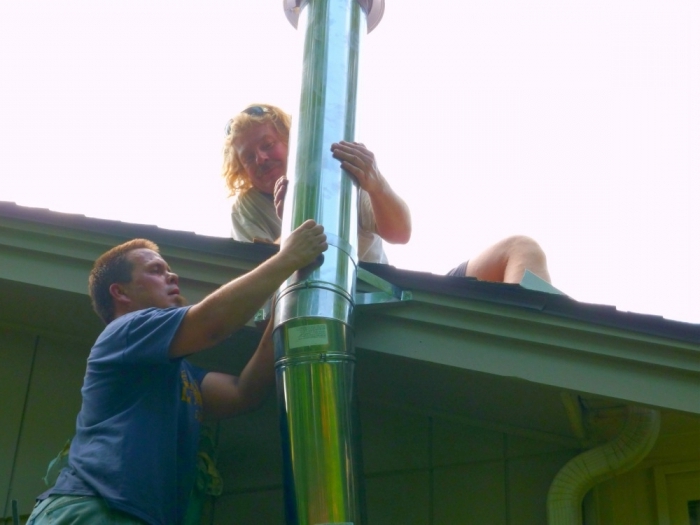
Chimney outlet to the roof

Installation of a chimney on the roof
A special link allows you to bring the sandwich pipe to the roof. The stove-makers call it roof cutting. This element is selected taking into account the slope of the roof. Knowing him, it will be easy to do this stage of work with your own hands. It consists of three operations:
- Marking is applied on the inside of the roof with a marker.
- With your own hands, a hole is cut out, the diameter of which corresponds to the diameter of the chimney pipe.
- Isolation is underway. To do this, a sheet of galvanized steel is attached to the roof from the inside. A hole for the chimney is pre-cut in it, and the pipe is brought out. Roof cutting is installed on top. As many links are assembled on top of it as necessary to achieve the planned height. And then an umbrella is fixed on top, protecting the chimney from precipitation.
Note! In this section of passage through the roof, the chimney pipe should not have joints.
Features of the operation of the chimney
Sandwich pipes are a new generation product. They have a prefabricated structure, which greatly simplifies the installation of a reliable chimney. But during its operation, soot accumulates inside. It is necessary twice for heating season remove. Otherwise, there is a high risk of reducing the useful cross-sectional area of the pipe, which leads to a decrease in thrust.
How to use the pipe correctly
Therefore, you will have to constantly clean the pipe chimney. To facilitate the task, a special glass is installed in its lower part, or a door is attached to provide access to the inside of the sandwich pipe. There are rules, the observance of which prevents the formation of a layer of soot. Here are the main ones:
- To fire a stove or fireplace, it is necessary to use firewood from coniferous trees as little as possible. When burned, they emit resins that very quickly settle on the inner walls of the sandwich pipe.
- The same result can be obtained by throwing raw firewood into the stove. Stove builders warn that wet fumes are just as dangerous to the chimney as tar.
- It is not necessary to burn household waste in the oven every time.
- If a wood-burning stove or a fireplace has appeared in the house, take care and prepare hardwood firewood in advance. Buy well dried wood.
- As an effective preventive measure, throw a bunch of aspen wood into the stove at the end of the firebox. They burn out very quickly and give a high flame, which burns out the soot in the chimney well.
Generalization on the topic
As you can see, assembling a sandwich pipe with your own hands is a laborious task, but it is quite possible to implement it by first studying the material and watching several video tutorials posted on the site. Before you decide on such an experiment, you need to carefully evaluate your own capabilities and decide whether such a task is within your power.
Observing all the rules outlined above, you can take a chance and implement the installation. T - Installing a chimney sandwich with your own hands - the main stages of installation D - Proper installation of a chimney sandwich with your own hands is a laborious process. It requires compliance with strict rules and regulations. fire safety. Knowing the features of each stage of installation greatly simplifies the task. K - do-it-yourself installation of a sandwich pipe chimney
A properly equipped flue gas exhaust system is one of the essential elements heating country house. The chimney must be installed in accordance with certain requirements, otherwise smoke will occur, reverse draft will occur and, as a result, a fire. In today's article, all aspects of this problem will be considered.
Important! A chimney is required in houses heated by a boiler, stove or fireplace, and is intended to remove the products of combustion of fuel.
If speak about self-manufacturing chimney pipes, the best option is a sandwich pipe (i.e., multilayer). It effectively prevents moisture condensation, minimizes the accumulation of soot and has a long service life, during which no special care is required.
Sandwich - chimney

Ideally, the chimney pipe should be horizontal, but in reality everything is much more complicated - it goes up, then horizontally through the wall, up again, etc. It also needs to be led through the roof. For all this, there are a variety of tees, adapters, knees and more.

Now - directly to the manufacture.
Stage one. Carrying out calculations
The exact design scheme depends on the parameters of the pipe used. To find out all the necessary parameters, a series of simple calculations should be carried out.
According to the norms of SNiPa, the following types of section are distinguished (depending on the power of the heat generator):
- from 4 to 8 kW - 14x27 cm;
- from 3.2 to 4 kW - 14x20 cm;
- less than 3.2 kW - 14x14 cm.
According to the above data, you can choose galvanized pipes of the required section on your own. If products with a circular cross section are used (this option is preferable), then their area should be equal to rectangular pipes for a heat generator of one or another power.
Here are the basic distance requirements. Their observance is mandatory.
- If the pipe is installed above a flat roof, then it should protrude 50 cm above its surface.
- If the distance between the ridge and the chimney exceeds 3 m, then the pipe is installed above the line conventionally drawn from the center of the ridge at an angle of 10ᵒ.
- When the pipe is located closer than one and a half meters from the ridge, it should rise above the ridge by at least 50 cm.
- If the roof covering is made of flammable materials, then the chimney must rise more than 1 m.
Stage two. Do-it-yourself chimney pipe
Before proceeding with the manufacture, it is necessary to check certain aspects of the operation of the heating system.
1. Important installation points
- The pipe being erected must not be allowed to have ledges.
- All inclined sections of the pipe should not be without roughness. It is also necessary that the cross section in this case be no less than the vertical area.
- There is also a limitation in the temperature of gases moving in the pipe - no more than 500ᵒС.
- The pipe outlet should be made at a slope of 30ᵒ.
Important! The chimney should be protected from rain or snow - for this you can use an "umbrella", a deflector, etc. Moreover, it is impossible to lay electrical wiring and other communications near the chimney.
2. Chimney pipe installation
Important! Before installation, the protective film is removed, which covers the pipes.
Important! Horizontal sections are installed only in case of emergency, and their length should not exceed 1 m.
To pass through the ceilings, special passage pipes are used. The dimensions of the box of such a branch pipe must exceed the thickness of the ceiling by at least 7 cm - this is necessary to protect combustible structural elements from ignition. Too rigid fastening of the box with the roof is not required.
Next, you should isolate the pipe itself. To do this, it is covered on both sides with basalt paper with a refractory mastic previously applied to it. The junction with the branch pipe is insulated with mineral wool.
Only after that the pipe is installed in place and the verticality of the entire structure is checked. If there is a slope, then the pipe is leveled.
4. Completion of installation
At the end of the installation, an adjustable apron is attached to the pipe, which is necessary for sealing the joints, and the chimney is extended to the required length. From above the pipe is covered with a protective "umbrella".
Important! Structural elements that do not have a galvanized coating (respectively, subject to corrosion), it is desirable to cover with heat-resistant paint.
Where is the pipe located in the house
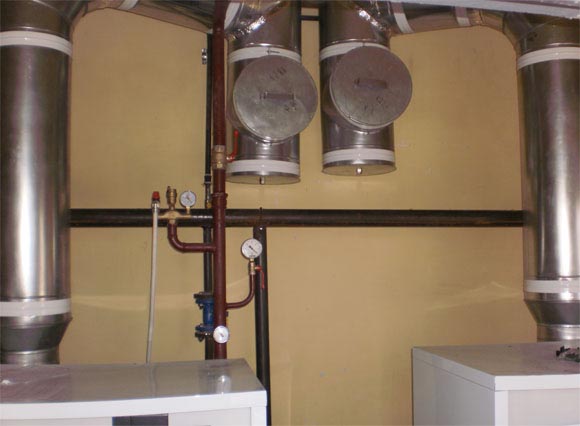
Often, a chimney is installed along walls and interior partitions (necessarily made of non-combustible materials). There is another option - to install it outside, near the house, but such a procedure will require additional insulation. If, for one reason or another, mounting on the walls is not possible, then the only option is to install overhead pipes.
It is also necessary to consider the installation location of the heater itself (often it is a gas boiler). In a suitable room for him, there must be a window or other additional exit from the house. The minimum area of this room is 7-8 m², and the ceiling height is 2.5 m. This room is called the boiler room.
Finishing the boiler room must be made of non-combustible materials. So, in a brick building, the walls are covered with plaster and painted with water-based paint. In a wooden house, they must be additionally insulated with asbestos sheets at least 3 mm thick (asbestos can be replaced with roofing steel).
Important! The boiler needs to be zaze
All these requirements must be specified in the instructions for the device.
What not to do during installation
During the assembly and installation of the pipe, it is prohibited:
Basic fire safety rules
It remains only to consider the basic rules that must be followed when building a chimney on your own.
Rule one. Any connections with other types of pipes are not allowed.
Rule two. The chimney can extend beyond the perimeter of the roof by no more than 50 cm.
Rule three. The maximum length of horizontal pipe sections is one meter. Although such segments are best avoided if possible.
Rule four. The chimney must be cleaned twice during the heating season.
Rule five. It is unacceptable for the chimney to come into contact with other communications, especially electrical wiring or a gas main.
And finally, the most important rule of fire safety - all flammable building structures should be as far away from the chimney as possible.
Video - Installing a sandwich chimney
The chimney can be installed according to one of the two existing principles - smoke (that is, after the tee) and condensate (directly from the heater).
Video - Ways to install a chimney
The chimney in the organization of heating systems plays three main functions. All of them can be achieved by installing a chimney with your own hands.
The main functions of the chimney
- First of all, the chimney is designed to remove combustion products that are extremely harmful, and often fatal to the body of the inhabitants of your home.
- In addition, the chimney must also have insulating properties and protect the building structures of floors and roofs from fire.
- And, finally, a beautiful chimney has an aesthetic function and decorates the roof of your house.
You can easily install the chimney yourself by following simple instructions.
The main types of chimneys
Depending on the material of manufacture, chimney systems can be divided into various types made of metal (for example, cast iron or stainless steel), brick and ceramic. A modern chimney can be made of composite materials and have a multilayer structure.
You can choose the modification of the chimney that will most closely match your building.
So, for example, the cheapest option - a metal chimney is best suited for arranging heating systems for boiler rooms or baths, that is, non-residential premises. However, such an economical approach is hardly advisable to use in a home. The metal structure has poor sealing of the joints, as a result of which you will not be able to get rid of the penetration of smoke into the room. Also, the metal does not have the most attractive service life, as it is extremely unstable to atmospheric moisture.
A pipe consisting of composite multilayer materials is more reliable and resistant to aging. But between the layers of such a pipe is placed a heat-insulating fire-resistant material. Due to unjustified savings, many manufacturers place a low-quality insulator in the intermediate layer, which, after a while, may begin to crumble. So when buying such a pipe, carefully follow the reputation of the manufacturer.
The cheapest option is to build a chimney from thin-walled stainless steel. The light weight of such a pipe allows it to be fixed in the structure even with the help of a minimum amount of fixing material. Also, a stainless metal pipe is very easy to process - it can be cut with ordinary metal scissors.
A ceramic chimney is very difficult to install, since its installation can only be done together with the whole house. In this regard, it is extremely rarely used, because in order to build it in a finished dwelling, the construction team will need to dismantle part of the floors.
Tools needed for a chimney
In order to install a chimney in your home with your own hands, you will have to stock up on the following minimum set of tools:
- grinder for cutting metal and a drill for drilling holes
- spatula, chisel and trowel
- a screwdriver, preferably with hex bits and a jigsaw, can be electric,
- small hammer and Phillips screwdriver
- protective gloves and goggles
What you need to remember when installing a chimney with your own hands
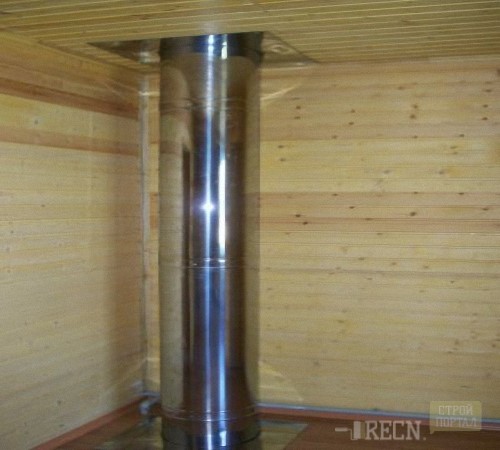
According to the method of construction, chimneys can be divided into internal or external. Let us consider in more detail in which case you need to choose one or another option.
So, the internal structure of the chimney can be used for the construction heating systems based on heating boilers or fireplaces. Such systems are usually installed inside walls. After installation, such chimneys are closed in the thickness of the wall and decorated. As an advantage, it can be noted that such a system is not subject to moisture condensation and is well protected from the influence of atmospheric moisture.
However, the products of combustion passing through the chimney have a high temperature. Consequently, the sections of the walls passing near the internal chimneys become very hot and may catch fire. Thus, internal chimneys are not recommended to be installed in walls built of flammable materials. Also, such systems are not recommended for powerful boilers with a large flow of hot combustion products.
An external chimney is recommended for industrial and large heating systems. Usually they are arranged if the area of \u200b\u200bthe heated room exceeds 500 square meters. Also, such a chimney can be installed if the installation of an internal chimney is associated with significant difficulties. So, in a building with concrete walls and a ceiling, it is easier to break through a slab between floors than to gouge a channel in the wall.
How to install stainless steel and cast iron chimneys
The cheapest and in a simple way chimney device will be the installation of a metal pipe. The entire installation is divided into several successive stages:
- First you prepare the channel for the chimney.
- Then you actually install the chimney.
- And at the final stage, you mount insulation around the pipe.
The channel under the chimney metal pipe should be approximately one and a half times its diameter. In this case, you will have space for isolation.
The actual metal chimney consists of the following constituent parts: metal pipe, adapters for mounting tunics, head and condenser. In a number of designs, a gate is installed with a chimney - a unit that increases draft in the system.
Chimney installation steps
At the initial stage of installing the chimney, you need to adjust the pipes in length. Further, the resulting structure is placed in a pre-prepared channel. After that, a capacitor is connected to the system and itself heater(stove or boiler). At the final stage, the head is installed.
In order to rigidly fix the pipe, it must be fixed to the wall at least every one and a half meters.
When installing steel and cast iron pipes, it is necessary to provide high-quality thermal insulation of the chimney. Only in this case will you be able to avoid the fire of the ceilings and structures adjacent to them due to a suddenly leaky pipe. To isolate a metal chimney, it is best to use the classic method - refractory clay. But in extreme cases, you can use special refractory foam.
Also, with the help of clay, it is possible to decorate the joints of the chimney from a metal pipe with ceilings and a roof.
If you use a metal pipe, then it must be fixed to the ceiling and walls with fasteners every half a meter. This is due to the large weight of such chimney pipes. In addition, the mounting holes are made wider - by about two pipe diameters.
A cast iron pipe will last longer as a chimney, but its installation is fraught with certain difficulties. So you can cut such a pipe only with the help of a grinder.
Do-it-yourself sandwich chimney installation
Sandwich chimneys made of several materials are replacing conventional metal pipes. The multi-layer design allows you to qualitatively isolate the floors from heating by the combustion products of the furnace. When installing such a chimney, additional insulation is not required, as a result of which the mounting holes can be made almost equal to the diameter of the pipe.
When installing metal pipes, they fit into each other like nesting dolls and no additional fixation is required to connect the knees of the work. In sandwich chimneys, the pipe elbows must be connected to each other using a special construction adhesive. In addition to fixing the knees, construction adhesive also prevents smoke from entering the premises.
Sandwich pipes are very sensitive to the formation of condensate from atmospheric moisture, therefore they are not recommended for use in the installation of external chimneys. Inside the building, such a pipe can last up to 70 years.
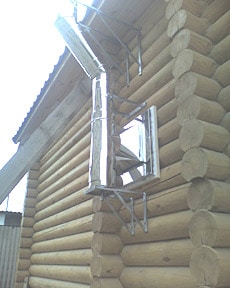
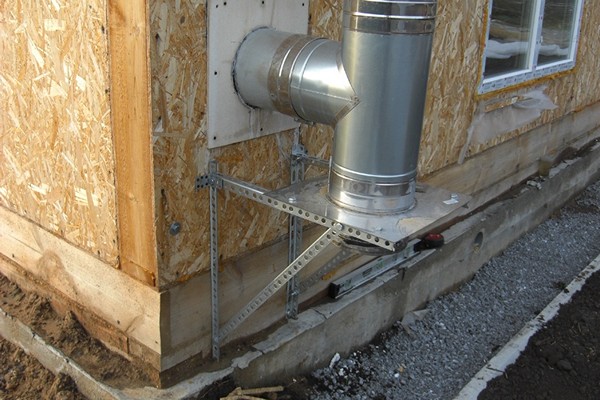
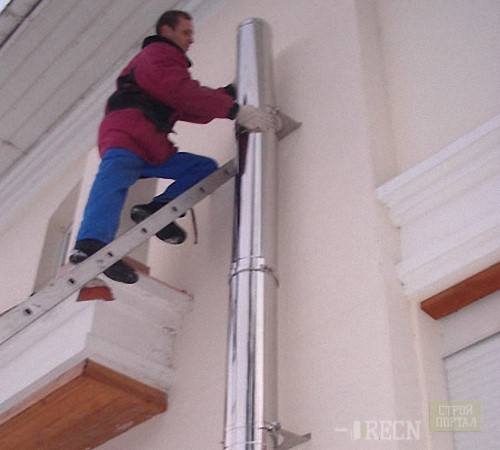
Do-it-yourself installation of an external chimney
The most optimal material for the manufacture of an external stove chimney will be a pipe made of stainless steel. It weighs a little and is well processed by the simplest tools.
In order to mount an external chimney from stainless pipe carry out the following work:
- Punch a hole in the pipe adjacent to the boiler. It should be located no lower than half a meter from the top of the boiler.
- Place fasteners on the outer wall a meter apart.
- Connect the chimney inlet to the heater.
- Move the bent pipe elbow out of the room.
- Mount the capacitor.
- Fix the pipe to the wall.
- Install the cap and chimney guard.
Do-it-yourself chimney installation: instructional video
No heating device can work without a good exhaust system. Often during construction country house forgot to include a chimney in the project. In this case, you have to lay it directly through the wall. Many people decide to make a chimney with their own hands. This problem is solved in several ways. Starting from classic and embedding in the main frame of the house, and including complex or other modern materials. All options differ in complexity, materials, labor and time costs, efficiency and heat capacity, and the ability to increase the efficiency of the heating installation.
The most suitable option is the construction of steel pipes- Do-it-yourself installation, as a rule, does not cause difficulties if you understand the sandwich chimney device.
The main advantages of sandwich chimneys
- metal pipes are a long-established and widespread element of smoke ducts. This is due to a number of reasons.
- Pipes have round section, through which gas exchange between the furnace and the environment is easier. This is important for organizing the movement of air flows inside the chimney.
- Only pipes allow you to arrange smooth and even surface on which combustion products do not settle, and even if they do, it happens evenly and is easily removed by cleaning.
- Do-it-yourself chimney installation is much easier compared to similar brick chimneys.
The gases passing through the smoke channels are saturated chemically aggressive impurities, therefore, they cause corrosion of the metal, which occurs against the background of temperature fluctuations, changes in humidity and other conditions. In this case, the service life of the chimney is reduced tenfold, so more resistant substances, such as stainless steel, are added to the pipe material. Except corrosion phenomena, and some other difficulties arise.
- High metal conductivity per a short time reduces the temperature of the gases passing through the pipes, as a result it turns out that the sandwich chimney, starting from the place where the bracket is attached, cools down, most of heat is retained indoors.
- As a result, a significant temperature contrast at different ends of the pipe simultaneously provokes a linear expansion of the bodies under the action of the energy of fuel combustion;
- The outer wall of the pipe is heated to a temperature dangerous for objects environment, therefore, an additional heat-insulating layer is needed that does not let excess heat out.
The creators of sandwich chimneys managed to solve these problems.
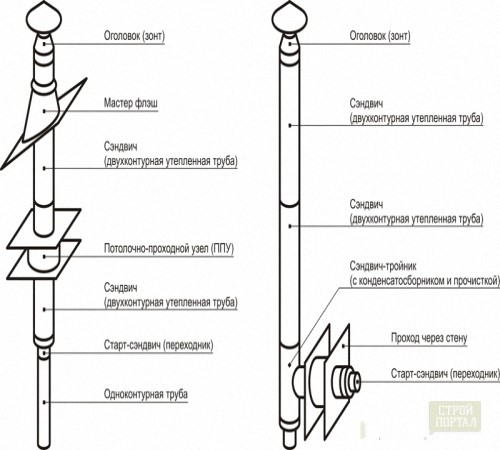
Sandwich chimney device
Thanks to the British, who like to call everything that consists of two layers and a filling a sandwich, the chimney got its name. Sandwich consists of two pipes different diameters (internal and external metal contours). Inside, between them there is a powerful insulating material, which is usually made from basalt rocks.
The chimney is made up of many parts. First, naturally pipes, Secondly, bracket Thirdly, other details: clamps, adapters, tees, pipes with revision, ensuring the correct operation of the structure and the efficient use of structural materials. The bracket allows you to comfortably mount the chimney to the wall with your own hands.
 The meaning of such a device is in efficient operation, in particular, in removing products from the furnace. The outer circuit is reliably protected from overheating, and the inner circuit from temperature contrast. The layer between them reliably protects against the appearance of moisture, condensate and efflorescence on the surface of the pipes; thrust, which should occur in the air currents, works properly.
Inner pipe always thicker and covered with a thick layer of stainless steel, which has enhanced properties against corrosion and burnout. Outer contour, as a rule, are made more economically, at a lower cost, from ordinary galvanized iron. The installer must choose between price and quality, since the difference between stainless steel and galvanized iron is very large. Inner contour material should be chosen based on knowledge of its resistance to thermal contrasts and high humidity, corrosive properties. The outer pipes must be rigid because they are the skeleton of the structure.
Preparing for installation
When installing chimney ducts, it is not necessary to build an additional cement foundation, as required by a chimney made of brick or ceramic masonry because thanks to small weight the design acquires another advantage of a metal installation over ceramics and bricks. But do not underestimate the task before you, because you need not just fix the bracket, although it is really easy to do it yourself.
Do not forget about the existence of a number of rules and recommendations that need to be understood and thought out even at the stage of choosing tools and materials. Please note that it will play into the hands of the ability to draw a diagram of the designed installation, defining all the dimensions on it. Experts with experience, who probably know how to install a sandwich chimney, are often advised to pay attention to points such as ceilings, etc.
Sometimes the boiler or furnace firebox is mounted on the subfloor. In such calculations, it is necessary to calculate thickness of all layers of the floor, not forgetting about the installation of floor surfaces, and install the heaters on stands so that the installation fits perfectly into the outlet for the exhaust of combustion products.
Chimney installation
Installation of a sandwich chimney start from the outgoing end of the heating equipment pipe. The first part of the chimney looks like a piece of pipe that is not covered with insulating layers. First, the bracket is fixed, and the pipe is already on it. If you start to mount the structure from a solid sandwich pipe, the insulation material will melt, a stone formation will form that will destroy the chimney. For this the bracket must be installed at a height, protecting against overheating. Incorrect installation most often results in a defect in heat generating equipment, and even ignition of flammable materials.
The part is driven into the socket, fixed by installing the bracket, and closed with a plug. Then the parts of the chimney structure are interconnected in order, fixing the pipe joints with crimping clamps.
If there is a possibility of a noticeable increase in pressure in the channel, the connection points, just in case, are also closed special couplings. Often, when installing steel pipes, heat-resistant sealants are used to cover the joints. The more isolated the chimney, the more correct the draft.
 Despite the excellent insulating properties of "sandwiches", some risk of overheating and ignition materials adjacent to the pipe. To guarantee a certain level of fire safety, it is advised to increase the thickness of the thermal insulation layer at the joints.
Fixing the chimney with your own hands is not difficult at all, for this it is enough to understand the device and know the basic safety regulations. After installation, it is necessary to properly maintain the chimney and to reduce the risk of accidents when operating stoves.
There are effective folk remedies for cleaning the chimney. Yes, in recent times it is often advised to occasionally heat the stove with aspen wood: the result is a powerful flame that burns precipitation on the surface of the pipe walls. You should not do this often, you should be careful, because it often provokes fires.