
How to install a new heating battery. How to install a heating radiator with your own hands - preliminary steps
Radiator installation
Everyone is once faced with the need to install a new battery due to the fact that the old one has become thin or has ceased to suit. Do it in the process of construction or overhaul own house. In this case, it should be borne in mind that professional installation of heating radiators is a guarantee of flawless and long-term operation of both the device itself and the entire heating system of the building. Responsibility for the quality and consequences is borne by the specialist-executor, and in case of self-replacement, respectively, the owner of the housing and the installed new battery.
Basic requirements for the successful installation of heating appliances
It is clear that the refusal of the services of qualified plumbers in such a matter as installing batteries does not arise from a good life. Someone is sorry for the money, which is not there anyway. And some of the owners, having heard enough stories about unscrupulous hired craftsmen, quite reasonably believe that no one will do better than myself.
In fact, it is possible to independently perform this work without skills and special equipment, if the radiators themselves do not interfere with this. For example, for the installation of aluminum heating appliances, special equipment is not needed. Unlike them, heavy cast iron units simply cannot be installed without some skill and a welding machine.
Do-it-yourself involves the ability to read instructions and diagrams. Neglect of the recommendations of heat engineering manufacturers, established norms and rules for its installation, advice from experienced craftsmen and safety precautions, as a rule, has detrimental consequences.
SNiP standards for battery installation
General rules for the installation of heating devices according to SNiP:
- It is necessary to fix the radiators in such a way that the vertical axis passing through the center of the window coincides with the center of the battery - with a maximum deviation of no more than 2 cm.
- The battery length should be 75% of the window width.
- The distance between the installed radiator and the floor must be at least 60 mm, to the window sill - at least 50 mm, to the wall - at least 25 mm.
- In some cases, before installing the heater, the wall surface must be covered with a heat-reflecting material.
Compliance with these standards will allow you to obtain optimal heat exchange between the radiator and the room air.
For mounting heating batteries fasteners that match their material are required. For example, to install cast-iron (the most massive) radiators, brackets of sufficient thickness and length are required to adjust the distance to the wall. When a cast-iron product is fastened to a base made of drywall or wood, a special stand is used.
Installation of aluminum appliances is carried out on brackets of a certain length. Since these batteries are lighter, no special efforts and devices are required for their installation.
Work time

Autonomous heating installation
Each owner in his house, as they say, is "his own director." Any manipulations with heating, including the installation and replacement of radiators, can be done whenever you like. You just need to remember to drain the water from the system before doing this.
Another thing is an apartment building, and even with centralized heating. If the installation is carried out at the time intended for this, that is, between the heating seasons, then in this case, the employees of the housing office should be notified. For the duration of the work, they will discharge from your coolant riser, which may be in the system in order to reduce its destruction by corrosion.
Another question - is it possible to change the batteries in heating season when is it winter outside? This will depend to a lesser extent on the desires of the owner of the living space. Of course, if an emergency occurs when the radiator leaks or, even worse, turns into a real apartment geyser, then the housing office employees will simply be required to take the necessary measures - to shut off the emergency riser and drain the water from it.
When the replacement will be due to dissatisfaction with the operation of the radiator or with a planned winter overhaul apartments, then everything is somewhat more complicated, but still possible. It is advisable to choose a period when the temperature outside is not lower than 15 ° C, and contact the Housing Office with a request to turn off the heating of the desired riser. As a rule, employees of the housing office do not refuse this, especially since today the practice of switching off on a paid basis is widespread. You will also need the consent of the neighbors in the riser above and below.
Note! Change the radiators winter time even preferable, since the presence of pressure in the system will make it possible to immediately check the quality of the work performed. It would be best to turn to the services of plumbers serving the housing office. The quality of the work performed should be specified in detail. It is better to change all the heating devices in the apartment at once - it will cost much less than each radiator individually.
Radiator installation
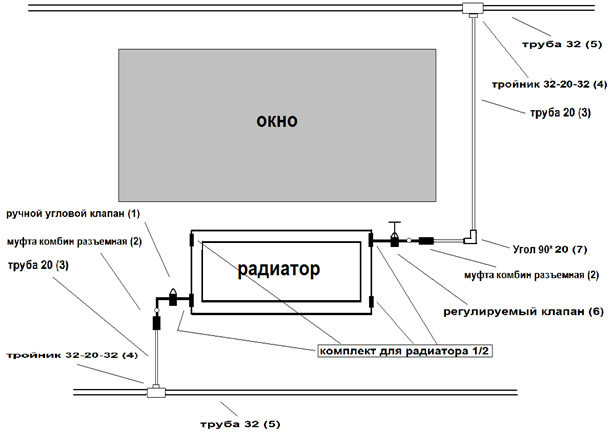
Scheme of mounting a heating radiator on polypropylene pipes
Typically, radiators are located under the windows and much less often on the wall - for example, near the front door in the hallway. Pipes to heating devices are brought from below, from the side or on both sides. When installing batteries with one-way pipe connection, one should not strive to excessively increase the number of sections. In systems with natural circulation coolant, a maximum of 12 sections is recommended, and with artificial - no more than 24. apartment buildings unauthorized change in the configuration of the existing heating system is generally punishable by law, as it can lead to an imbalance in the heating of the entire house and even to the creation of emergency situations.
To be able to control the temperature in the room and consume thermal energy in automatic or manual mode, thermostatic valves are installed. And in case of maintenance or accidents - stop valves, which will allow, if necessary, to disconnect the battery from the heating system.
After the installation is completed, a test run is required in your home. It will allow you to check the performance and trouble-free operation of newly installed or replaced radiators. This will help to avoid a rush job when winter comes, and "white flies" will fly outside the window - it is better to detect and eliminate the flaws in the work carried out immediately.
Note! In order not to impair heat transfer from radiators and not to disturb the correct operation of thermal valves, it is not recommended to cover heaters with decorative grilles, make them furniture, or hang heavy long curtains.
Conclusion
It is better to entrust the installation of heating radiators to qualified specialists. This will avoid surprises such as insufficient battery performance or a burst pipe. Carrying out such work on your own will require some skills in handling the tool, unconditional compliance with existing norms and rules for installing heaters, as well as following the instructions and recommendations of the manufacturer of a particular radiator.
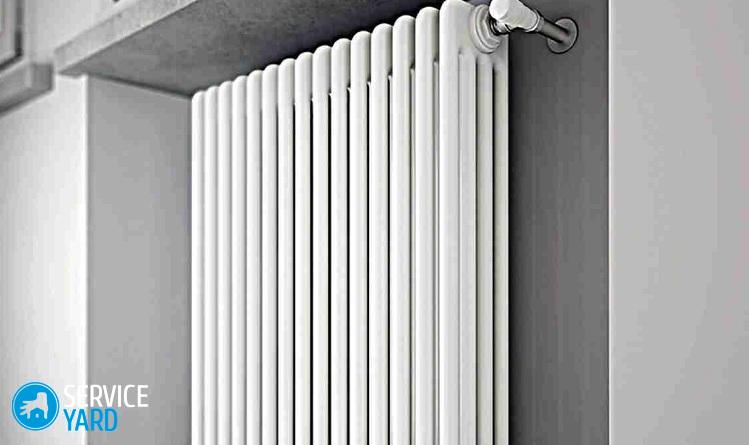
Living in a house becomes comfortable when it is warm. To ensure that the heating of the apartment does not cause any problems, it is necessary to install high-quality modern radiators. As a rule, this process takes place at the construction stage. But over time, the need to replace the heating batteries necessarily arises.
Need to replace radiators
There are many reasons to think that replacing batteries in your apartment is inevitable. Someone's radiators have rotted from old age and flow in small jets of water. Mechanical destruction of a part of the heating system and the battery occurs as a result of water hammer, which consists in a sharp increase in pressure in the system.
In others, the radiators do not provide enough heat, hinting that there is more dirt inside than the necessary coolant. The formation of mineral deposits on the inner walls also leads to a decrease in the clearance and a significant deterioration in the permeability of the heating system coolant, which in this case is water.
Sometimes it happens that the power of the radiator is not enough to heat the home. And if residents of a private house can change the level of heat in their house by adjusting the gas pressure in the boiler, then those living in city apartments of panel houses are constantly forced to put up with ordinary convectors, which do not have enough power for high-quality heating of the entire living space.
But replacing heating batteries is topical issue and for residents of private houses, since today there are many modern technologies to regulate the heating in your home and the possibility of saving a lot of money on heating while obtaining the maximum efficiency. In addition, when using radiator thermostats, you will have the opportunity to independently choose the desired temperature in the room.
In addition, do not forget that the useful life of old batteries will eventually expire, and the operation of such batteries is not desirable. Such radiators can fail at any time, but they can also cause a serious accident, not only in heating period but even in summer. In this case, the price of dismantling and installing heating radiators will increase greatly, because the consequences of the breakdown must also be eliminated.
Instructions for replacing heating batteries
It is better to deal with heating devices in the off-season, when the heating system is inoperative. Since the heating is turned off in the summer, you can get permission to replace the batteries without much difficulty.
1. The choice of heating radiators
Before replacing a heating radiator with your own hands, you need to consider their varieties and parameters. There are the following types of radiators:
- Panel radiators are 2 or 3 panels through which water will pass. Heating of such radiators is carried out faster than sectional ones. Connection is bottom and side. Devices are made of rolled steel.
- Column radiators - two collectors, which are interconnected by tubular columns. These devices are made of aluminum or steel.
- Sectional batteries consist of two or more hollow sections through which the coolant circulates. The number of sections is almost unlimited and is most often determined by the mass of the radiator. That is, the sections can be increased as long as it is possible to hang this battery. Devices of this type are made of cast iron, aluminum, steel and bimetal - two dissimilar metals.
Whether you will be replacing heating radiators yourself, or you are going to invite a specialist - in any case, you should choose the highest quality batteries. In this case, you should pay attention to the criteria for choosing radiators:
- Strength. Batteries may be cheaper, with low heat dissipation, but they must be durable. The passport of any device indicates the working and test pressure. You need to focus on the working pressure, leaving in reserve and in case of force majeure the test strength. To supply the coolant to the height of the ninth floor, a pressure of 6 atmospheres is applied, and to the 22nd floor - already 15 atmospheres! Not every radiator can withstand such pressure, so devices and aluminum disappear immediately. Aluminum radiators appropriate in the private sector, because they have a high heat transfer. Cast iron batteries heating systems are only suitable for nine-story buildings. Cast iron has no working pressure of more than 9 atmospheres. With such high pressure it is better to put a device made of bimetal or stainless steel. Bimetal radiators combine high heat transfer and increased strength.
- Corrosion resistance. Corrosion resistance is another important factor when buying heating radiators. On this scale, the most polar are cast iron radiators. Cast iron batteries resist corrosion the best, while aluminum batteries will be the weakest in this regard. Therefore, when choosing aluminum while pouring water into the heating system, it is recommended to mix anti-corrosion additives into the coolant.
- Heat dissipation. The most pressing moment for which radiators are actually installed is an indicator of their heat transfer to heat the room. The accompanying documents for the battery indicate its power, or the power of one section may be indicated. To calculate this value, it should be remembered that 80-120 watts of coolant power is required per 1 m2 of a traditional room, depending on the height and thermal insulation of the walls.

2. Preparatory process
If you succeed, then agree with the neighbors from below and above about the complete replacement of pipes, as this is considered the most the best option, because you do not have to cut in your apartment metal pipes. Persuade them to put a new pipe from the outlet of the neighbor's battery from above to the entrance to the neighbor's battery from below. So you will greatly facilitate the replacement of old heating radiators, and the neighbors will receive a new section of the pipeline in their apartment.
If you are not lucky, you will have to cut the riser at the floor and under the ceiling and switch to polypropylene reinforced pipes in my apartment. Batteries are connected with polypropylene, metal-plastic, metal welding and on spurs. But most often they use metal-plastic. They are much faster and easier to install, and they last much longer than traditional metal pipes.
Before replacing the heating battery with a new radiator, the water in the entire system must be shut off. Then use the pump, pump out as much water as possible, and then turn off the water near your radiator. Calculate how much water can be contained in the batteries, and stock up on dishes of a suitable volume, which you will substitute in the process of dismantling the old radiator.
Then proceed to take the necessary measurements:
- Take measurements and write down the diameter of the outlet from the radiator of the neighbor who lives upstairs, and the diameter of the radiator inlet of the neighbor living below your apartment.
- Make all the necessary measurements of the length of the pipeline that is needed to connect the neighbor above: calculate the distance from the outlet of the neighbor's radiator above, up to the corner, and the distance from it to the ceiling between your apartments.
- Make all the measurements of the length of the pipe that you need to connect the neighbor from below by analogy.
- Calculate the required length of pipe that will be needed in your apartment.
- Find the length of the pipe that will pass through the floors - approximately 1 meter. In this case, you should take a pipe of the same diameter that you used to connect the old battery.
3. Purchase of consumables
Heating batteries for the home are sold "naked". They should buy the following parts:
- Three plugs - one deaf and two through passages for your diameter. You will also need a plug to the Mayevsky tap to screw it in so that you can bleed air during the start of the heating system.
- Gaskets for all plugs.
- Reinforced polypropylene pipes.
- American taps, which are required to completely turn off the radiator and carry out preventive maintenance, as they provide the ability to turn it off and remove it.
- A polypropylene tap, which is useful for turning on the heating system with the American taps closed and allows the coolant to circulate with the radiator removed.
- The PPR trailer, which has a diameter of 20 millimeters and a similar thread, is required to connect to the neighbors' batteries.
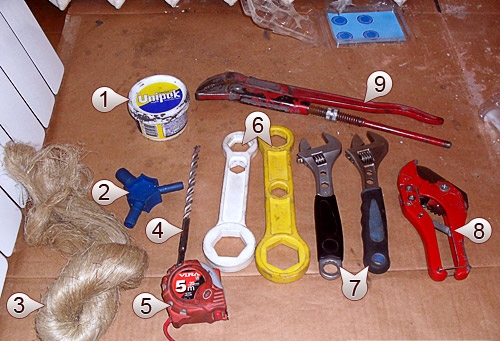
4. Preparing the necessary tool
At this stage, you just have to prepare all the tools for work:
- Soldering iron for soldering the pipeline (today, many stores rent this tool);
- Gas and wrench;
- Drill and concrete drill for attaching a new bimetallic battery to the wall;
- Bulgarian and disc for metal;
- Level;
- Marking pencil;
- Roulette.
If you could not agree with your neighbors, then you will also need a lehr for cutting on the pipe near the floor and under the ceiling of the external thread.
5. Dismantling the old battery
If you look closely at old heating appliances, you will see that they are usually connected to the pipeline using the so-called spurs - a finished long thread onto which a coupling and a lock nut are screwed, which will serve as an excellent place to connect a new battery. To dismantle the old radiator, do the following:
- To begin with, twist the locknut on the lower and upper eyeliner to the end of the thread.
- After that, arm yourself with a plumb line or level and determine the cut points. Set the tool so that at least 1 centimeter of thread remains on the pipe.
- It is very important to use the level, because if you ignore this point, then you will not be able to hang the new radiator evenly. And connecting heating radiators to crookedly cut pipes is quite problematic.
- Next, cut the pipes at the marked places and remove the batteries from the brackets. From the walls, remove the old brackets that hold the battery.
- If the new battery is different from the old one, proceed as follows. Cut the pipes to size and then weld or thread them. If the pipes are old, then it is better to use welding, because the pipe may burst along the seam when threading.
- If pipes need to be extended, then you can use an insert. You can use ecoplastic, having previously made the necessary turn of the pipe or soldered the missing length.
- Prepare the rest of the thread for further work. If necessary, trim the edge of the thread with a grinder, twist the locknut from the thread to get rid of burrs.
6. Marking the location of the radiator
You will mount the battery in the marked places. When marking the position of the radiator on the wall, consider the following points:
- The distance from the floor to the radiator should be 10-15 centimeters. If you place the battery lower, then there will be poor air flow through it. And wet cleaning will be inconvenient.
- Due to poor convection, it is not recommended to bring the radiator close to the window sill. The distance to the battery from the windowsill must be at least 15 centimeters.
- You can not press the battery very hard against the wall, as the heat output will deteriorate. The optimal distance is 3-4 centimeters. The distance to the battery from the wall is regulated by the screwing depth of the brackets.
7. Installation of a heating battery
The installation sequence for heating batteries is the same for all types of radiators:
- If you work in winter, then arrange with the maintenance service to turn off the heating riser for at least half a day. Usually it is not allowed to carry out such work during the heating season. But if a breakdown occurs, or the apartment is critical low temperature and children live, you will be able to obtain permission to replace the batteries.
- When the riser is turned off and the drain valve is open in the basement, proceed to the procedure. Equip the new battery with futor nuts, and the pipe connections with ball valves.
- Start with the faucets - wrap the sealing material properly around the threads. The main thing is that the connection is reliable, almost all masters use tow for these purposes. First, paint the thread well with any paint, except for water-based paint, then wrap tow on the thread. Wind should be clockwise, tight and with a cone that starts from the edge of the thread. Paint over the wound tow again abundantly.
- Then turn on the faucet. It should be twisted so that there are almost no threads on the pipeline. Saturate the excess tow with paint. After it dries completely, this connection will not leak, and it will be problematic to twist the tap itself.
- There are 2 internal threads on each side of the radiator for connecting the radiator to the system. Screw the fittings into these threads. On one side of the battery, install nuts with a left-hand thread, and on the other, parts with a right-hand thread. In order not to get confused, it is recommended to buy through nuts that allow you to connect the radiator in any position. Futor nuts in most cases are installed on paronite or rubber seals.
- After installation, fit the nuts additional equipment. In places where you will connect the battery to the pipes, install the mates of the "American". On the other side of the battery, put a plug at the bottom and a Mayevsky crane at the top.
- Install the battery like this. Pick it up and connect the faucet to the American. So you protect yourself from falling batteries during further work. Put something under the bottom of the battery.
- The battery is hung on the wall using special brackets. To accurately install them, you need to mark the place for attaching the brackets. To do this, use the level. Drill holes and install hooks.
- When all 4 brackets are installed in their place, the radiator can be finally hung in place, while tightening the nuts of the detachable connection with an adjustable wrench.
![]()
Here you have completed the installation of heating radiators. Start the heating system by first filling the riser with coolant from the bottom up and at the same time bleed the air on the top floor using the Mayevsky crane. Open the supply valve and check the assembly for leaks. If you carried out work in the summer, it is recommended to close the taps on the connections before the seasonal start of the heating system.
Proper installation of heating devices is a great way to ensure an optimal indoor climate during the cold season. Today we will talk about how to properly install heating batteries in an apartment. This work cannot be called too difficult. It is only important to strictly observe all the rules and nuances of installation.
How to choose a radiator?
The range of heating devices on the market, frankly, is impressive. A variety of batteries are presented - from budget to exclusive options. However, the principle “the more expensive the better” does not always work. Secret right choice- in the ability to find the option that is optimal for you.
Here are the factors to consider when buying:
- Type of housing (apartment in high-rise building, a private house).
- Distribution of the heating system.
- How to install the heater.
- Temperature regime in the heating system.
- The material used to make pipes.
- The location of the apartment in the house.
- The need for control devices and fittings.
Depending on the material of manufacture, there are such options.
Cast iron
Today's cast iron batteries do not resemble the heavy bulky "accordions" of the times Soviet Union. These are flat panels of quite modern design. Cast iron retains heat for a long time and has good heat dissipation. Cast iron batteries last long enough: from 20 to 50 years.
Important! The main disadvantage of cast iron products is a large mass. The weight of one section is 8 kg. For this reason, they cannot be mounted in rooms with wooden or plasterboard walls. In addition, due to the roughness of cast iron, radiators are quite difficult to clean from contamination.
Aluminum
By design, they are not much different from cast iron products. The main difference is the mass of sections (one section weighs 1 kg). Like cast iron, aluminum has good heat dissipation properties. You can fix such batteries on walls made of any material.
Important! The main disadvantage is the susceptibility to corrosion from a chemically aggressive coolant and sensitivity to water pressure surges.
Bimetallic
Bimetal design is a kind of compromise between cast iron and aluminum. Outwardly, they resemble aluminum, but are chemically neutral with respect to aggressive aquatic environment and are insensitive to pressure drops in the system. Very easy to install, have good heat dissipation, affordable.
Steel
Steel radiators have a modern design and excellent thermal properties. There are practically no drawbacks to the steel structure, except that they do not tolerate water hammer.
How to install a heating radiator with your own hands - preliminary steps
Before starting the installation work, it is necessary to coordinate the installation scheme with the specialists. This will allow you to properly install and effectively heat an apartment or house. Preliminary work are performed in this order:
- Turn off the water in the apartment and near the installation site.
- Drain the area where the radiator needs to be replaced.
- Blow out the pipes, drain the remaining water.
- Install a new battery in accordance with the manufacturer's instructions and recommendations.
- After heater installed, test it for leaks.
Rules for installing batteries, in accordance with SNiP
Correctly install heating batteries in the apartment in accordance with the following requirements:
- It is necessary that the centers of the window and the radiator coincide. The error value should not exceed 20 mm.
- The width of the battery should be 0.5-0.7 of the width of the window sill.
- The height of the battery above the finishing flooring must not exceed 120 mm.
- The distance from the top of the battery to the window sill should not exceed 20 mm.
- The interval between the battery and the wall is from 20 to 50 mm. This distance can be reduced if the wall is treated with a heat-reflecting material.
Aluminum Construction:
- Assemble the device first.
- Screw in the plug, install thermostatic and shutoff valves.
- Install Mayevsky crane.
- Mark the places for fixing the device on the wall.
- If necessary, treat the wall with heat-reflecting material.
- Attach the brackets to the wall.
- Hang the battery on the brackets by placing the hooks between the sections.
- Connect the radiator to an autonomous or individual heating system.
Important! On sale there are 2 types of radiators for different types buildings: designed for a pressure of 6 atmospheres (for autonomous heating systems) and devices designed for pressure up to 16 atmospheres (used for installation in high-rise buildings).
Features of the installation of cast iron and bimetallic structures
The installation procedure is almost the same as for aluminum batteries:
- It is recommended to install the appliances at a slight slope to avoid the accumulation of air in the radiator (this leads to a decrease in heat transfer).
- Before installation, unscrew the device, check the nipples, then assemble it together.
- In houses with wooden walls, brackets alone cannot be used. The battery is installed on floor stands, and the brackets play the role of additional support.
In this article, we have analyzed all the nuances regarding how to properly install heating batteries in an apartment. We hope you managed to cope with this task efficiently, and in winter there will be no problems with heat.