
At what height to hang cast iron batteries. Installation of heating radiators
During the construction and preparation for operation of any building intended for people to live and work in it, fixing heating radiators to the wall becomes one of the most important stages. To do the job correctly, the master must not only know how to fix the heating radiator, but also understand the types of batteries, mounting options, types of fasteners, pipeline connectors and other subtleties of this procedure.
The main indicator of the quality of radiators is the indicator of their heat transfer. It entirely depends on the material from which the heater is made. The most popular are:

Installation of radiators
Those who are wondering how to hang a heating radiator without the help of professional plumbers need to know what steps this process includes. So, it is necessary:

We purchase the necessary materials and equipment
 To begin with, it should be noted that it is not recommended to install radiators in winter. And even if you decide to install heating on your own, in any case, you need to call a plumber who will disconnect your apartment from the riser. To fix the radiator on the wall, you will need such accessories for heating radiators as: corners, bushings, nipples, brackets, shackles, couplings, adapters, tow, valves, keys.
 If you plan to install cast iron batteries, it is also necessary to purchase Mayevsky taps designed to bleed air from the heating system and prevent airing. Aluminum and bimetal radiators equipped with them from the start.
Calculate location
This stage is important so that the heater works at full strength and does not collect air. For this, sections of underwater pipes should be installed at a slight slope relative to the floor. The minimum slope is 0.5 cm. Here are the optimal battery location options:

If the selected battery type is the same high heat transfer, you can also install a heat-reflecting tap on the wall behind the battery. Usually it is made of insulating material or a special heat-reflecting substance that is applied to the wall.
Installing the brackets
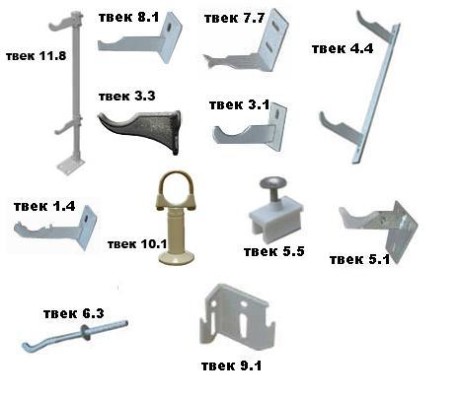 Brackets are called fasteners for heating radiators in the form of durable metal hooks installed inside the wall. It is easy to calculate the number of brackets: 1 piece per 1 m2 of battery. Of course, even if the entire battery area does not exceed 1 square meter, two brackets will still be needed, since fixing the structure on one will be very unreliable.
Now you need to mark their location: we use a tape measure and a level for this.
Then we drill holes in the wall, install special dowels in them, tighten the fasteners for heating radiators and use our hands to make sure that the brackets sit tight and do not hang out. If the choice fell on cast iron batteries, you may need a special mount for cast iron radiators heating - floor supporting elements in the form of legs. They will help evenly distribute the weight on all fasteners.
Installing the radiator
The last stage of the installation of the radiator. We hang the battery and check how tightly it sits, whether the mass of the structure is equally distributed on all fasteners. Try to shake the radiator a little: if the fixation is strong enough, you can proceed to the next step.
Connecting and assembling connections
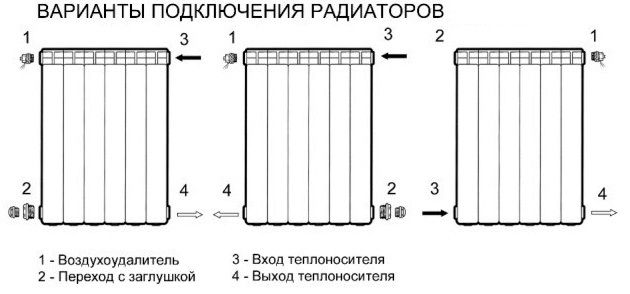
There are three different schemes for connecting radiators:
Let's start assembling the connections. Regardless of which fittings for heating radiators are purchased, it is necessary to carefully seal each connection.
Any leak can literally and figuratively result in additional repair costs.
 Special tapes, silicone, sealant or good old tow are used as seals. If the purchased battery is protected by a special film, it is better to remove it only after carefully pressing each connection.
Now it remains only to return the water supply to the heating system and carefully check all connections for leaks.
To maintain warmth and comfort in the cold season, when outside the window is rain and slush, or snow and frost, each room needs heating appliances. An excellent choice would be aluminum heating radiators, which are manufactured in accordance with all the rules of SNiP. These heaters are light, durable and reliable, and also have a beautiful design.
Advantages of aluminum over other materials
The main advantages of aluminum are:
1. High thermal conductivity. Reduces heat loss, saving money.
2. High plasticity. Significantly reduces manufacturing costs.
3. Low cost of the material, and hence products from it.
4. Light weight.
5. Ergonomics.
6. Easy to install, replace parts and maintain.
7. High working and crimping pressure.
There are two types of aluminum batteries:
Cast radiators. The advantage of this type is the design of the "setting" of sections.
Extruded Radiators. These are high-quality batteries, the surface of which is homogeneous, which excludes pores and microcracks in the structure. Radiators of this type are highly durable. The guarantee that there will be no leakage between the sections is the side sections, which are closed.
Thanks to modern technology production, radiators are produced not only in standard white, but also in others, which is an excellent quality that will help fit the battery into absolutely any interior.
Aluminum heating radiators can be installed in single-pipe and two-pipe systems. To connect the radiator to a single-pipe system, adapters do not need to be used. The standard assembly of the battery is 6 sections, but assembly from 2 to 12 sections is allowed. To prevent damage, the batteries are packed in a special protective film made of polyethylene, then placed in a cardboard box.
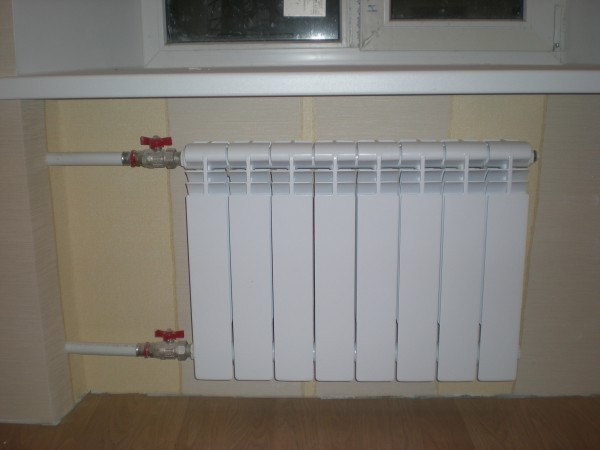
When installing the radiator, it must be taken into account that the distance from the wall should be at least 30 millimeters, and from the floor - at least 120 millimeters. If the battery is installed in a single-pipe system, then it is impossible to close the radiator valve for a long time. On the supply - return of the battery, it is desirable to install shut-off and control valves, which are necessary to regulate heat transfer in automatic and manual modes. During installation, first of all, it is necessary to mark the places where the brackets will be installed. Do not install the battery too low, because heat dissipation will be impaired. It is also not recommended to install a decorative curtain or screen in front of the radiator, this will also adversely affect heat transfer.
In what areas are aluminum heating radiators used?
Today it is aluminum radiators that are in the greatest demand. They are installed almost everywhere where autonomous heating systems. But for central heating this type of battery is not recommended. Supplied with each battery detailed instructions, which indicates all the qualities that the coolant must have. The pH should be between 6.5 and 7.5 units (chemically neutral water). Central heating systems have a different pH balance.
How many sections to choose?
When you nevertheless decided to change your old battery to a new one, and the choice nevertheless fell on an aluminum radiator, the next question arises: “how to choose the required number of sections?”. Each section can warm 1.5 - 2 square meters, you just have to do simple calculations - divide the area of your room by 1.5 meters, the result will be the number of sections.
Every professional builder knows that when organizing various installation works, certain postulates-rules should be followed, which can be conditional and legalized by various certified documents such as GOSTs and SNiPs.
Rules and recommendations on how to install the structure exist on any, even a small part, respectively, they are also for organizing heating, including the installation of radiators - the heating elements of the system.
How to choose batteries for the room
 The volume of batteries should be enough to heat the room
 Heating system is a complex structure, therefore, it as a whole and its individual elements, such as heating radiators and pipes, require correct installation and the appropriate choice of product suitable for a particular room.
Regarding the radiator, there are recommendations for laying pipelines, the height of the radiators (observing the distance from the floor) and their correct location.
 As a rule, radiators are installed in places of greatest heat loss.
 As for the choice of the place of installation of radiators, then, as a rule, these are places with the largest heat losses. In almost all houses or apartments, such places are windows and doors, regardless of the use of new technologies. It is not always possible to install a radiator above the door, so they are often mounted under windows.
To prevent dampening of the wall under the window, and warm air is evenly distributed over the lower part of the room, and then rises, it is necessary that the dimensions of the heating radiator make up 70-75% of the window in this room.
A small heater will not give a significant heat transfer, and there will not be enough heating in the room.
Rules for installing radiators
 If the radiator is under the window, then install it strictly in the middle
 For heaters, not only the size is a reference requirement, but there are a number of other recommendations that should be followed both when choosing a heating element and when performing installation work.
These requirements include:
- the heating device must be installed strictly in the middle of the window, equally spaced from the edges;
- the installation height of radiators from the floor should not exceed 15 cm, otherwise cold zones will form above the floor, and if you lower the heater below 8-10 cm from the floor, then it will be problematic to clean under such a device;
- radiators should be at a distance of 12-18 cm from the window sill, if the device is placed closer, then there may be a loss of heater power due to the influx of cold air from the window opening;
- the distance from the rear wall of the device to the wall covering should be 3-7 cm, this is necessary for proper air convection.
It should be remembered that if the radiator is brought as close as possible to the wall, then the gap will be a “dust collector”, and besides, the device during the heating period can not only spoil the outer wall finish (wallpaper), but also destroy the wall structure - plasterboard.
Performing installation work
 Before performing installation work, and choosing at what distance from the floor and wall the heater will be installed, it is necessary to stick aluminum foil on the wall at the approximate installation location of the device to increase heat transfer and efficiency (coefficient of performance). After that, you can mark up the fasteners.
You should be aware that there are several options for connecting radiators to the heating system, you can see some of them from the diagram table.
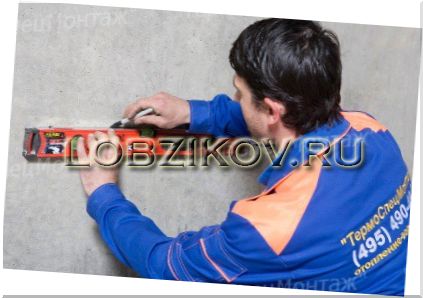
 A medium-sized radiator is hung on 2 brackets
 When hanging a radiator, all planes should be checked, since the heat transfer of the device depends on the observance of the verticality and horizontality of the heater.
For medium-sized heaters, 2 brackets are installed so that they go between the extreme sections, but if the radiator is large, then an additional hook is installed strictly in the middle opening of the radiator. How to hang a radiator, see this video:
 Bypass allows you to regulate heat
When connecting radiators, there are also a number of features and requirements that must be observed. One of these requirements includes the rule of installing a jumper (bypass) between pipes in a single-pipe distribution system, which will make it possible to independently regulate the required amount of heat in the room. The main advantage of the bypass is that the basis for its installation does not need to be legalized, and the installation process can be done independently.
It should be remembered that all the rules for installing radiator systems are the same as with individual heating as well as central heating. If you are going to install new heating elements, then you should take permission for this action in management company or ZhEK.
 Summing up the article, it should be said that the choice and installation of a heating radiator is not an easy task.
All the activities, requirements and recommendations for the installation of heating elements of the heating system indicated in the article can serve every owner who decides to install radiators on his own and organize a heating system in his house or apartment.
A few days ago I got a call from my old client, let's call him Andrey, for whom I recently changed batteries, with an unusual question.
The crux of the matter was this: he and his friend decided on one's own replace old batteries. How, and what is needed for this, they knew in a nutshell, and Andrei generally observed my actions when I worked. If there was something incomprehensible, he always asked, and I didn’t hide much, told him in detail the features of the work. But, here's how to make the markup correctly and make sure that the centers of the axes of the radiator and the pipe coincide - they didn't notice. That is why they contacted me.
To be honest, I didn't expect this at all. I did not expect that someday someone would need it and would have to explain by phone how to make the markup. I never thought it would be so difficult. Of course, everything looks simple to me: I removed the old battery, marked it out, drilled holes, drove brackets into them and hung the radiator. But everything is simple only for me, a person who changes batteries almost every day, as, for example, for each of us in the morning to wash
In the evening, Andrey sent a letter of gratitude and photos of the work done. It turned out great, just as good as mine.
This life episode is firmly embedded in my memory. Probably, Andrey is not the only person who faced such a problem. Therefore, I decided to tell in more detail how I mark and install brackets for aluminum or bimetallic radiators.
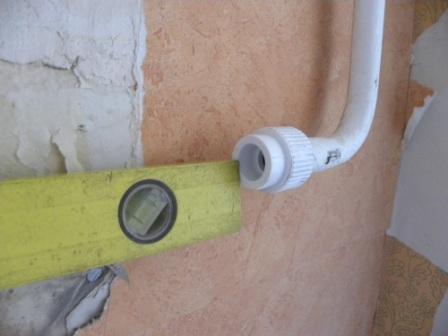
How to prepare for replacing the radiator, what is needed for replacement and what tool is needed, I wrote here. I won't repeat myself, but I'll get straight to the point. Having dismantled the old battery, we will see the following picture:

On a horizontal pipe, we unscrew the couplings, if there are no couplings, we cut the threads and install transitional connections. In this case, the replacement is polypropylene pipes. I use flax and Unipack paste as a sealing material for threads.


Now we substitute the radiator to the window. Someone likes it when the radiator hangs in the center of the window, someone moves it closer to the edge. How exactly to put - the choice is yours.

Personally, I like it when the radiator hangs in the center.
By the way, the question is often asked: how many brackets are needed for a radiator? Practice has shown that for aluminum radiator up to 12 sections - three fastening points are enough: two from above and one from below. And if there are more than twelve sections, then four attachment points will be needed. And yet, bimetallic radiators are heavier, so such radiators up to 10 sections are installed on three brackets. Well, if more than 10 sections, then four.

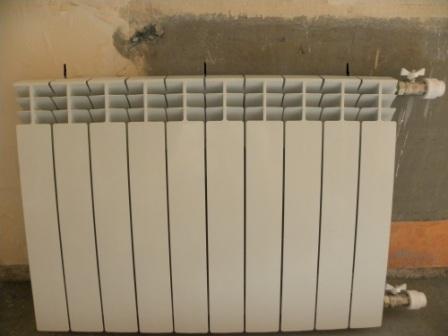
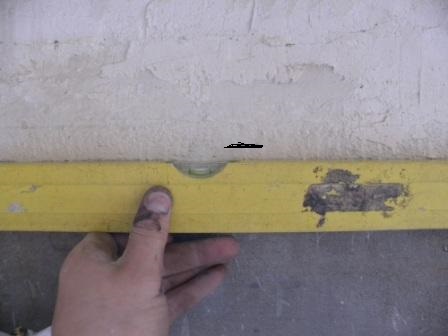
We remove the radiator to the side, we do not need it yet. We take the building level, substitute it to the center of the horizontal pipe, on which the adapter was previously installed, and make a mark on the wall. It is not necessary to calculate the center with a ruler, it is enough to determine by eye.
![]()
About one centimeter, below our mark, we draw a horizontal line. Brackets will be installed on this line. Why below? To ensure that the centers of the axes of the radiator and pipe coincide.
Now we draw vertical lines to this line. It will turn out like this:

It remains to note the location of the lower central bracket. We mark 50 cm from the top line and make a mark.

We drill holes, insert dowels and twist the brackets into them. Of course, the brackets can simply be hammered in, because as folk wisdom says: “A hammered self-tapping screw holds better than a twisted nail”
![]()
The bracket for the radiator is best to choose flat, with a dowel. Unlike other brackets, these brackets allow you to easily adjust the distance of the radiator from the wall and align it in planes.


If necessary, align the radiator by bending the bracket up or down.

When adjusting the radiator, do not forget to follow the axes of the radiator and pipe, they must be at the same level.

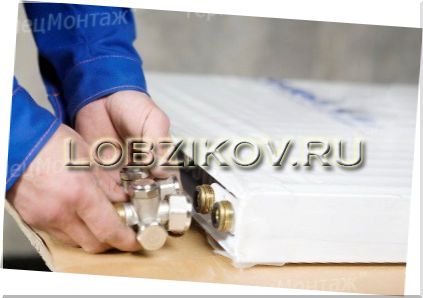
Of course, before you hang the radiator on the brackets, you need to "assemble" it, i.e. install fittings, valves and adapters.
After all the manipulations, you will get a radiator correctly installed along the axes. Ready for connection and further operation, but this is completely
P.S. All the same, replacing heating radiators requires certain knowledge and skills, as well as a set of necessary tool. If you don’t have either of these, but you still want to replace the radiators, you can contact me for help. To do this, just call 903-36-05, send an email [email protected] or leave a request on the Golden Hands website and I will call you back myself.
We decided to demonstrate how to properly install a heating radiator in a room. To hang a radiator, you need to have a wall at the place where the radiator is attached, “brought to zero”. For finishing (painting or pasting behind the wallpaper radiator), the radiator can be removed, it is important that the radiator mounts remain in place and are not transferred. Installation is carried out at a slight inclination to avoid air accumulation.
A good example of installing a heating radiator
For example, we chose steel panel radiator firm "Buderus" Germany. This model has a bottom connection and a built-in thermostatic valve. The “Buderus” radiator has a very high-quality packaging made of durable plastic, protective corners (blue) are put on the corners of the radiator.


We connect pipes
Now you can connect pipes from the manifold to the radiator. But we propose to first install a certain unit, the so-called "multiflex", which has shut-off inserts, fittings for adjusting and draining the coolant, can interchange the direct line with the return line (depending on the model).
Also, the multiflex can be straight (pipes from the floor) and angular (pipes come from the wall). This material shows a direct multiflex, but in the work we often install corner options.

![]()


Installation of fasteners
Attachment is screwed on. Moreover, in standard situations, the mount is fixed using one self-tapping screw that comes with the mount.

It should be noted that there are several models of mounts for Buderus radiators, which are ordered separately depending on the selected radiator model and the type of surface on which it is supposed to be installed.


Some models of "Buderus" radiators have a feature: they are double-sided. That is, they can be hung with a multiflex to the right, or to the left. It is only worth removing the top cover and throwing the "tongues" to the opposite side.
