
Where to mount the expansion tank in the heating system. Do-it-yourself installation of an expansion tank for a heating system
Despite the fact that he mounting expansion tank heating systems very simple, some mandatory requirements is still here. And these requirements are very significant for reliable operation. heating system. Here we are talking about them below.
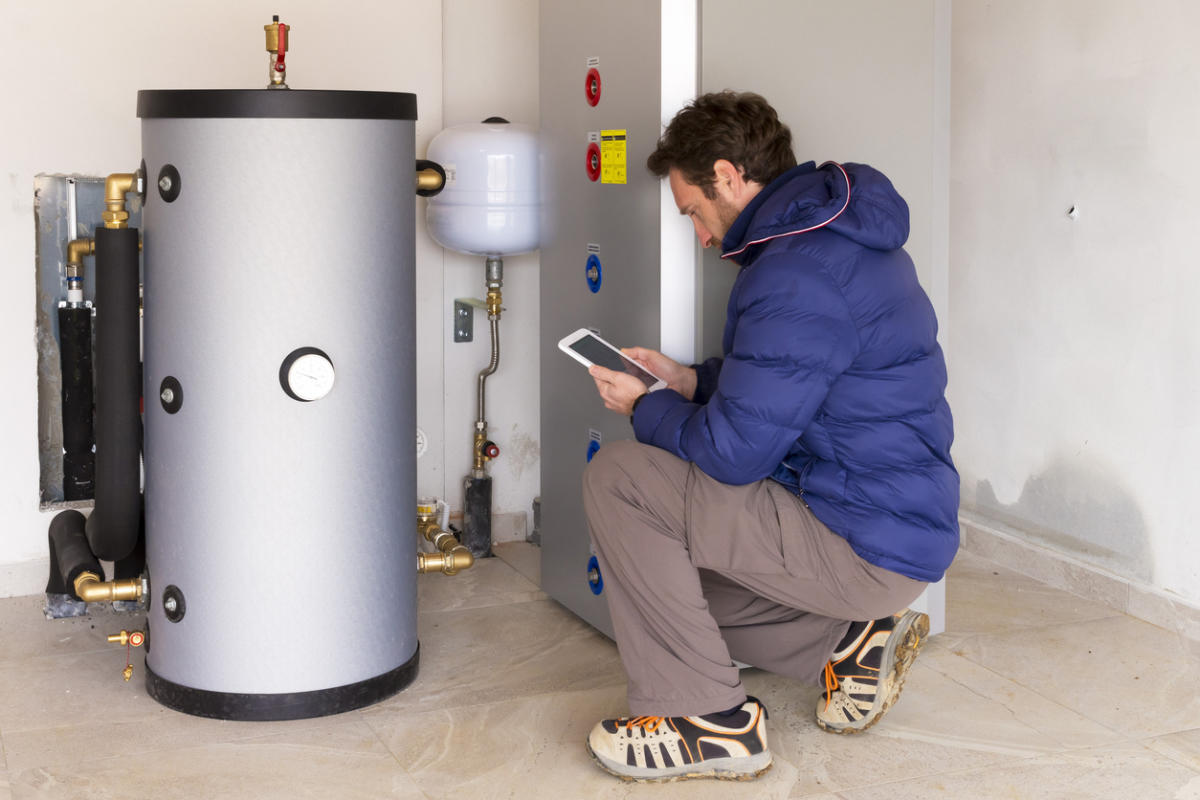
How to properly install the expansion tank?
The tank can be mounted horizontally and vertically, “upside down” ... this will not affect its operation.
The expansion tank is mounted to the wall with special clamps in the following way:
As you can see, the tank is unpretentious in installation. The only requirement, the observance of which will make your life easier, is that the expansion tank should have fairly free access for maintenance.
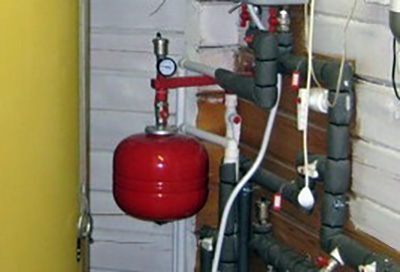
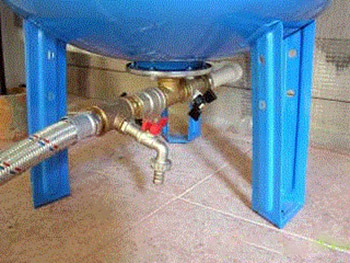
The photo shows the installation of a floor expansion tank: 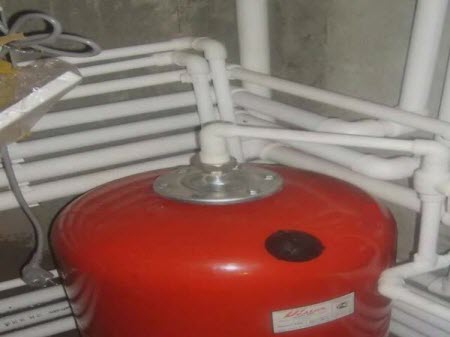
It can be seen that the tank is connected to the main pipeline with a bolted flange. This option has an invaluable plus: if the diaphragm is damaged, the flange unwinds and only the diaphragm is replaced, and you do not need to buy a whole new tank. There is a saving of money (it is clear that this applies to tanks in which the diaphragm is a pear).
Where to install the expansion tank?
Where is the best place in the heating system to install an expansion tank? In fact, it is possible in any place where they will not stumble on it, and at the same time, it is easy to approach it.
And yet there is the most preferred place: on the return line between the circulation pump and the boiler.
Errors when installing the expansion tank
Despite the ease of installation, errors are possible even here. The main thing is to release air from the tank.
Attention! It is impossible to release air from the expansion tank!
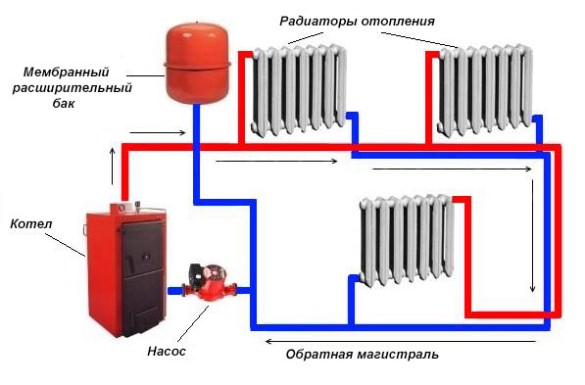
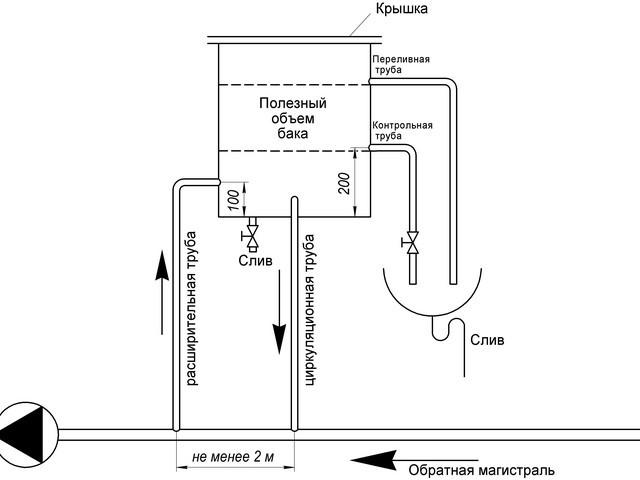
Expansion tank installation diagram
The installation of the expansion tank is carried out according to the following scheme:
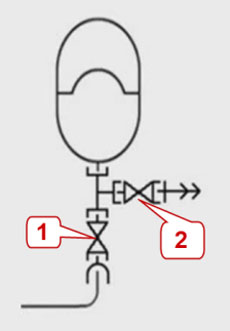
In this variant, the tank can be serviced while leaving pressure in the rest of the system.
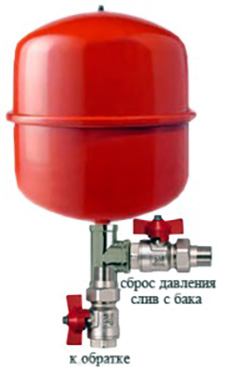
The expansion tank is connected to the main pipeline by means of a pipe on which ball valve(1) - in case of replacement or repair of the tank. At number 2 in the diagram is a drain valve, which is necessary for the convenience of servicing the tank.
Ball valves here are the most common, for example, these: 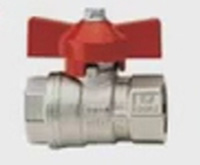
How to maintain an expansion tank?
Before starting work on the tank, turn off the boiler!
Next, close the valve (1; see the diagram above). Open the cock (2) to drain the remaining coolant from the tank. Then we measure the pressure in the tank with a conventional car pressure gauge (just attach the pump with a pressure gauge to the nipple and look at the readings). If necessary, pump up, bringing the pressure in the expansion tank to desired value. After the pressure in the tank is raised, close the valve (2), open the valve (1). Everything. You can turn on the boiler.
Important! The valve (1) must be open before starting the heating system and during its entire operation!
What happens if the valve (1) is closed? It’s easy to guess: the coolant will have nowhere to expand - the pressure in the system will increase - the coolant will begin to drain through safety valve or - if it fails - either the pipeline or any equipment will be destroyed.
It turns out a dilemma: on the one hand, the tap is needed to service the expansion tank, on the other hand, they forgot to open it or the children played and closed it, and the heating system “flew”. The solution is simple: we put the tap, open it, but remove the “lamb” (handwheel) from it.
Expansion tank installation conclusions
Since this is the final article on expansion tanks, we will briefly summarize.
In order for the operation of this device not to cause problems, it is necessary.
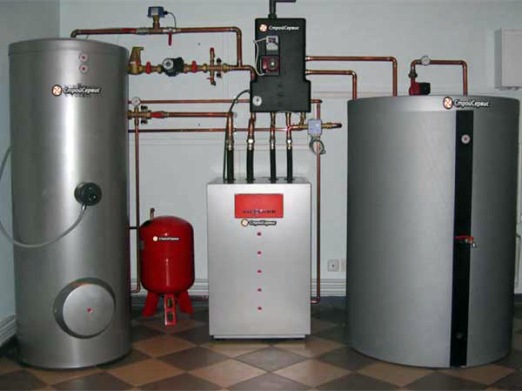
You have successfully selected and purchased a tank membrane type to your heating system. It's time to install it, and then a lot of questions arise: where to put it, how to connect it, and so on. There is a lot of advice on this topic on the Internet and everything is contradictory. In order to clarify all the controversial points and consider in detail how the expansion tank is installed correctly, we bring to your attention this article.
Where to put the expansion tank in a closed heating system?
By the way, in private houses there are no open and closed systems, there are gravity and pressure (pumping). In the first, water moves due to the difference in specific gravity (natural circulation), and in the second, it is forcibly induced by the pump.
For reference. open system works simultaneously for heating and hot water supply, it is used only in large centralized networks. That's why everyone individual systems- closed.
To properly install the expansion tank in the heating system, the following requirements must be met:
- the location of the tank is the furnace room, not far from the boiler;
- the device must be in a place where it will be freely accessible for configuration and maintenance;
- in the case of mounting the tank to the wall on the bracket, it is recommended to maintain a height convenient for access to its air valve and shutoff valves;
- the supply pipe together with the taps must not load the expansion tank with its weight. That is, the eyeliner should be attached to the wall separately;
- the connection to the floor expansion tank for heating is not allowed to be laid along the floor across the passage;
- do not put the container close to the wall, leave enough clearance for inspection.
Tanks of small capacity may be suspended from the wall, provided that its bearing capacity is sufficient. As for the orientation of the tank in space, there is a lot of conflicting advice. Some recommend an installation method in which the pipe is connected to the tank from above, and the air chamber, respectively, is located below. Rationale - it is easier to remove air from under the membrane when filling, water will force it out.
![]()
In fact, in its original state, the rubber “pear”, pressed on one side by air pressure, leaves no room for it on the other side, as shown in the photo above. Installation specialists just advise installing the expansion tank with the connecting pipe down, and only in this way. In some models, the fitting is initially located on the side wall, in its lower part, and it is impossible to put the vessel in a different way (see photo below).
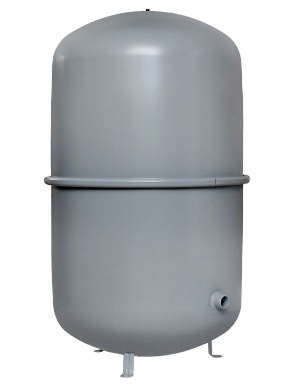
It's easy to explain. The device will function in any position, albeit lying on its side. Another thing is that sooner or later cracks will appear in the membrane. When the membrane expansion tank is installed with the air chamber up and the pipe down, the air will penetrate through the cracks into the coolant very slowly and the tank will still last for some time. If he stands upside down, then the air, being lighter than water, will quickly flow into the chamber with the coolant and the tank will have to be urgently changed.
Note. Some manufacturers offer to install the expansion tank of the heating system, just hanging it "head" down on the bracket. This is not prohibited, everything will work, only in the event of a membrane malfunction, the unit will fail immediately.
How to connect an expansion tank
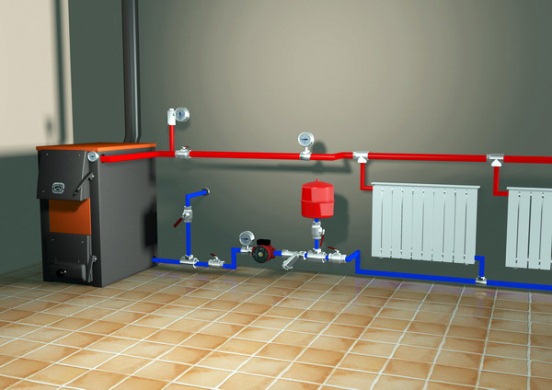
After the container is securely fixed to the wall or fixed to the floor, it is necessary to correctly connect the expansion tank to the heating pipelines. To do this, you need to outline the route for the pipe, passing the shortest path to the connection point. It's believed that the best place connection for closed membrane tanks is located on the return pipe. Only not before the very entrance to the boiler, but before the circulation pump (if it is not installed at the supply) and the accompanying stop valves. The expansion tank installation diagram is shown below:
There are several reasons for this notion:
- in the return, the temperature of the coolant is much lower, which will extend the life of the membrane;
- if the place of installation and tie-in is on the return pipeline, then circulation pump works in comfort mode;
in the supply pipeline solid fuel boiler critical pressure and steam-water mixture may occur due to overheating for various reasons. If this mixture gets into the rubber "pear" of the container, it will stop performing its functions.
In fact, practice shows that there is no big difference between supply and return for connection. It is simply accepted to connect the expansion tank to the heating system through return pipeline so more reliable. But what definitely does not hurt is a shut-off ball valve on the eyeliner, and even better - a fitting for emptying and a second valve. Then at any time the tank can be cut off from the system, drained of water and removed for repair or replacement.
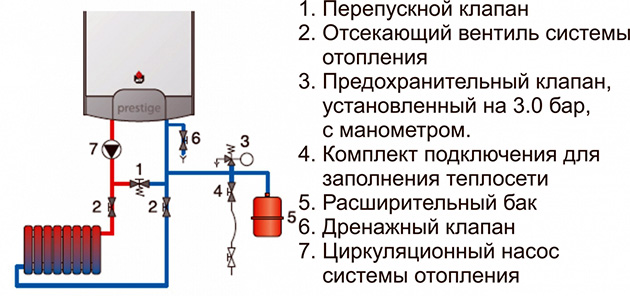
Advice. For those whose gas boiler is not equipped with a pressure gauge or a safety group, it would be useful to build it into the expansion tank circuit using the following installation scheme:
Setting instructions
After mounting and inserting the device into heating network you need to configure it. It is to provide the necessary pressure in the air chamber, corresponding to your system. This is necessary to avoid water hammer in the network, they can be created by the tank membrane during the cooling of the coolant and pushing its excess out of the chamber. The operation is performed in the following sequence:
- when the installation of the closed tank is completed, the system is filled with cold water;
- with the help of Mayevsky valves and taps, air plugs are removed from pipes and radiators;
- the pressure gauge measures the pressure in the system, and then in the air chamber of the tank;
- by bleed or boost, the pressure in the chamber is set to 0.2 bar lower than the pressure in the system.
Now that it's done correct installation expansion tank with subsequent adjustment, you can start the boiler. The pressure in the tank will increase equally smoothly during heating and cooling of the coolant.
Conclusion
In principle, the installation of a compensating tank is not too complicated a procedure. Any special tools or fixtures are also not required, just the usual set that every zealous owner has. But in order to install a tank in the heating system and set it up, you need to be more careful and not skip any little things. Then the device will last a long time and without problems.
Often they ask themselves the question of how to properly install an expansion tank. And it will be more useful to figure out what an expansion tank is in general and why it is needed.
Therefore, we will do everything in order, and first we recall the lessons of physics.
Physical properties of water
One of physical properties water - almost zero ability to compress. This means that when you try to reduce its volume (that is, compress), there is a sharp increase in pressure.
And water (like other materials) can increase its volume when heated. This property is called thermal expansion. Near the water, it begins already at a temperature of +4°C. However, when the temperature drops below this mark, the water also begins to expand. This phenomenon is called water paradox. At a temperature of +4°C, water has the highest density: the weight of one liter is equal to one kilogram.
However, for heating systems, this paradox is not important, because the temperature of the water supplied by the boiler to the radiators is much higher.
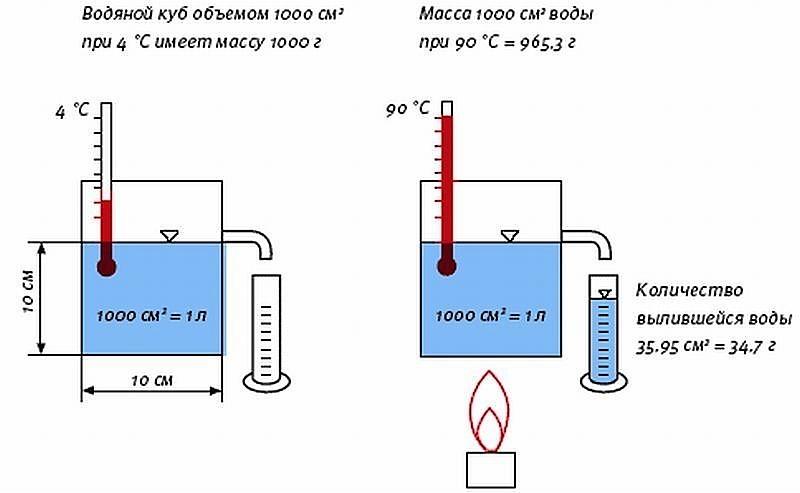
Let's take a container with an overflow, which limits the volume to 1000 cubic centimeters. Pour one liter of water into it, having a temperature of + 4 ° C, and then proceed to heating. The density of water will begin to decrease, and the volume will increase.
Since the overflow limits a known volume, excess water will spill out. When heated from +4°C to +90°C (normal water temperature in the heating system), this excess will be 39.95 cm³ (or 34.7 grams). It is this process that occurs in the heating system when the boiler heats the water.
What is an expansion tank
Recall: if we are trying to compress water (that is, in our case, to fit the increased amount of coolant into a given volume of the heating system), the pressure increases. So that the excess water formed during heating does not spoil the pipes and appliances, you need to drain it somewhere, as in a measuring container in the experiment.But we cannot drain the water from the heating system. This means that the excess must be temporarily “put aside” in some kind of “pocket”, so that later, when the water temperature drops and its density rises, it returns to the system, and the water occupies the same volume as it was originally.
In the heating system, such a "pocket", which receives excess water formed during thermal expansion, is expansion tank. Its task is to be a pressure damper (compensator) in the system.
Open and closed expansion tanks
Expansion tanks can be of open and closed type. That is, communicating with the atmosphere or with a controlled, albeit changing, pressure.
Open expansion tank
The beaker from the described experiment, into which excess water has poured out during thermal expansion, is the simplest open expansion tank. Its disadvantage is that the spilled water must be returned to the system manually. Simply put, pouring back into the container in which the water was heated.Naturally, such a primitive method is not suitable for a heating system. So the expansion tank open type for heating schematically looks like this:
Schematic arrangement of an open-type expansion tank. Illustration from the book by Scanavi A. N. and Makhov L. M. "Heating"
An open expansion tank can either be bought ready-made or made independently. Any container of the required volume is suitable for this, for example, a plastic canister.
Expansion tank closed type
Now more often they try to use closed tanks: they are more compact and devoid of the negative features of open ones, which are characterized by freezing, saturation of the coolant with oxygen, and increased corrosion. Tanks of the closed type are hermetic and consist of two chambers: water and air.
Pressure compensation occurs as follows: excess water fills the water compartment and presses on the elastic partition between the two chambers, and the air (or gas) in the air compartment is compressed. Unlike water, gas can be subjected to significant compression without a strong increase in pressure.
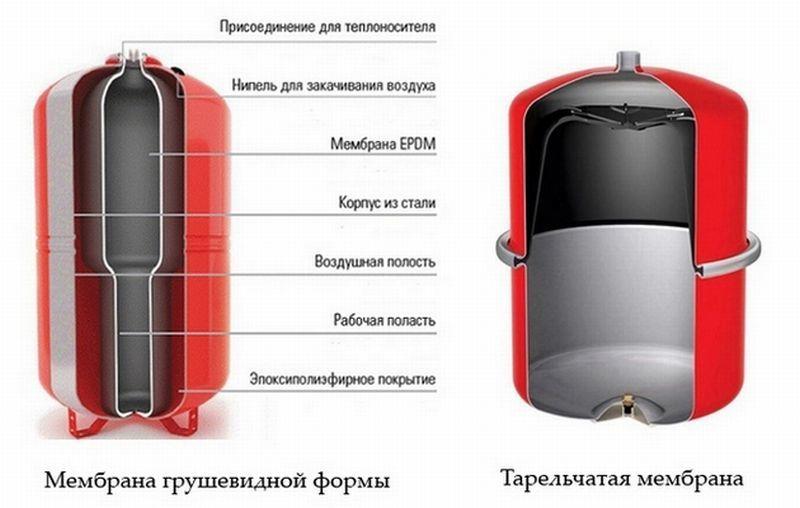
Varieties of expansion tank membranes. Photo from profiteplo.com
There are two types of closed expansion tanks on sale, differing in their design:
- with a plate-shaped membrane;
- with pear-shaped membrane.
How to install an expansion tank in a heating system
Having dealt with theoretical foundations and types of expansion tanks, let's move on to the main question: how to properly install an expansion tank in the heating system. Or rather, where.
The correct answer to it is wherever you want. That is, the expansion tank can be installed both on the "supply" - the main line of the system leading from the boiler to the heaters, and on the "return" - the pipe through which the coolant returns to heating device(boiler), giving up its heat to the radiators. In any case, it will perform its function as a buffer that restrains the growth of pressure.
![]()
Both methods have their pros and cons. The installation site is chosen, focusing on the design features of a particular heating system. As well as ease of installation and subsequent maintenance.
Nuances
An open tank, unlike a membrane tank, can be installed in a system with natural circulation water, that is, in non-volatile - not requiring electricity. A forced system requires a pump. Therefore, an open expansion tank is installed at the highest point, located above all heating appliances.
Most often, such a point is located on. Today, when the under-roof space in private houses is also used, arranging living quarters there, this option often turns out to be inappropriate.
There are no restrictions on the placement of a closed tank. He can stand in any convenient place and in any position.
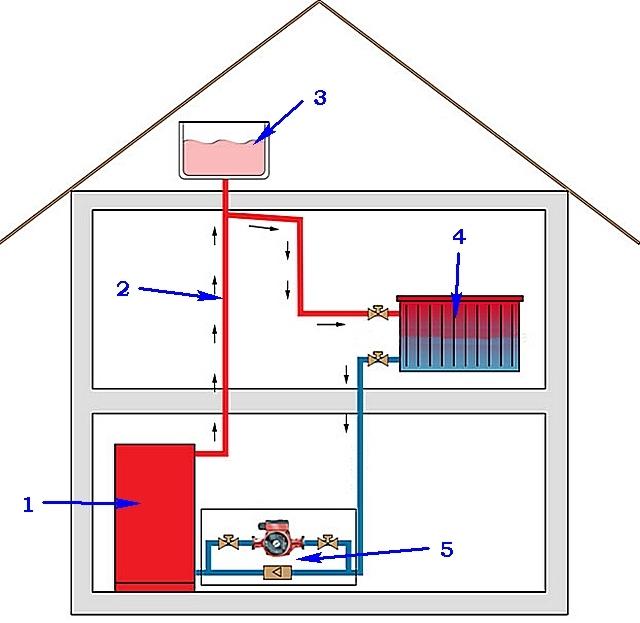
Scheme of installation of an open expansion tank. 1 - boiler, 2 - coolant supply line, 3 - open expansion tank, 4 - heater, 5 - pump unit. Photo from the sitestroim-svoi-dom.ru
Although the membrane tank can be installed both before and after the heaters, it is usually installed according to the second scheme (on the "return"). Because after the boiler, water is usually supplied very high temperature, from which the tank membrane may soon become unusable. In addition, with this installation option (after heating devices), the boiler and pump are not subject to pressure surges and work in a more comfortable mode.
It should be noted that if the pump in the system is external (not built into the boiler), then the compensating tank must be installed before the pump, and not after it. Otherwise, the expansion tank will react to the overpressure created by the pump and work incorrectly.
By the way, do not rush to choose and buy an expansion tank. First, check if your boiler is already equipped not only with its own pump, but also with a compensating tank located in the boiler body.
General rules
Having determined the hypothetical location of the expansion tank, choose the correct location for its actual installation.
- the compensating tank must be installed so that it is convenient to maintain it: between the tank and the wall or other equipment, free space must be left;
- water supply fittings should not press or pull on the tank nozzle: fix the supply pipes separately; it will also simplify the dismantling of the tank if necessary;
- for dismantling and repair or replacement, install a separate shut-off valve in front of the tank.