
Roof chimney insulation: how to install it correctly. TD Master. Chimney installation instructions. Stainless steel chimneys
The main difficulties most often arise during the installation of internal chimneys, when it is necessary to equip the passage of such structures through the roof and floors. The second option is not so complicated in its execution, since it must be supported by compliance with fire safety rules. As for the arrangement of the chimney through the roof, in this case it must not only be safe from a fire point of view, but also be sealed from moisture.
Moisture is the main problem
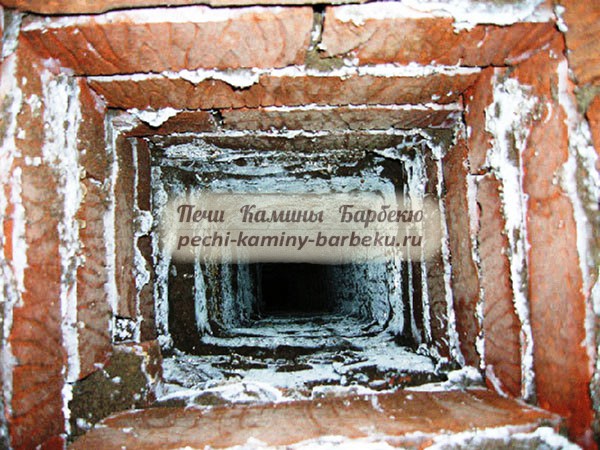
The penetration of moisture into leaky chimney openings allows the formation of dampness, which leads to mold and further destruction of the roof. In order to protect your home and chimney channels from this problem, you need to competently and carefully carry out each stage of the installation of the chimney passage through the roof.
The relationship between the chimney and the passage
Carefully studying the design of the chimney, it is worth taking into account the many options for arranging the passage through the roof. First of all, this design is directly affected by the type of chimney and the method of its exterior decoration.
- It is impossible not to take into account that, for example, the ceramic and brick versions of the chimney differ significantly in their properties and, accordingly, installation.
- In addition, a ceramic chimney has more than one way of exterior decoration.
- In the case when the chimney element under the roof has a brick lining, its own type of arrangement and installation is used for it, and with ordinary plaster it is completely different.
This can be seen from the fact that in the first case, the external concrete structures of the chimney come into contact with the roof, and in the second case, a brick, the installation of which begins with an intermediate crown.
Influence of floor and roof material
The roof plays an important role in the arrangement of the chimney passage through the roof. One option could be a multi-layered soft roof, on which a ceramic chimney must be installed. According to the requirements, the passage node must be equipped in a specific way. The distance from the chimney itself to the ceiling will be at least 50 mm. This space is fixed with a non-combustible material that isolates the elements from each other.
Different feed-through elements – different possibilities
Depending on what consumables will be used as a ceiling, the roof passage assembly can be mounted in different ways. There are also walk-through components of the structure that can be used anywhere.
- A hole is made through the roof, which provides a pipe for the chimney. It can be imagined that the ceiling does not have powerful structures on which the passage can be fixed.
- In this case, it is worth using a prefabricated passage, consisting of two parts, which can be firmly fixed from the inside with self-tapping screws.
- Further, a special rubber seal is attached to the outside of the structure using silicone.
- From above, a non-combustible type insulation fills the distance that has arisen between the collection passage and the pipe. It is worth carefully laying the insulation so that it does not cover the rubber seal from the outside.
- Finally, the roof groove is attached, which is usually included in the constituent elements of the prefabricated passage. It can also be fixed with self-tapping screws.
Cutting the roof: a variety of types
Of course, when arranging a chimney, do not forget about protection from water. In the case of a modular steel structure, it is possible to use a special roof groove, of which there are many options on the market today. They differ in the method of manufacture, the material used and the angle of inclination. Basically, the last indicator borders on the level of 15-35 degrees or 35-55 degrees, depending on the slope of the roof.
In the variant we are considering, this method can also be used. You can also use self-adhesive tape for joining.
tiled roof
What to do if your roof, along with the chimney, is equipped with bricks? This state of affairs leads to special attention to external processing, for which corrugated, self-adhesive aluminum sheets, as well as lead sheets are used. It is worth considering that these materials have the form of an insulating roll with two different sides. The first is a self-adhesive surface, and the other is covered with foil (aluminum or lead), which protects the roof from weather and mechanical influences.
Tape usage
When the need arises, the shingles are cut and laid next to the chimney. In this case, the edge must be processed in those places where the tile is joined to the metal sheets. The processing of such a plan should be carried out in segments, gradually laying the self-adhesive a metal sheet for each element of the tile. After appropriate work with the side of the chimney, it is worth fixing a sheet of metal from below. Thus, the side and bottom element are connected to each other by the adhesive side and securely fixed by force pressure.
Connection options for self-adhesive tape
The connecting seam, which is obtained from the joining of two media, must be at least 50 mm in width. From above, this seam is folded along the entire length, a fold is made so that the hem line is at a level of 10-15 mm from the upper edge. Next, a block of wood is installed on the seam and completely beaten off with a rubber hammer.
A spacer bar is installed along the entire edge in its upper part, and its connecting joint with the chimney is fixed with a hermetic sealant. This version of installation work can be performed without self-adhesive aluminum, and using the standard method - metal.
Building on tradition
To ensure the efficiency of the work carried out in the traditional way, it is important to form the front and rear, as well as the neck and side sheets of metal. This is done in the following way:
1) Front, side and rear metal sheet are connected to each other first. To achieve a strong connection, you need to fit these materials, trimming them with the appropriate tool if necessary, and then fasten them. For the manufacture of high-quality rivets, the sheets are drilled with a drill of a suitable diameter.
2) After joining the sheets, the seam is folded along the entire length. This process can be done with pliers, a wooden block and a hammer.
3) In conclusion, a hinged bar is made, and the processing is compacted with roofing material.
Works with metal tiles
We figured out the brick option, but what to do with a metal tile coating? In some cases, cutting is performed externally, but the reliability of this method remains in question. You can consider how the facing brick is cut around the pipe and how to do it correctly.
- To achieve tightness at the joints of chimney pipes and metal tiles, one of the options may be an internal apron.
- It is installed before the direct laying of the roofing material around the chimney.
Chasing - a universal method
- The inner apron can be made with or without a galvanized coating.
- First you need to mark the upper border of the apron by attaching the profile to the pipe wall.
- Further, with the help of a grinder, this wall is chiseled, based on the outlined lines.
- After this procedure, the strobe should be cleaned with water.
- The installation of the inner apron is initially made from the bottom element. The profile is cut at the planned points, and the apron is firmly installed in its place.
- It is necessary to carefully observe the exact measurements so that the upper part of the structure coincides with the strobe.
- The apron is fixed on self-tapping screws, which are screwed into the wooden elements from below.
In the same way, the remaining parts of the apron are installed - side and top elements. To prevent leaks, it is necessary to overlap the parts on each other at least 150 mm. The edge of the steel profile, which is inserted directly into the strobe, must be treated with a special sealant.
Under the lower element is the so-called "tie", through which the flow of water flows will be carried out. It goes either to the valley or down to the eaves of the roof. With the help of a simple bend of the edge of the “tie”, a side is made with ordinary tools.
After covering the roof with a metal tile, a decorative version of the outer apron is made. It is mounted in the same way as the internal one, however, there is one difference - the upper edge of the structure is not recessed into the strobe, and the joint is treated with a special sealant.
The main safety criterion is high-quality materials
The article considered only a few options for mounting the roof cutting of the chimney. But it is impossible not to mention those things that you absolutely should not do if you plan to run a chimney through the roof.
- Usually, modern roofs are multi-layered, while a lot of materials that are used in it are absolutely incompatible with elements that are constantly in a state of heating.
- When evaluating the market and the available options for a chimney passage, first of all, you need to pay attention to the safety of the structure and only then to tightness.
- It is important to realize that the chimney used on the roof is not just a decorative element, but a functioning appliance. Its incorrect installation can lead to global consequences for your property and health.
- Each material that you will use in your work must fully match the chimney according to its characteristics. Do not forget that similar elements of the passage device may be suitable for some types of chimneys, but have destructive consequences when used in others.
Materials only with a guarantee!
The most reliable choice would be to purchase materials in stores specializing in this, which employ qualified consultants. If necessary, they will provide you with a full range of information support regarding the design of your chimney and suitable materials for it.
You can also make it a rule to demand from sellers the appropriate quality certificates for the products you plan to purchase. In case of difficulties with documents, it is not recommended to buy goods without confirming their quality. You should not believe the statements of the chief that there are certificates, but at the moment they are not.
When arranging a chimney through the roof, it is best to purchase materials for work only with valid quality certificates. Despite the possibly higher price, you will be completely confident in your purchase.
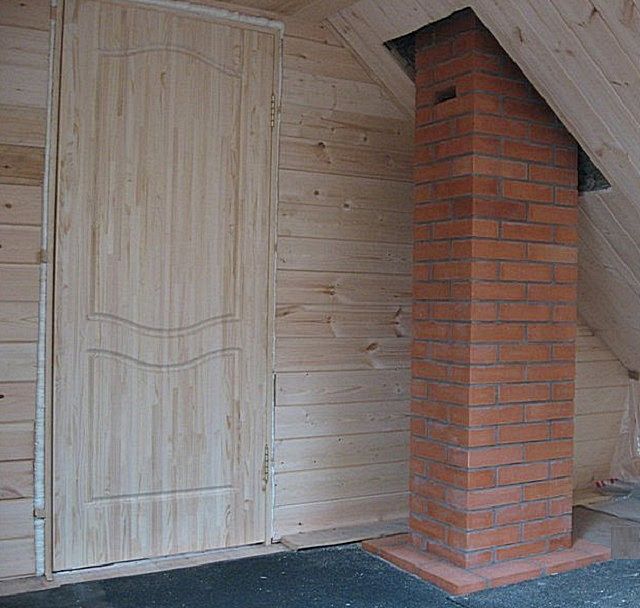
The correct passage of the chimney through the attic floor, truss system and roof is no less important than compliance with all other requirements when building the stove itself. How securely equipped these nodes will depend fire safety at home, and therefore - and all living in it, as well as the efficiency of work heater.
The passage of the chimney through a wooden floor must be especially reliable, since in this area the heated walls of the pipe are in close proximity to combustible materials. In order to secure the floor elements, various thermal insulation materials and special devices can be used - there is no shortage of them on the market today.
The performance of such work must be treated with the utmost responsibility. Therefore, in order to understand these issues, you should familiarize yourself with the current requirements. normative documents, consider the very process of passing the chimney through the ceiling in order to do everything strictly according to the rules established by the controlling organizations.
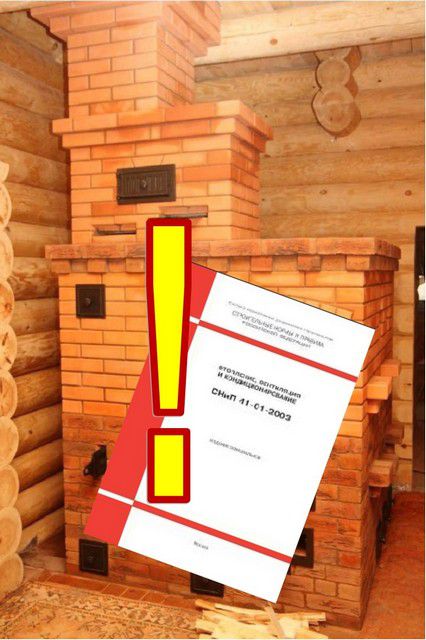
What do building codes and regulations (SNiP) say about this?
SNiP 41-01-2003 "Ventilation, air conditioning and heating" regulates the main aspects related to the arrangement of various autonomous systems heating. Because this publication is devoted to the analysis of the design features of the passage of the chimney through the attic floor, it is necessary to pay special attention to section 6.6 - this is " Stove heating”, and its subsections.
In some cases, these existing rules become a real problem for owners of private houses when arranging their home heating system. Such difficulties arise due to the fact that some of the requirements for modern heating systems and materials used for thermal insulation are clearly outdated. However, despite the possible obvious contradictions, the controlling organizations rely on this guideline and require the implementation of established standards.
At the same time, it must be remembered that if the stove is installed in a newly built house, then it will be necessary to legalize its presence in fire fighting services Otherwise, registering the property simply will not work. Such a permit is issued on the basis of an act drawn up by an employee of the controlling organization that accepts the building. If, during the inspection, serious violations of existing standards are found, then there is nowhere to go - you will have to correct the mistakes made. Therefore, it is best not to immediately deviate from the established standards.
Not everyone likes the dry language of regulatory documents, and therefore they are simply afraid to look into them. Let's try to state these rules for them in a few paragraphs:
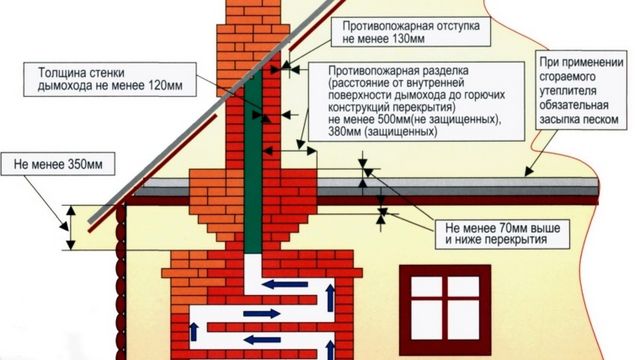
- The thickness of the walls of a brick chimney in the area of \u200b\u200bits passage through ceilings, roofs or walls (partitions) must be greater than along the main height. This thickening is called cutting.
According to existing standards, the thickness of the groove is considered taking into account the thickness of the pipe itself. The masters often use the colloquial term “from smoke” in this regard. So, the standard size of the cut is:
- 500 mm, if the pipe borders on a building structure made of combustible material (which, of course, includes a wooden floor).
- 380 mm - for those cases when the materials of the building structure are protected from fire by a layer of plaster of at least 25 mm with steel mesh reinforcement, or a metal sheet with asbestos lining under it with a thickness of at least 8 mm.
- The height of the chimney cut must be at least 70 mm greater than the thickness of the ceiling. By the way, SNiP does not stipulate from which side these millimeters should “look out” - from below, on the ceiling, or in the attic. Among the masters, judging by the forums, there is also no unanimity. But, as a rule, customers are asked to make a flat ceiling in the room, so a 70-millimeter step can be located in the attic. However, if you read the forums again, you can find cases when fire inspectors demanded a 70-mm "side" both above and below. And it was not possible to convince them otherwise.
- It is undesirable to cut the chimney rigidly to the floor materials or to rely on any building structures. True, there is no categorical prohibition on this matter, but one should nevertheless adhere to such a recommendation that the deformation of one element that occurred for some reason does not entail the destruction of the other.
- The space between the cutting and the building structure is filled with non-combustible materials. The list of materials is not specified, but in practice, those that can be classified as thermal insulators are usually used - these are expanded clay, vermiculite, mineral wool.
- If the pipe cutting falls on the opening of a wall or partition and combustible materials, then its thickness cannot be less than the thickness of the partition itself. In this case, the cutting must be performed along the entire height of the wall.
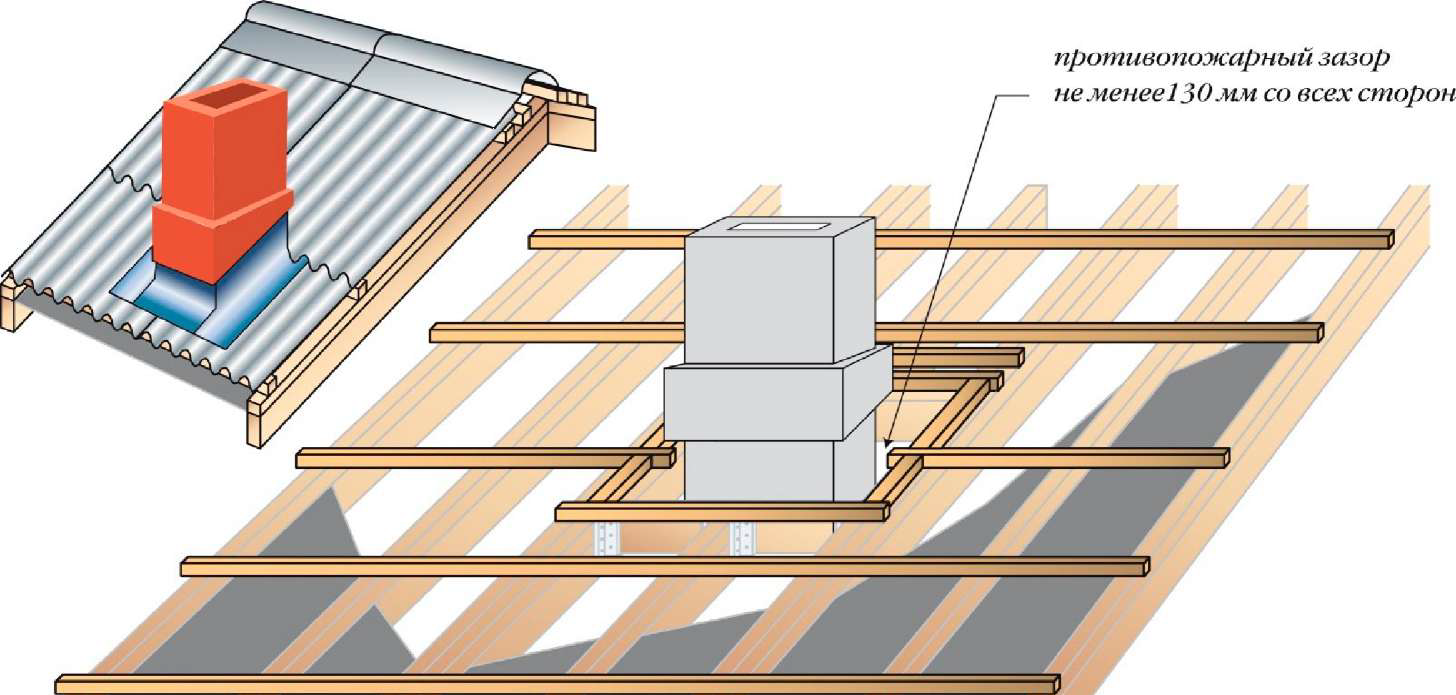
- When the pipe passes through the roofing, cutting is also often performed, which in this place is called "otter". In any case, the distance from the outer walls to any elements of the roof structure made of combustible materials must be at least 130 mm for brick pipe, and 250 mm - for ceramic without thermal insulation (when using insulation with a heat transfer resistance of at least 0.3 m² × ºС / W - 130 mm). The section of the roof at the passage should be made only of non-combustible material.
- When building a stove and its chimney, it is important to observe the distance to walls and partitions. This gap has its own name - retreat. The amount of retreat is also regulated by the requirements of SNiP:
| Chimney wall thickness, mm | Retreat type | Distance from the outer surface of the wall of the furnace or chimney to the wall or partition made of combustible material, mm | |
|---|---|---|---|
| - non-flammable surface | - surface protected from fire | ||
| 120 (ceramic fired brick) | open | 260 | 200 |
| Closed | 320 | 260 | |
| 65 (heat-resistant concrete) | open | 320 | 260 |
| Closed | 500 | 380 | |
The surface will be considered protected from fire if the requirements already mentioned above are met - plaster of the required thickness or asbestos-metal "pie". At the same time, the dimensions of the area on which such protection is made must be larger than the dimensions of the furnace or chimney pipe by at least 150 mm in each direction.
These requirements are optional only for partitions made of materials with a fire resistance rating of REI 60 and higher (maintaining load-bearing capacity, integrity and thermal insulation qualities with a 60-minute direct exposure to fire) and zero flame spread.
- When installing metal furnaces factory-made, it is necessary to adhere to the recommendations that are given in the documentation from the manufacturer. If not, the general rules apply.
- The distance between the furnace itself (its upper wall) and the ceiling is also important. The following regulations apply here:
BUT. If the furnace ceiling consists of three continuous brick rows, then this distance should not be less than:
— for unprotected ceilings - 350 mm for periodic fires, and 1000 mm for long-burning stoves.
- for ceilings protected with a plaster layer or asbestos 10 mm + metal - 250 and 700 mm, respectively.
B. If the oven floor consists of only two continuous rows, then the above distances to the ceiling should be increased by one and a half times.
AT. For metal stoves, the clearance between their upper surface and the ceiling of the room must be at least 800 mm if the ceiling has the above-mentioned thermal protection, and 1200 mm if it is not.
- The penetration of metal chimneys through any floors or walls must be carried out through sleeves made of non-hot material.
The gaps around the chimney pipes must be sealed with non-combustible materials (class NG or, in extreme cases, G1), best of all - with the lowest possible coefficient of thermal conductivity. This will provide the necessary fire resistance for fences.
The wood used for the installation of the truss system and the attic floor belongs to the G3-G4 group in terms of combustibility. After being treated with flame retardants, it becomes more resistant to fire, but, despite this, it remains combustible. It is naive to rely on the "magical qualities" of the advertised impregnations, which allegedly completely makes the tree non-combustible. That is why it is necessary to adhere to the norms established by SNiP, correctly positioning the chimney and other sections of the furnace at the specified distances from the structural elements of the house.
Self-activity in these matters, unauthorized deviation from the existing rules, simply committed negligence can lead to tragic consequences, since overheating of the building elements adjacent to the furnace structure will most likely end in their ignition.
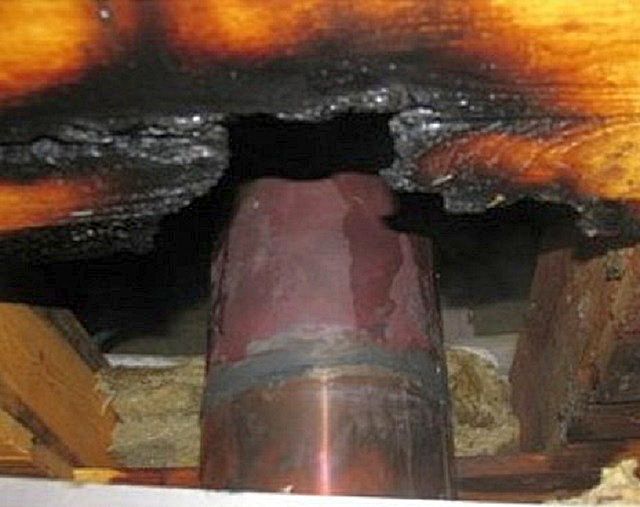
So, a poorly equipped chimney penetration through a wooden ceiling can easily lead to a fire. To avoid tragic consequences, it is necessary to properly insulate the cutting, ensuring the proper level of fire safety.
To figure out how to carry out these actions correctly, it is necessary, keeping in mind the recommendations of SNiP, to consider the whole process in stages.
Since the chimney can be metal or brick, it is necessary to separately consider the installation of both options.
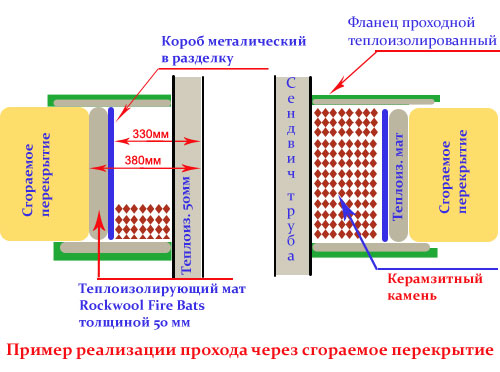
Penetration for a metal chimney pipe
Special devices and materials for sinking a metal chimney
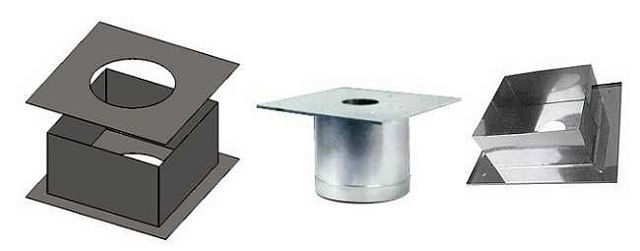
Box-shaped ceiling-through structures
The arrangement of the passage of a chimney metal pipe through the structure of a wooden floor can be carried out using a ready-made ceiling-through assembly, or made independently, but in compliance with the standard dimensions.
If a ready-made version of such penetration is purchased, then its size is selected according to the diameter of the chimney pipe. The convenience of using the factory box is that its design already provides for all the dimensions established by SNiP, so you don’t have to rack your brains over this. It remains only to show an opening in the ceiling for penetration, and then strengthen its thermal protection of the surfaces.
You can make a passage-box yourself. It is made from different materials- it can be a steel sheet with a thickness of at least 0.5 mm, alone or in combination with mineralite, asbestos sheet, with mineral basalt wool foiled on one or both sides. If the box is purchased or made of metal, then it will need to be thermally insulated with ordinary or foil mineral wool, vermiculite, expanded clay.
If it is decided to make such a penetration on its own, then the diameter of the hole in its central part should be approximately 0.5 mm larger than the outer diameter of the pipe. This is done in such a way that the metal pipe passes freely through the box, but at the same time, the gap between them would not be too large.
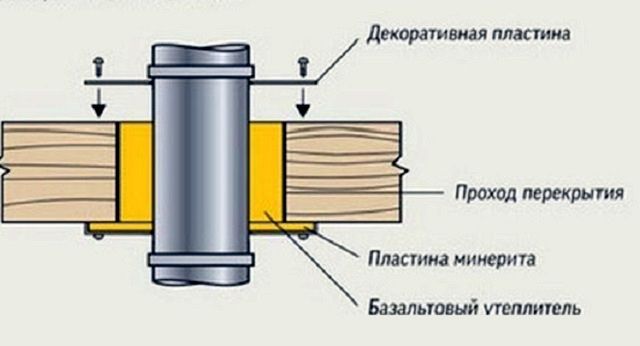
For the manufacture of penetrations, you can use the dimensions shown in the illustrations and presented in the table:
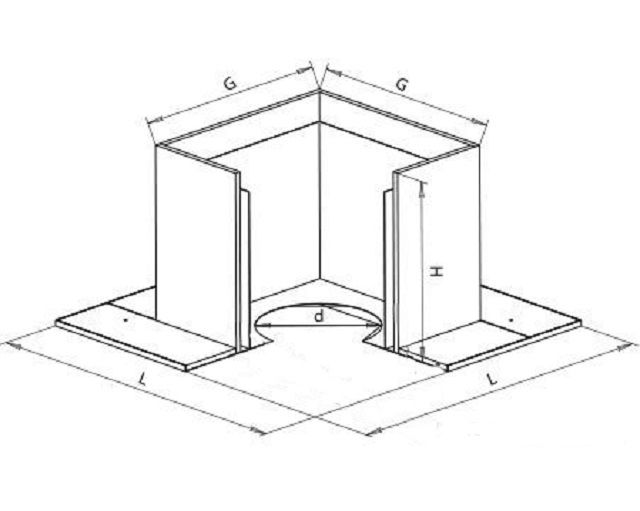
| Letter designation of structural elements and size in mm | |||
|---|---|---|---|
| d - hole diameter | L - side length of the decorative panel of the box | G - the width of the sides of the box | H - box height |
| 205 | 580 | 370 | 310 |
| 215 | 580 | 370 | 310 |
| 255 | 580 | 450 | 310 |
| 285 | 580 | 450 | 310 |
- If the passage box is made only of 50 mm thick foiled mineral wool, then it is best to cut the elements for it according to pre-made templates. Assembly of parts into a single structure is carried out using heat-resistant foil tape. Having chosen this option for cutting, you must not forget that you will also need to purchase or make one or two metal panels for it. One of them is fixed to the ceiling surface, flush with it, and the second (optional) closes the heat-insulating material from the side of the attic.
- Another option for penetration can be a box made of a metal sheet, insulated with the same foiled mineral wool. This insulation is cut into strips with a width equal to the height of the resulting box and is laid along the walls on the end, with the foil side to the pipe. The space of the box free from the pipe must be densely filled with a thermal insulator.
- The box can also be made of mineralite (fiber-reinforced concrete slabs) 10 mm thick. Structural elements are also cut out according to prepared templates, and then fastened together using metal corners. A smaller box made of a metal sheet 0.5 mm thick is installed and fixed in a casing made of this material.
Between the walls of the outer and inner ducts there should be a gap of 10 ÷ 15 mm wide, which is filled with basalt insulation, and the space around the pipe can be filled with vermiculite, expanded clay of fine or medium fraction or the same mineral wool. The holes through which the pipe will pass must have the same diameter in both boxes. A metal plate can also be used to aesthetically design the penetration from the side of the living room, or the fiber cement board can be left open. After completion of the installation work, it will be easy to paint the slab facing the living room in the same color as the ceiling.
Video: making and installing a homemade box-shaped penetration for the chimney of a sauna stove
Heat-resistant materials for the manufacture of penetrations
A few minutes of attention deserve the characteristics of heat-resistant materials that are used to insulate the ceiling penetration. They differ in some of their qualities from conventional insulation made on the same basis.
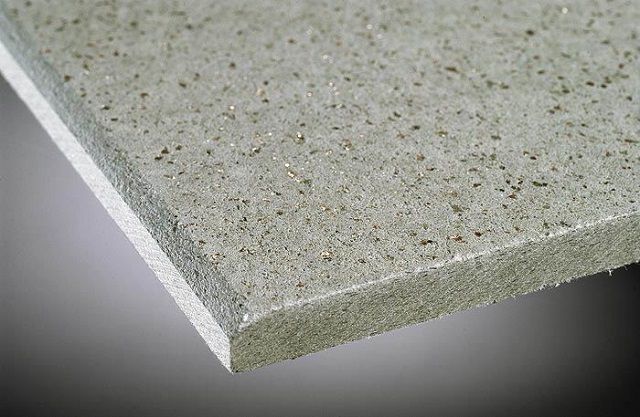
- Minerite is an absolutely non-combustible material, which is also called fiber cement boards in another way. It is often used for wall cladding in areas where stoves and chimneys are installed.
This material is not only resistant to extremely high temperatures, but also moisture resistant, has good mechanical strength, does not contribute to the formation of mold and fungus colonies. Minerite is an environmentally friendly material, therefore, at elevated temperatures, it does not emit fumes harmful to human health.
For the manufacture of screens installed in the cutting and on the walls around furnaces and chimneys, "minerite LV" panels are used. In addition, such panels are also suitable for the construction of fire-resistant partitions.
- Non-combustible slabs made of basalt wool and covered with aluminum foil are used for fire protection of walls and passages around chimneys.
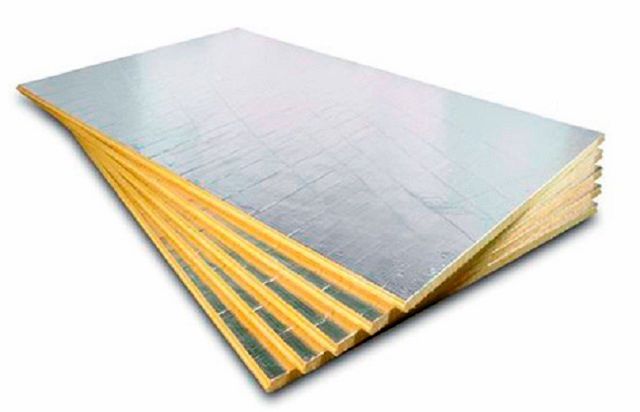
This material is made from environmentally friendly components and has a high resistance to aggressive biological and chemical effects. According to its thermal insulation data, mineral wool, of course, is many times superior to mineralite, but inferior to it in mechanical strength and durability.
High-quality basalt slabs do not accumulate moisture, and they do not create a favorable environment for the settlement of rodents and insects, the appearance of microflora colonies. This type of insulation belongs to the flammability group G1. (Yes, and this is only due to the adhesive layer that holds the foil coating, since in " pure form» basalt insulation can be attributed to completely non-combustible materials). Basalt slabs different manufacturers may slightly differ in the upper limit of the operating temperature range. But in any case, it ranges from +750 to 1100 degrees, which should be more than enough for the chimney.
Installation of a penetration for a metal pipe
Before installing the penetration into the window cut out for it in the attic floor, it must be prepared, further strengthened, if necessary, and insulated from high temperatures.
- The first step is to additionally monitor the state of the opening and the surrounding parts of the ceiling structure. This is done in order to make sure that the box in it will be securely fastened.
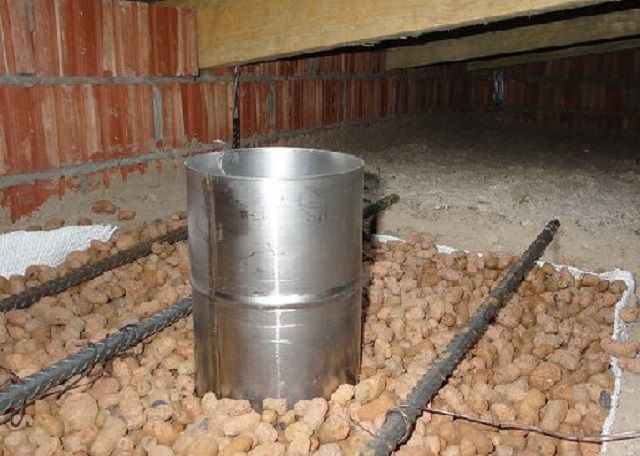
The box penetration must be firmly fixed to the ceiling structure. It, of course, is positioned so that it is between the floor beams (it is clear that these issues regarding the placement of the furnace in the room are always thought out in advance). Beams can become a reliable basis for fastening the penetration, located on the sides of it.
However, it often happens that the floor beams are too far apart and therefore the "pie" of the floor in the area of \u200b\u200bthe pipe passage does not have the necessary rigidity, and it will need to be strengthened. Another option, exactly the opposite, is that the too frequent step of the installed beams does not leave enough free space to accommodate the box penetration.
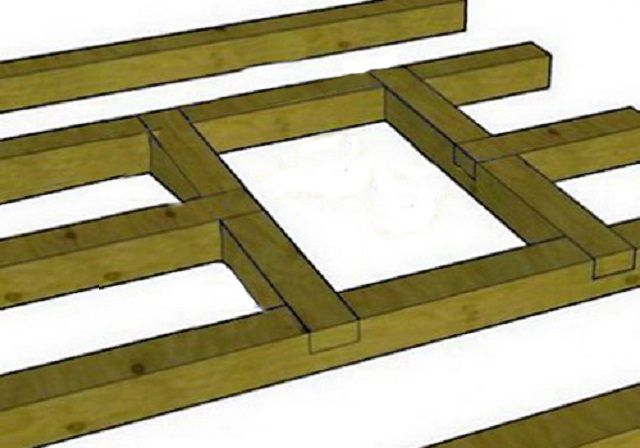
In any of these cases, it is possible, after removing the desired section of the coating, to mount the frame, in accordance with the dimensions of the box, using a wooden beam. The crossbars of this frame are rigidly cut into the floor beams. If necessary, with too widely spaced beams, additional longitudinal support bars can be used in the frame. An example of creating such a frame is shown in the illustration.
Such a check and strengthening (refinement) of the frame will be necessary if the chimney is mounted in an already built house. However, as a rule, the installation of stoves and, therefore, the installation of chimneys, are planned in advance. And in the process of installing floor beams during the construction of a building, such a frame is provided in advance for the subsequent installation of box-shaped penetration.
- Further, all wooden parts of the ceiling structure, located along the perimeter of the cut-out window for penetration, must be additionally treated with special impregnation. The flame retardants included in the composition will increase the fire characteristics of the created assembly. Continue to further operations only after complete drying of the treated surfaces.
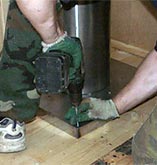
- The next step is to install a penetration box into the cut-out opening from the side of the room. The edges of its bottom part are securely screwed with self-tapping screws on the ceiling surface.
But this operation should be carried out only after careful control of the location of the round hole for the chimney relative to the heater. It is unacceptable that even a small deviation causes unevenness, "kink" installed pipe. This will create unnecessary stress in its walls, which may well lead to insufficient sealing in the joints.
Precise alignment of the box passage is best done on a plumb line to ensure that the axis of the pipe being installed is vertical.
- Further, the lower part of the chimney pipe is assembled, starting from the outlet pipe of the furnace (boiler).
It is very important - no matter the distance from the stove to the ceiling, and no matter what accessories are used, never, under any circumstances, the connection of two elements (pipes) of the chimney should not fall on the ceiling. Moreover, the minimum distance from such a connecting node to the floor surface (whether from below, indoors, or from above, from the side of the attic) must be at least 300 mm.
The requirements for the correct location of the junctions of individual pipes are important, of course, from the standpoint of providing visual control. But the main predetermining factor of such a considerable (300 mm) offset from the ceiling is the continuing possibility of a breakthrough of hot gases in these, to be honest, remaining the most vulnerable places of the prefabricated metal chimney.
- The next stage of work can be carried out from the side of the attic or living space, depending on how it is more convenient to mount the next section of the pipe. If the work is carried out from the side of the attic, then the next part of the chimney pipe is passed through the hole and fixed on the lower, already mounted section.
- When the pipe is led into the attic, you can proceed to filling the penetration box with heat-insulating material. If one of the loose thermal insulation materials is selected, and small gaps remain between the pipe and the border of the round hole, they can be clogged with basalt wool or plastic clay, and then the insulation is poured from above.
From bulk heat-insulating materials, it is best to choose expanded clay or vermiculite. Ordinary sand is used for backfilling only as a last resort, since it has a too fine fraction, a large weight and an excessively high thermal conductivity for such a function. Expanded perlite sand is not particularly convenient to use in such conditions due to its excessively high "volatility".
The easiest way to fill the box with heat-resistant basalt wool, as it has the lowest thermal conductivity. When using a mineral wool mat, the box from the attic side should not be sealed thoroughly in order to have free access to the pipe throughout its entire length. If the pipe goes to the second floor, then the hole in its floor with insulation material around the chimney can be closed with a metal sheet, screwing it to the floor.
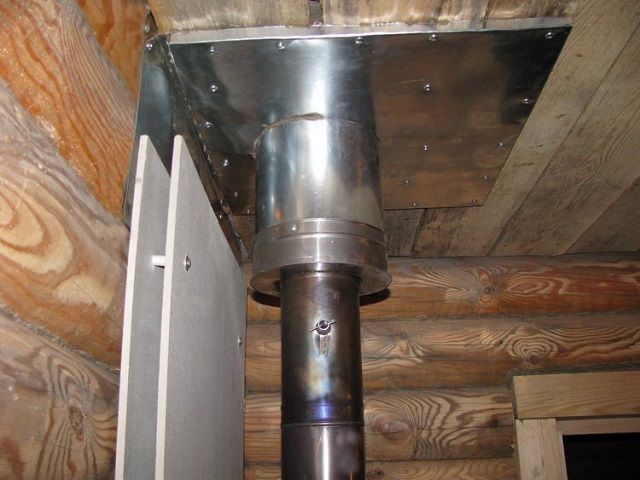
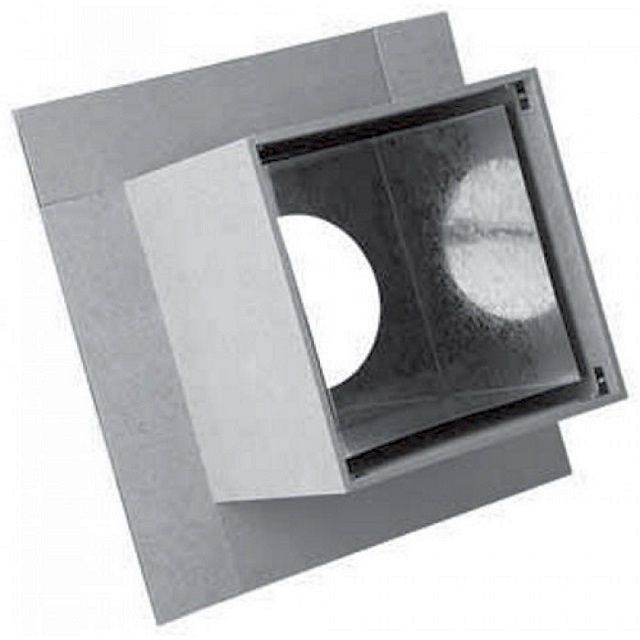
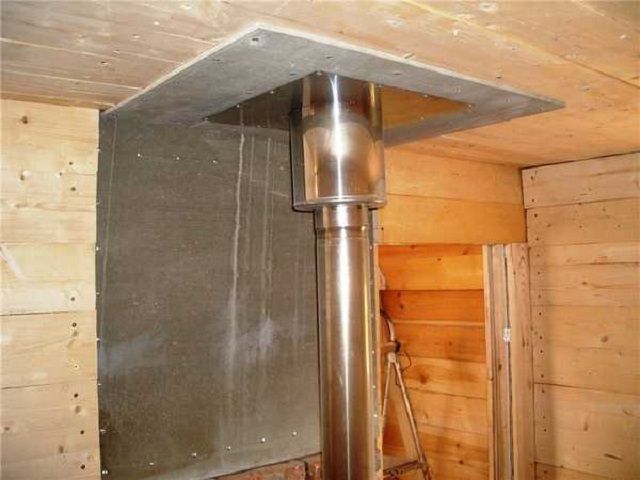
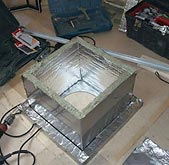
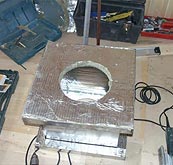
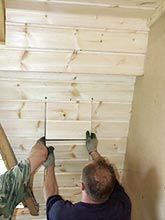
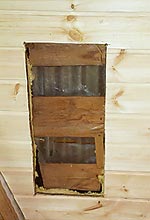
The selection of photographs below demonstrates the installation of a home-made box penetration made of dense slabs of foil basalt insulation.
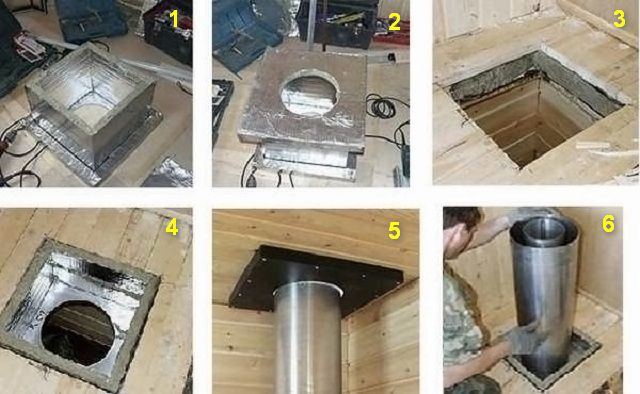
- The first two fragments: this is a finished self-made penetration from different angles.
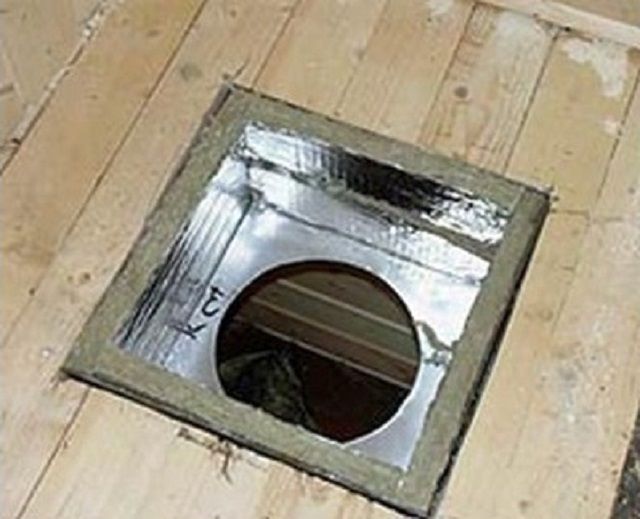
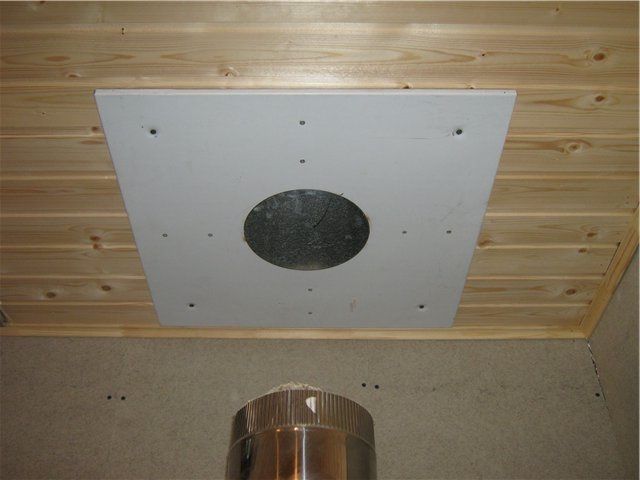
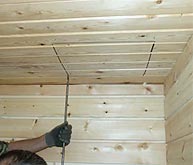
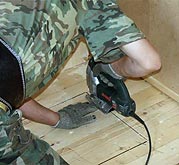
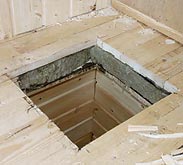
- The third fragment: a window was cut out in the ceiling for the installation of penetrations. Please note: to ensure maximum safety, the master filled the gap between the ceiling covering and the attic floor with mineral wool.
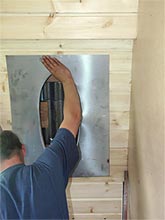
- Fourth photo: The penetration box is inserted into the prepared opening and fixed from below.
- Fifth fragment: After the installation of the pipe section leading to the attic, the penetration is closed from below with a metal panel. It is securely fixed on the ceiling with self-tapping screws, completely covers the edges of the window of the passage unit, holds the heat-insulating box well in the ceiling and provides mechanical protection for the mineral wool panel, which is not very durable.
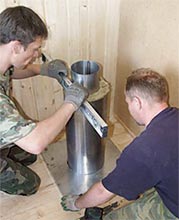
- Sixth photo: Continuation of the installation of the chimney. The gap between the pipe and the box will be tightly filled with mineral wool. Since the attic in this case is “inhabited”, the passage node will be covered with a decorative metal plate.
And in the video below, the master managed without creating a box structure at all.
Video: fire fluffing of a chimney pipe in a passage through a wooden floor
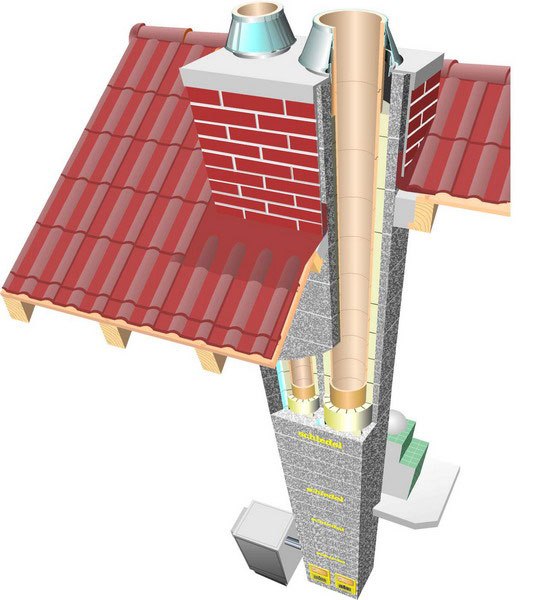
The passage of a brick pipe through the ceiling
A masonry chimney is usually designed to protect surrounding combustible materials from overheating. The section of the pipe, which is laid out when it passes through the ceiling, is already a cut in itself and is called "fluff".
This chimney design is traditional, long-tested, and most often chosen by stove-makers.
- "Fluffing" begins under the very ceiling in the living room (three to four rows of bricks before it) passes through the entire thickness of the attic floor. Sometimes the fluff is raised to the clean floor of the attic, in other cases it is made flush with the subfloor. Both options can cause nitpicking of the inspectors - we recall the notorious “70 millimeters” already discussed above.
This structural element plays the role of the necessary thickening of the pipe walls, which protects the combustible materials of the ceiling from overheating.
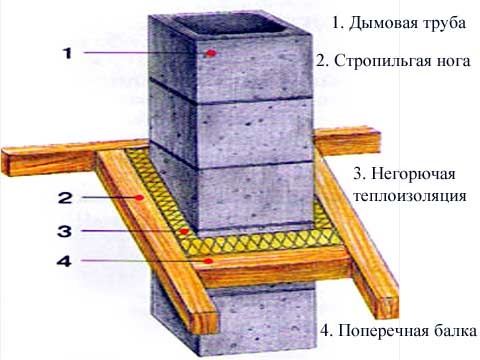
In fact, the design of the “fluff” is directly affected by precisely the requirements of the SNiP that were considered in the first section of the publication. In order not to repeat yourself, you can give a diagram that clearly shows what dimensions and where must be observed:
Can I lay out a brick chimney myself?
The work, at first glance, is simple, however, a lot depends on its quality, up to the health and life of the inhabitants of the house. You can read detailed information about by following the recommended link - it will be easier to figure out whether it is worth taking this event on yourself, or it is better to invite specialists.
- Another option for arranging the penetration of a brick pipe through the ceiling is carried out in almost the same way as a metal pipe. In this case, of course, the chimney along its entire height has the same cross-sectional size, without increasing the thickness of the walls. However, everything linear parameters established by SNiP are observed.
The hole in the ceiling can be covered with a metal sheet or fiber cement board. In the middle of the thermal insulation panel, a window is marked, through which the chimney will pass. The length and width of this opening should exceed the similar parameters of the pipe by literally 3 ÷ 5 mm.
When laying the chimney, about three to four rows from the ceiling, a sheet with a prepared opening is put on it, and then the laying is carried out further to the height of the attic's clean floor.
In the next step, the sheet put on the pipe is lifted, pressed and fixed to the ceiling in a convenient way. specific case way - with screws or dowels.
Further, work is carried out from the side of the attic or the second floor. Strips of basalt wool, pieces of asbestos or fiber cement slabs are laid along the walls of the opening cut out for penetration. This "frame" should cover the entire thickness of the attic floor. If necessary, the material can be fixed on the floor beams.
Thanks to these operations, a kind of box is created around the neck of the pipe, which will be filled with heat-resistant material. As it can be used basalt wool, which densely fill the entire volume. If cotton wool with a foil layer is used, then it is turned towards the walls of the furnace.
It is quite possible to perform such thermal insulation of the pipe with expanded clay or vermiculite, but before backfilling, it is imperative to close up the gaps remaining between the pipe and the edges of the opening, especially if fine fraction material is used.
Of course, you can do exactly the same as with a metal pipe, putting on brick chimney finished penetration made of steel sheet. This option will probably be more reliable and convenient both in terms of its installation and reliable fixation, and when filling the box with thermal insulation material. True, such a box will cost much more. Does it make sense - decide for yourself.
After filling the penetration with insulation, it is also covered from above with a metal or fiber cement sheet.
At this point, the work on arranging the safe passage of the chimney through the ceiling can be considered completed.
After reviewing the details of the arrangement of this area of \u200b\u200bthe chimney, we can come to the following conclusion:
That there are no particularly complex actions that are subject only to highly qualified narrow specialists in this process. The main thing is to scrupulously follow the requirements established by SNiP, maintaining all the necessary dimensions and following the recommendations. If everything is done according to the rules, then you can not only ensure the safe operation of the heater, but also avoid completely unnecessary problems with regulatory authorities.
Installation instructions for chimneys made of stainless steel sandwich pipes.
Consider the sequence of cutting the ceiling to ensure safe passage
chimney between floors. The passage of the ceiling is carried out using the serial spigot of our
production.
Preparing the duct for installation
First you need to prepare the passage pipe for installation. A layer is installed along the walls of the pipe
insulating material - for example, foil mats made of basalt fiber. The internal cavity of the passage is isolated
branch pipe and parts adjacent to the ceiling.
Preparing the ceiling for the installation of a duct
Now you should prepare the ceiling for the installation of the through pipe. Determine the place in the ceiling where it should
pass the chimney pipe. The size corresponding to the installation of the through pipe is marked and an opening is cut out in
overlap. Mineral wool insulation insulates combustible materials of the ceiling at the point of contact with the passage
branch pipe.

In the prepared opening, you can install a through pipe. The ceiling is ready for the installation of the chimney.
![]()

The passage of the chimney through the ceiling
We pass the elements of the chimney through the ceiling. The parameters of the chimney should be calculated in such a way that in place
the passage through the ceiling, the chimney pipe passed entirely - without joints with other elements. Docking elements
in these placesprohibited
. For additional heat removal, an air gap should also be provided between
elements of the branch pipe and pipe (the diameter of the through hole of the serial branch pipe is slightly larger than the diameter of the serial pipes).
After passing chimney pipes we fix the protective elements of the pipe.
Checking the vertical
We check and, if necessary, align the vertical of the chimney trunk. Ceiling has been completed successfully.
Chimney installation procedure
We will consider the installation of a chimney using the example of the installation of a double-circuit chimney system.
The elements are mounted from the bottom (from the heating unit) up. During installation, the inner tube goes inside
the previous one, and outer pipe puts on the previous one, which prevents moisture from entering the mineral wool
insulation. The mnemonic rule is simple: the inner pipes are “by condensate” (condensate, flowing down, should not
be obstructed by a pipe seam and must not flow into the pipe).
For better sealing of pipes, it is desirable to use a sealant with an operating temperature of at least 1000 degrees.
The joints of pipes and other products (tees, elbows, etc.) must be fastened with clamps. For every two meters
chimney, you must install the bracket for fixing to the wall, and the tee must be fastened with a support
bracket.
The chimney of the stove must not have horizontal sections longer than 1 m.
Smoke channels should not come into contact with electrical wiring, gas pipelines and other communications.
When passing chimneys through walls, ceilings or roofs, use ducts insulated in
in accordance with fire safety regulations.
To clean the chimney, a removable part (glass) or a hole with a door (revision) should be provided at its base.
The chimney needs professional care. At least 2 times per heating season should be cleaned
chimney.
In order to be sure of the chimneys and the operation of the heating units in general, their installation and maintenance
it is better to entrust to professionals.
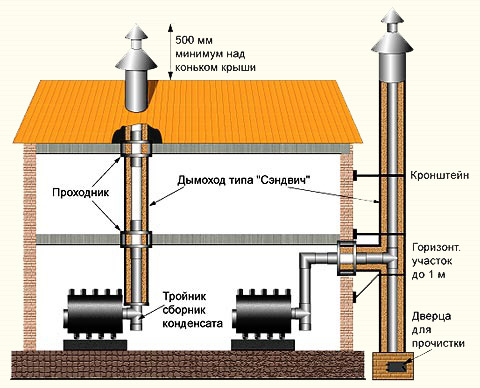
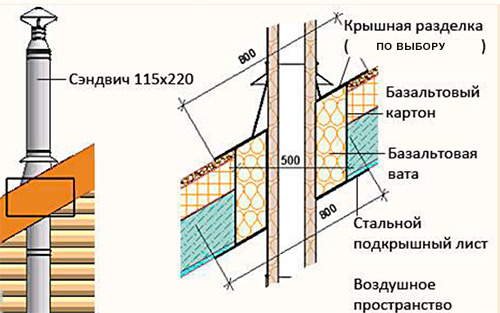
Requirements for the elevation of the chimney above the roof
Elevation chimneys should be taken (see fig.):
not less than 500 mm over a flat roof ;
· at least 500 mm above the roof ridge when the pipe is located at a distanceup to 1.5 meters from the ridge ;
· not lower than the roof ridge when the chimney is located at a distancefrom 1.5 to 3 meters from the ridge ;
·
not below the line drawn from the ridge down at an angle of 10 o to the horizon, when the chimney is located
on distancemore than 3 meters from the ridge
.
Options for placing chimneys above the roof
In addition, it should be taken into account that the chimney must be raised 500 mm above the top of the building,
attachedto a heated building. Chimneys on buildingswith combustible roofs
should
to display above the ridge of the roof by 1-1.5 meters. Also affects the elevation of the chimney, the presence of nearby more
tall buildings or structures.
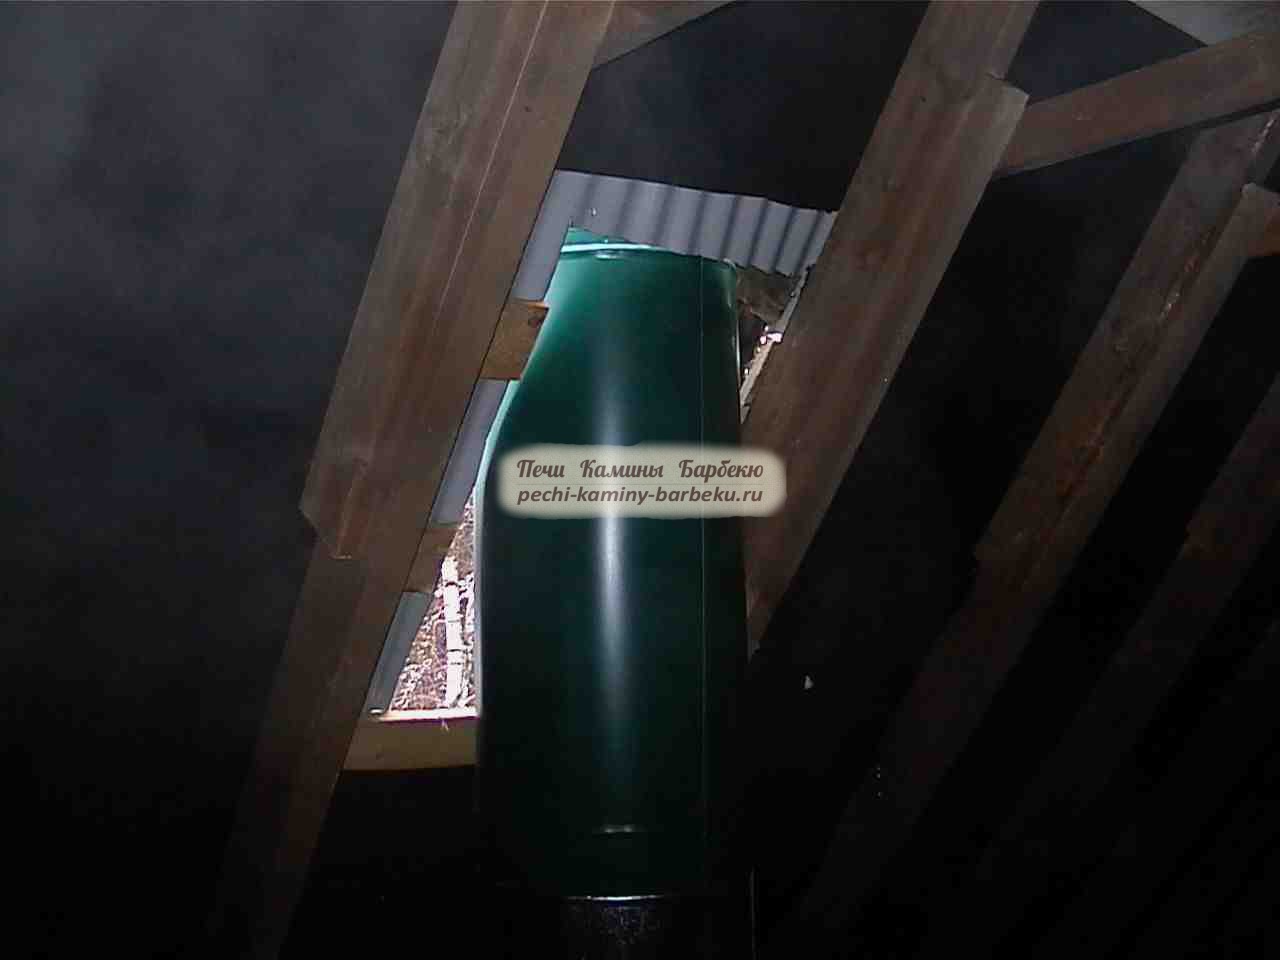
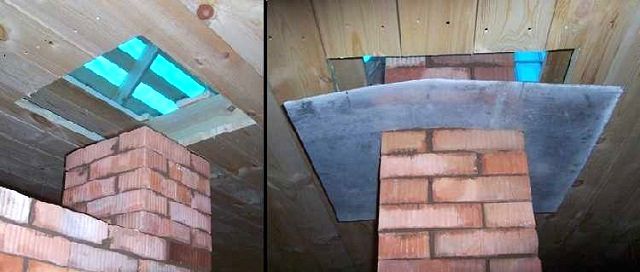
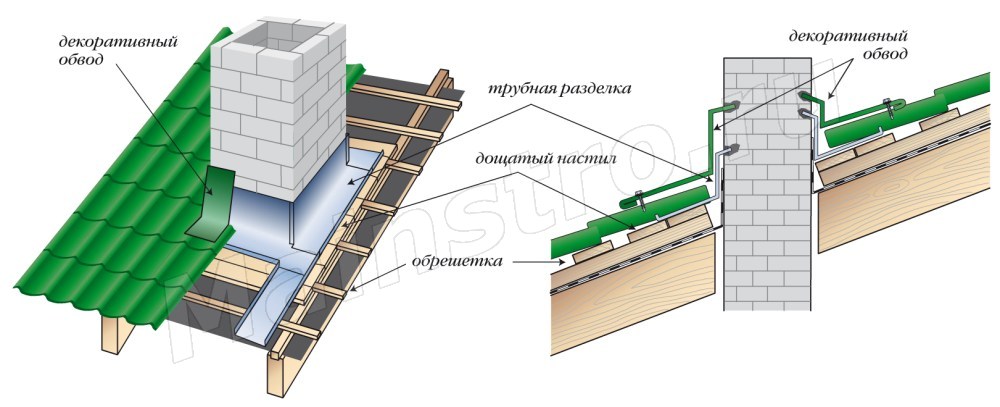
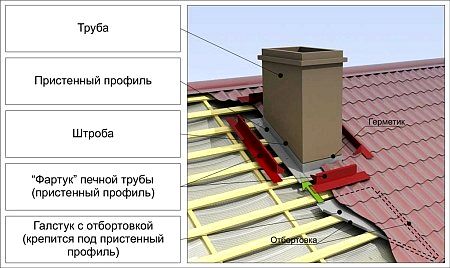
Chimney passage through the roof
Let's analyze the sequence of the roof passage to ensure the safe exit of the chimney to the street.
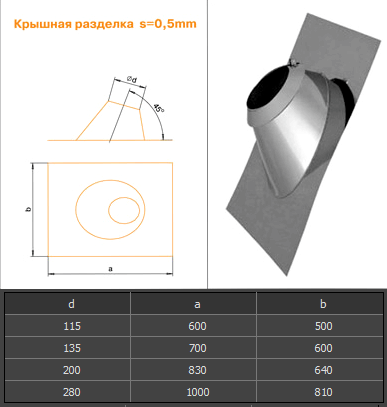
The passage of the roof is carried out using a special element "roof cutting", which is selected according to
the appropriate angle of inclination of the roof (standard cuts are available at an angle of inclination of 15-35° and 35-55°).
Preparing a hole for the chimney to pass through the roof
The place where the chimney pipe must pass through the roof is determined. The size corresponding to
installation of roof cutting, and an opening is cut in the ceiling from the inside of the roof.
To ensure the safe operation of the chimney, reduce heat loss and humidity in the house, it is imperative to cut it on the roof. In case of improper organization of the chimney outlet on the roof, precipitation penetrates, as a result of which the load-bearing wooden structures of the roof rot and disintegrate. Improper installation of the chimneys themselves can lead to ignition of the wooden elements in dry weather. Having carefully studied the installation rules on the roof, the chimney can be cut with my own hands.
Types of cuts for the chimney
The choice of cutting option for the chimney is mainly influenced by the following factors:
chimney pipe material
type of roof covering
roof configuration shape, slope angles,
the location of the chimneys in relation to the ridge.
Important functions of cutting are the maximum protection of the roof from rainfall inside and the reduction of heat losses. Proper selection of materials for cutting contributes to the normal functioning of the roof.
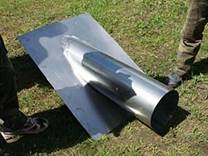
metal
For metal chimneys of the sandwich type, the groove is made of a metal cone, which is rigidly attached to a metal apron at a given angle.
Slate
For a roof with a slate coating, the apron is made of a material such as lead, in order to repeat the wavy relief of the slate coating due to its plastic properties. The angles of inclination of the cutting for pipes and roofs must match. The sandwich pipe must be inserted into the transition cone and the gap formed must be carefully sealed with a sealant.
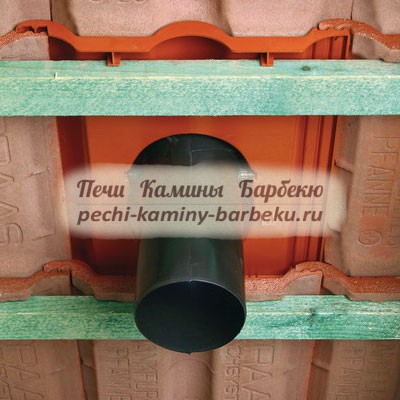
Wavy relief
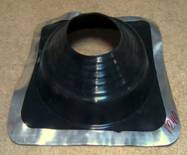
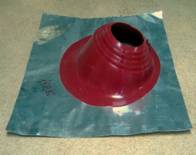
When installing round pipes through a roof with a wavy metal relief, in addition to metal cutting, it is recommended to use penetrations made of polymeric materials on a metal frame. Such elements are made of steel or aluminum sheet with a hole that is larger than the diameter of the pipe and a cap made of rubber or silicone. (cm. ). A hole of the required diameter is cut out in the polymer cap, while the metal part of the frame is adjusted to the type of roof covering. As a result of installing such a cut, a sufficiently dense and safe exit of the chimney from the roof is obtained.
ceramic
To bring to the roof constructed sandwich type, which is very common in our time, or ordinary brick chimneys, it is necessary to use another method. To seal such chimneys, metal aprons, special adjacent strips and heat-insulating ones are used. Tightness is carried out by gluing parts with special films and the use of special sealing materials. Subject to a strict sequence of cutting work, it is possible to achieve a tight transition of the chimney through the roof.
cutting
For sealing metal pipes from stainless steel of the sandwich type or ceramic round, special penetrations are used for the roof with a steel or polymer cap. In order to protect roofing elements made of wood from heating in the area of the chimney passage, a heat-insulating box made of non-flammable material should be used, while the resulting gap between the box body and the chimney should be sealed with non-combustible refractory material, basalt or stone fiber with high temperature melting compared to the chimney material during operation.
Installation and output
- The first step is to buy or make a thin-walled metal pipe with your own hands. It must be dimensioned in such a way as to achieve a safe distance between the hot chimney and the wooden combustible roof element of more than 25 cm in all directions. The protective pipe is made in the form of a box with a lid, in which holes equal to the diameter of the pipe are made on both sides. The manufactured pipe must be protected with non-combustible insulation with basalt fiber. You can fix the heat insulator with a special metallized adhesive tape or heat-resistant sealant.
- After marking the floor area at the point where the pipe exits the room to the attic or second floor, it is necessary to cut a square hole in it with a jigsaw equal to the dimensions of the protective box made before, taking into account the heat-insulating belt made of basalt fiber. After that, you can mount the pipe.
- When a sandwich type chimney exits through the holes in the branch pipe, it is necessary to treat the resulting gap with a heat-resistant sealant with an allowable temperature during operation of the chimney equal to 10000C. The space between the chimney and the box body is filled with heat-insulating material with basalt fiber.
- On both sides, from above, from below, the box is closed with lids with holes for the pipe and fixed with screws.
- Having marked the roofing area at the point where the pipe exits the attic or the second floor onto the roof surface (roof), which is under a certain slope, it is necessary to cut a hole in the same way, but not a square shape, but a rectangular configuration due to the slope of this ceiling. Next, we mount the lower cutting apron in accordance with the slope of the roof; the sharper the slope, the longer the hole should be.
- Through the hole made with the box installed, stretch the chimney, while the apron can be lowered down for a while. It must be reinforced with clamps and fixed with brackets on the load-bearing structures roofs.
Above the roof, the pipe must be raised to a certain height. At the same time, it is important to remember that the joints of straight smoke elements should not be located in the transition zone through any ceiling or roof ceilings. In the case of such a hit in the transition, it is necessary to trim the elements. In order to achieve maximum strength and fire safety, reinforcing clamps should be tightened at the junctions of straight pipe elements, which, in turn, must be finished with sealant.
After the pipe is finally fixed and located above the roof, it is necessary to fix the lower apron and put on it the selected cutting option.
When performing furnace work, it is imperative to observe " Rules for the production of work and repair of furnaces, chimneys and gas ducts". Below is a summary and explanation of those points, without knowledge of which it is impossible to conduct furnace work.
- 3.2.1. In places where combustible and slow-burning building structures (walls, partitions, ceilings, beams, etc.) are adjacent to furnaces and smoke channels (chimneys), it is necessary to provide cuttings from non-combustible materials. When the furnaces are located in the opening of a wooden wall or partition, vertical cuttings are arranged for the entire height of the furnace, hearth or chimney.
Rice. 1. Vertical fire cutting furnace:
1 - heating furnace; 2 - felt or asbestos; 3 - brickwork; 4 - metal sheet.
At the transition of the smoke channel (chimney) through the attic or interfloor overlap, horizontal cuttings are arranged. Vertical cuttings are laid in ½ bricks or ¼ (on the edge) on a good mortar without dressing the seams with the masonry of the stove or chimney. Horizontal cuttings are placed with dressing of seams, they are performed simultaneously with the laying of the channel. They represent an enlarged canal wall to a safe size. Other non-combustible materials can also be used to perform cutting - reinforced concrete slabs, ceramics, metal, asbestos-cement slabs. When arranging cuttings near furnaces, it is necessary to provide for possible shrinkage of the walls of wooden buildings, it can reach 4% of the height of the building. In interfloor and attic ceilings, the cutting height increases by the height of possible shrinkage. When applying insulation from flammable materials (moss, sawdust, peat, etc.) in attic floors, the cutting at the chimney must be raised 2 rows of bricks higher.
When performing horizontal cutting in an interfloor or attic floor, it is necessary to ensure that the brickwork does not rest on beams or flooring, the outer walls must be even so that cracks do not form during shrinkage. All joints must be tightly filled with mortar. Common causes of fire are cracks that form in the array of the furnace and smoke channels due to uneven settlement or chipping of the mortar from the joints. Therefore, the main means of fire prevention is the protection of wooden and flammable structures with fireproof materials. For protection, non-heat-conducting materials are used: wool felt and asbestos. Felt does not conduct heat well and is a good heat-insulating material. When ignited, it smolders, emitting smoke with a pungent odor, signaling the danger of a fire. To give greater resistance to fire, the felt is impregnated with a liquid clay solution before laying. All wooden structures adjacent to the cuttings are upholstered with 2 layers of felt or asbestos. The design in this case is considered protected.
- 3.2.2. Distances from the inner surface (from smoke) of furnaces, channels and chimneys to a combustible or slow-burning building structure should be provided not less than those indicated in Table 1.
- 3.2.8. The distance from the overlap (roof) of the furnace to the ceiling should be 350 mm to the unprotected and 250 mm to the protected.
- 3.2.9. The outer surfaces of brick chimneys when they are installed through the roof should be removed from combustible structures (beams, battens) at a distance of at least 130 mm.
- 3.2.11. To protect the floor under the furnace door of the furnace, there should be a metal sheet measuring 0.7 x 0.5 m, laid with a long side along the furnace.
- 3.4.7. Foundations for furnaces and chimneys are laid in accordance with general rules conducting stone work in accordance with SNiP 11.17.78.
Between the foundations for the furnace and the foundations of the walls of the building, a gap of at least 5 cm is left, filled with dry sand.
- 3.4.11. Masonry (kilns) must be made in compliance with the horizontal rows, the verticality of the outer surfaces and corners, the shape and size of the internal channels. Each row of masonry should be made with ½ brick seams. In rows where ¾-th brick should be used, dressing in ¼ brick is allowed.
- 3.4.12. The thickness of the seams of the furnace masonry, made of ordinary clay bricks, should be no more than 5 mm, and from refractory and refractory 3 mm.
The thickness of the joints of the chimney masonry, made on a complex mortar, should be no more than 10 mm, the horizontal and vertical masonry joints should be completely filled with mortar. In the course of laying, the inner surfaces of the channels (furnace) and the chimney must be processed by mopping.
- 3.4.15. The grates must be placed in the firebox 714 mm below the furnace opening and laid in place with a gap of 5 mm around the perimeter filled with sand. The grate slots should be located along the firebox.
- 3.4.21. The outer surfaces of the furnaces are finished with mopping and grouting with dry bricks or plastered. The thickness of the plaster layer should not exceed 10 mm.
- 3.4.22. The outer surfaces of chimneys in attic spaces must be wiped with mortar and whitewashed..
It is allowed to build stoves with outer walls ¼ brick thick, provided that they are enclosed in a metal frame or a case made of roofing steel.
It is not allowed to connect the ash pan of the furnace with the underground in order to ventilate them during the firing of the furnace.