
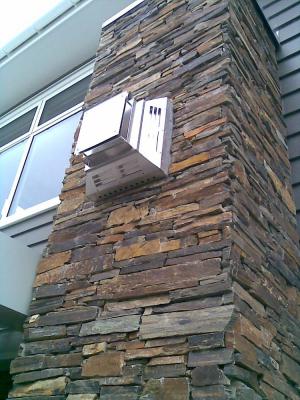
How to install a chimney from sandwich pipes. Sandwich pipes for chimneys. Chimney Requirements
Add to bookmarks
Sandwich pipes for chimneys
Sandwich pipes for chimneys - correct installation
DIY sandwich chimney
If the house has a fireplace, and a bathhouse is built on the site, then the chimney device is an integral part of the construction. Modern manufacturers offer a large number of options for creating heating systems, but each owner gives the choice to the most optimal option, which can be done with your own hands.
Sandwich chimney is one of the most demanded materials in construction. furnace heating. This is explained by the fact that the sandwich pipe has a large number of advantages, the main of which is safety.
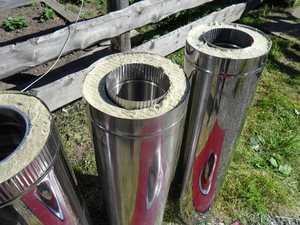
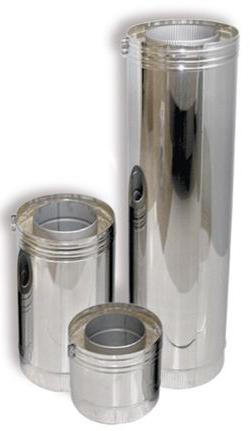
The sandwich chimney got its name due to the fact that it has characteristic design features, which is the main element of such a device. Sandwich chimneys consist of outer and inner pipes, between which there is a heat-insulating layer.
Many manufacturers use basalt fibers (mineral wool) as heaters. Their properties are similar to asbestos fibers.
Mineral wool is very resistant to various chemical elements and high temperatures. It also has excellent sound and heat insulation properties.
The thickness of such a layer of mineral wool is 25-60 millimeters. The inner tube of the sandwich construction is made of stainless steel. The outer is made from various kinds of material. Most often, external elements are also made of stainless steel, but there are also brass, copper, etc.
Scheme of the device sandwich chimney
Sandwich pipes are produced various kinds, have a difference in diameter and thickness of the heat-insulating layers and are intended for use under different temperature conditions.
The main requirement for connecting a chimney sandwich is tightness. The connections themselves are different in type - flanged, "cold bridge", bayonet, etc.
The sandwich chimney has significant advantages over a single-shift chimney:
- practically no condensate;
- much less soot accumulates.
All this helps to ensure long and reliable operation of stove chimneys, during which they require almost no maintenance.
Sandwich chimneys compare very favorably with their brick counterparts.
Firstly, such stove chimneys have a more aesthetic and attractive appearance,
Secondly, they are made of refractory materials and at the same time weigh much less than brick chimneys.
This means that it is not required to build a special foundation (foundation), therefore, this method is more economical and profitable, especially for those who make repairs with their own hands. In addition, the installation of a sandwich chimney is a guarantee that the pipe will not be subject to corrosion and will provide reliable gas and vapor tightness.
It must be remembered that it is forbidden to use a sandwich pipe as the one that will be located directly above the furnace accessory.
In order to avoid the risk of fire, the following recommendations are mandatory: when passing through the most fire hazardous area (roof, beam, wooden wall and ceiling), an additional thermal insulation layer is required.
The installation of this type of pipe is carried out in the same way as the installation of other types - according to two principles.
- "Through the smoke." This means that tees for condensate outlets must be fixed in the system.
- "By condensate". In this case, tees are not needed in chimney systems. It is necessary to fix it in this way: after the tees - “by condensate”, before the tees - “by smoke”.
If you use solid fuels, then it is mandatory to install a sandwich pipe made of heat-resistant stainless steel.
Preparatory installation work
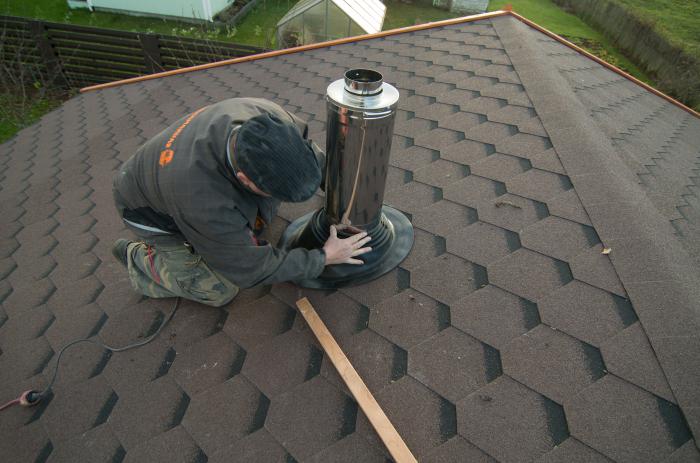
In order for the chimney to pass safely between floors, it is necessary to follow the correct sequence during installation work. The device of passages through the ceilings can be done by hand using special nozzles.
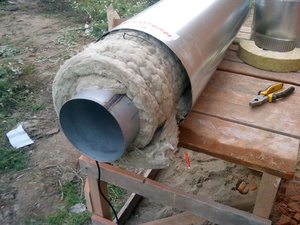
Before the pipe is installed, it must first be prepared. An insulating layer of material is installed along the walls of the pipe. For these purposes, mats are used that are made of basalt fibers (mineral wool). Then isolate the inner, as well as all adjacent parts of the pipe.
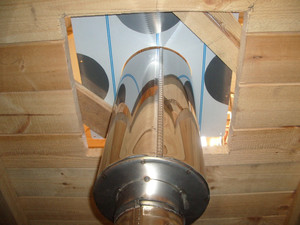
The next step is the installation of the ducts. This requires, first of all, an accurate determination of the place in the ceiling where the sandwich pipe will be located. This is followed by markings, along which an opening in the ceilings is cut out. In places where the pipe and the ceiling touch, an insulating layer of mineral wool is applied.
At this stage, the ceiling is ready for the installation of a sandwich chimney. The pipe elements are passed through the ceiling slab. In this case, the parameters of the pipe are calculated in such a way that they allow the chimney to pass completely, and there is no place for contact with the ceiling. In such places, elements cannot be joined.
To provide additional heat removal between the pipe and the nozzle elements, an air gap device is left. After passing through the ceiling, installation of nozzle protection elements is required. Here it is necessary to check the verticality of the chimney shaft.
Chimney installation It is most convenient to consider the example of two-circuit systems. Elemental installation is carried out from the bottom up, i.e. from heating equipment. The inner pipe of the sandwich during installation must go inside the previous pipes. The outer pipe is put on with your own hands on the previous ones. In this way, it is possible to provide reliable protection layer of thermal insulation against condensation.
The inner pipe sandwich for furnace chimneys is installed “by condensate”, which will allow the flowing water to avoid an obstacle in the form of a seam on the pipe, which means that there will be no leakage.
To ensure maximum reliability and durable sealing, the installation of the chimney is carried out using sealants with operating temperature not less than one hundred degrees.
Tee, elbow, pipe joint and other elements are fastened with their own hands using clamps. The tees must be fixed with a support bracket, and for every 200 cm, brackets for fixing to the walls must be installed.
In the following steps, important details must be taken into account:
- in the chimney there should be no horizontal sections exceeding a length of one meter;
- pipe channels should not touch the gas pipeline, electrical wires and any other communications;
- when passing a sandwich pipe through any type of ceiling - a wall, roof, ceiling, pipes insulated with a heater must be installed (insulation must be carried out taking into account all fire safety requirements);
- for regular cleaning of the pipe for a sandwich chimney, you need to install a revision (special holes with doors) or glasses (removable parts). Emphasize that the pipe needs professional cleaning, carried out in the required time and in compliance with all norms.
If available detailed instructions, necessary tools and materials, then it is quite possible to do the installation of a sandwich pipe with your own hands. Installation of sandwich pipes guarantees a long and reliable service of the chimney.
The chimney in the organization of heating systems plays three main functions. All of them can be achieved by installing a chimney with your own hands.
The main functions of the chimney
- First of all, the chimney is designed to remove combustion products that are extremely harmful, and often fatal to the body of the inhabitants of your home.
- In addition, the chimney must also have insulating properties and protect the building structures of floors and roofs from fire.
- And, finally, a beautiful chimney has an aesthetic function and decorates the roof of your house.
You can easily install the chimney yourself by following simple instructions.
The main types of chimneys
Depending on the material of manufacture, chimney systems can be divided into various types made of metal (for example, cast iron or stainless steel), brick and ceramic. A modern chimney can be made of composite materials and have a multilayer structure.
You can choose the modification of the chimney that will most closely match your building.
So, for example, the cheapest option - a metal chimney is best suited for arranging heating systems for boiler rooms or baths, that is, non-residential premises. However, such an economical approach is hardly advisable to use in a home. The metal structure has poor sealing of the joints, as a result of which you will not be able to get rid of the penetration of smoke into the room. Also, the metal does not have the most attractive service life, as it is extremely unstable to atmospheric moisture.
A pipe consisting of composite multilayer materials is more reliable and resistant to aging. But between the layers of such a pipe is placed a heat-insulating fire-resistant material. Due to unjustified savings, many manufacturers place a low-quality insulator in the intermediate layer, which, after a while, may begin to crumble. So when buying such a pipe, carefully follow the reputation of the manufacturer.
The cheapest option is to build a chimney from thin-walled stainless steel. The light weight of such a pipe allows it to be fixed in the structure even with the help of a minimum amount of fixing material. Also, a stainless metal pipe is very easy to process - it can be cut with ordinary metal scissors.
A ceramic chimney is very difficult to install, since its installation can only be done together with the whole house. In this regard, it is extremely rarely used, because in order to build it in a finished dwelling, the construction team will need to dismantle part of the floors.
Tools needed for a chimney
In order to install a chimney in your home with your own hands, you will have to stock up on the following minimum set of tools:
- grinder for cutting metal and a drill for drilling holes
- spatula, chisel and trowel
- a screwdriver, preferably with hex bits and a jigsaw, can be electric,
- small hammer and Phillips screwdriver
- protective gloves and goggles
What you need to remember when installing a chimney with your own hands
According to the method of construction, chimneys can be divided into internal or external. Let us consider in more detail in which case you need to choose one or another option.
So, the internal structure of the chimney can be used for the construction heating systems based on heating boilers or fireplaces. Such systems are usually installed inside walls. After installation, such chimneys are closed in the thickness of the wall and decorated. As an advantage, it can be noted that such a system is not subject to moisture condensation and is well protected from the influence of atmospheric moisture.
However, the products of combustion passing through the chimney have a high temperature. Consequently, the sections of the walls passing near the internal chimneys become very hot and may catch fire. Thus, internal chimneys are not recommended to be installed in walls built of flammable materials. Also, such systems are not recommended for powerful boilers with a large flow of hot combustion products.
An external chimney is recommended for industrial and large heating systems. Usually they are arranged if the area of \u200b\u200bthe heated room exceeds 500 square meters. Also, such a chimney can be installed if the installation of an internal chimney is associated with significant difficulties. So, in a building with concrete walls and a ceiling, it is easier to break through a slab between floors than to gouge a channel in the wall.
How to install stainless steel and cast iron chimneys
The cheapest and in a simple way chimney device will be the installation of a metal pipe. The entire installation is divided into several successive stages:
- First you prepare the channel for the chimney.
- Then you actually install the chimney.
- And at the final stage, you mount insulation around the pipe.
The channel under the chimney metal pipe should be approximately one and a half times its diameter. In this case, you will have space for isolation.
The actual metal chimney consists of the following constituent parts: metal pipe, adapters for mounting tunics, head and condenser. In a number of designs, a gate is installed with a chimney - a unit that increases draft in the system.
Chimney installation steps
At the initial stage of installing the chimney, you need to adjust the pipes in length. Further, the resulting structure is placed in a pre-prepared channel. After that, a capacitor is connected to the system and itself heater(stove or boiler). At the final stage, the head is installed.
In order to rigidly fix the pipe, it must be fixed to the wall at least every one and a half meters.
When installing steel and cast iron pipes, it is necessary to provide high-quality thermal insulation of the chimney. Only in this case will you be able to avoid the fire of the ceilings and structures adjacent to them due to a suddenly leaky pipe. To isolate a metal chimney, it is best to use the classic method - refractory clay. But in extreme cases, you can use special refractory foam.
Also, with the help of clay, it is possible to decorate the joints of the chimney from a metal pipe with ceilings and a roof.
If you use a metal pipe, then it must be fixed to the ceiling and walls with fasteners every half a meter. This is due to the large weight of such chimney pipes. In addition, the mounting holes are made wider - by about two pipe diameters.
A cast iron pipe will last longer as a chimney, but its installation is fraught with certain difficulties. So you can cut such a pipe only with the help of a grinder.
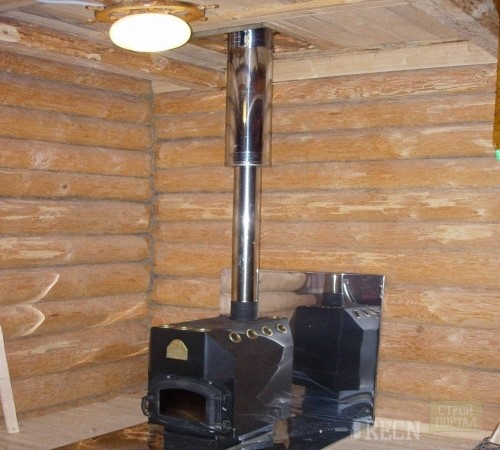
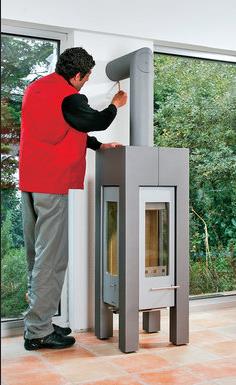
Do-it-yourself sandwich chimney installation
Sandwich chimneys made of several materials are replacing conventional metal pipes. The multi-layer design allows you to qualitatively isolate the floors from heating by the combustion products of the furnace. When installing such a chimney, additional insulation is not required, as a result of which the mounting holes can be made almost equal to the diameter of the pipe.
During installation metal pipes they fit into each other like nesting dolls and no additional fixation is required to connect the knees of the work. In sandwich chimneys, the pipe elbows must be connected to each other using a special construction adhesive. In addition to fixing the knees, construction adhesive also prevents smoke from entering the premises.
Sandwich pipes are very sensitive to the formation of condensate from atmospheric moisture, therefore they are not recommended for use in the installation of external chimneys. Inside the building, such a pipe can last up to 70 years.
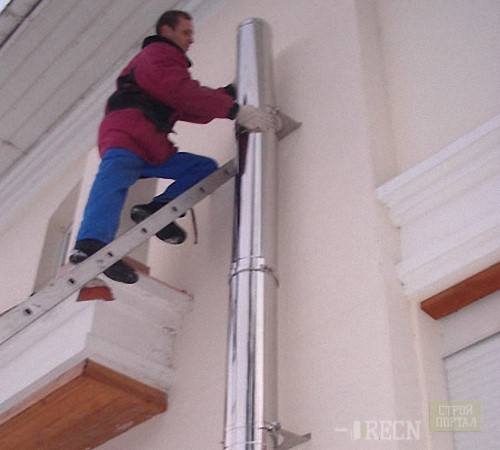
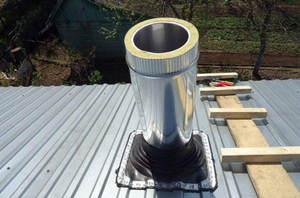
Do-it-yourself installation of an external chimney
The most optimal material for the manufacture of an external stove chimney will be a pipe made of stainless steel. It weighs a little and is well processed by the simplest tools.
In order to mount an external chimney from stainless pipe carry out the following work:
- Punch a hole in the pipe adjacent to the boiler. It should be located no lower than half a meter from the top of the boiler.
- Place fasteners on the outer wall a meter apart.
- Connect the chimney inlet to the heater.
- Move the bent pipe elbow out of the room.
- Mount the capacitor.
- Fix the pipe to the wall.
- Install the cap and chimney guard.
Do-it-yourself chimney installation: instructional video
Owners country houses and dachas have to take care of heating the premises on their own. Any generator of thermal energy, except for an electric boiler, must be equipped with a system for removing combustion products into the atmosphere. Therefore, when organizing heating, a lot of attention will have to be paid to the chimney.
Today the most popular is practical, functional and aesthetic chimney in the form of a sandwich tube. Do-it-yourself installation is a fairly simple and completely safe undertaking. Only in advance you need to take care of purchasing high-quality materials, and watch the video instructions for installing a sandwich chimney.
Design features of a sandwich pipe
Chimneys in the form of a sandwich pipe are manufactured using a new technology. Layered construction assembled from various materials, and resembles an ordinary sandwich. Its base is two pipes of different diameters, which are nested in each other. Between them is placed a heat-insulating gasket made of basalt fiber or mineral wool. Such materials are resistant to high temperatures and immune to active chemicals. They perfectly retain heat and dampen sound waves.
Unite double-circuit pipes can be done in several ways: flanged, bayonet or "cold bridge". Chimneys can have a different diameter and thickness of the heat-insulating layer. The type of structure depends on the temperature conditions of the environment where it will be operated and on its purpose.
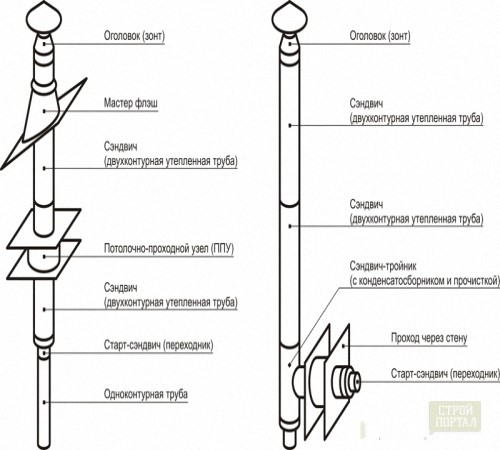
Sandwich pipes have not only a straight shape. Because the the chimney must pass through the ceiling and roof, and on its way there may be various elements of the building, the design contains sectional fragments and additional elements for their connection.
The kit, along with a sandwich tube, includes:
- tee;
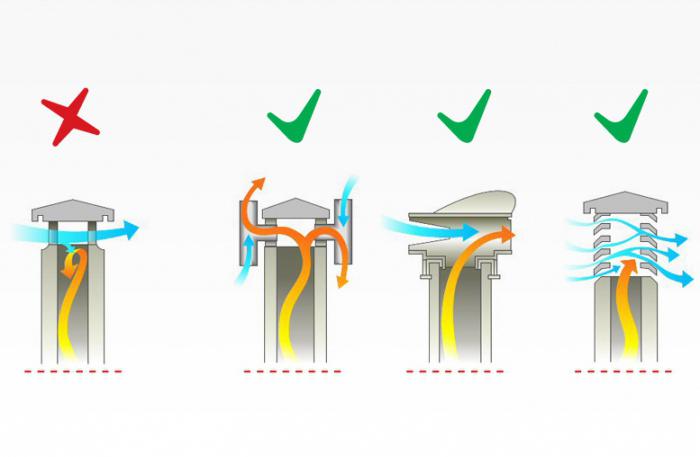
- weather vane - protects the structure from the wind and prevents back draft;
- knees with an angle of 45 and 90 degrees;
- cone for free flow;
- revision to check the condition of the chimney;
- protective fungus.
If a heating stove runs on gas, then the weather vane and fungus are not used.
Advantages and disadvantages of chimneys from a sandwich pipe
The positive aspects of the design include:
In addition to all of the above, sandwich pipes have an attractive appearance that will last for many years.
Design flaws include only its rather high cost and not very simple installation. But with all other advantages, such disadvantages of a sandwich pipe pay off.
Materials for the manufacture of sandwich pipes
Almost all sandwich chimneys offered in hardware stores look the same. But since they manufacturing is a profitable business There are low quality products on the market. Therefore, when purchasing a structure, it is necessary to pay attention to the quality of the steel, especially the one used to make the inner pipe.
quality products must have technical documentation, in which the steel grades used for its manufacture must be prescribed.
Check stainless steel for quality can folk way with a magnet. If it slips over its surface and does not stay on it, then the material contains alloying additives. Stainless steel, on the surface of which the magnet is fixed, is not worth buying.
Do-it-yourself installation of sandwich pipes
Mounting the chimney must pass in accordance with all the rules only then its operation will be durable and safe.
Basic rules for installing sandwich pipes
To heating was effective, most of chimney must be located indoors. This will reduce the temperature difference.
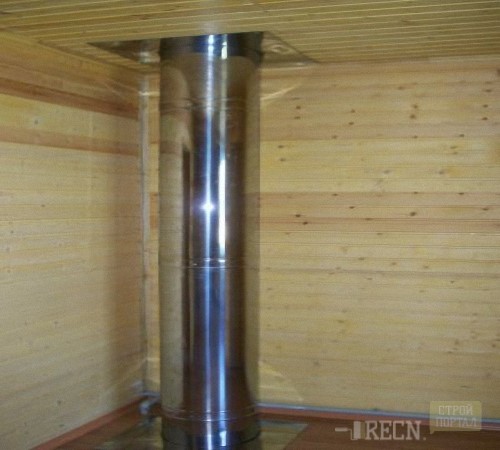
Assembly and installation of a chimney from a sandwich pipe inside the house
Installing the structure with your own hands is quite simple. The main thing is to connect each section consistently and correctly.
Installation steps:
Mounting chimney from a sandwich pipe finished by hand. Now you can start masking the unsightly appearance left after the system. For example, plaster and paint over the ceiling.
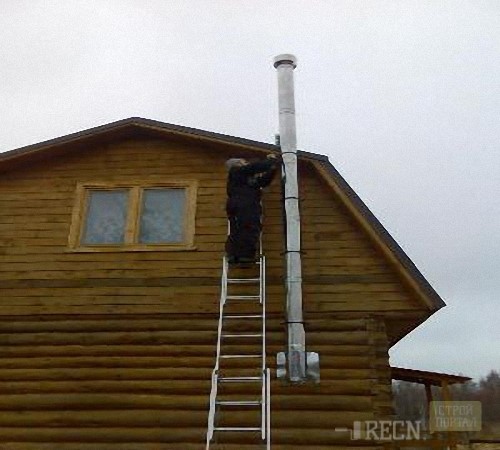
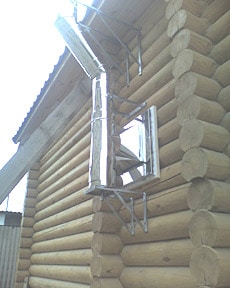
How to properly install a sandwich pipe outside the house?
assembly and wall chimney installation do-it-yourself is made if, due to the design features of the roof, it is impossible to make holes in it. In addition, such an installation will save the interior space of the room.
Stages of work:
When installing and during operation of a sandwich pipe, it is prohibited:
- install a chimney to coal-fired units;
- install a galvanized structure in rooms with increased level air humidity;
- use paint-and-lacquer objects and construction debris as fuel;
- place sections of the chimney near flammable materials;
- use the design for drying shoes, clothes and various household items.
Mount correctly sandwich pipe chimney pretty easy to do by hand. You may only need additional tools, if necessary, make technical holes, and a ladder or crane for roof work. To speed up the installation process at different levels, you can find an assistant.
Today almost everyone a private house equipped with a chimney. And in most cases, it has a practical meaning, rather than a purely decorative one. This is due to the fact that private houses are very rarely connected to centralized heating, they are heated using boilers, stoves, etc. And the chimney plays a very important role in all this. Through it, steam and smoke are emitted. It helps to properly function any heating system. Installing a chimney is a very complex and painstaking process.
Introduction
The chimney is a complex structure, the purpose of which is to remove heating by-products from the furnace into the atmosphere, which protects the house from dampness, burning, tar and burning through the walls. It is an integral part of almost every country house or cottages.
The principle of operation of this design lies in its ability to create natural draft, which removes steam, tar, etc. Installing a chimney is a very significant process. If you make mistakes during its construction, you can not get the desired result and earn a lot of problems. An example is insufficiently powerful traction for a certain type of furnace, which is fraught with poisoning
There are many different configurations of chimneys, which differ both in their installation price and in traction and other characteristics. Each of them has its own disadvantages and advantages. Let's talk about what the different types of chimneys are, what tools are needed to install them, and how to install them correctly.
Tools
We will list the minimum tools that will be needed when performing chimney installation work. This set may vary depending on what type of system you are installing. So let's get started. You need to prepare the following tools:
- Bulgarian (to her - a set of disks for working on stone and metal).
- Grinder.
- A hammer.
- Perforator with a set of drills of various diameters.
- (for convenience, it is better to have a large and a small one).
- Bucket, trowel, square, tape measure - small accessories that will simplify the work.
- If possible, purchase a mounting gun.
Now you can start work. Installing a chimney or building one won't seem like much tricky business if you have a head on your shoulders and hardworking hands.
materials
Today, there are many different types of chimneys that are built from different materials. Depending on the type of construction, a certain set of materials is purchased. So, for example, installing a sandwich chimney involves the use of the following components:
- pipes of different diameters that are inserted into each other;
- filler (insulating material) with a working temperature of up to 700 degrees Celsius - this is what is between the pipes;
- pipe fasteners;
- screws for metal;
- clamps and brackets;
- pipe elbows - necessary for pipe bends, etc.
For laying traditional brick chimney you need cement, a special umbrella to cover the pipe, etc. And here we already see how much consumables differ for a particular design. Thus, having decided on the type of chimney, we begin the search and purchase of everything necessary for its installation.
Requirements for a modern chimney
Any modern chimney, be it a sandwich or brick, must meet a certain set of requirements and what are these requirements?
- It must be resistant to moisture. The condensation process leads to the fact that the walls of chimneys, both brick and metal, are capable of self-destruction.
- Possession of powerful traction.
- A good chimney can withstand temperatures up to 1000 degrees Celsius.
- It should have excellent resistance to chemicals.
- Smooth inner surface (cleaning such a design will be much easier).
By following the rules for installing a chimney, you can achieve good results and build a really good, high-quality system for the removal of combustion products.
Main varieties
There are many different classifications of chimneys, but today we will talk about such types as:
- Brick chimney.
- Chimney-sandwich.
- coaxial designs.
- Gas heat sink as a kind of chimney.
We will talk about them, as they are the most popular among summer residents and owners of country houses. It is worth noting that each of the types has its own advantages and disadvantages, so only you will choose which one is right for you.
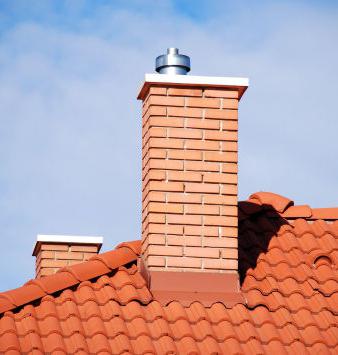
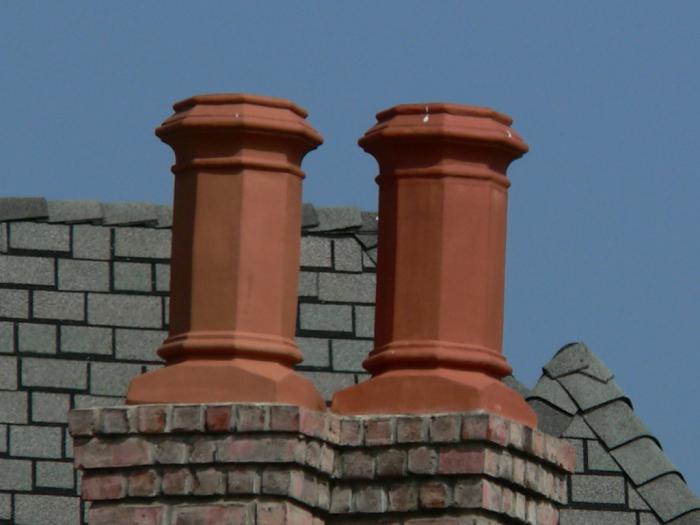
Brick chimney
Installing a brick chimney, or rather its construction from the base to the visor, is a rather complicated process, including many stages and rules that you need to know and follow. Let's start with the fact that one such design is designed for a maximum of two furnaces, provided that they are on the same floor.
The rules for installing a chimney are of great importance in this case. In part, they relate to masonry. Each brick should overlap the joint below those lying - this will avoid self-destruction. It is believed that a structure erected by this method is much stronger than any other.
The temperature at the bottom of the oven can be staggering. Especially if the house is heated with coal. To avoid damage to the base of the pipe, a special stainless steel nozzle is mounted on the furnace, which is then lined with a double layer of brick. The size of this design depends on the height of the ceilings and the stove itself. For masonry, it is necessary to use only clay mortar with the addition of cement. It is very important to make a special valve that will block the entire hole - it will serve as a regulator for increasing or decreasing thrust.
It is also allowed to build chimneys inside external walls, with one condition, of course: if they are made of non-combustible materials. AT recent times most of these systems are based on steel pipe, which is further isolated and lined with bricks.
Chimney installation: sandwich technology
Sandwich technology is a complex and expensive structure that can withstand as well as brick high temperatures. A huge plus of such a chimney is that it practically does not need to be serviced. The only thing you need is to clean it periodically.
The chimney-sandwich consists of three main elements. First, the inner and outer pipes, which are inserted into each other. The seams of each of them must be well welded and wrapped with a protective fire-resistant fabric or fiber. The gap between the pipes is filled with a special fire-resistant and heat-resistant material, which does not allow the outer pipe to become very hot. This is the third element.
Installing a sandwich chimney will take a lot of time and effort, but it's worth it. The final stage of work is to fix the structure on the outer part of the wall of the house. This process is carried out by means of special clamps, fasteners and brackets.
coaxial chimney
Installation coaxial chimney most often carried out on steam generators, gas boilers etc. This technology is somewhat similar to a sandwich, however, instead of a sealant, spacers are simply installed inside, which do not allow the pipes to touch. Such a system, unlike other varieties, can be displayed in a horizontal position through an external wall. The installation is very popular today, and the coaxial view is the most used.
You ask: "Why are they installed only on gas boilers and generators?" The answer is obvious. The thing is that the temperature in such boilers at the outlet is much lower than that of real furnaces. That is why this type is not used anywhere else. Installation gas chimney similar to the work on the installation of a sandwich system.
Modular ceramic chimney
Today, modular ones are in great demand, despite their exorbitant prices. This is due to the fact that such constructions carry two key qualities that are very important for a person - they are very easy to install and quite reliable. Such chimneys can be laid even inside wooden walls, it is only necessary to observe a gap between the wall and ceramics - 5 cm. In addition, they have a very attractive appearance.
Installation of such a chimney is very simple. To do this, it is necessary to connect the already finished sections of the pipe (modules) to each other, fasten well and fill the seams with a special sealing solution, after which the whole structure is fixed on / in the wall.
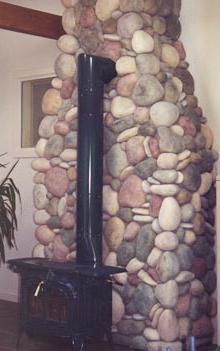
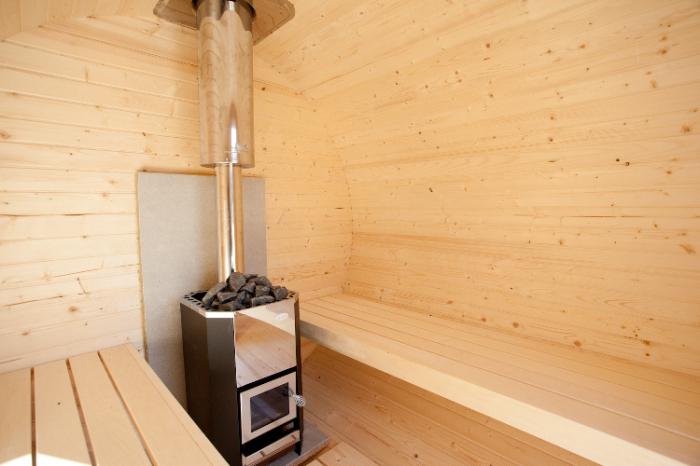
Sauna chimney
Almost any owner of a suburban area dreams of having a sauna or bathhouse in or near the house. The most important element the last is the oven. After all, it is she who creates high temperatures in the steam room. And for this, a high-quality installation of a furnace and a chimney is required, which will work, so to speak, in tandem. It is best to use traditional brick structures for such a case.
We have already considered the rules for installing such a chimney above. So there shouldn't be any issues. As for everything else, the installation of a chimney in a bath is possible both inside and outside the room. The decision, as always, is yours. But experienced experts advise building a structure inside. The walls of the chimney get very hot, they can increase the temperature in the room. However, if you are not confident in your abilities, it is best to entrust such work to professionals who will do everything efficiently and quickly.
Problems when installing chimneys
Installing a chimney pipe can be accompanied by a lot of problems, and an improperly built system will simply nullify all efforts and add headache. Various difficulties may arise. One of the reasons may be the wrong material. For example, if you put a bad brick at the base of the stove, you can be left without a chimney, as it will quickly crack and crumble. In addition, it is necessary to know the design features of such a system in order to prevent the disappearance of thrust. For example, the height of the pipe above the adjacent part of the roof should be at least 0.5 m, and for houses with a combined roof (flat) - at least 2.0 m. And one more important point. The mouths of brick channels to a height of 0.2 m should be protected from precipitation with a layer of cement mortar or a cap made of roofing or galvanized steel.
Of course, it is best to learn from the mistakes of others so as not to make your own. And mistakes in this case are fraught with major troubles. The wrong chimney can destroy your entire home. For example, burnt walls can easily cause a fire. Therefore, before you start something, you need to carefully plan and think through everything. Consult with knowledgeable people, re-read the special literature, in the end play it safe and entrust the installation work to such important systems professionals. From this, there will be fewer problems, and you can get the job done faster.
The heating system in any building includes two elements. This is the installation of the heat generating unit itself - a gas, liquid or solid fuel boiler, and a system that facilitates the removal of combustion products. The installation of these elements requires close attention. The heat supply in the house and the safety of people depend on the operation of the system as a whole.
In the article, we will look at how to properly install an outdoor chimney with our own hands, we will present a number of tips from a chimney wizard. If you install the chimney outside the house incorrectly, this can lead to unpleasant consequences: reverse thrust exhaust gas systems (ingress of combustion products into the room), this may cause a fire and people may suffer. There may also be insufficient heating. If you have come to the conclusion that an outdoor chimney will suit you, it is possible to do it yourself without resorting to outside help and save a significant amount of money.
Currently, insulated outdoor chimneys are popular, they are usually called "sandwich" (see Installing a sandwich chimney).
They have their own advantages:
- Good traction (contributes increase in efficiency thermal plant).
- Rapid overcoming of the threshold of condensate formation.
- Minimal soot deposits on the walls.
- Structural durability.
- The outdoor chimney is easy to maintain.
- Minimum weight.
- Allowed to install in wooden houses.
- Complies with fire safety standards.
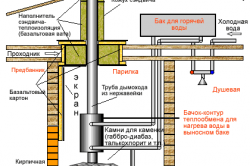
Sandwich chimney has three components:
- outer pipe;
- inner pipe;
- thermal insulation layer.
There are three types of connection of such systems:
- flanged;
- bayonet connection;
- type of connection "cold bridge".
Attention: The main requirement for all types of connections is the same: high tightness. Pay special attention to this.
Structural elements
Before starting the installation with your own hands, you must know the device of the external chimney. The main thing is to decide what elements you need and their number. Make a drawing and list everything you need.
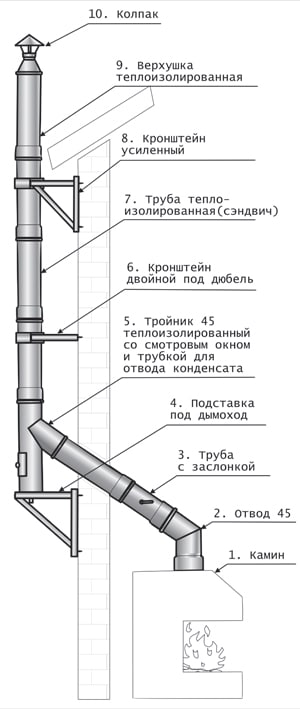
- Any unit t for heat production - boiler.
- Elbows- regulate the movement of exhaust gases. The name of the knee contains information about the angle of inclination. Branches are welded using argon welding or a tungsten electrode in an argon environment. It is possible to install dampers of various types and viewing windows in them.
- dampers, which are to be installed in bends, pipes, tees and transitions.
- Tee stand, is made from stainless steel square tube. Fastening to the wall is carried out using dowels. To properly install the chimney, you need the right support for the tee. Be sure to specify the distance between the chimney and the wall when ordering.
- Tee 45 thermally insulated, stainless, required to connect the boiler to the bottom of the chimney, vertical direction. A condensate drain pipe and an inspection window can be installed on the side of the structure, or at the bottom of the tee. To comply with all requirements for the installation of chimneys, after assembly, the viewing window door should be planted on silicone. There are continuous, solid and prefabricated tees, connections to them are made at various angles.
- brackets are made from stainless steel tube. Be sure to specify the distance from the wall to the chimney when ordering it (to comply with fire safety regulations).
- The external chimney must be thermally insulated. Chimney, together with thermal insulation, is placed in a protective casing and thus forms a so-called sandwich. The standard pipe size is half a meter or a meter; for the manufacture of the casing, not only stainless steel and galvanization are used, but also the material of the customer. Ceramic wool or basalt fiber is used for thermal insulation.
- dowel bracket reinforced, used for reinforced fastening. This helps with lateral loads; with their help, unloading and expansion glasses are mounted.
- tip, heat-insulating pipe in a protected casing. The diameter of the casing itself gradually decreases and approaches the diameter of the pipe, this allows you to protect the insulation from external influences.
- Cap, stainless steel, which is given the desired shape by welding with a tungsten electrode.
Now you have an idea about the components and will be able to correctly select all the details of the chimney for the heating boiler. Correctly calculate the length and cross section of the structure.
Attention: At the design stage of the chimney system, parameters such as section size and height should be taken into account. The thrust increases with greater length, the higher the pipe, the stronger the thrust. However, a very high chimney will create a large aerodynamic resistance to moving combustion products. The placement of flue pipes is clearly regulated SNiP 2.04.05-91. The section of the chimney is important. As a rule, it is determined: the ratio of the inner diameter of the chimney to the maximum dimensions of the opening of the fireplace insert (height / width) will be 10:1.
When choosing the diameter of the smoke channel, it should be noted that according to GOST 9817-95 the area of the smoke channel along the cross section of the pipe must be at least 8 cm 2 per kilowatt of power of the heating unit (fireplace, boiler or stove). And the calculated value of the velocity of exhaust gases in the boiler itself should have an interval of 0.15 - 0.6 m / s.
Assembly of the structure
The external chimney (its main part) is installed outside the building, which is connected by a horizontal pipe through the wall of the building with a thermal unit. After installing the heating boiler, it must be connected to the chimney pipe, which will be located outside the building. It is not as difficult as it seems at first glance. However, some rules must be observed.
Work performance rules
The installation of the chimney is carried out in all cases from the heating boiler, or rather, from the chimney up. The gas exhaust pipe is always put on the previous one, this avoids the penetration of moisture into the insulation.
- A heat-resistant sealant is used for the tightness of the structure, not less than 1000*С.
- Clamps should be used on waste connections, tees and pipes.
- At an interval of two meters, the external chimney must be rigidly attached to the wall with special brackets. They should also be used when fastening tees.
- Horizontal sections of the chimney pipe are not allowed to exceed one meter.
- Avoid contact of gas pipes with chimney ducts and electrical wiring.
- When passing a pipe through a combustible structure, use special fire-fighting nozzles.
- Install a removable cleaning door (this must be done twice a season) of the structure, at the base of the chimney.
Installation
When everything is known about the design and the material is ready, you can proceed to the main work.
- We connect the chimney to the nozzle of the heating boiler using an elbow, pipe or tee (depending on the design).
- We join the pipe with the chimney with the necessary transition node.
- We process the joints with sealant and install clamps.
- The passage through the wall is carried out using a special passage pipe (docking is prohibited at the place where the wall passes).
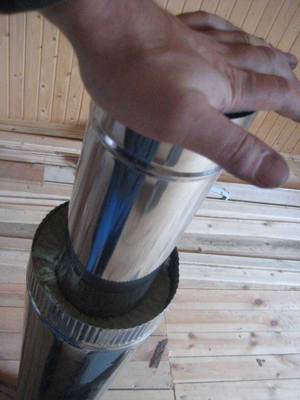
Attention: All sections of the chimney pipe should be pushed tightly, without gaps, one into the other, the insertion distance should be at least 0.5 of the pipe section (planting depth).
- We are preparing the installation of the vertical part of the structure. At the end of a horizontal pipe led through the wall, we attach a tee with fasteners for a vertical pipe. If we use a knee, conditions should be created for cleaning the horizontal gap of the connection. When using a tee, the lower outlet is blocked by a plug, which is removed or we use a tee with revision. How and to what to attach the chimney depends on its location. The pipe is attached to the wall with wall brackets every 2 meters. If the main pipe is heavy, the elbow must be supported. It often happens that it is impossible to fasten to the wall along the entire length of the structure; in this case, stretch marks are used.
- We install a collar with ears, attach clamps to the ears and we already attach stretch marks of the required length to them. In this case, the cable for stretch marks must be at least 3 mm in diameter.
- In places of fastening of stretch marks, we install eye-studs or anchors (we choose based on the surface of the fastening).
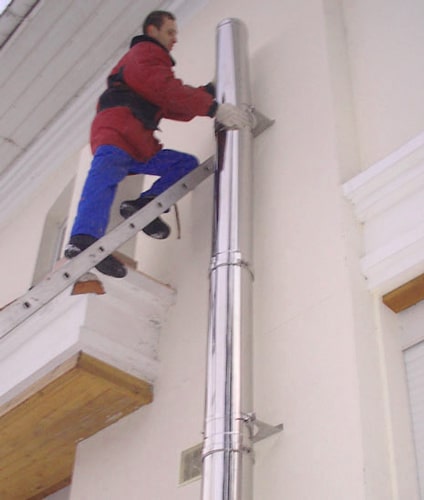
The next step is to lift and fasten the entire structure of the vertical pipe. It is possible to install in parts, but this is unsafe work at height, and sometimes even impossible. As a rule, the pipe is assembled on the ground, fasten all parts with clamps, prepare fasteners for stretch marks and brackets.
- To facilitate this process, we use a hinge.
- We select the desired knee for connection and fasten the hinge to the edge outer pipe, weld it.
- We raise the finished end of the pipe at the level of the junction and also attach the hinge to the end of the elbow.
- We lift the entire structure with the help of attached cables and horns. This should be done in good weather, it is unacceptable to perform in gusty winds.
- We carry out fastening in accessible places.
- For stability, we fix slightly stretch marks.
- We unscrew the nuts that fastened the hinge. We cut off the bolts themselves with a grinder and knock out the endings.
- We knock out the hinge and make fasteners of the remaining bolts at the junction.
- We produce full tension stretch marks. We adjust the tension with lanyard screws.
Installation has come to an end. We make fasteners of the junction and sealing of the joint. After we carry out the insulation of the vertical pipe, we make insulation (this way we will avoid the appearance of condensate). Now for the heating of the house you can be calm.